The 2nd part of the W3D plugin for max is the WWSkin. Although it is located under Space Warps in max, Its not a space warp in the traditional sense, but more-less put into the "Space Warps" section in max for because of the way this part of the plugin works. The WWSkin is used create a binding between the bones (used for animation in your scene) and the vertices of your geometry. Without this part you are unable to export any animations, transforms, or bones into W3D.
You Can find the "WWSkin" Plugin in the create panel of 3D
Max under:
> Space Warps > Westwood Space Warps >WWSkin
To Create a WWSkin:
Select the button labeled "WWSkin" in the Object type rollout,
now click and drag in the viewport to create it. It may look very small
at first, you can use the scale tool to enlarge it. The WWSkin is represented
as a set of crossbones.
To Bind A WWSkin to your geometry:
This Plugin works on a bones system. So you must have bones in your scene.
Although it can work with Biped, Dummy objects are used for most purposes.
Select the WWSkin Icon and go to the Modify panel in max. Click the "Add
Bones" button and select the bones that will be used to control the
geometry you wish to export then Click "OK". With the Icon Still
Selected, Click the "Bind to spacewarp" button, located on the
main toolbar in max. Starting from the Bone, Click and Drag until your
over the geometry you wish to bind to, then release. You've now bound
the spacewarp to the geometry.
To Attach the vertices to a bone:
Your geometry will now be showing its vertices. Select the regular
Selection tool from the main toolbar in max and draw a selection set around
the vertices you wish to link to a particular bone. With the vertices
selected, click the "link to bone" button, then click on the
dummy object or (bone) you wish to link them to. To link more vertices
to more bones, just do the same process from the selecting the vertices
part. The WWSkin works on a single mesh and you can use multiple bones
with it.
 The bones wont influence
your geometry until you have moved from frame 0 and turned on the Animate
button in max.
The bones wont influence
your geometry until you have moved from frame 0 and turned on the Animate
button in max.
To Animate:
With the frame on anything other than "0" and the animate button
on, Select the bones and animate them as you would normally
Heres a look at the WWSkin interface in max:
| Object Type: | 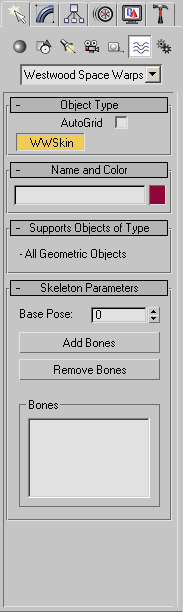 |
|
| WWSkin | Click this and drag in your viewport to create the WWSkin space warp. | |
| AutoGrid | A Max implemented option:
lets you automatically create objects on the surface of other objects
by generating and activating a temporary construction plane based
on normals of the face that you click. This serves as a more efficient
way of stacking objects as you create them, rather than building objects
and then aligning them. |
|
| Name and Color: | A Max implemented option: Name and color your WWSkin | |
| Supports Objects of Type: | All Geometric Objects | |
| Skeleton Parameters | ||
| Base Pose | Usually the default of 0 works fine for this, however, if in the instance your skeleton's base pose (T-pose) is not at frame "0" then adjust this spinner to the frame that your base pose is located on. | |
| Add Bones |
Select your bones with the selection tool and Click the "Add Bones" button to add the bones you intend to use with the WWSkin space warp. |
|
| Remove Bones | Select and remove previously added bones you do not wish to use with the WWSkin space warp. | |
| Bones | Displays the bones you have selected to be used with the space warp. | |
For a simple walkthrough of this exporting process,
see the tutorial: (Exporting from Max).END