 For more advanced procedures with exporting
from max, (See W3D in Max)
For more advanced procedures with exporting
from max, (See W3D in Max)
You will need these basic software installed on your system before you
begin
A: 3d studio max 3.1 or above
B: W3D viewer
C: W3D update
D: "Max2W3D.dle" must be installed in the "plugins"
directory of 3d
Max.
Once these are in place, you may move on to the next step.
=========
Overview
=========
1. Create your model (3DS Max)
2. Create your map(s) (photoshop)
3. Applying maps (3dmax) W3D material in your Material/Map browser.
4. Create bones (3d max dummy objects)
5. Set up your bones (3dmax) W3D plugin under "space Warps"
6. Animating
:::::::::::::::::::::::::::::::::::::::::::::::::::::::
Create your model
:::::::::::::::::::::::::::::::::::::::::::::::::::::::

Create a model in 3DS max, or if you have one created, move on to next step.
---------------
:::::::::::::::::::::::::::::::::::::::::::::::::::::
Create your maps
:::::::::::::::::::::::::::::::::::::::::::::::::::::
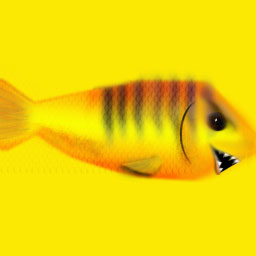
Create your maps in photoshop (or whatever paint program you use), if you already made one, move on to next step.
![]() {
"Mean_fish.tga"}
{
"Mean_fish.tga"}
::::::::::::::::::::::::::::::::::::::::::
Applying maps
::::::::::::::::::::::::::::::::::::::::::
Step 1.
=====
Select your model, click open the material editor, pick an empty slot,
click "assign material to selection"
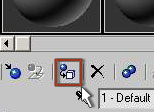
Step 2.
=====
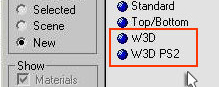 Click the
default "standard" button to open the material map browser.
Select the "W3D" or "W3D PS2" from the list and click
"OK".
Click the
default "standard" button to open the material map browser.
Select the "W3D" or "W3D PS2" from the list and click
"OK".
Step 3.
=====
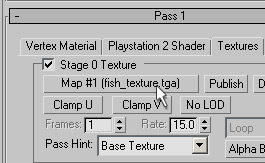 Click
the "+" (plus) sign next to "Pass 1" to Expand the
rollout. Click on the "Textures" tab up top and check the box
labeled "Stage 0 Texture".
Click
the "+" (plus) sign next to "Pass 1" to Expand the
rollout. Click on the "Textures" tab up top and check the box
labeled "Stage 0 Texture".
Click the bar labeled "None" and Look for the texture you wish
to apply, click on the file, then click "open". Now you've selected
your texture map.
NOTE: The "show map in viewport" button will be ghosted. Well fix that right now.
Step 4.
=====
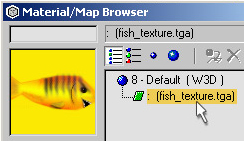 Click on the material/
map navigator button, and you should see your map file under the W3D texture.
Click on the material/
map navigator button, and you should see your map file under the W3D texture.
Step 5.
=====
 Click
on the file name "Fish_texture.tga" then close out the box using
the "x" close window button located in the top right hand corner.
Click
on the file name "Fish_texture.tga" then close out the box using
the "x" close window button located in the top right hand corner.
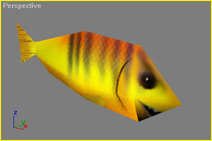
You should now see the interface that resembles the "standard" max material and "show map in viewport" is now unghosted, click it so you can see the map in the viewport.
--At this point, your texture should be viewable on your model, in the
viewport -- (see illustration)
::::::::::::::::::::::::::::::::::::::::::::
Creating bones
::::::::::::::::::::::::::::::::::::::::::::
Step 1.
=====
 Create dummy objects that
you will use to control the vertices of an area of the model and Position
them in the areas of the vertices you wish to control.
Create dummy objects that
you will use to control the vertices of an area of the model and Position
them in the areas of the vertices you wish to control.
Tip:
You can use the "affect pivot only" in max to reposition the
pivot center of the dummy object for greater control in your animation.
:::::::::::::::::::::::::::::::::::::::::::::::::::::::::::::::
Setting
up your bones
::::::::::::::::::::::::::::::::::::::::::::::::::::::::::::::::
Step 1.
=====
Click on the "Create" tab of the side toolbar in max. Click
on "Space warps" and select from the drop down list "Westwood
Space Warps."
Step 2.
=====
Click on the "WWSkin" button, (its the only one there) and Click
and drag in an orthographic viewport to create the space warp.
Step 3.
=====
 It
will first look very tiny or not visible at all. You can use the "scale"
Modifier on the main toolbar to enlarge it so that it is more viewable.
The Space warp Icon looks like a set of crossbones.
It
will first look very tiny or not visible at all. You can use the "scale"
Modifier on the main toolbar to enlarge it so that it is more viewable.
The Space warp Icon looks like a set of crossbones.
Step 4.
=====
Next, you must "add the bones", do so by clicking the "Add
Bones" button, located on the modify panel. Select the bones you
want to add and click OK.
Step 5.
=====
 Bind
your model to the "WWSkin" space warp by first selecting your
model, then clicking the "bind to spacewarp" button located
on the main toolbar in Max. Next, position your mouse back over the your
model and click and drag to the "WWSkin" (crossbones) Icon to
bind them.
Bind
your model to the "WWSkin" space warp by first selecting your
model, then clicking the "bind to spacewarp" button located
on the main toolbar in Max. Next, position your mouse back over the your
model and click and drag to the "WWSkin" (crossbones) Icon to
bind them.
Step 6.
=====
Select your model and you will see it now how the space warp bound to it and its vertices are showing.
Step 7.
=====
 Deselect the "bind
to space warp button and use the select button to draw a rectangle around
the vertices you would like to bind to a particular bone, then click the
"link to Bone" button located on the modify panel under your
"WWSkin binding", then Click the dummy object used to represent
that bone.
Deselect the "bind
to space warp button and use the select button to draw a rectangle around
the vertices you would like to bind to a particular bone, then click the
"link to Bone" button located on the modify panel under your
"WWSkin binding", then Click the dummy object used to represent
that bone.
Step 8.
=====
Continue doing the until you have assigned the vertices to the particular
bones you want to be able to animate.
![]() At
this point you're almost done and about ready to animate, but the move,rotate,and
scale tools will be ghosted and not selectable yet.
At
this point you're almost done and about ready to animate, but the move,rotate,and
scale tools will be ghosted and not selectable yet.
You must first click the "*WWSkin Binding" in the modify panel
to gray the word "*WWSkin binding" then click in the viewport
to deselect it, now you may select the dummy objects.
:::::::::::::::::::::::::::::
Animating
:::::::::::::::::::::::::::::
 The
dummy objects will not work unless you are on any frame other than frame
0 (zero) and you will also need to have the animate button depressed before
beginning,
The
dummy objects will not work unless you are on any frame other than frame
0 (zero) and you will also need to have the animate button depressed before
beginning,
Step 1.
=====
Click the animate button and move any any frame (other than zero).
Step 2.
=====
Animate your model with the dummy objects (bones) and make note of the
ending frame. When your happy with the anim loop, move on to next part.
END