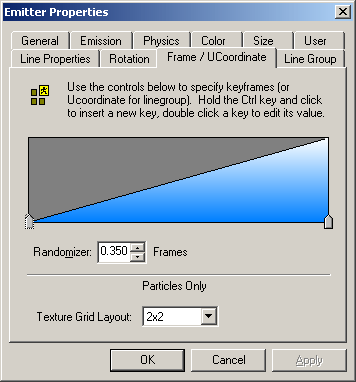
Frame / UCoordinate |
|
| Frame / UCoordinate: |
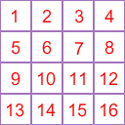
When creating a line group bitmap(aka: grid map), you will need
to follow this format: Above is an example of a "4 X 4" Texture Grid Layout.
4 Frames across and 4 Frames down. The numbers are there to show
you how the computer reads your bitmap. The lines are there just
to show the separation and aren't necessary in your real bitmap. To specify which frames will be used and how many times it shall cycle through the grid per particle lifetime: Use the keys in the display window to control the starting and ending frame numbers throughout the lifetime of the particle. Starting with "0" means you start on frame "1" of the bitmap. After reaching the end number specified, it goes cycles back the beginning number specified. Only utilizing the frame numbers you have specified for it to use. This also directly affects the speed at which, the bitmap will animate. By using a higher number of frames, the bitmap will animate quicker but is relative to the lifetime of the particle. To move a key: click and drag the key left or right on the
bar. The beginning Key cannot be moved. To Delete a key: click the key you wish to delete and hit the "delete" key on your keyboard. |
| Randomizer: | Still keeping within the number of frames specified with the keys, it will start on a random frame within the range specified on the randomizer. |
| Texture Grid Layout: | Use this drop down list to select the type of Texture Grid Layout you have. |

END