
If you're following the tutorial from "Exporting
your files from 3DS Max", You should have 5 files that
need to be in the same directory before beginning; "fish_bones.w3d",
"fish_model.w3d", "fish_swim.w3d", "fish_jump.w3d
and "fish_texture.tga".
=========
Overview
=========
2. Changing your viewing angle. (Moving the camera around)
3. Changing the lighting position
4. Changing the lighting Values
:::::::::::::::::::::::::::::::::::::::::::::::::::::::::::::::::::::::::
loading
the files into W3D
:::::::::::::::::::::::::::::::::::::::::::::::::::::::::::::::::::::::::
Step 1.
=====
 Open your
W3D program by double clicking the icon.
Open your
W3D program by double clicking the icon.
Step 2.
=====
Go- File > open >, from the main toolbar. Select all your W3D Files,
then click "open".
Step 3.
=====
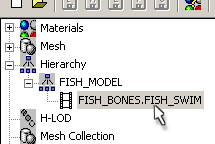 You
wont see anything just yet, Click the "+" (plus) sign next to
"Hierarchy" in the W3D explorer panel to expand it. Click the
plus sign next to "Fish_model" to expand that, Click on "Fish_Bones.Fish_SWIM".
Now your animated model will show up in the viewport.
You
wont see anything just yet, Click the "+" (plus) sign next to
"Hierarchy" in the W3D explorer panel to expand it. Click the
plus sign next to "Fish_model" to expand that, Click on "Fish_Bones.Fish_SWIM".
Now your animated model will show up in the viewport.
Alternatively- ** (If you just want to view the model without any animation, just click on word "Fish_model", in the hierarchy tree.
::::::::::::::::::::::::::::::::::::::::::::::::::::::::::::::::::::::::::::::::::::::
Changing your viewing angle. (Moving the camera around)
::::::::::::::::::::::::::::::::::::::::::::::::::::::::::::::::::::::::::::::::::::::
To change the camera angle is pretty simple. There is no icon to represent the camera because the camera is in first-person perspective. When you left click and drag around the viewport you will spin the camera around the geometry's center axis.
Left and right spins the Camera along the "y" axis
up and down spins the camera along the "x" axis
left clicking and dragging the mouse in a clockwise (counterclockwise) circular pattern kind of spins it along the "z" axis.
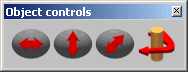
For more accurate results, you can use the
"Object > Rotate X, Rotate Y, or Rotate Z"
alternatively, you can use the constraints located on the "Object
Controls" panel.
*** Hold the left and right buttons Simultaneously as you drag, to pan
the Camera around.
*** Right click and drag up and down to zoom the camera in and out.
*** IF you want more accuracy for positioning the camera distance, From the Main toolbar- Select "Camera > Set Distance..." and type in a number, I.e.: "500" and click "OK". (Distance is measured in meters)
*** You also have the standard viewports you can select from the main toolbar under "Camera", such as front, left, etc.
-Here are the Keyboard shortcuts to change the viewport.
Top = "CTRL"+"T"
Front = "CTRL"+"F"
Left = "CTRL"+"L"
Right = "CTRL"+"R"
Back = "CTRL"+"B"
Bottom = "CTRL"+"M"
:::::::::::::::::::::::::::::::::::::::::::::::::::::::::::::::::::::::::::::::::::::
Changing the lighting position
:::::::::::::::::::::::::::::::::::::::::::::::::::::::::::::::::::::::::::::::::::::
 ***
By Holding "CTRL" down on the keyboard, the lighting Icon will
appear in the viewport
***
By Holding "CTRL" down on the keyboard, the lighting Icon will
appear in the viewport
*** Holding "CTRL" down while left Clicking and dragging your mouse will move the light around the viewport. The camera's target is facing toward the geometry in center of the scene. Therefore, When you move the camera around, it will track around the geometry.
*** Holding "CTRL" down while right clicking and dragging will zoom the lighting toward or away from the geometry in the center of the scene.
::::::::::::::::::::::::::::::::::::::::::::::::::::::::::::::::::::::::::::::::::
Changing the lighting Values
 ::::::::::::::::::::::::::::::::::::::::::::::::::::::::::::::::::::::::::::::::::
There are also some more accurate controls for adjusting the lighting
as well.
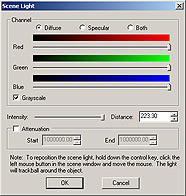
If you go to the main toolbar and select "Lighting > Scene Light..." you have more controls at setting the color values, switch between ambient, specular or both. Setting the Attenuation and distance as well.
*** Main toolbar "Lighting > Ambient..." controls the rgb values of the light, as well as the grayscale.
::::::::::::::::::::::::::::::::::::::::::::::::::::::
Animating
the light
::::::::::::::::::::::::::::::::::::::::::::::::::::::
*** On the main toolbar select "Lighting > Rotate Y" to animate
the light spinning around the models y axis.
Keyboard shortcut "CTRL"+"up arrow"
*** On the main toolbar select "lighting > Rotate z" to
animate the light spinning around the models x axis.
Keyboard shortcut "CTRL"+"Right arrow"
END