W3D Shader: |
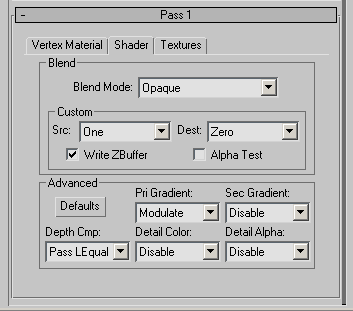 The
Shader tab is directly related to the "stage" mapping or
(mappers), which is located on the vertex material tab. The way in
which these mappers will blend with the background and other objects
in the scene will be determined by the blending mode you choose. The
Shader tab is directly related to the "stage" mapping or
(mappers), which is located on the vertex material tab. The way in
which these mappers will blend with the background and other objects
in the scene will be determined by the blending mode you choose.
Everything in the advanced portion of the shader tab is directly related
to the "stage 1 texture" or (detail texture). Use these
setting to adjust how the texture behaves if you have enabled stage
1, from the texture tab. |
| Blend
Mode : |
Select
from this variety of ways to blend against the elements of your scene. |
|
Opaque:
|
The
map or color in its normal state with No Alpha opacity, and No blended
overlay. |
|
Add:
|
Looks
at the color information in each channel and brightens the base color
reflecting the colors behind it, creating the effect of an additive
overlay. It creates an opacity value based on the grayscale levels
of the map. |
|
Multiply:
|
Looks
at the color information in each channel and multiplies the base color
by the blend color. The result color is always a darker color. Multiplying
any color with black produces black. It creates an opacity value based
on the inverted grayscale levels of the map. (Blacks are opaque, whites
are transparent) |
|
Multiple and Add:
|
Multiplies
the base colors by themselves, lights become brighter, darks become
darker. It creates an opacity value based on the inverted alpha levels
of the map. (Blacks are opaque, whites are transparent) |
|
Screen:
|
Similar
to Add but not burning the brightness levels as much.
It creates an opacity value based
on the grayscale levels of the map. |
|
AlphaBlend:
|
The
map or color in its normal state, If the map contains an alpha channel,
it uses the alpha channels grayscale values to establish the opacity
of the map. |
|
AlphaTest:
|
The
map or color in its normal state, If the map contains an alpha channel,
it uses the alpha channel to establish the opacity of the map however,
it adjusts the threshold of the alpha channel to make it higher in
contrast, no grays just black and white, resulting in harsher edges
in the opacity. |
|
AlphaTest and Blend:
|
Combines
aspects from AlphaTest and Alphablend. |
| Custom: |
You can
create a custom blend mode using any of the combinations below;
e.g. If you select the Src to be Alpha, and you select 1 Src Alpha
for the Dest, you will have created the "Alpha Blend" effect,
however if you used zero for the source and zero for the Dest, this
would produce pure black.
 NOTE:
Many of these custom blend modes aren't very game engine friendly,
use caution when making decisions to use
these to avoid costly mistakes. NOTE:
Many of these custom blend modes aren't very game engine friendly,
use caution when making decisions to use
these to avoid costly mistakes. |
| |
|
Src : |
This
controls the source blend factor. Blending is specified by the following
equation: (Destination Blend * Destination Pixel) + (Source Blend
* Source Pixel). The destination pixel is the pixel which exists in
the frame buffer while the source pixel is the pixel which has been
generated by this material. |
|
Zero:
|
Nothing
will be the base. |
|
One:
|
The
map in its normal state. |
|
Src Alpha:
|
Creates
a grayscale value based on the color and uses this for the base. |
|
1-Src Alpha:
|
Inverts
the alpha channel of the map and uses this for the base. If map has
no alpha channel then black is the default color. |
| |
| Dest
Src : |
This controls
the destination blend factor. |
| Zero: |
Creates
no opacity value for the base and If the base has its own alpha channel,
this will override and disable it so that the base will have no opacity
values. |
| One: |
Creates
an opacity value for the base, based on the maps grayscale levels,
also adds those levels to the base to increase the lightness of light
areas in the base. |
| Src Color: |
Overlays
the colors in the object over the base. |
| 1-Src Color: |
Creates
an opacity value for the object based on the maps color levels, if
no color is present, then it uses the grayscale levels. |
| Src Alpha: |
Overlays
the base with its own Inverted Alpha channel. |
| 1-Src Alpha: |
This
uses the the bases levels to establish and determine opacity values.
If the base has no alpha channel, then no opacity values will be established. |
| Src Color PreFog: |
Uses
the rgb values, then decreases the contrast to determine the opacity. |
| |
| Write
Zbuffer: |
This
will enable / disable itself when certain blend modes are selected. |
| |
| Alpha
Test: |
This
will enable / disable itself when certain blend modes are selected. |
| |
| Defaults: |
Clicking
this button resets the defaults for the advanced parameters. |
| |
|
Everything
Below here is directly related to the "Stage 1 Texture"
which is the secondary (if desired) detail texture.
|
| |
| Depth
Cmp: |
(Depth Comapre)
Tells the graphics card what to do with the polygon its rendering
based on the value of the Zbuffer. |
| Pass Never: |
New polygons
never pass, polygons wont render. |
| Pass Less: |
Renders the
polygon if the Z value is less than the value thats in the Zbuffer
already. |
| Pass Equal: |
Will only
render the polygon if its equal to whats already in the Zbuffer. |
| Pass LEqual: |
-Gets
used most often: Polygon gets drawn only if it's less than or
equal to the Zbuffer value. |
| Pass Greater: |
Only renders
the polygons if they farther back than the closer polys. (If you want
far away things poking through closer things) |
| Pass NEqual: |
Only renders
a polygon if it's not equal to whats in the Zbuffer. |
| Pass GEqual: |
Only renders
the polygons if they are Greater or Equal to the Zbuffer value. |
| Pass Always: |
Draw the
Polygon no matter what, -ignores the Zbuffer. |
| |
| Pri
Gradient: |
(Primary
gradient) This tells it what to do with the diffuse lighting. |
| Disable: |
Disables
it, If you want it Not to use the diffuse lighting. |
| Modulate: |
Multiplys
the color of the pixel by the lighting color. |
| Add: |
Adds lighting
to the color of the pixel, e.g. Lightmaps |
| |
| Detail
Color: |
These allow
for more specific detail in how the second texture is applied. |
| Disable: |
Disables
it, You wont see it at all. |
| Detail: |
Overrides
stage 0 mapping. |
| Scale: |
Pure white
in the overlay will remain unchanged, while darks become darker, increasing
the contrast. |
| |
| InvScale: |
Similar to
add but doesn't burn as much. Creates a transparency based on the
grayscale values of the map. A little more costly than add. |
| Add: |
Looks at
the color information in each channel and brightens the base color
to reflect the colors behind it, creating the effect of an additive
overlay. |
| Sub: |
This works
as a Subtractive overlay. Looks at the color information in each channel
and darkens the color overlaying the brighter colors behind it. |
| SubR: |
? |
| Blend: |
? |
| DetailBlend: |
Uses the
detail texture and self illuminates it. |
| |
| Sec
Gradient: |
Disabled:
(Secondary Gradient) controls the specular lighting. |
| Disable: |
Disables
specular lighting |
| Enable: |
Enables specular
lighting |
| |
| Detail
Alpha: |
This tells
the map what to do with the Alpha Channel in the stage 1 texture. |
| Disable: |
Disable it. |
| Detail:
|
Overrides
the alpha of stage 0 mapping. |
| Scale:
|
Pure white
in the Alpha's overlay will remain unchanged, while darks become darker,
increasing the contrast. |
| InvScale:
|
Uses a transparency based on the grayscale values of the map. A little
more costly than add. |
| |