Search the Community
Showing results for tags '6 - Professional'.
-
This is going to be a nice short tutorial on how to add more bones onto an existing skeleton in a way that preserves the animation (useful if you want to add additional bones to the stock male or female human skeleton and don’t want to reexport all its corresponding animations). First things first, take the existing skeleton (either import it or open it from a save) and add your new bones). As you can see here, I’ve added 7 bones to the stock male skeleton (breast bone, c L UpperStab, c L ForeStab, c L Stab, c R UpperStab, c R ForeStab, and c R Stab. Next let’s export it to its new skeleton name, in this case I did s_3_human, select the skeleton option and hit okay. Now download chunky and use it to open your file, switch to the pivots tab and lets look what’s there. As you can see, c r UpperStab, c l stab, breastbone, etc. are mixed in with the rest of the bones, unfortunately, we want them at the end of the list. Notice the last bone in the list is “BONE FOR BAG” this one is the key to how we will fix this mess. So back to the editor. So, what we need to do now is export our skeleton again, this time I’m naming it “original.” Now that that’s done select breast bone, c l UpperStab, c r UpperStab (the base of each of our new bone hierarchies). Now attach them to “BONE FOR BAG” Now once again let’s export this to our new skeleton (s_3_human) for me. Don’t save this, you might have to reopen the original depending on how complex the bones you're adding are. Now open both files, original and s_3_human in chunky (you’ll need to open two copies of chunky). As you can see now, our 7 bones are now at the end of the file, which means they won’t mess with our existing animations; however, now we need to fix their attachments because right now they're hooked to "Bone For Bag" instead of their proper pivots. This is easier to do than one might think, simply copy the BASE HIREACHY bones in original (not all of them just the bases) from original and paste them over the bones in s_3_human (in this case just beast bone, c l UpperStab, c r UpperStab). Now that that’s done, save it and let’s reimport it into our 3d editor and make sure the bones attached correctly. As you can see, something isn’t quite right, breast bone and the hierarchy for c l UpperStab are fine, but for some reason c r UpperStab’s hierarchy has ended up hooked to c r hand. My assumption is this is caused by the repositioning of so many pivots it wasn’t originally accounting for. Reopen you’re original file for the 3d model and lets play with what the bones are attached to, in this case we need to move the bone back 3 positions to get it attached to c r clavicle, this took me some guessing but in the end I figured out attaching it to c l UpperStab does the trick. Now export it over original and reopen it in chunky then copy C R UpperStab from original into your already modified s_3_human, save and reimport. And ta da, you’ve successfully merged new bones into an existing skeleton in a way that won’t affect the already existing animations!
-
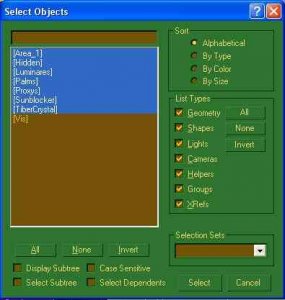
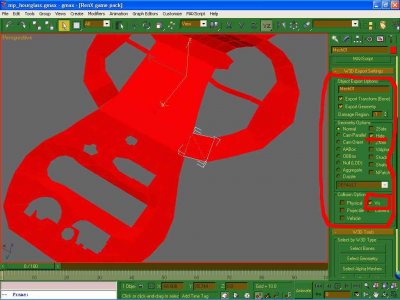
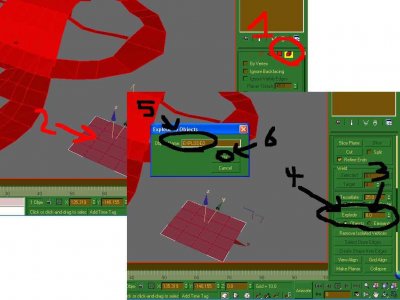
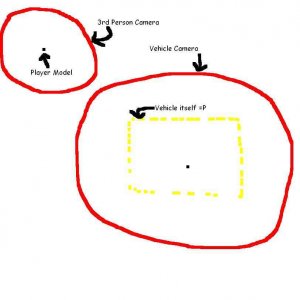
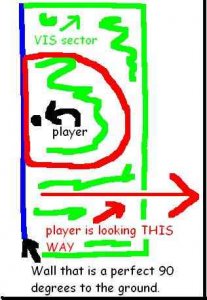
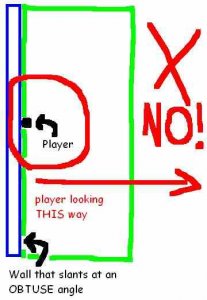
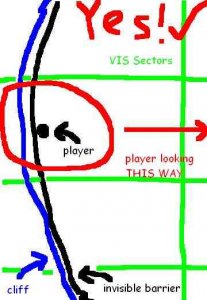
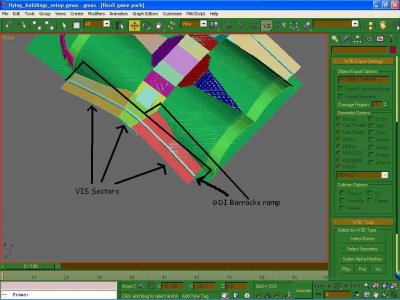
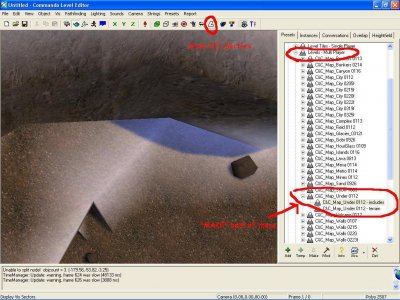
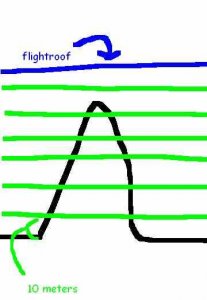
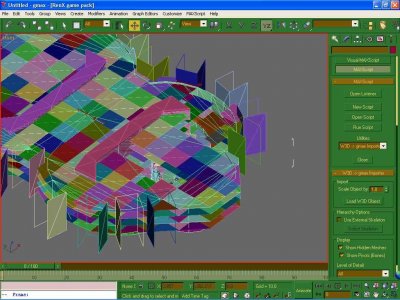
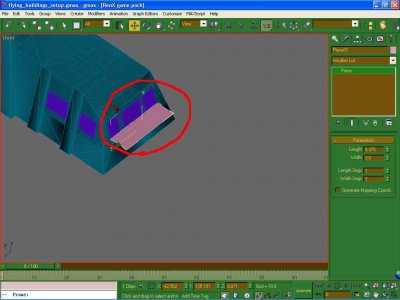
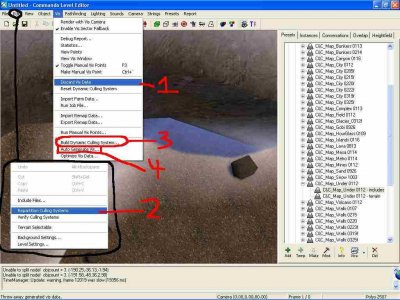
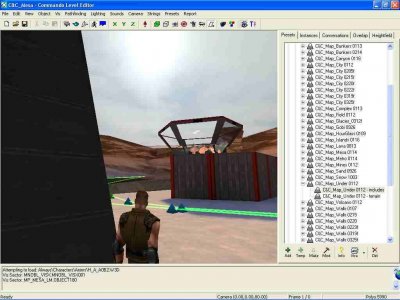
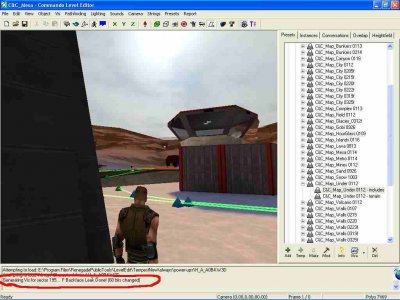
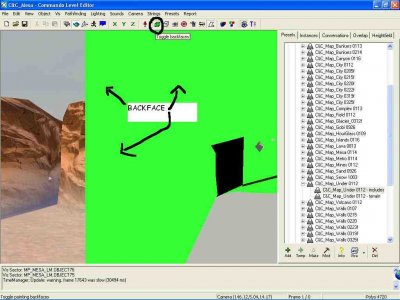
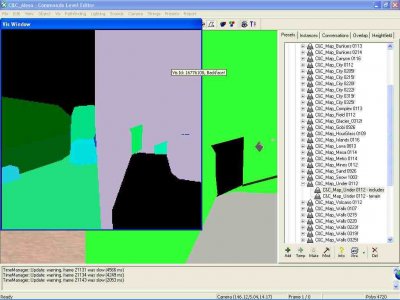
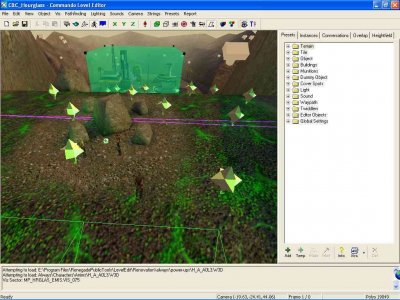
Author: YSLMuffins Skill level: 6 This tutorial shows you how to add VIS to your map (objects that the players can't see from certain angles will not be rendered for them, increasing the Frames Per Second for the players). Content: 1.1 Introduction 1.2 Getting Started 2.1 Getting the VIS sectors done 2.2 Important VIS sector notesTHE PLAYER in THIRD PERSON 2.3 Important VIS sector notesTHE PLAYER in a VEHICLE 2.4 VIS Sectors on a map with FLYING UNITS ENABLED 2.5 My personal VIS set up recommendations/known VIS issues 3.1 Getting VIS set up in the Commando Level Editor 3.2 Detailed Manual VIS point placement 3.3 VIS troubleshooting 3.4 Retouching VIS after the fact 4.1 Additional hints and tips 5.1 Credits 1.1 Introduction So youre creating a map and you want your map to be played by as many people as possible? Whats the best way to do this? Make sure that the map gives the best performance as possible! Whats one way to do this? Get VIS set up on your map! VIS is short for VISibility, as far as I know. Its Renegades way of speeding up performance on their huge single player levels and on their online multiplayer maps. By way of invisible meshes called VIS sectors located all over the map, each sector has its own data on what can and cannot be seen from that particular pointso for example, if youre inside the Hand of Nod your computer wont waste time rendering the inside of the GDI Barracks (with proper VIS data), or the barracks period if you cant even see it. The end result saves your video card and CPU from processing useless data and can leave it to focus on whats importantwhats right around you. Now, setting up VIS properly can be time consuming, and most smaller maps should do fine without it, says Greg Hjelstrom, lead programmer for Renegade. On bigger, higher poly maps, though, VIS is a mustand if there are parts of your map where the FPS drops dramatically, youll want to seriously consider setting up VIS for your map. Besides, all of WWs maps have a VIS system in place! 1.2 Getting started I assume youve downloaded the Renegade Public Tools. Navigate to your Program Files > Renegade Public Tools > HowTo > Multiplayer Maps > mp_hourglass folder. Open the mp_hourglass.gmax scene in RenX. Hit the Select by Name button and select everything in this diagram. Hide them after theyre selected. Everything thats left is the VIS group. Ungroup it. Here are the VIS sectors for the map Hourglass. Notice the important characteristics that these VIS sectors share: Most every POLYGON on the map has been cloned into separate individual VIS sectors. A VIS sector is basically a hidden mesh with the VIS option checked in the W3D options. See diagram. Each VIS sector is hidden. Each VIS sector is located a meter or two below the actual terrain. The VIS sectors are located in every place the player, whether on foot or in a vehicle, can move (actually, every place where the players CAMERA can movemore on this later). The VIS sectors are not one huge mesh. Study this setupyoull have to mimic this type of setup on your own map. 2.1 Getting the VIS sectors done This is probably the most tedious part of the processif you do it right. I personally recommend getting your VIS sectors done before you texture your terrain, as hundreds of tiny meshes with a material texture assigned to them take longer to load than hundreds of tiny meshes with NO textured assigned to them. The lazy way to do it would be to clone your terrain ground and Explode it. Select your terrain, clone it, select all of the faces of your mesh by hitting the ELEMENT selection button, click your terrain, scroll down to the Explode box in the Editable Mesh tab, set the number by the button to 0.0, and hit explode. Pick a name for your exploded meshes, and hit OK. See Diagram. Now, I no longer recommend this method because (1) you can end up with thousands of VIS sectorsmeaning thousands of unnecessary VIS sample points, and (2) WW doesnt do this. The Explode function separates a mesh, when set to 0, into individual triangle FACES, which are not only awkward VIS sectors, but unnecessary. Detaching your VIS sectors manually may take a lot more time, but it could save your VIS system from crumbling entirely when you try to Auto-Generate the VIS for your entire map (i.e., LevelEdit crashing when trying to Build the VIS sample points). If you notice on the Hourglass gmax scene, youll notice that WW did not explode their VIS sectorsthey selected a polygon or two, hit the DETACH button, and gave it a name. You could end up with hundreds of sectors, but not thousands upon thousands compared with using the explode method. Give your VIS sectors a unique name followed by a number, so when it comes time to Select them all you can easily assign the VIS sector W3d propertiesHIDE and VIS. Group all of your VIS Sectors, and lower them all by two meters along the Z-axis. 2.2 Important VIS sector notes - THE PLAYER in THIRD PERSON Its not where the player currently is thats important in the VIS culling systemits where the CAMERA is located. See diagram. When the Player is in first person mode, the camera is located exactly where the player is standing. When the Player is in third person or inside a Vehicle, that is no longer the case. By looking at the crude diagram Ive supplied, consider this: the camera is always BEHIND the player depending on the direction the player is looking and the camera swings around the player as the player moves the mouse. This may be obvious, but you may not have consciously realized this. Also consider these situations: First diagram: the player has backed up against a wall that has the PHYSICAL and CAMERA w3d characteristics checked. The players camera cannot move beyond the wall, so when the player is perfectly against the wall the player is also smashed against the camera so the players view is probably obstructed by the players character model. The VIS sector in green, in this case, is fine. This case also applies if the wall slants at an ACUTE angle against the ground. Second diagram: the player has backed against a wall that has the Physical and Camera w3d characteristics checked. The wall slants backwards against the ground at a degree greater than 90 degrees (pretend its a mountain or something). The VIS sector ends at the base of the wall, but since the wall slants backwards so that the players camera can move beyond the VIS sector, the VIS sector MUST be extended PAST the wall. As you can see by the Red camera circle in the diagram, the players camera has moved out of the VIS sector. Whenever the players camera stumbles outside of any VIS sector, nothing could happenor everything could turn invisible for the player (a VIS glitch). Third diagram: the player has backed against an INVISIBLE barrier that blocks the player from falling off the cliff, but the invisible barrier does (and should not) have the CAMERA w3d property selected. The players camera has moved past the invisible barrier and the cliff itself! However, because the VIS sectors extend past the cliff, the player should experience no VIS glitches when this situation is encountered in game. Now, in the gmax scene, we can put these situations to the test. Study this diagram. Get the picture now? 2.3 Important VIS sector notesTHE PLAYER inside a VEHICLE Fire up Level Edit, load the map UNDER, and click the SHOW VIS SECTORS button. See diagram. Enter walkthrough mode, change the camera to third person, and escape walkthrough mode. Click the Camera menu, and click on GDI_Mammoth_Tank. Enter the walkthrough mode againsee something different? This is how you can walk around the map in your own virtual mammoth tank, minus the model and the speed. When you make your VIS sectors, you must not only consider the FIRST and THIRD person camerasyou must also consider the VEHICLE cameras. If you remember from the crude Camera diagram, the vehicle camera travels around a much larger radius than the Third Person camera. Walk around the map Under with the mammoth tank Camera. You may also want to consider using the camera Nod_Apache if you have flying units on the map. It swings on the widest radius possible--so it is even larger than GDI_Mammoth camera. Youll notice the green highlighted VIS Sectors as you walk around. If you ever have a landmark ramp like on under, youll have to make sure your VIS sectors extend beyond the physical ramp beyond a much larger area, but ONLY if a vehicle can get up there. Youll probably only have to test using the Mammoth Tank camera, because I believe that is the camera that circles the largest radiusso if you have the Mammoth tank camera covered, you have the rest of the vehicles covered. (The Nod_Mobile_artillery camera appears to be larger, but it seems pretty obsolete since if you look up the Havoc model gets in your waythis was patched with the flying path.) Youll want to consider making sure the player cant get too close to the edge, or rely on the player not getting so close to the edge that they fall off! 2.4 VIS Sectors on a map with FLYING UNITS ENABLED When you have flying units enabled, you must have additional layers of VIS sectors in addition to the VIS sectors you have on the ground. Each VIS layer should be separated 10 meters on the Z axis. See diagram. Hopefully you wont have this many VIS layers, but you should get the idea. You should continue to have VIS layers until you hit the flight roof. The 10 meters number is directly dependant on the VIS Sample height that you can increase/decrease in Level Edit. 10 meters is the default, but increasing this number, while it can cut down on VIS layers, it will vastly increase the auto-generate VIS processing time. I recommend leaving the VIS sample height at the default. More on this later. Consider what WW did apparently on C&C_City_Flying. It was mostly likely because the team was short on time, but WW basically added square VIS sectors 30x30 each all over the map, even in areas where there were already VIS sectors. Since WW seems to have gotten this to work, perhaps you can too. According to the diagram, there are four layers of VIS sectors, each layer covering the entire map. The first layer seems to have been made from scratch, and each additional layer was cloned from the first. This could get complicated, but Ill leave it up to you to get things doneI dont have anymore specific advice on making VIS sectors for flying maps. 2.5 My personal VIS set up recommendations/known VIS issues The GDI/Nod Power plants need to have additional VIS set up on themthe default VIS sectors arefaulty. Even if you arent going to include flying units on your map, locate the FLYING_BUILDINGS_SETUP.gmax available on the WW FTP and merge the GDI and Nod Power plants onto your own map. They include the necessary VIS that youll need if you do not have terrain under your buildings (you have holes cut out of your terrain to specially fit each building, like WW does). I recommend adding VIS sectors outside of the windows of the Hand of Nod. They are common places for VIS glitches. See diagram, except do this for all the windows. 3.1 Getting VIS set up in the Commando Level Editor So youve finally gotten your VIS sectors done in gmaxnow youre ready for the work in Level Edit! Make sure youve generated your Pathfind sectors and whatnot, so the Human Pathfind Generator is already on the map. See diagram. First, go to the VIS menu and DISCARD VIS DATA. Next, go to the Edit Menu and REPARTITION THE CULLING SYSTEMS. Third, go back to the VIS menu and BUILD THE DYNAMIC CULLING SYSTEM. This step will take a little while. Fourth, go take a nap or something while this is chugging away. Go to the VIS menu, and hit Auto Generate VIS. In the dialog that pops up, set the Granularity to 5 (my personal recommendation). I recommend 5 because this could save you a vast amount of time while checking for VIS glitches Fifth, walk around the map, look for VIS glitches, and take MANUAL VIS point samples. 3.2 Detailed Manual VIS Point placement The auto-generate VIS function is not going to be perfectyoull have to walk around the map and check for VIS glitches. Over my experience here are common places where VIS glitches occur: The doorways at every building The Hand of Nod interior looking out through the windows The GDI Advanced Guard tower just as you enter through the doorway Tunnel entrances The roofs and ramps of the buildings on Flying maps When dealing with this places, hit CTRL + SHIFT + T to hide the doors of the base buildings so you can enter/exit freely and check for VIS glitches. When you find a VIS glitch, hit CTRL + ~ to take a manual VIS point sample. The invisible object that should be visible should become visible. See diagram. Here is before; notice the obvious VIS glitch? After hitting CTRL + ~, pay attention to the status window at the bottomhere is the after result: I think you should get the idea now. Run around the map, around the areas I suggested, and check for VIS glitches. 3.3 VIS troubleshooting Q: Im trying to fix this VIS glitch, but I keep getting a BACKFACE LEAK OVERFLOW ERROR! This means there is a BACKFACE at that particular point. Backfaces prevent the VIS sampling system from generating a VIS sample, because the VIS system thinks the player is in an invalid location (i.e., under a mountain) and wont generate a sample. See diagram. To show backfaces, hit the SHOW backface button. Everything that appears in BRIGHT GREEN is a backface. According to Greg Hjelstrom, the VIS system needs there for not to be any backfaces, or a very tiny amount, because this saves the VIS system from performing needless processing. To fix the backface problem, go to the VIS menu and hit VIEW VIS window. Try the manual VIS point sample againthis is when something should appear in the VIS window. Move the mouse around the window until you see BACKFACE! Go to the instances tab and locate the particular mesh that has the backface exposed. Clear the checkmark by it and try to do the VIS sample again. This should fix the VIS glitch. However, if this method cannot solve the VIS glitch, or if hiding that mesh with the backface makes something turn invisible that you dont want to turn invisible, you will have to go back to gmax and fix the problem manuallythis means youll have to start the VIS process in Level Edit ALL OVER AGAIN, so as you work, use the Toggle backfaces button often and be mindful of backfaces on the battlefield! Q: I keep getting a Vis Sample Rejected - No Vis Sector or Vis Sector ID not assigned! error! If the VIS glitch is severe, you will have to go back to gmax and add a new VIS sector to that location. You will have to start the VIS process in Level edit all over again. Study section 2 again, as this is probably most likely the culprit behind your VIS glitch problem. 3.4 Retouching VIS after the fact After exporting your map, and after youve closed Level Edit, should you find more VIS glitches in game, reopen your map in Level Edit and fix the VIS glitch. Before you save your level again, make sure you go to the EDIT menu and REPARTITION the CULLING systemsthis is very important, if you dont do this, the VIS data could be COUNTER-PRODUCTIVE and actually SLOW down the players FPS. Do this every time before you export your level again, and your arduous VIS work will pay off. 4.1 Additional hints and tips Use the wireframe mode as you move around, then hit F9 and toggle it back and forth before adding a VIS sample. You can totally customize the way VIS samples are taken this way, by making sure that only a needed sample is taken that doesn`t show more polygons than are actually visible to the player. Use wireframe because it can tell you when something is disappearing and lets you see how the VIS is working in the specific level. You can see things way off in the distance just become totally obscured by the VIS engine as you run around, and you can see the interiors of the bases start coming into view as you move towards each base. Use the other camera views, like varying tank views, so you can fix issues the same way with vehicles, too. Other points about hills. Say you`ve got a lot of hilly terrain on your map. It`s my theory that the VIS auto-generate sample seems to be based on the first person camera. If you open up Hourglass I think you`ll notice all of the manual VIS points high in the air over the hill. If you switch to the first, or even third, person camera while on the hill, you`ll notice you won`t see a lot from the hill. But change to a vehicle camera you`ll see a lot more--but apparently the auto-generate VIS sample doesn`t consider the vehicle cameras. It appears that VIS glitches are common with a land form like the hill on Hourglass, or even on a smaller scale, if you have a sharp, sudden rise in elevation several meshes over the hill might be accidentally turned invisible by the VIS sample. So, if you`ve got a lot of hilly terrain, like Hourglass, on a smaller scale, be sure to walk around with the vehicle camera and check for VIS glitches. If you move your view below the map, and "unhide" all the VIS layers, it seems to go MUCH faster with high settings on the granularity and flight ceiling. 5.1 Credits Written by YSLMuffins Additional notes by Dante and Aircraftkiller HTML Formatting by General Havoc
-
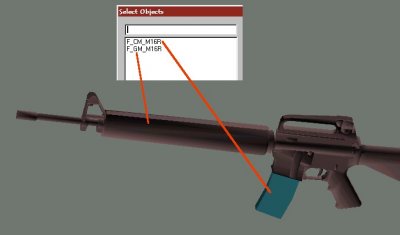
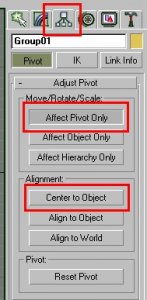
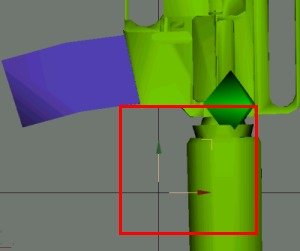
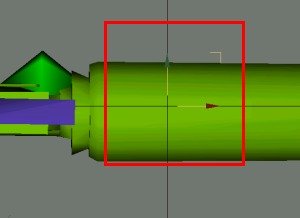
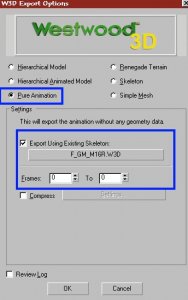
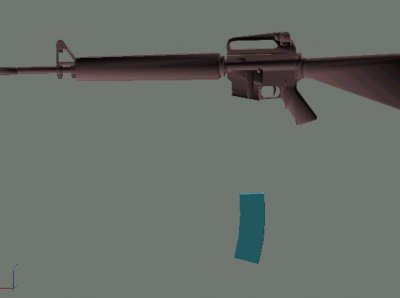
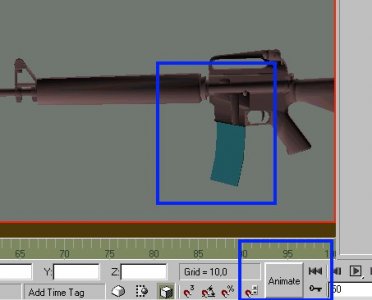
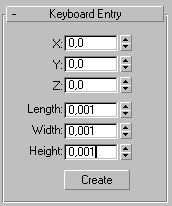
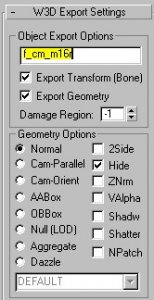
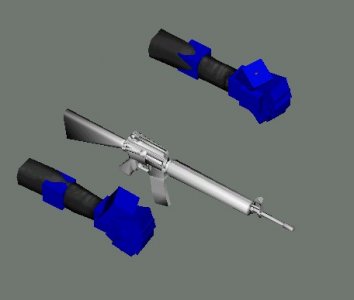
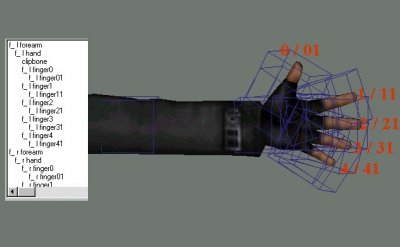
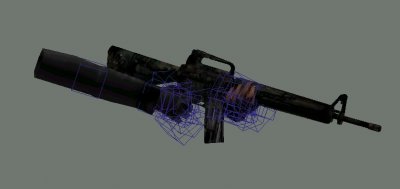
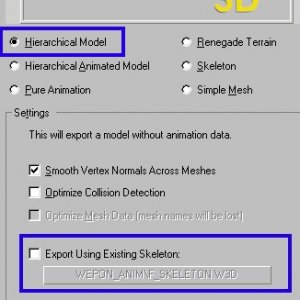
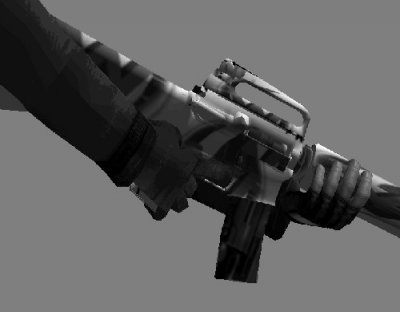
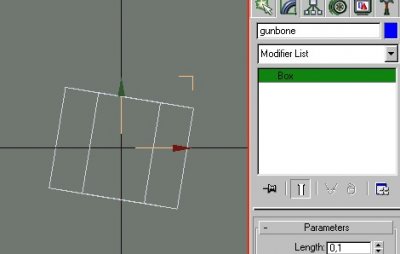
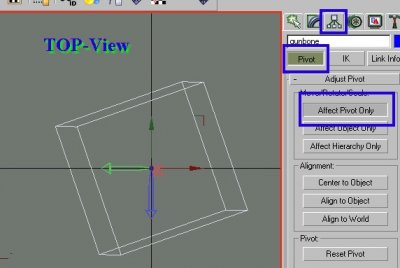
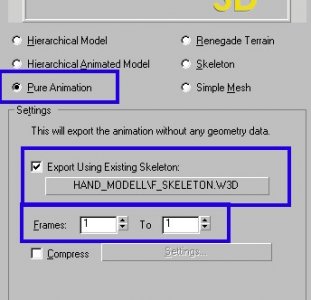
Author: Läubi Skill level: 6 !!! Important notice !!! 1. To follow these Tutorial you must have these files and the 1st Person view of your wepon. Put all these files into a folder (e.g. mywep) You must also have created your weapon for use in Renegade see the Weapontutorial ----------------PART I - prepare your weapon 2. Open you 1st Person Wepon in RenX, you must have two parts, the gun, and the clip. Choose a name (max 4 chars) I have coosen m16r, and name your gun f_gm_xxxx (xxxx = your name) and the clip f_cm_xxxx Now group thr clip and the gun, goto Hirachy -> Affect Pivot Only -> Center to object Deaktivate now the Affect Pivot Only and move the gun into the center of GMAX Now save the file and export it as f_gm_xxxx.w3d (Hierachial Model) into the folder where all the other files are. 3. Now export your file as f_ga_xxxx_idle.w3d, select Pure Animation, Frame 0 to 0, use Existing Skeleton (select here your exported f_gm_xxxx.w3d file) Do the same again, but name the file f_ga_xxxx_fire.w3d ( Before that you can make an animation, e.g. if there is a rotating gun, like the chaingun, but normaly there is no aniamtion needed at this time, the fire anim will be made later. The aniamtion here is only needed, if there is something moving at the gun while firering) 4. Ungroup now the wepon. Now it is time for the relaodaniamtion. For that you should know, how long it takes for your gun, to reload (this will be set up in Commandoeditor). Now calculate the needed frames. Needed frames = ( 30 * reloadtime ) If you have the needed frames divide them by 2. Move to this frameposition and a click Animate . Move now the clip down, so that it is unloaded. Now move to the needed frame and move the clip back, so that the clip is back at the old pose. Now click again at Animate. Now export your file as f_ga_xxxx_relod.w3d, select Pure Animation, Frame 0 to (the end frame), use Existing Skeleton (select here your exported f_gm_xxxx.w3d file) Your reloadaniamtion is now done. Select the gun and the clip and make a groop of them. Save your work. Of course it is possible to make any other aniamtions for the reload, but this is an easy and effective way. Now make a new file, and just create an 0,001 x 0,001 x 0,001 Box ->name it f_cm_xxxx and select hide at the W3D Options now export the file as f_cm_xxxx.w3d as Hirachial Model ----------------PART II - do the handposition and the animations 5. Open now the gun_hands.gmax file, and save it under a new name ( e.g. m16r_hand.gmax ) now goto file->merge and merge your 1st Person weapon into, save your work. Rotate your grouped gun now, so that the gun is on the right position between the both hands. (use only the rotation tool, to prevent missposition) The blue boxes are the bones, that are affecting the handposition. Press `H` to diplay all Objects in the scene, activate [x] Display Subtree, you see now the linking of the bones. I recommend to use this dialog later to to select the bone you want to aniamte. YOU MUST ANIAMTE THE BONES INSTEAD OF ANY PART OF THE HAND OR WEPON OR IT WILL NOT WORK. The bones are what they named, f_l_forearm = left forearm, f_l_hand = left hand the fingers have a simple system: With the (n = 0 - 4) f_l_finger n - bone you can move the finger at the hand, with the f_l_finger n1 - bone you can bend the finger. 6. We will now do the standard hand position, I recommend that you spend a bit of work for this, because this basepose will later be used too for the reloadaniamtion etc. Of course you can make for every state (enter/exit, fire, reload, idle) a seperate handposition, if that is needed. Now click the animate button, and move to frame 1. It`s important that you move to frame 1 and has enabled the Animate or you`ll later get in trouble with exporting!!!! Then select the bone you want to change, and move the fingers, hand and forearm into the position you want. I recommend that you only rotate the fingerbones, or the may look too long or deformed. If you want to test the handposition export your Model as Hierachial Model, and deaktivate [ -] Export using existing skeleton 7. When you are ready with the handposition you must select the bone: `gunbone` and move it exactly to the pivot: Now go to the hirachy tab, select pivot -> Affect Pivot only, and rotate the pivot of the bone (Use Top-view) so that the green arrow stands in an 90° angel to the worlds green arrow (y - Achse) and the red arrow stands in a 90° angel to the green and red arrow. Now the most work is done deaktivate the animate button, save the file. Now hide your wepon, and export it as f_ha_xxxx_idle.w3d select Pure Animation, Frame 1 to 1, use Existing Skeleton f_skeleton.w3d 8. Now it is time for the fireanimation. Save your file with a new filename e.g. mywepon_fireanim.gmax I can`t say directly what to do from now on, because it depends on your wepon, and you can`t "see" a animation on pictures. A good idea is to animate the forearm bones a bit. But only animate the handbones, not the weapon! Then save, hide the wepon and export the file with the same settings as before, but at the frames use 1 to (lastframe you used) name the file f_ha_xxxx_fire.w3d 9. Then open the gmax file with your standard handposition and save it again with a new name e.g mywepon_exit.gmax Make now an aniamtion for the exit of your wepon, e.g. rotate the forearm bones, so that it looks like the wepon gets behind you. Export the files with the already known settings as f_ha_xxxx_exit.w3d Repeat these with an enter animation and export as f_ha_xxxx_enter.w3d 10. Now comes the final step, the relaod animation. For that load your standard handposition file again, save it e.g. as mywepon_relaod.gmax Ungroup your wepon, so that the clip when you aniamte the handposition moves too. Goto frame 1 and press animate and change the base position if that is neede, so that the hand holds the clip and the move to the frame when the clip is `unloaded` and correct the handposition. Then move to the frame, when the clip is attaced to the wepon and correct the handposition again. Export it with the same settings as before and name it f_ha_xxxx_relod.w3d ----------------PART III - insert your files and enjoy your work 11. Copy now all .w3d you have exported into your Mod folder, setup your wepon in Commandoeditor and select as 1st Personview the file f_gm_xxxx.w3d 12. Export your Modpacket and ENJOY! F.A.Q. Question: My wepon is a bit to high/low or has not the postion it should have Answer: Rotate or move the gunbone bone Question: The handposition and animations works fine, but the clip don`t move while reload. Answer: Check if you have exported the f_ga_xxxx_relod.w3d right (check start/endframe, and the naming) Question: How do I add an emitter to the first person view mode? Answer: You need to add and link the emitter to the gun model (f_gm_name) and then hide/unhide it using visibility tracks when exporting the f_ga_xxxx_ animations. E.g. for an emitter to only show up during reload, you need to hide it in enter/exit/idle/fire and make it visible in the relod animation.
