
---Interim Apex Unit Guide---
This unit guide will help show all the strengths/weakness of every individual unit along with help get a better insight on how to use them. The format for the unit description is as follows. Please read it or this guide will not make sense. I will do my best to include all the knowledge about the game i've learned throughout the years of playing.
Unit Title will go here along with a picture of the unit in-game.
Health/Armor: Basic Health when purchased will go here. Will of Kane adds 25 hp to every infantry.
Armor Class: (Vehicle use only. Special Infantry Armor will be listed in special abilities)
Special Abilities: Anything note worth that the unit can do that others normally cannot will go here or special features the unit have that should be noted. Please note that all special abilities will not be beneficial in this guide but should be noted (for example, this unit has a slower walking speed than normal or cannot pilot vehicles). (Largely Infantry use only)
Weakness (Rating of Danger): In here will be a description of what the unit is truly awful against/should fear. These are things that can kill this unit with no question. In addition a rating is given so you can determine how risky it is to go through with your plan if you come across said thing. While other things are not listed here they are common sense, for example a sniper is weak against ships but you shouldn't need to worry about them for obvious reasons. Furthermore while alot of infantry are weak against mammoth tank rocket pods it will not be listed here unless the unit will typically go to combat with it. For vehicles it should be implied that anything listed is good against it and should be avoided at all costs.
Strengths (Rating against): In here will be a description of what the unit excels against and what you truly should use it for. For example, while you can use a unit against buildings, some are better off against defenses instead. Furthermore units may be very good against vehicles but only if used correctly and in a special way (Ex: Tunguska or Mammoth 36 inch). Any special notes like this will be listed below. It should also be noted that infantry against buildings implies you have reached the MCT and are hitting that weak point.. not the outside unless otherwise noted.
Special Notes/Tactics: As stated above, this is where descriptions will go into how to properly use the unit if it's not immediately obvious. Furthermore, a unit may have a special ability that has to be utilized a certain way for it to work or on a map where it's critical for victory.. This is where it will go if a description is needed.
Speed: (Measured in-game using m/s)
Damage: There are a lot of different ways to measure damage, however i'm going to use one. The damage to a building will be listed here in points per hit to the side of a building. The building used for testing is the side of HON. It will be measured per shot/hit instead of magazine. For example, the Mammoth Tank has 2 shots per magazine. This only mesures one shot. For Vehicles such as the Flame Tank or XM3 Disruptor, it will be measured by 5 seconds of attacking.
Interim Apex Unit Guide (Cont.)
Nod Units Overview
Nod's arsenal consists of specialized units to help ensure victory and with distinctive, careful usage can seriously help turn the tide in combat. However, with Nod units it is more of when, where and how to use the units rather than a blazing through with firepower and massive rushes like GDI. Nod Infantry highlights include Stealth Black Hands, Heavily armored elite Black Hand Infantry and mutant units that can heal in tiberium. Nod Vehicle highlights include stealthed units with fast capabilities, flamethrower vehicles that can level buildings in seconds and a variety of arty. Read on the unit guide to find out each strength and weakness to help ensure you're using your favorite Nod unit to its fullest capabilities.
Nod Infantry
(To find a Unit, click "Cntrl F" and type in the unit name you'd like to find)
Black Hand Sniper
Black Hand Designated Marksman
Raveshaw (Mutant)
Petrova (Mutant)
Black Hand Lancer
(Free) Sharpshooter
Chemical Warrior (Backpack)
Red Tide Sharpshooter
Mendoza(Firesuit)
Chemical Warrior
Black Hand Machine Gunner
Nod Technician
Nod Grenadier
Black Hand Engineer
Flame Thrower (Backpack)
Rocket Soldier Officer
Red Tide Warrior
Black Hand Elite
Nod Fanatics
Shock Trooper
(Free) Rifle Soldier
Blackhand Melta
Petrova (Mutant)
Rocket Soldier Officer
Petrova (Mutant)
Rocket Soldier Officer
Petrova (Mutant)
Rocket Soldier Officer
Petrova (Mutant)
Rocket Soldier Officer
Ballistic Sniper (Possibly Wrong Sniper. Double Check)
Petrova (Mutant)
Black Hand Sniper
Price: 500 Credits
Armament: R69 Pierce Sniper Rifle, (x2) M3 Grenades, (x9) Throwing Knifes, (x1) Timed C4, (x1) CZ-75 Pistol, (x1) Combat Knife
Health/Armor: 100 hp / 200 Armor
Speed: 7.2 m/s
Special Abilities: Radar Invisible, able to swim
Weakness (Rating of Danger): Direct Heavy Combat (7/10) , Tanks (10/10) , Counter Snipers (5/10)
Strengths (Rating against): Infantry (8/10) , Aircraft (2/10)
Special Notes/Tactics: Typically seen as a bargain and go-to sniper, this unit will provide instant 1 hit kill headshots if used against normal infantry. M3 Grenades can be used to help with escape from a bad situation. This unit is one of the few on Nod that is Radar invisible which can be used to great advantage if you have a Stealth suit and Nuke beacon equipped.
Black Hand Designated Marksman
Price: 650 Credits
Armament: Dragunov SVD, (x2) M3 Grenades, (x1) Timed C4, (x1) CZ-75 Pistol, (x1) Combat Knife
Health/Armor: 100 hp / 200 Armor
Speed: 6.7 m/s
Special Abilities: Able to swim
Weakness (Rating of Danger): Direct Heavy Combat (7/10) , Tanks (10/10) , Counter Snipers (5/10)
Strengths (Rating against): Infantry (4/10), Aircraft (2/10)
Special Notes/Tactics: While this sniper sports a higher rate of fire it also has a lag/time between firing and when the actual bullet hits. This means that if the target is moving and you fire at the head then it won't hit. While the intention was purposed for more close range fighting this unit fails to utilize its fire rate advantage because the range it needs in combat to hit more accurately (The bullet from the SVD isn't instant) is too close.. As such this unit will be hit by normal infantry weapons. An additional disadvantage that should be considered with this unit is that the projectile that is fired, is not invisible. This unit is typically skipped for in favor of the cheaper and 1 hit instant headshot Black Hand Sniper that also fires an invisible projectile.
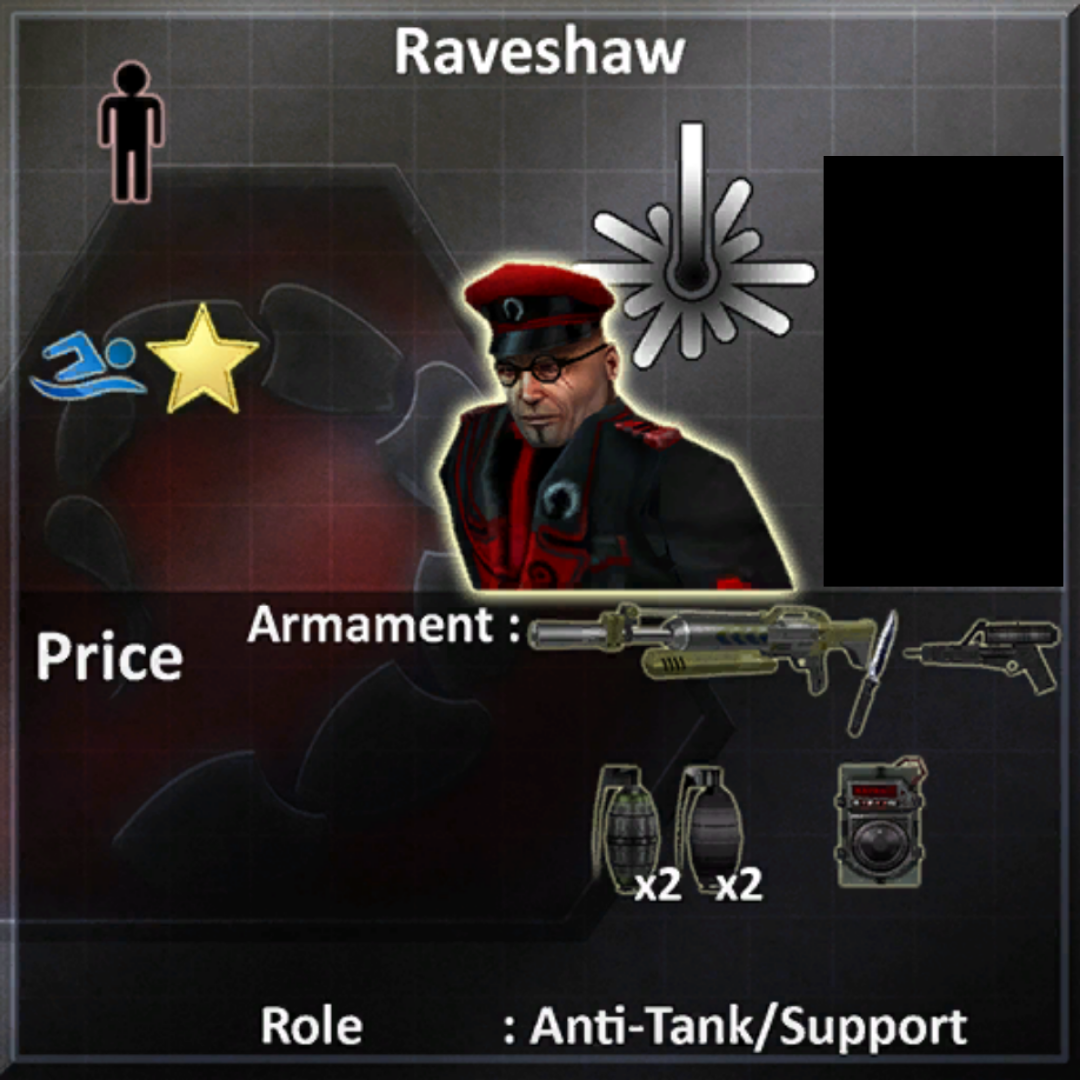
Raveshaw (Mutant) (Mut Rav)
Price: 1750 Credits
Armament: Scorpion Railgun, Beretta .93R Auto, (x1) Timed C4, (x2) Chemical Grenades, Combat Knife
Health/Armor: 600 hp / 300 Armor
Speed: 6.3 m/s
Special Abilities: Uncrushable, Heals in Tiberium, Death instant Spawns an Adult Visceroid, Auto Heals Health, Cannot Pilot Vehicles, Special Heavy Armor, Takes 2 Ramjet Headshots to kill, adv Auto Heal
Weakness (Rating of Danger): AA-12 (10/10), Volt Rifle (6/10), Ramjet Headshots (6/10)
Strengths (Rating against): Heavy Combat Situations/Tank Battles (10/10) , Field Camping (10/10), General Infantry (7/10) , Defenses (7/10) , Buildings (5/10) , Aircraft (3/10)
Special Notes/Tactics: Nearly unkillable, Mutant Raveshaw is unstoppable in a veteran players hands. If you pick up an ADATS, use this unit throughout the match to camp the field. It will help your team out immensely. If you encounter any normal infantry without specialized armor immediately use your Chemical grenades to 2 hit kill anyone who opposes you. Keep this unit alive and you'll quickly be able to help out in any situation your team finds itself in.. just avoid those being snuck up on by an AA-12. Alternatively, you might want to rush a building with this unit but I don't reccomend it because you'll give the DNA to the enemy team which can become a major problem in the hands of someone skilled. If you can, build up your weapons before going into direct combat as your pistol can only do so much. Don't rely on the Tib regen as it's not that good ethier. If you have to eat mines to clear a building be sure to remember that a visceroid spawns as well which means you can tank about 8-10 mines from full HP if really needed.
Petrova (Mutant)
Price: 1350 Credits
Armament: Mantis Tiberium Rifle, Talon Flechette Gun, (x2) Timed C4 , (x2) Chemical Grenades , (x2) EMP Grenades , Combat Knife
Health/Armor: 300 hp / 100 Armor
Speed: 7.5 m/s
Special Abilities: Heals in Tiberium, Death instant Spawns a Baby Visceroid, Auto Heals Health, able to swim, Increased speed/jumping abilities, Stand still to go invisible
Weakness: (Rating of Danger): Ramjet Headshots (9/10) , Power Suit Armor (9/10) , Volt Rifle (9/10) , AA-12 (8/10)
Strengths: (Rating against): Unarmored Infantry (9/10) , Light Armored Tanks (6/10) , Heavy Armored Tanks (5/10) , Base Defenses (4/10)
Special Notes/Tactics: While useful on the surface and able to multi-task very well, petrova ultimately isn't worth the cost of admission when it comes to fighting. Petrova is only good vs unarmored infantry and most vehicles are able to kill her since she herself has a weak armor class. Save your money, go with Mutant Raveshaw. The only time you should be using petrova is with a !char command. Otherwise, if you want to kill infantry roll with an AA-12.
Black Hand Lancer
Price: 1,750 Credits
Armament: M10-R Lancer
Health/Armor: 100 hp / 300 Armor
Speed: 5.4 m/s
Special Abilities: Immune to Tiberium (Black Hand Armor) , Cannot Pilot Vehicles , Uncrushable , Slower
Weakness: (Rating of Danger): Ramjet Headshots (9/10) , Volt Rifle (8/10) , Power Suit Armor (6/10)
Strengths: (Rating against): Heavy Armor Vehicles (10/10) , Light Armor Vehicles (9/10) , Infantry[Any] (4/10)
Special Notes/Tactics: Considered one of the heaviest units on Nod, this bad boy has the task of going into hard combat and destroying the hell out of GDI vehicles. Use this unit by going into hiding spots or in a vehicle with a teammate, jump out and hit the enemy in the rear or sides for max damage! Your teammate should then finish off the enemy unit (due to you having a long reload time). In short this unit will destroy tanks all day assuming you can get close enough or lucky to hit them (there is a 2 second delay for firing and also a small random spread of where it will fire leading to long range inaccuracy). Light Armor vehicles will fall to this unit, but again you have to hit them first. As for infantry you'll sometimes be able to 1 hit kill them. Recommended best with a rush to help out if really needed.
One last thing, you should not buy this unit for offensive situations as it's just not effective enough to justify doing so. Instead, use this unit near a Purchase Terminal or when you really need to defend the base from a massive rush.
(Free) Sharpshooter
Price: Free!
Armament: 1 M14 SSC (Silenced) , (x2) M3 Grenades , HK45 Pistol , (x1) Timed C4 , Combat Knife
Health/Armor: 100hp / 100 Armor
Speed: 7.0 m/s
Special Abilities: Able to Swim
Weakness: (Rating of Danger): Armored Vehicles of any kind (10/10) , Infantry (8/10)
Strengths: Infantry (4/10)
Special Notes/Tactics: Unit is free so don't expect much. Rarely used due to the fact that there is a half second delay from firing to hitting the actual target leading to frustrating gameplay. Furthermore a headshot does not always guarantee an instant kill depending on the armor class of the unit you're hitting. However, with practice it is possible to snipe others at the start of the game.. just don't expect anything from this unit after that.
Chemical Warrior (Backpack) (Baja Blast Sprayer)
Price: 650 Credits
Armament: V2 Venom Chem Sprayer (Unlimited Ammo)
Health/Armor: 100 hp / 200 Armor
Speed: 5.8 m/s
Special Abilities: Immune to Tiberium , Unlimited Ammo (Backpack) , Death instant Spawns a Baby Visceroid
Weakness: (Rating of Danger): Base Defenses (10/10) , Fast Vehicles (10/10), Ramjet (10/10), Infantry (8/10), Vehicles (8/10)
Strengths (Rating against): Buildings (10/10), Infantry (8/10) , Vehicles (8/10)
Special Notes/Tactics: This unit has an unlimited ammo capability but is just unfortunately limited back by its small range. Don't let this fool you however, the backpack chem warrior is an absoulte MONSTER. The gun deals massive damage to anything it hits and can melt an MCT in about 10-15 seconds uninterrupted. Buying the Heavy Weapons upgrade will make the unit nearly twice as powerful and have people calling you a hacker. The upgraded weapon is typically nicknamed "Baja Blast". Be aware however that when firing that your Chemical Spray it's highly visible for everyone to see and you'll be a target instantly for GDI. Lastly, this unit is crazy good at destroying barriers and stuff blocking your way. Use this to clear the way for a flame rush later on if the enemy is heavily building barriers with pioneers. Can decimate the MCT in seconds.. you just need to get inside the building first.
Red Tide Sharpshooter
Price: 300 Credits
Armament: Bolt-Action Rifle (x1) Timed C4 , Machete
Health/Armor: 100hp / 200 Armor
Speed: 7.25 m/s
Special Abilities: Able to Swim
Weakness: (Rating of Danger): Tanks (10/10) , Direct Heavy Combat (8/10) , Counter Snipers (8/10)
Strengths (Rating against): Infantry (7/10) , Scout Vehicles (2/10)
Special Notes/Tactics: The first unit you can buy that can actually 1 hit instant kill infantry with a headshot.. this unit lends itself helpful in early games with non-specialized GDI infantry units taking the field along with hitting some damage on Humvee's. Do be aware and careful of the large tracer that fires from the rifle along with the long 2 second firing delay between rounds. The white uniform doesn't help against counter sniping as well. If you really want to get crafty, you can fire.. switch weapons quickly and switch back to skip the delay. This will increase your ROF slightly but requires input on your end. Overall, just buy the $500 sniper and don't waste your time with this garbage.
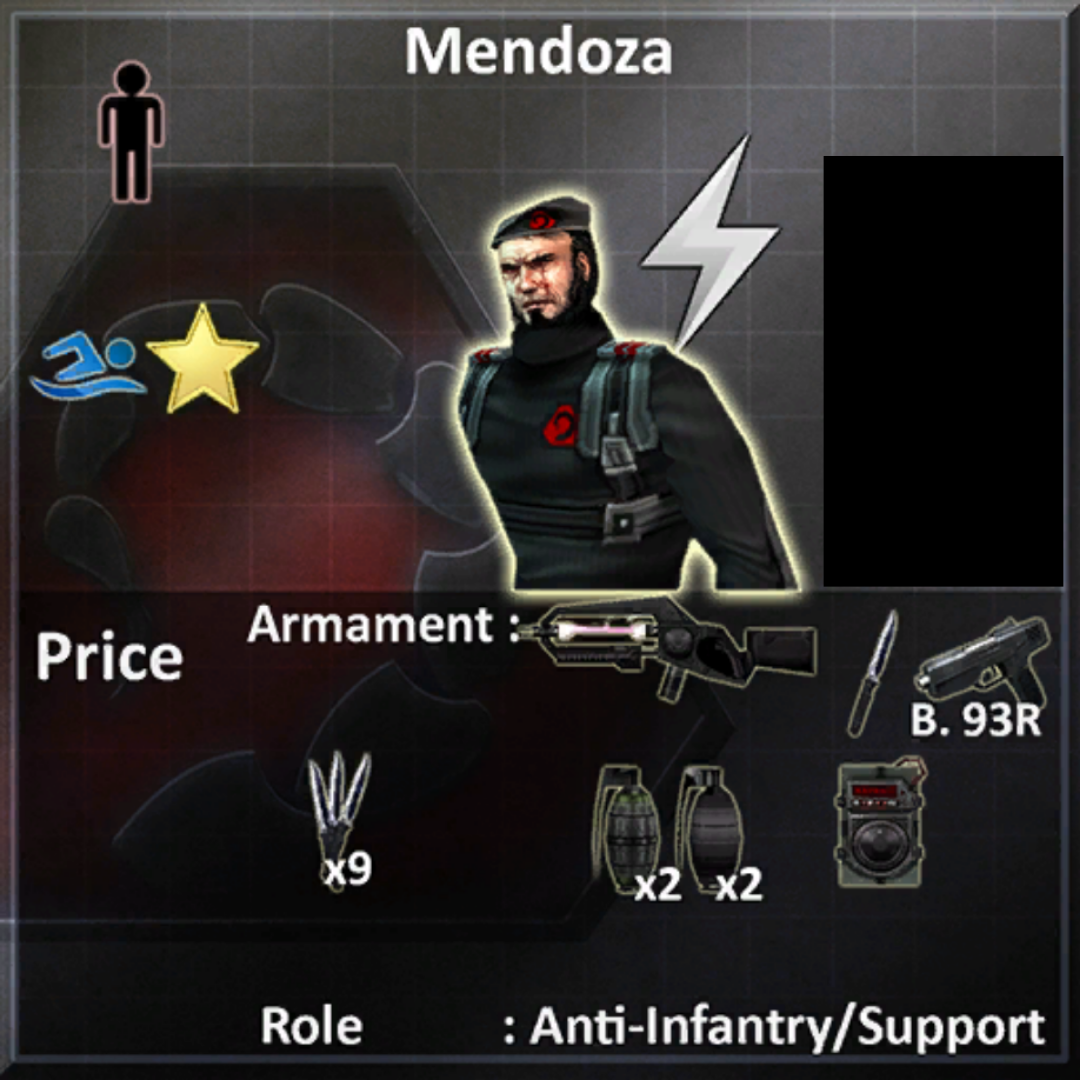
Mendoza (Firesuit)
Price: 1000 Credits
Armament: Volt Rifle , Beretta 93R Auto Pistol , (x2) EMP Grenades , (x2) M3 Grenades , (x1) Timed C4 , Combat Knife
Health/Armor: 100 hp / 250 Armor
Speed: 6.7 m/s
Special Abilities: Firesuit (Higher protection against flames and proxy mines)
Weakness: (Rating of Danger): M4 Rifle (8/10), Volt Rifle (8/10) , Snipers (8/10)
Strengths (Rating against): Proxy Mines (10/10) , Infantry (9/10) , Buildings MCT (9/10), Light Armor Vehicles (8/10) , Heavy Vehicles (6/10)
Special Notes/Tactics: The primary Mendoza to buy as the unit is crazy good. What makes this unit important is that it's able to run through proxy mines like crazy, if you're going to rush have this guy go first into the building. You can eat up anywhere from 7-10 mines before you die depending on how forgiving the game wants to be. You can use two Mendoza flame suits to take down a building by running inside and placing 2 timed C4's on a building, then Volt Rifling it to death. Highly reccomend this unit to anyone.
Chemical Warrior (Chem)
Price: 300 Credits
Armament: V2 Venom Chem Sprayer , HK45. Pistol , (x2) M3 Grenades , (x1) Timed C4
Health/Armor: 100 hp / 200 Armor
Speed: 7.15 m/s
Special Abilities: Immune to Tiberium , Death instant Spawns a Baby Visceroid
Weakness: (Rating of Danger): Vehicles (9/10) , Base Defenses (9/10) , Infantry (7/10)
Strengths (Rating against): Infantry (6/10) . Buildings (4/10)
Special Notes/Tactics: Gaining slightly lower marks for damage and higher for weaknesses this is the standard chemical warrior that does not sport a backpack full of unlimited ammo. Without unlimited ammo you'll be forced to reload marking down combat effectiveness.. however infantry capabilties will remain high due to gaining 2 chemical grenades. Worth it to just go with the Backpack ChemSprayer. Do be careful when firing as you'll be largely visible on the field.
Black Hand Machine Gunner (BHMG)
Price: 650 Credits
Armament: Tarantula Laser Machine Gun, CZ-75 Auto Pistol, (x2) M3 Grenades, (x1) Timed C4
Health/Armor: 100 HP / 225 Armor
Speed: 6.0 m/s
Special Abilities: Uncrushable , Slower Speed , Immune to Tiberium , Upgraded Armor Class (Caprese Armor)
Weakness: (Rating of Danger): Mammoth Tank Rockets (7/10) , Ramjet Rifle (7/10)
Strengths (Rating against): Infantry (10/10) , Power Suit Armor (10/10) , Viceroids (9/10) , Vehicles (7/10) , Buildings (3/10)
Special Notes/Tactics: The Black Hand Machine Gunner (BHMG) , is a great all around unit. Your gun (Laser Machine Gun) has 90 bullets, reloads extremely fast, and does ok burn damage. In terms of fighting against vehicles this unit will shred light armor and also lend itself useful against heavy armor slowly draining away health until you're dealt with. This unit overall is a good all arounder. Just don't expect to own any one particular thing.
Nod Technician (Techie)
Price: 400 Credits
Armament: Gizmo Repair Gun Mk.III, Beretta 93R Auto, (x4) Proxie Mines, (x2) Timed C4 , (x2) Timed C4 , Knife
Health/Armor: 100 HP / 200 Armor
Speed: 7.45 m/s
Special Abilities: Fast Speed, Can Swim
Weakness: (Rating of Danger): Long Range Combat (10/10) , Vehicle Combat (9/10), Medium Range Infantry Combat (8/10)
Strengths (Rating against): Buildings MCT (10/10) , Defenses (6/10), Infantry Close Quarter Combat (6/10)
Special Notes/Tactics: Straight Forward this unit is used often to place mines or repair buildings quickly. Quite a bargain for what's offered. Use the Repair Gun's "Disassemble" (Right Click) against infantry close range as it'll burn them along with unlimited ammo. When placing mines never forget that placing them under stairs will also allow them to activate without ever being seen due to their activation radius. When in close combat with this unit, use the proxie mines offensively to win a battle. Be sure to check out the mining guide to learn how to mine best as it can be the difference between losing and winning a game.
Nod Grenadier
Price: 100 Credits
Armament: (x40) HE Grenades, (x40) Incendiary Grenades, HK.45, (x1) Timed C4 , Combat Knife
Health/Armor: 100 HP / 150 Armor
Speed: 6.8 m/s
Special Abilities: Slightly Faster, Can Swim
Weakness: (Rating of Danger): Vehicles (9/10), Direct Infantry Combat (7/10) , Snipers (7/10), Base Defenses (7/10)
Strengths (Rating against): Urban Infantry Combat (10/10) , Medium Range Inf. Combat (7/10) , Light Armor (6/10), Power Armor (4/10)
Special Notes/Tactics: This speedy boi is a diamond in the rough and a total gem no matter what situation you're in. The Incendiary Grenades do massive splash damage along with burn damage (in combination with the initial damage when you hit someone).The grenades also do a good amount of damage against light vehicles. The most effect use of this char. is to stay back and throw grenades far from behind cover. You'll stay alive, help your team and burn people to death after a while. I haven't found much use for the HE Grenades besides a lucky 1 hit kill every so often.. in which case I would honestly stick to Incendiary Grenades as they kill people more reliably. If you can hide behind cover you can knock off a base defense or two as well. If you're strapped for cash, go with this unit and you'll find gold.
Black Hand Engineer (BH Engi)
Price: 650 Credits
Armament: Vulture Shotgun, Gizmo Repair Gun MK.II, (x4) Proxy Mines , (x2) Timed C4 , (x2) Remote C4, Combat Knife
Health/Armor: 100 hp / 250 Armor
Speed: 5.9 m/s
Special Abilities: Uncrushable , Slower Speed , Immune to Tiberium , Upgraded Armor Class (Caprese Armor)
Weakness: (Rating of Danger): Mammoth Tank Rocket Pods (10/10), Artillery (9/10) , Ramjet (7/10) , Power Armor Volt Rifle (7/10)
Strengths (Rating against): MCT (10/10) , Urban Infantry Combat (9/10)
Special Notes/Tactics: A VERY hardy version of the Engineer. This badass will survive for a while in the field which should allow him to sneak into a building and blow it up or stay out to fix up vehicles. This unit will be able to survive the roughest of situations so decide what ultimately you want to do with your strategy and include this guy whenever you can. Just be careful because while this unit is hardy he still will succumb to proxy mines. If you're rushing a building that you think has no mines or 1/2 then use this unit. Keep in mind you're uncrushable!
Flame Thrower (Backpack)
Price: 300 Credits
Armament: Dragon Flamethrower (Backpack)
Health/Armor: 100 hp / 150 Armor
Speed: 6.4 m/s
Special Abilities: Firesuit , Slightly slower , Backpack
Weakness: (Rating of Danger): Vehicles (9/10) , Base Defenses (9/10) , Infantry (6/10)
Strengths (Rating against): Proxie Mines (8/10) , Infantry (5/10)
Special Notes/Tactics: Previously a bargin. The Flame thrower has been nerfed so hard that this unit isn't very viable. The slow speed, low armor and low dmg flamer will get you killed. Purchase the Chem Trooper (Backpack) instead. Something of note, you can switch weapons everytime you fire a fireball (rightclick) then switch back quickly. Doing so will skip the "cooldown" time for the fireball. You'll essentially be able to have the same Fireball firing rate as the Turboflame thrower. This unit is also equipped with a firesuit that will allow him to run through proxie mines like crazy. Unfortunately this unit's health is not as high as Mendoza's Fire suit meaning marks are taken off proxie mine effectiveness.
Nod Anti Tank Infantry (AT Rifleman)
Price: 200 Credits
Armament: Anti-Tank Rifle, (x1) Timed C4 , Combat Knife
Health/Armor: 100 hp / 150 Armor
Speed: 6.2 m/s
Special Abilities: Can swim
Weakness: (Rating of Danger): Direct Combat (9/10) , Ramjet Rifle (9/10) , Artillery (8/10)
Strengths (Rating against): Defenses (9/10) , Light Armor (8/10) , Heavy Armor (8/10) , Sniping (6/10)
Special Notes/Tactics: An overlooked but critical starting unit. The Nod Anti Tank Rifleman will be able to destroy anything in no time with its long range rifle that does high damage to low armor objects. Use this Rifle against Guard Towers, Light Armor and to finish off ORCA Aircraft. With some time you'll be able to help change the tide at the start. An added advantage of getting this unit over the rocket soldier is that the shot is instant and has little trail to help make you a bit more harder to find in comparison. Do not use this unit to snipe unless you have too as a headshot will not 1 hit kill most infantry w/ armor. In close combat your reload time and 1 shot handicap will get you killed, so bust out your knife and go old school.
Rocket Soldier Officer (RS)
Price: 200 Credits
Armament: Salozchry Rocket Launcher 66mm, HK Pistol, (x1) Timed C4
Health/Armor: 100 hp / 150 Armor
Speed: 6.5 m/s
Special Abilities: Can Swim
Weakness: (Rating of Danger): Mammoth Rocket Pods (10/10) , Sniping (9/10) , Infantry (8/10) , Aircraft (8/10)
Strengths (Rating against): Defenses (10/10) , Light Armor (8/10) , Heavy Armor (7/10) , Power Armor (5/10)
Special Notes/Tactics: The ultimate starting unit and defense killer. The Rocket Soldier Officer can make great use of itself in low income situations and also later on in-game should you be under attack. At the start of the game buy this unit if you're going infantry only. I don't care what map just get him. Go near the enemy base and use the Rocket Launcher to destroy base defenses. Start with SAM sites, then Guard towers, then A.A. Guns, then Coastal Guns. To aim at long range use the bottom circle part of the reticle to hit your target. Use right click for Anti-Aircraft purposes although it should be noted you can 1 hit K/O any infantry assuming you hit them on the head or even body. Next up on this beast, don't forget when firing to hit the rear of the tanks for more damage.
Nod Red Tide (Red Tide Tsunami)
Price: 100 Credits
Armament: Lee Enfield (Scopeless, Bayonet Attached), (x3) Sticky Bombs , Schmel Rocket (x5 Rounds), Timed C4 (x1), incendiary Grenade (2)
Health/Armor: 100 hp / 125 Armor
Speed: 7.25 m/s
Special Abilities: Bayonet (Right click for melee) , Swim
Weakness: (Rating of Danger): Defenses (9/10) , Vehicles (9/10) , Infantry Combat (7/10)
Strengths (Rating against): Buildings (10/10) , Defences (8/10) , Infantry (4/10)
Special Notes/Tactics: One of the most controversal units. Nod's "Red Tide" can be used to turn games around and win in an instant. This is accomplished through loading up a Weisel 20mm and using your RPO-A Shmel to blow up a building in seconds. Simply hop out with the RPO, switch weps, hop in, hop out and fire the RPO in a milisecond. This tactic is nicknamed a "Red Tide Tsunami". When not being used for cheese the Red Tide can also be used in a group rush. One such tactic involves loading up a Hind with Red Tides and nearly 1 Hit K/Oing any GDI building. If you have to go into combat with this unit, try out the bayonet. The range is crazy far and it usually kills infantry in 1 hit. Be aware that while your RPO Shmel is useful so are the incendiary grenades. Use them when you can.
Black Hand Elite (BH Elite)
Price: 700
Armament: AK-107, CZ-75 Pistol, (x1) Combat Knife, (x3) Throwing Knifes, (x1) Timed C4
Health/Armor: 100 hp / 250 Armor
Speed: 7.20 m/s
Special Abilities: Can Swim
Weakness: (Rating of Danger): Vehicles (10/10) , Power Armor (10/10) , Aircraft (8/10), Sniping (7/10)
Strengths (Rating against): Infantry (9/10)
Special Notes/Tactics: A peculiar unit. The Black Hand Elite has an incredibly powerful Assault Rifle that can 2 hit kill any infantry with a headshot. In addition, you have 3 throwing knifes that deal incredibly high damage upon hitting someone. The main usage of this unit is going to be to support an infantry assault or defend planted beacons from being disarmed. While incredible against infantry the Black Hand Elite is just unable to compete initially in any way against vehicles, buildings or Power Armor unless sporting other weapons. Great for infantry only maps. Honestly though, skip this unit and get the Black Hand StormTrooper. The lack of armor with this unit means it can barely fight anything and it's way too overpriced.
Nod Fanatics
Price: 500 Credits
Armament: Suicide Bomb
Health/Armor: 100 hp
Speed: 7.50 m/s
Special Abilities: Kamikaze
Weakness: (Rating of Danger): Anything that attacks it (10/10)
Strengths (Rating against): Any infantry in close range (10/10) , Vehicles (2/10)
Special Notes/Tactics: The ultimate unit to stop any infantry in its tracks. The Nod Fanatics is an easy to use suicide bomber dedicated to stopping GDI Power Armor or some annoying unit that you deemed has been living way too long. To use this unit the best you're going to need to sneak up to your target. This can be done by getting a buggy, hopping out and left clicking explode or staying inside your friends vehicle and hopping out when you're close to your target. Be aware that you have zero armor and will die in 1 shot (weapon depending). You also need to be right next to your target or the game will calculate that you're behind cover, the damage won't kill enemy or something of the sort. It's often speculated that using this unit with a Goliath will increase suicide damage.. this is untrue as you die immediately upon exploding the Goliath therefor not giving you the chance to use your fanatic kamikaze. But also you can use it to not allow GDI to repair your destroyed vehicle. If there's someone that you can't kill infantry wise, use this guy, get a stealth tank and reverse next to said person. Hop out and blow up. You're going to want to reverse your stealth tank because you exit the Stank from behind.
Two Fanatics can kill an unupgraded pillbox.
Shock Trooper (Shockie)
Price: 1350 Credits
Armament: Portable Tesla Coil
Health(Max Upgraded)/Armor(Max Upgraded): ? hp ( hp) / 200 Armor ( Armor)
Health/Armor: 100 hp / 200 Armor
Speed: 5.8 m/s
Special Abilities: Uncrushable , Firesuit , Swim , Slower Speed
Weakness: (Rating of Danger): Mammoth Rocket Pods (9/10) , Sniping (8/10) , Aircraft (8/10) , Infantry (6/10)
Strengths (Rating against): Buildings (10/10) , Defenses (9/10) , Light Armor (8/10) , Heavy Armor (8/10)
Special Notes/Tactics: The quintessential unit for attacking armored or structural targets, the Shock Trooper comes in ready to rock with a portable tesla coil that can seriously damage almost anything. Perfect for rushes, use this unit in groups to destroy a building in seconds depending on how many people you have with you. On it's own in the field you'll find that your Tesla Coil is excellent for hitting weakspots of Heavy Armor tanks. While you can also deal great damage to light armor initially, the reload is so long that the threat will most likely run away before you have a chance to finish them off. If you're going out by yourself, catch a ride to shock any vehicle you encounter. The extra firepower you provide will tip the balance and also ensure you're in a vehicle instead of being shot at.
You're going to constantly be under the threat of infantry attacking you however as firing your tesla coil is quite noticeable and lets GDI know what/where you are quickly. As a result you should find another weapon as soon as possible to help repel basic infantry. In addition, watch out for snipers as your slow speed makes you an easy target for GDI's sharpshooters.
Ultimately though, if you're going out alone it's better off to just buy a Mutant Raveshaw. While this unit is good, it should really only be used to rush with your team. Even then, it takes 25 hits from the outside of a building to blow it up with the shock trooper alone. So any shockie rush should include at least 6 - 7 of these units to ensure a building kill.
(Free) Rifle Soldier
Price: Free!
Armament: Corbetti Raptor Rifle , H&K Pistol , (x2) Incendiary Grenades , (x2) M3 Grenades , (x1) Timed C4 , Combat Knife
Health/Armor: 100 hp / 100 Armor
Speed: 7.55 m/s
Special Abilities: Swim , Very Fast Movement Speed
Weakness: (Rating of Danger): Heavy Armor (10/10) , Power Armor (9/10) , Light Vehicles (8/10) , Aircraft (7/10) , Infantry (5/10)
Strengths (Rating against): Infantry (5/10) , Aircraft (2/10)
Special Notes/Tactics: The most insignificant yet important unit you'll encounter in this game, the rifle solider for both sides is the starting unit for IA. Being default and free however, you're still packing quite a bit if you know how to use it. For starters, you'll want to take advantage of your impressive speed and use this unit to scout out areas at the beginning of the game defeating any engineers you encounter along the way. Next up is the grenades you're packing. The incendiary grenades do pretty decent damage against armor for what they are so use them for that or power armor if you encounter it. Save the M3 Grenades for weak basic units you see in the field to hopefully give you a slight long range advantage. Your rifle unfortunately is just pure shit.. however you can use it against aircraft to damage them a bit if you're able to shoot at them for a while. Lastly, if you're running around in field and see a forgotten Tib Silo, throw your Timed C4 on it to blow it up. It just takes one.
The weaknesses of the Rifle Soldier doesn't really need to be explained much as it's not only free, but weak against pretty much everything. Your best strategy is running away to cause destruction elsewhere or picking up weapons to actually take on whatever tank is trying to hit you. If you die, don't feel too bad. You'll just spawn again with the same character.
Blackhand Melta (BH Melta)
Price: 500 Credits
Armament: Melta Gun , CZ-75, (x2) M3 Grenades , (x1) Timed C4
Health/Armor: 100 hp / 250 Armor
Speed: 5.75 m/s
Special Abilities: Uncrushable , Slower Speed , Immune to Tiberium Fields , Upgraded Armor Class (Caprese Armor)
Weakness: (Rating of Danger): Long Range Combat (10/10) , Sniping (9/10) , Aircraft (8/10) , Mammoth Rocket Pods (5/10) , Infantry (5/10)
Strengths (Rating against): Building MCT (10/10) , Light Armor (9/10) , Heavy Armor (9/10) , Defenses (7/10) , Power Armor (6/10)
Special Notes/Tactics: A serious bang for the buck, the Blackhand Melta is a force to be feared. For $500 you gain an armored Blackhand that is able to take on vehicle threats of any size with a triple shot Melta gun. This unit is best used hiding behind cover, firing and taking cover again.. alternatively, you can run next to slower units blind spots and hit them where it hurts on their weakspots. If you are suffering on funds, this is a great unit to accompany your teammates vehicles and hop out to decimate whoever you meet. In terms of fighting against infantry, this is a great unit if you have a decent aim. Landing a headshot will 1 hit K/O almost any infantry. Furthermore, you'lll be able to score burn damage with any hit. Inside an enemy building you'll decimate the MCT. Testing shows that each shot from the Melta does nearly half a bar of dmg to a building if not more.. and that's unupgraded to!
The Melta is not without it's shortcomings however... long range combat is going to be non-existent with the Melta gun armed. Furthermore, your slower speed is going to leave you open to snipers so be sure to not stay too long in open fields with no cover or you'll be dead. In terms of vehicles you should actually be worried against Aircraft. Special notice should also be given to Titan Railguns as the splash dmg they inflict will eventually kill you. As a last note, if you're running up to the blind side of a Mammoth 36.. be sure not to run up to it when it's guns are aimed in your direction. This unit you'll go against will 1 hit kill you or seriously damage if you're not careful.
Nod Officer
Price: 100
Armament: (x1) Timed C4 , Combat Knife, (x1) Chain Gun, (x1) HK.45 Pistol, (x2) M3 Grenades
Health/Armor: 100 hp / 150 Armor
Speed: 6.9 m/s
Special Abilities: Can Swim
Weakness: (Rating of Danger): Any Vehicle (9/10) , AA-12 (6/10)
Strengths (Rating against): Infantry (8/10) , Aircraft (4/10), Light vehicles (4/10)
Special Notes/Tactics: A powerful starting unit. The Nod officer is actually a great bang for the buck. Use this unit to take the field at the start and rack up a crazy amount of kills against infantry. The Chaingun cuts down anything that's unarmored. Just be sure to close in with your enemy to land every single shot. If needed, this unit can also hit aircraft and light vehicles.. Just don't expect much.
Nod Tank Crew
Price: 100
Armament: HK Pistol, (x1) Timed C4, Knife
Health/Armor: 100 hp / 150 Armor
Speed: 7.90 m/s
Special Abilities: Swim, Fastest Infantry in the game, Auto Heals any vehicle they're inside (+6 HP per 2 seconds)
Weakness: (Rating of Danger): Anything (9/10)
Strengths (Rating against): Infantry (2/10)
Special Notes/Tactics: The Nod Tank Crew is the first unit you should be buying with your first vehicle at all times. It's often overlook how invaluable the auto heal is but in the field it greatly increases your survivability and when it comes to taking the field at the start, this is key. Later in game the Tank Crew is replaced with the more expensive tank ace but you should never forget about this unit. If you're strapped for cash then purchase the Tank Crew and don't look back. Just be aware, getting the Tank Crew means you're commiting to whatever vehicle you drive because they're next to useless outside of it. One last note is that this unit is the fastest unit in the game infantry wise, use to your advantage by running away from any fight you encounter or taking cover more quickly than people realize.
Nod Flame Thrower
Price: 200
Armament: Flame Thrower, (x1) Timed C4 , Combat Knife
Health/Armor: 100 hp / 125 Armor
Speed: 7.45 m/s
Special Abilities: Flamesuit, Swim (?)
Weakness: (Rating of Danger): Everything (8/10)
Strengths (Rating against): Proxie Mines (8/10) , Infantry (3/10)
Special Notes/Tactics: A previously powerful unit, the Flame Thrower has been reduced to what we see now. The flamer has only 70 ammo requiring frequent reloads, the unit only has 125 armor, and that's about it. There's no reason to get this unit besides running into proxie mines for cheap, which at that point you might as well just buy a Black Hand StormTrooper because they have more armor. Don't buy this unit. You deal less than 1 bar of dmg to an MCT, vehicles take zero dmg from you and the secondary fireball is your only saving grace here. If you have to use this unit then use right click fireball to burn enemies while your team deals with them. Good luck.
Red Tide Firewarrior
Price: 300 Credits
Armament: 1 DP-27 Machine Gun , HK45. Pistol , Russian Machete, (x2) M3 Grenades , (x1) Timed C4, (x1) Sticky Bomb
Health/Armor: 100 hp / 200 Armor
Speed: 7.15 m/s
Special Abilities: Swim
Weakness: (Rating of Danger): Vehicles (9/10) , Base Defenses (9/10) , Infantry (5/10)
Strengths (Rating against): Infantry (7/10) . Building MCT (6/10 , Light Vehicles (5/10)
Special Notes/Tactics: An ok unit overall. The Red Tide Fire Warrior seems to have a variety of weapons to help deal with enemies. First up is the DP-27 which actually does great dmg against infatry. Land a headshot and you'll have people calling you a hacker in no time. Use the grenades for long range or when your opponent takes cover behind a wall. This unit is an ok all arounder but it's worth honestly just saving up $200 more for the Black Hand Melta/Storm Trooper. You gain Caprese armor and you a better weapon overall.
Black Hand Stormtrooper (BH Storm Trooper)
Price: 500 Credits
Armament: AA-12 , CZ-75 Auto Pistol, (x2) Incendiary, (x1) Timed C4
Health/Armor: 100 HP / 250 Armor
Speed: 6.0 m/s
Special Abilities: Uncrushable , Slower Speed , Immune to Tiberium , Upgraded Armor Class (Caprese Armor)
Weakness: (Rating of Danger): Heavy Armor (7/10) , Ramjet Rifle (7/10), AA-12 (7/10)
Strengths (Rating against): Infantry (10/10) , Power Suit Armor (10/10) , Viceroids (10/10) , Light Vehicles (7/10) , Building MCT (4/10)
Special Notes/Tactics: The bargin of the century. The Blackhand Storm Trooper. If you're looking to buy an infantry unit it's worth it to just save up and buy the BH (Black Hand) Storm Trooper. Where to start.. The AA-12 has a crazy range for a shotgun and does stupid high dmg up close. Tactic wise, if you're far away try to "Tag" your enemy by hitting them and then hiding. You'll burn them which means when you close in for the kill it will be easier as they have less HP. Alternatively, you can use the incendiary grenades to great effect. Be aware that your AA-12 does great dmg against vehicles as well so don't be afraid to get in and get up close. Something to note that's overlook is that if you make it inside a building with this unit you can throw 1 timed C4 on the terminal, call in !ammo to throw anouther and then hit the MCT with your AA-12. In 30 seconds you'll have a dead building. Lastly, if you're going to rush a building that has little to no mines I highly reccomend using this unit instead of the BH Engineer. The AA-12 will kill the bot and you can use the method above to blow up the building. Any infantry you encounter can be dealt with up close as well with the AA-12.
With this unit you're going to need to be very agressive in everything that you do. If you stay at range you'll get sniped or slowly lose all your HP and Armor. Close in for the kill and don't look back.
Ballistic Sniper
Price: 650 Credits
Armament: SAKO-42 Sniper Rifle, CZ-75 Pistol, (x2) M3 Grenades, (x1) Timed C4
Health/Armor: 100 HP / 200 Armor
Speed: 6.70 m/s
Special Abilities: Swim
Weakness: (Rating of Danger): Vehicle Combat (9/10), Infantry (9/10)
Strengths (Rating against): Infantry (7/10) , Aircraft (4/10) , Light Vehicles (2/10)
Special Notes/Tactics: An interesting version of the sniper that's curiously not radar invisible as well. This unit is just, not worth the price for any serious sniper worth their salt. The weapon does get some lucky one hit K/O's every so often and does actually great dmg to anything that's unarmored. But you're dealing with a Sniper Rifle that when you fire it that's 1 - 2 seconds to reach it's target and has bullet spread for some reason. Don't buy this. Get the $500 sniper instead. If you're stuck with this unit, use it to hit unarmored targets. You'll get some great kills if you're lucky but don't get fooled into buying this over the $500 Radar Invisible Blackhand Sniper.
Stealth Black Hand (SBH)
Price: 700 Credits
Armament: Firefly Laser Rifle, CZ-75 Pistol, (x1) Timed C4 , Combat Knife, (x3) Throwing Knives
Health/Armor: 100 HP / 200 Armor
Speed: 6.9 m/s
Special Abilities: Can Swim, Stealth/Invisible
Weakness: (Rating of Danger): MSA (10/10), Pillbox Base Defence (10/10), AA-12 (8/10)
Strengths (Rating against): Infantry Combat (8/10) , Light Vehicles (7/10) , Light Armor (6/10), Power Armor (4/10)
Special Notes/Tactics: A defining unit of Renegade, the Stealth Black Hand (SBH). This is gonna be a long one.
The main purpose of the Stealth Black Hand is to gather recon, clear the field and help assist your team in keeping a hold on to the field. If you use this unit for these purpose's you'll greatly multiply the effect that you have on the outcome of battle. Be sure however to let your team know in voice chat what's occuring at the enemy base and if a rush is incoming. It can be the difference between winning and losing. Be aware that dying may give GDI your DNA which means you'll be in a world of shit if someone good picks it up. Choose your battles very carefully. When killing infantry use your throwing knives to 1 Hit K/O infantry.. they'll never see it coming. If your target has low HP then use the Laser Rifle to burn them and hide in cover. They'll eventually die in 3 seconds while you're busy cloaking up for your next kill. Be aware your laser rifle does great dmg to low armor vehicles so if you really need to then help out your team and inflict some damage. There are many quirks and tactics to learn about the SBH so i'm going to list them below.
- The Stealth Black Hand should be used when you know that the enemy isn't going to place any Mobile Sensor Array's (MSA's) or has any Pillbox Base Defences as you'll be spotted immediately on Radar. To know if you're being detected, look at your radar and if you see a Red Dot where you're at, that means you're showing up on radar and will be killed soon.
- Bots detect stealth from about 5 Meters away so when running next to bots or base defences take into account not to get too close.
- Gun Towers can not detect SBH units. Use this to your advantage and take a route that has a gun tower rather than a pillbox.
- When you use a Sniper Rifle or Ramjet you'll unstealth when aimming down the scope but recloak after 4 seconds. So try to aim in cover then pop out and fire at your target.
- At the start of the game on some maps you and 2 other's can get SBH's to run inside an enemy building and throw a combined (x3) Timed C4's. This will 1 Hit K/O the building in 30 seconds. While risky it's very effective should it work. If detected abandon the plan, it's not worth it to lose 3 SBH's and possibly give the DNA to the other team.
- Be very aware of how many SBH's are out in the field. Press "J" to see what your team is doing. The more SBH's there are, the higher the chance the enemy will deploy an MSA thereby wasting your time. In addition, SBH's do not win games. If there are too many then you're going to eventually get steamrolled by GDI.
- Use the SBH with an ADATS launcher pick up to take out base defences. This honestly is the most powerful use of the character and will turn the tide of the game.
- If you're about to die, type in !char to switch to a different Character. Run, Jump, press the Team Chat button while in the air and type in !char. This will not only allow you to possibly win the battle but will deny GDI your SBH DNA.
- Be very aware of picking up a weapon on the ground near infantry. Very skilled players may not see you, but will see the weapon dissappearing and hear the "Pick up sound". This can be the difference between life and death.
- I don't believe the SBH Spy from a crate is detected by Bots. Instead of buying a beacon, go to an enemy MCT and throw your timed c4. Call in !ammo and throw anouther Timed C4. Use !char and throw that 3rd and final C4. Be sure to kill the bot with the throwing knife to the head and ceiling gun before using the !char cmd.
- Be aware that your upgraded Rifle does twice the dmg and is very potent. Use it against light vehicles any chance you get to help out.
- The right click should only be used for surefire headshots. Other than that, you can use it to deal dmg vs vehicles right before you take cover to reload.
Sakura
Price: 1000 Credits
Armament: Ramjet, Beretta 93R Pistol, (x2) M3 Grenades, (x1) Timed C4 , (x9) Throwing Knives, Combat Knife
Health/Armor: 100 hp / 250 Armor
Speed: 6.7 m/s
Special Abilities: Can Swim
Weakness: (Rating of Danger): Vehicles (10/10), Artillery (9/10) , Ramjet (9/10) , Close Quarter Combat (9/10)
Strengths (Rating against): Long Range Infantry (10/10) , Powerarmor (9/10), Light Vehicles (9/10), Aircraft (9/10), Light Armor (7/10) , Heavy Armor (2/10)
Special Notes/Tactics: I don't think much needs to be said about this unit. If you're buying this you know what you're getting yourself into. There are some overlooked things however that IA adds to the unit. The Ramjet is extremely good vs Aircraft and Light vehicles. Like annoyingly good. Be aware you have throwing knives.. use this in a close infantry combat sitation as they fire faster than the ramjet. You have EMP Grenades as well, help your team out and use them against vehicles. Lastly, your EMP Grenades are refillable because your character costs $1,000. Use this to your advantage.
Raveshaw
Price: 1000 Credits
Armament: Railgun, Calico 50 round Machine Pistol, (x2) M3 Grenades, (x2) EMP Grenades, (x1) Timed C4 , Combat Knife
Health/Armor: 100 hp / 250 Armor
Speed: 6.9 m/s
Special Abilities: Swim, Refillable EMP Grenades
Weakness: (Rating of Danger): Arty (8/10, Aircraft (8/10), Infantry (7/10)
Strengths (Rating against): Vehicles (9/10) , Base Defenses (9/10) , Infantry (3/10)
Special Notes/Tactics: Not a lot to say about Raveshaw honestly. Just buy the Mutant Raveshaw as you gain way more abilites and are uncrushable. Trust me, it's worth the extra $750. You should really only be using the normal Raveshaw if you're in a vehicle and you want to EMP Grenade your opponent. The railgun does great dmg vs vehicles/base defences and your small size funny enough makes you a slightly harder target to be hit from medium to long range. If you're stuck with this unit somehow, it's one of the best to be stuck with.
Mendoza
Price: 1000 Credits
Armament:
Normal Mendoza: Volt Rifle (400 Rounds), (x1) Timed C4 , Combat Knife, Calico Pistol MG, (x2) EMP Grenades, (x2) M3 Grenades
Firesuit Mendoza: Volt Rifle (400 Rounds), (x1) Timed C4 , Combat Knife, Calico Pistol MG, (x2) EMP Grenades, (x2) M3 Grenades
Backpack Mendoza: Volt Rifle Backpack (Unlimited Ammo, does +25% or so more damage than standard Volt Rifle)
Health/Armor: 100 hp / 250 Armor
Speed:
Normal Mendoza: 6.8 m/s
Firesuit Mendoza: 6.8 m/s
Backpack Mendoza: 5.9 m/s
Special Abilities:
Normal Mendoza: Refillable EMP's, Can swim
Firesuit Mendoza: Refillable EMP's, Firesuit, unable to swim
Backpack Mendoza: unable to swim
Weakness: (Rating of Danger): Ammuntion Based Weapons (9/10), Snipers (9/10) , Heavy Armor (8/10) , Artillery (8/10),
Long Range Combat (8/10)
Strengths (Rating against): Defenses (10/10) , Light Armor (9/10) , Power Armor (8/10) , Infantry (8/10), Heavy Armor (7/10) , Sniping (6/10)
Special Notes/Tactics:
Normal Mendoza: Do not buy this unit. Buy the Flamesuit Version instead. Yes you can swim but it's not worth it soley for that.
Firesuit Mendoza: Use the Firesuit Mendoza to run through Proxie mines like crazy. You can tank run through about 6-8 proxie mines before you die. When there's a building you need to get into and in turn blow up, use this unit. Remember you have EMP Grenades so use them to not get ran over! Be very aware that you take increased damage from bullet based weapons. Be careful.
Backpack Mendoza: Previously twice as powerful.. the backpack mendoza now deals moderate increased damage compared with the Normal Volt Rifle. Is it worth it? Kinda. Use the backpack mendoza in combination with a Phase Tank to fire deal inital damage and then more while your opponent turns around to find you. Complete this hit and run tactic by then just moving away. You'll eventually get them with some time. The Backpack Mendoza is also incredible at taking out base defences and the fact you have no reload requirements makes you harder to spot from far away. No calling in ammo here. Be aware that you're extremely slow and will be sniped if you're out in the field. Upgrade the heavy weapons to deal +25% more damage on top of what you're already doing. With the upgrade, this unit goes from a "Maybe" to a sure thing.
Nod Sapper (Offensive Based)
Price: 400 Credits
Armament: MK.I Repair Gun, CZ-75 Pistol, (x2) 7 Stick Timed Dynamites, Various buildable objects
Health/Armor: 100 hp / 200 Armor
Speed: 6.0 m/s
Special Abilities: Able to build defensive barriers and turrets
Weakness: (Rating of Danger): Everything (10/10)
Strengths (Rating against): Defenses (10/10) , Mammoth 36 inch (10/10), Building MCT (10/10)
Special Notes/Tactics: A very unique unit that requires consideration to use. As the Nod Pioneer you're able to build offensive based things to help you win the game. These include turrets and barriers. Use the barriers to prevent rushes against your base or take cover as needed out in the field. To place something, press the "T" Key and build it. Be aware that your unit also comes with 7 Timed Dynamite Sticks. These can be used against buildings, heavy slow vehicles and MCT's. You can not building within 55 meters of your base as the unit wont let you. Most importantly note that the Turrets you build have a "Decay" system. They will take damage over time and must be repaired if you want them to survive. Each turret has a life of aprox 10-20 minutes or so.
Use a Stealth Tank and this unit to throw 2 timed Dynamites on a Mammoth 36 inch. It will 1 Hit K/O the unit.
Use the Timed Dynamites on Pillboxes. They will 1 Hit K/O an unupgraded pillbox.
Use the Timed Dynamites on MCT's. They will 1 Hit K/O it. Be aware that they take 55 seconds to blow up.
Your AT mines that can be placed in the ground are invaluable to stopping rushes. If you have the time and the money then place a couple on a vehicle path into your base.
There are Twin Stingers that you can build to detect invisible aircraft. They're not very good against bombers however so don't rely solely on them.
The BM-24 Rocket Pods that you can build are a waste of money. Don't bother unless you're bored.
The turrets that you build can detect stealth. So if you're having a problem with stealth'd units then build a turret or two out in the field.
The ability to build on a specfic part of the map may prevent rushes like crazy. Be very mindful of where you build as it can completely tilt and change the game.
Do not team hamper by doing dumb stuff with this unit please. Like building so none of your team can leave the base. - From Threve
Nod Pioneer (Defensive Based)
Price: 400 Credits
Armament: MK.I Repair Gun, CZ-75 Pistol, (x1) Timed C4, Various buildable objects
Health/Armor: 100 hp / 200 Armor
Speed: 6.0 m/s
Special Abilities: Able to build defensive based objects
Weakness: (Rating of Danger): Everything (10/10)
Strengths (Rating against): None
Special Notes/Tactics: Nearly the exact same as the Sapper. See above for tactics. Be aware that the turrets you build can not detect stealth. Use this unit to build even stronger defensive based objects to block rushes. Be aware you have 1 Timed C4 and not dynamites. So don't expect anything offensive based with this character.
Lastly, you're able to build Tiberium Machines as you see. Place these where a Tiberium Field is to regrow the Tiberium Faster. You'll need to place about 2 to really make a difference. However, be aware it's not really worth it as they typically get blown up anyways.
Nod Commissioner
Price: 400 Credits
Armament: Machete, Anaconda Pistol, (x1) (x2) EMP Grenades, (x3) Timed C4
Health/Armor: 100 hp / 250 Armor
Speed: 7.0 m/s
Special Abilities: Can Swim, Grenades are non-refillable
Weakness: (Rating of Danger): Vehicles (10/10) , Power Armor (9/10) , Aircraft (8/10), Sniping (7/10)
Strengths (Rating against): Building MCT's (10/10), Infantry (9/10), Aircraft (4/10)
Special Notes/Tactics: A unit that's gone over numerous revamps. The Nod Commissioner. Use this unit to run into an enemy base and plant 3 Timed C4's on the MCT. It only takes 3 to kill a building so you're in luck. Be aware that your Anaconda Pistol is incredibly powerful against infantry lacking armor with headshots able to 1 Hit K/O most. Something of note is that your Anaconda Pistol is able to shoot through the shield at Shield Barrier Bots. Use this to your advantage.
If you have to tank 1 or 2 mines with this unit it's entirely possible as you have 250 armor. Use the EMP Grenades if you really need to to escape a situation. Be aware you can't refill them however. The machete is also really really good believe it or not. If you run out of ammo or suck with aimming then go hard with it.
The best tactic with this unit is to get a Stealth Suit and sneak into GDI base to blow up a building. Other than that you're pretty much an infantry killer and it's not worth it to get this unit soley for that.
Nod Tank Commander
Price: 600 Credits
Armament: Calico Machine Pistol, Knife, (x1) 4 Stick Dynamite
Health/Armor: 100 hp / 150 Armor
Speed: 7.00 m/s
Special Abilities: Auto Heal Vehicle (+9 HP per 3 seconds), Swim
Weakness: (Rating of Danger): Anything (9/10)
Strengths (Rating against): Building MCT (10/10) , Any infantry in close range (4/10)
Special Notes/Tactics: The upgraded version of the Nod Tank Crew. This unit sits inbetween the slot of the Nod Tank Crew and Tank Ace respectively. The only reason for getting this unit is that you have no refinery but have your vehicle, 600 credits and are badly needed immediately to defend the base from the enemy. Other than that just save up for the Tank Ace. If your vehicle is disposable (Like a 203mm Arty or Luna) then get a tank crew. If you make it inside an enemy building, throw your Dynamite at the MCT. Be aware that your dynamite does the dmg of 4 timed C4's.
Nod Tank Ace
Price: 1400 Credits
Armament: Calico M-900 Carbine, (x2) 7 Stick Timed Dynamite, Knife, Mk.I Repair Gun
Health/Armor: 100 hp / 200 Armor
Speed: 7.00 m/s
Special Abilities: Auto Heal Vehicle (+12 HP per 3 seconds), Swim
Weakness: (Rating of Danger): Heavy Vehicles (9/10) , Sniping (8/10) , Aircraft (8/10) , Infantry (6/10)
Strengths (Rating against): Building MCT (10/10) , Defenses (9/10) , Slow Heavy Armor (9/10), Light Armor (3/10)
Special Notes/Tactics: An incredible bargin for everything that this unit does. The Tank Ace is the multi-tool of Nod's Arsenal. If you plan on using any vehicle for a period of longer than 2 minutes I highly highly reccomend getting this unit because it will increase your survivabilty ten fold. It's often overlooked, but surviving on the field longer in your vehicle means you're able to do more dmg to your opponent over the long term. This is better than dealing slightly more dmg short term and risking failure. Buy this unit with every expensive tank that you can and you'll no longer risk dying to arty or infantry sniping you.
In the event you see a Mammoth 36 inch, use this unit to drive up with a Stealth Tank and throw both Dynamites on the 36 inch. Do not fire your Stealth Tank as you don't want to alert their teamates to your location. Drive away if you can afterwards and map sure no one hops out to repair that vehicle. In 55 seconds you'll kill the Mammoth Tank and score big points. Remember the you exit from the rear of the Stealth Tank so don't back up before you exit or you'll get stuck.
Place Dynamite on an MCT to score a 1 Hit K/O.
Your Mk.I rep gun unupgraded barely repairs better than just sitting inside your tank. I'd reccomend just driving away or getting into position rather than repairing your tank as there's not much of a noticable difference.
Your M-900 Carbine is actually very very good against infantry. Use it.
Again, don't forget about your Dynamites. 1 Dynamite can kill a Pillbox in 1 Hit. It may be worth it to suicide yourself into the enemy base just to blow up one base defence if you have the money.
Getting inside anouther persons vehicle will heal said vehicle.
Black Hand Red Arrow (Javelin/Red Arrow)
Price: 1,400 Credits
Armament: Red Arrow Javelin Rocket Launcher, Corbetti Raptor Rifle (x600 rounds) , CZ-75 Pistol , Combat Knife
Health/Armor: 100 hp / 200 Armor
Speed: 5.9 m/s
Special Abilities: Stand still and press "T" to deploy.
Weakness: (Rating of Danger): Snipers (10/10) , Infantry (8/10) , Light Vehicles (8/10) , Aircraft (8/10)
Strengths (Rating against): Defences (10/10) , Vehicles/Armor (10/10) , Infantry (4/10)
Special Notes/Tactics: An interesting addition to IA, the Red Arrow is able to destroy Base Defences and vehicles alike with ease. To use the rocket ability just stand still on flat ground and press the "T" Key. You'll then be deployed into a small defensive outpost where you can take aim against units. If you stay long enough you'll start to annoy people and become a prime target so make sure to stay mobile. You have a back up rifle but don't rely on it. Your main purpose is to kill base defences or vehicles. Can not track aircraft so don't bother trying.
(Free) Nod Shotgunner
Price: Free!
Armament: Knife, Shotgun (x40 Rnds) , AT-4 CS Rocket
Health/Armor: 100 hp / 100 Armor
Speed: 6.6 m/s
Special Abilities: Swim
Weakness: (Rating of Danger): Long Range Combat (10/10) , Everything (7/10)
Strengths (Rating against): Infantry (10/10) , Light Armor (8/10)
Special Notes/Tactics: Hilariously overpowered as of writting. The right click on the Rocket does about 177 Damage against infantry with a splash of about 10 Meters. Meaning you can kill nearly anyone, anywhere as long as you can see them. Moving past that the right click on the shotgun has a range comparable with a Rifle, hits anything instantly like a laser beam and also burns people to boot. A headshot will land you a 1 hit K/O. The rocket also deals insane dmg against vehicles so you can spam this unit to your hearts content. Use this free unit if you have no $. There's zero reason not to.
(Free) Engineer (Engi)
Price: Free
Armament: (x2) Remote C4's , (x1) Timed C4, (x1) Sticky Bomb , HK.45 Pistol, ($100) Barbed Wire, ($700) Dentrov MG Sentry.
Health/Armor: 100 hp / 100 Armor
Speed: 6.5 m/s
Special Abilities: None
Weakness: (Rating of Danger): Anything (9/10)
Strengths (Rating against): Building MCT (9/10) , Infantry (4/10)
Special Notes/Tactics: Use this unit to build your silo at the start and earn extra money. Alternatively you can rush with this unit and blow up a structure at the start if the enemy team isn't paying attention. When attacking the MCT be aware that you + another Engi can blow up a building using only Remote C4's and your sticky bombs. This is faster than planting a Timed C4 and waiting for it to go off. If you're the only one inside a building, you have to use your sticky bomb, Remote C4's and the Timed C4. There's a couple things to note however.
When going solo and if no one knows you're inside a building, place the timed C4 first on the MCT, then place the remotes. The Timed C4 takes 30 seconds to explode. When it reaches 20 seconds left, throw your sticky bomb, then detonate the Remote C4's. This makes it so the enemy team has no time to respond or knows what happened.
If you're going solo and the enemy know you're inside the building, then throw your Timed C4 on the MCT. Be sure to place it on the sides if possible because it's hard to notice/disarm. Then throw your Remote C4's and hopefully kill anyone attacking you with the blast. Then throw your Sticky bomb and try to force your opponent to chase you or distract them to buy enough time to have the Timed C4 explode.
Nod Vehicles/Armor
(To find a Unit, click "Cntrl F" and type in the unit name you'd like to find)
Damage Building (Measured in points): There are a lot of different ways to measure damage, however i'm going to use one. The damage to a building will be listed here in points per hit to the side of a building. The building used for testing is the side of HON. 1 Shot is considered 1 Click of the mouse button.
Damage Vehicle (Measured in points, used when dmg against building is unviable): The damage to a vehicle will be listed here in bars of damage against vehicles it's supposed to be going up against. For example, a M6 Lineback 25mm can't take on a Mammoth Tank. But it can defeat Medium to Light armor. So how effective it is vs medium armor will go up here. Trying to calculate all the dmg vs all the armors would be overly complicated for this simple guide.
Dmg Building:
Dmg Vehicle:
- M6 LineBacker 25mm
- 9K-22 Tunguska
- (Aircraft) MI-24 Hind
- (Aircraft) RAH-66 Comanche Anti-Tank
- M-1978 Koksan 170mm Artillery
- Stealth Tank
- Ezekiel's Wheel Stealth Tank
- (Aircraft) Banshee
- Tick Tank 120mm
- Goliath
- Tick Tank Firebug
- SSM Launcher
- Stingray Light Tank (Hyper Velocity Gun)
- G6 Rhino Howitzer (155mm Self Propelled Artillery)
- Infrared Stealth Tank
- 2S9 Nona (120mm Mortar)
- 2S7 Pion (203mm Nuke Artillery)
- F.A.V. 50. Cal (Fast Attack Vehicle)
- Mobile Tracked Repair Vehicle
- OT-34
- Black Hand Light Laser Tank 75mm
- Infiltrator Melta
- 9K52 Luna-M (V2)
- Elbrus 9K72 ICBM
- Mobile Stealth Generator
- ASU-57mm
- Black Hand Light Tank 75mm
- Mobile Sensor Array
- M579 Fitter Repair Vehicle
- Tesla Tank
- Phase Tank
- T-62
- T-54
- BDRM-2 AT
- Microwave Tank
- Six Wheeled BDRM
- Six Wheeled BDRM (Splitfire)
- Devil's Tongue Flame Tank
- Blackhand Flame Tank
- Wiesel 20mm
- SU-85
- Stridsvagn 103 155mm
- AAI RDF Light Tank
- SU-122-44
M6 LineBacker 25mm
Price: 800 Credits
Armament: 25mm Auto Cannon (x90 Rounds per Magazine), A.I. AA Rocket Launcher (x4 Rounds per Magazine)
Health/Armor: 660 hp / 660 Armor
Max Speed (m/s): 16.7
Dmg Building: 9 Shots (AP-T) = 1 Point
Dmg Vehicle:
Armor Class: Medium
Capacity:
Weaknesses: Mammoth Railgun Tanks, Titan Railguns, Heavy Armored Vehicles, Pillbox Defences
Strengths (Rating against): Defenses (10/10) , Lightly Armored Infantry (9/10) , Aircraft (7/10) , Light Armor Tanks/APCs (7/10)
Special Notes/Tactics: The range on the 25mm is immense.. use it to take out defenses early going hard on those SAM Sites, Gun Towers etc. Slaughter any infantry you see by capping them on their forehead with the explosive shells (from long range to..). Help your team later on in the match by harassing vehicles and the harvester. A great tip is to press T up in the air very quickly then press T again. This will aim the AI AA Launcher a little upwards so that when you see an aircraft you'll be able to hit it immediately without delay. After you destroy the aircraft, make sure you have 4 missiles inside your launcher.. If you have 3 then fire all 3 by pressing T and your gun will reload. Set that bad boy to auto (press T again while it's reloading) and now you'll have 4 shots for the next aircraft. I've tried to use the right click HEFI-I Rounds but have found they do less damage vs everything.. don't bother with them.
Weakspot(s): Rear Armor, Optics, Ammo Rack
9K-22 Tunguska
Price: 2400 Credits
Armament: 30mm Auto Cannons (x952 Rounds per Magazine), 69mm AA Rockets (x8 Missiles if fired after reloading)
Health/Armor: 500 hp / 500 Armor
Max Speed (m/s): 16.59
Armor Class: Medium
Weaknesses: AVRE Mortar Tank , being attacked while reloading , Mammoth Tank 36 Inch, Titan Railguns, Personal Ion Cannons , Power Armor, Carl Gustov Recoiless Rifle, Ramjets
Strengths (Rating against): Long Range AA (7/10) , Short Range AA (7/10) , Light Armor Vehicles (5/10) , Unarmored Infantry (5/10)
Special Notes/Tactics: No unit in IA has been gutted more than this one. Previously very capable and powerful in skilled hands the 9K22 Tunguska doesn't live up to even 10% of what it previously was. The 20mm Autocannons at the moment are ok vs infantry but you'll likily encounter aiming problems. Light vehicles are susecptable to the Autocannons but that's assuming you don't die first. The missiles don't even track Aircraft anymore let alone vehicles last I heard. On top of that they fire way too slow to even be remotely useful. While the speed is pretty good and that Autocannons are ok against aircraft i'd recommend just getting a Geko for AA duty. The Rockets can kill a 105mm turret base defence that's unupgraded but the reload time for the missiles is near 20 seconds. Terrible. Don't waste your time or credits on this unit.
Weakspot(s): Rear Armor , Top, Treads
(Aircraft) MI-24 Hind (HIND)
Price: 2400 Credits
Armament: 30mm Vulcan (x240 in reserve.. Upgradable to x300) , 40mm Rockets
Health/Armor: 660 hp / 660 Armor
Max Speed (m/s): 16.7
Armor Class:
Weakness: (Rating of Danger): Consistent AA fire , Mammoth 36 Rockets , Long Range AA Fire , Carl Gustov Recoiless Rifle , M113 SIDAM , 551 Sheridan Rockets , Mitsubishi SPAAG
Strengths (Rating against): Aircraft (8/10) , Infantry (6/10) , Power Armor (5/10) , Light Armor (4/10) , Defenses (4/10) , Buildings (3/10) , Heavy Vehicles (2/10)
Special Notes/Tactics: Able to transport Infantry
Previously a great all arounder, the Hind Mi-24 has become neutered and nothing more than a flying hit box for GDI units. This unit is supposed to find its strength in infantry combat to which it does in a extent.. however the main spread from the gun means you have to be directly next to infantry to ensure a kill. What this means is that you'll either be EMP'd , killed by passing armor or the infantry unit will just run to cover. You can however fire your missiles (Right Click) to hopefully burn damage them to death which is the best case for Power Armor.
Unlike before, armor is a hopeless battle. Your missiles simply don't do as much damage to really be considered a threat anymore to anything that has Mammoth Tank or Titan in its name. In addition, light vehicles are typically too fast to engage effectively and the forced reload after a couple missiles means your target just relocates to a place you'll get killed.
Shooting defenses is pointless despite being able to take hits. Your gun at long range has so much spread you'll barely land any shots. The damage they do furthermore is negligible.
Hitting buildings with your missiles is a good way to get yourself killed as well. While you can fire multiple missiles in one go, the reload associated with doing so reverts the ROF back to what is essentially the same before this unit was nerf'd (if not worse..). What this means is that when you hit any building, you'll just alert GDI forces and be reloading while they repair instead of pre-nerf where you had continuous fire. In the grand scheme of things however this is irrelevant because the damage your Hind inflicts with the missiles is dreadful. Combined with the reloading and the time GDI starts repairing their building while you're reloading this unit is a terrible option to attack buildings. It can be said that a rush of Hinds would destroy a building (as would a rush of anything) but I truly believe there are way better units to use for attacking GDI structures than this one.
If using this unit, be aware that the armor really is great and you can use the Hind to transport units for a Shock Trooper rush against GDI forces. Although that's the only thing this unit really is good for.
Weakspot(s): Tail-rotor , Undercarriage , Helicopter Blades
(Aircraft) RAH-66 Comanche Anti-Tank (AT Commanche)
Price: 2750 Credits
Armament: Anti-Tank Missiles (x8 Rounds)
Health/Armor: 660 hp / 660 Armor
Max Speed (m/s): 16.7
Armor Class: Light
Weaknesses: Mammoth Tank Rockets , AA Stinger Missiles (1 Hit K/O/), Ramjet Rifles , Titan Railguns , Anything that attacks it longer than 3 seconds
Strengths (Rating against): Heavy Armor (9/10) , Light Tanks (9/10) , Crushing Infantry (9/10)
Special Notes/Tactics: If piloted in skillful hands this unit can turn the tide of a game, stop rushes or destroy GDI's morale. The Anti Tank Comanche is very fast but extremely weak. 1 Hit from a AA Stinger will destroy it if not Upgraded and Vet'd. Therefor to use this unit you'll need to strategically decide every single engagement you do by scanning the battlefield, knowing what infantry is sitting in what GDI vehicle and evaluating how fast you can retreat after you fire your missiles. Although difficult at first, you'll be able to destroy Mammoth Tanks in one sortie and fly away unscathed wasting GDI money and gaining you immense points. The best tactic is to duck behind cover, fire, retreat. Bonus points if you can convince your team to EMP your enemy target. Just be aware that once you take fire you have to retreat or you'll die. Guaranteed.
Use this Helicopter with practice and you'll be at the top of the scoreboard everytime. Be aware this units damage has been toned done a very small amount recently.. losing 1 mark for strengths.
Weakspot(s): Tail Rotor , Undercarriage , Rear
M-1978 Koksan 170mm Artillery (Koksan)
Price: 1,200 Credits
Armament: 170mm Artillery Cannon
Health/Armor: 500 hp / 500 Armor
Max Speed (m/s): 10.4
Dmg Building:
1 Shot (HE) = 45 Points
1 Shot (HESH) = 60 Points
Armor Class: Medium
Weaknesses: Everything
Strengths (Rating against): Infantry (6/10) , Buildings (6/10) , Power Armor (5/10) , Light Defenses (5/10) , Heavy Armor (3/10)
Special Notes/Tactics: Requires to be set up by pressing "T"
In keeping the theme of Nod units being gutted we have here the M-1978 Koksan. The firing Arc is now 170 degrees to your field of vision. No 360 degree aiming here. You're also required to be set up in order to fire. Moving past all these things, the Koksan deals ok damage but is again not worth getting due to being able to purchase the cheaper 203mm arty. The Koksan noticable moves a lot faster in transit but can not fire without being set up. This maps is really unviable against vehicles and the extra armor the Koksan has won't save it from death on a long enough timeline to matter.
Skip this unit and the get $450 Credit 203mm Arty for offensive based operations.
Weakspot(s): Rear , Top , Arty Cannon , Turret
Stealth Tank (Stank)
Price: 900 Credits
Armament: Dragon TOW Missiles
Health/Armor: 400 hp / 400 Armor
Max Speed (m/s): 15.75
Dmg Building:
1 Shot (Guided) = 11 Points
1 Shot (Unguided) = 5 Points
Armor Class: Light
Capacity: 1
Weaknesses: AVRE Mortar Tank (1 Hit K/O) , Mammoth Tank Railguns , Titan Railguns , Mobile Sensor Arrays , Aircraft
Strengths (Rating against): Light Armor Vehicles (6/10) , Anti-Aircraft (5/10) , Heavy Armor (4/10)
Special Notes/Tactics: The stealth tank has always been a Renegade favorite and for good reason. The Interim Apex stealth tank is fast and a great addition to any rush that Nod may be organizing. You should use this unit to kill light GDI vehicles while scouting the field giving info to your team. If not GDI Vehicles are present then rack up some points by using your TOW Missiles to hit defenses and buildings. Always use left click (tracking) missiles against any target you encounter. Only use right click (non-tracking) missiles against buildings. Non-Tracking missiles have a little farther range than the tracking missiles. This range bonus can be used for targets just out of your range. Another tactic to bear in mind is that you can hop out of your stealth tank and use your infantry weapon then hop back in and not be seen. This is highly useful when you have an imperial hand cannon and want to hit a building without being detected. This bears extreme usage when you have an AGT or ADATS gun as you can deal massive damage then move away with little resistance. Since the update, some stats above have been reduced by 1 point due to the turret moving slower and reload time being longer. When captured by GDI, use the stealth tank to help sneak into Nod Base as a Spy. The abandoned vehicle will be difficult to find and not lead to any concern when (and if) found by Nod. One last note is that the bottom of the Stealth Tank seems to really messed up and is unable to be hit. What this means is that about 25% of your vehicle (The lower half treads) is unable to take damage. Be aware when hopping out that you jump out from the rear.. you'll get stuck if you're not careful and die while standing still. Plan ahead!
Weakspot(s): Rear , Top Armor
Ezekiel's Wheel Stealth Tank (Ezek)
Price: 3,000 Credits
Armament: Quad-Dragon TOW Missile Launchers (Fires one at a time)
Health/Armor: 600 hp / 600 Armor
Max Speed (m/s): 15.75
Dmg Building:
1 Missile (Guided) = 4 Points
1 Missile (Unguided) = 5.2 Points
Armor Class: Medium
Weaknesses: AVRE Mortar Tank (2 Hit K/O) , Mammoth Tank Railguns , Titan Railguns , Mobile Sensor Arrays , ORCA Aircraft , Short Range Combat , Infantry
Strengths (Rating against): Defenses (7/10) , Light Armor Vehicles (6/10) , Heavy Armor (5/10) , Anti-Aircraft (4/10) , Buildings (2/10)
Special Notes/Tactics: Previously unstoppable. The Ezikel Stealth Tank got hit with the nerf hammer and is what we have here today. The price at $3,000 is a steep entry into a subpar unit. The missiles do an ok amount of damage but the reload time is what prevents people from actually pulling the trigger and buying the unit. You can do a right click for a fast volly of missiles to destory a unit quickly but the inaccuracy and reload time is so determental it's not worth it. The Ezikel tank armor also means that you're going to need to hit and run anything you encounter, but you can't chase anything down because the reload time will again just let your target get away. Skip this unit and get a T-95 Black Eagle. The preformance is just too average/sub-par for the price. By the time you have one of these roll out, GDI will have something to match or outpreform it.
Weakspot(s): Rear , Top armor , Wheels , Front Windshield
(Aircraft) Banshee
Price: 3,000 Credits
Armament: Plasma Beams (x4 per shot, upgradable to x6) (x16 Rounds in Reserve, upgradable to x24)
Health/Armor: --- hp / --- Armor
Max Speed (m/s): ----
Dmg Building:
1 Missile (Guided) = 4 Points
1 Missile (Unguided) = 5.2 Points
Armor Class: Medium
Weaknesses: Continuous AA Fire , SIDAM-26 , Mitsubishi SPAAG , Stryker AGTM
Strengths (Rating against): Buildings (9/10) , Defenses (9/10) , Mammoth 36 Inch (8/10) , Ships (8/10)
Special Notes/Tactics: A unit that was previously over powered beyond belief.. the banshee fires non-tracking Plasma Rounds which now makes it extremely difficult to target moving vehicles but deal high damage to buildings and defenses alike. Of note is the fact that the banshee can survive a couple hits from AA rounds which should be considered when you're evaluating any risk you're about to take. Also its fast enough to usually dodge AA bullets or even rockets. Use this unit when you're purely on anti-building duty and there is little AA resistance. Effective against ships, thay're AA easy to dodge. A cool tip is to use your first shot as left click and other shots as right click. But remember that double shot (right click) is less accurate, so use left click often against small targets.
Weakspot(s): Undercarriage, Cockpit Glass
Tick Tank 120mm
Price: 3,000 Credits
Armament: (x2) 120mm Cannons
Health/Armor: 900 hp / 900 Armor
Max Speed (m/s): ----
Dmg Building:
1 Shot (HEAT) = 15 Points
1 Shot (AP) = 2 Points
Armor Class: Medium (Mobile) , Extremely Heavy (Deployed)
Weaknesses: Mammoth Tank Railguns , Titan Railguns , Aircraft , Power Armor , Infantry , Mammoth 36 Inches , Dynamite
Strengths (Rating against): Buildings (10/10) , Heavy Armor Vehicles (10/10 must be deployed and in cover) , Light Armor (8/10) , Defences (8/10)
Special Notes/Tactics: The Tick Tank 120mm is an incredibly effective tank when pit it against any slow moving GDI vehicles... however you have to ensure a couple things before going into the fray or you'll die quickly. First and foremost you need to deploy this tank because when you do it'll be nearly impossible to destroy, you gain an armor bonus that is retarded high. Second look for the perfect place to deploy.. this can be behind a destroyed Helicopter, behind logs, behind a wall. Whatever you choose you'll not only make yourself harder to hit but also be harder to kill with your deployed armor bonus. This will also negate the fact your opponent can move and you cannot. Third, practice firing with the weird off-set cannons. It will be difficult at first but if you can aim your shots then you can hit heavy GDI Vehicles from long range and hold up anything thrown at you. If you encounter any infantry with half a brain you'll need to call on your teammates to kill them as your cannons are worthless against them. If you really kick ass, you can press T then E quickly to deploy the tank and hop out at the same time. When you do this the person will try to get in the tank but can't because it's deploying. Quickly kill your opponent and then hop back in the tank while they are distracted. Be aware they can steal your tank when it is finished deploying.
Deploy bonus effect: Range, Armor, Reload.
Weakspot(s): Rear , Tick Tank Turret , Unable to fire at infantry directly on the sides of it or behind.
Goliath
Price: 1550 Credits
Armament: Suicide Bomb
Health(Max Upgraded)/Armor(Max Upgraded):
Speed (k/h):
Armor Class: None
Weaknesses: Anything that attacks it , EMP Grenades
Strengths (Rating against): Heavy Armor (10/10) , Light Armor Vehicles (7/10)
Special Notes/Tactics: Always a fun unit to use. This suicide tank has the special ability to turn invisible when it stays still for about 5 seconds. Assuming you are not detected, you can run behind units and detonate to do massive damage to any tank you stumble upon. Best used with a gap generator or hiding out in field for a Mammoth 36 Inch/Disruptor, it's invaluable for stopping units that are larger than itself. When Nod needs to save itself from destruction or buy some time, use the Goliath. Note, you can run infantry over with this unit and also drive it off cliffs to ambush GDI units. A common misconception is that you can purchase a Suicide Fanatic to deal extra damage when you explode. However this is untrue as you die before you can activate your Infantry suicide bomb.
It should also be mentioned that you can stop a Low Health Mammoth 36 inch tank from advancing by ramming it, have your team finish the 36 off and still live to help with your team assault. This of course depends on the situation and how brave you are to do so.
Weakspot(s): This whole tank is a weak spot
Tick Tank Firebug
Price: 1,800 Credits
Armament: 1 Charged Laser Beam (left side turret) , Canister Shotgun with Incendiary rounds (x5 per round) (Right Side Turret)
Health(Max Upgraded)/Armor(Max Upgraded):
Speed (k/h):
Armor Class: Medium (Undeployed) , Very Heavy (Deployed)
Weaknesses: Mammoth Tank Railguns , Titan Railguns , Dynamite/Timed Demolition Bombs , Mammoth 36 Inch , Aircraft , Hover MLRS
Strengths (Rating against): Infantry (8/10) , Light Armor Vehicles (9/10) , Power Armor (9/10) , Heavy Armor (8/10) , Buildings (7/10) , Aircraft 6/10
Special Notes/Tactics: Vastly different from the Tick Tank 120mm. This time we are taking things up a notch by having a tick tank with a Charged up laser (like the Infrared Tank) and a Canister Shotgun that can spit out 5 rounds of burning incendiary rounds. The tactics remain for using this tank in cover like the 120mm Tick Tank but your targets are vastly different. Use this tank as a support tank first and formost. Your charged up laser will help your team to decimate heavy vehicles and destroy light armor in seconds. Next up, use your shotgun rounds against infantry to burn them to death. While this unit is overlooked mostly, it is incredible for an assault and helps to gain a huge foothold in the battlefield against all targets minus aircraft. If you're a team player looking for a new tank to bring it home for Nod, try this bad boy out. It's also been recently reported that the shotgun alt fire is actually pretty capable against light armored aircraft. Try it out!
Deploy bonus affect: range, armor, reload.
Weakspot(s): Rear , Turret , Unable to fire at infantry directly on the sides of it
SSM Launcher
Price: 1,350 Credits
Armament: x2 Honest John Long Range Missiles (Non-Tracking)
Health(Max Upgraded)/Armor(Max Upgraded):
Speed (k/h):
Armor Class: Light
Weaknesses: Titan Railguns , Mobile Sensor Arrays , Ramjet/Long-Las Rifles , Carl Gustav Recoiless Rifle , Personal Ion Cannon
Strengths (Rating against): Defenses (10/10) , Buildings (10/10) , Heavy Armor (8/10) , Light Armor (5/10)
Special Notes/Tactics: Picking up on the artillery doctrine of Nod, the SSM Launcher really lends its hand to help push the game in Nods favor when they're next to GDI Base. Use this unit to hit buildings or defenses as the long range missiles will pound them into submission. On the battlefield you can assist your team in going against the Mammoth 36's or Titan's that are charging against you. While in theory an easy to use unit that can just destroy everything, you have to remember that your missiles are not tracking. This comes into play because there is a 3 to 5 second delay between you firing and hitting your target resulting in a lot of misses if you aren't careful. Most importantly, note that the missiles fired from this unit have a pretty decent splash damage so if you have some skill you can hit infantry from far away or become an annoyance for GDI units.
Don't waste your time with fast moving light vehicles as you'll just get frustrated missing them. Watch out for long range rifles as well, with constant hits they will destroy your vehicle in time.
Weakspot(s): Everywhere but the front
Stingray Light Tank (Hyper Velocity Gun)
Price: 3000 Credits
Armament: 105mm Hyper Velocity Cannon (x3 Rounds per Magazine) , M249 Coaxial
Health(Max Upgraded)/Armor(Max Upgraded):
Speed (k/h):
Armor Class: Medium
Weaknesses: AVRE Mortar Tank (1 Hit K/O) , Mammoth Tank Railguns , Titan Railguns , Challenger II , Heavy Armor Combat
Strengths (Rating against): Light Armor Vehicles (10/10) , Infantry (8/10) , Defenses (6/10) , Heavy Armor (4/10)
Special Notes/Tactics: A god amongst light armor vehicles, the Stingray is a tank meant to derail any type rush from light vehicles with hidden anti infantry potential as well. The rounds from this tank fire like a laser, hitting armor or people instantly along with having 3 every magazine. Be aware however that this tank can only serve in the support role against any type of heavy armor. The shells, combined with the reload time will not allow the stingray to destroy heavy armor, but it can put a dent in them (lending to it's support role in this capacity). At this price point however, GDI will typically be bringing in heavy armor anyways which means this tank should only be purchased if GDI has lost their refinery or are employing a huge amount of light vehicles. Unfortunately, the armor of this tank doesn't allow it to play with any GDI unit packing a railgun or Personal Ion Cannon. Failure to stay out of combat with these units will lend to a quick death. Utilize the Machine gun if you can as well, it's actually pretty good against normal infantry.
Weakspot(s): Turret, Rear, Sides, Tank Treads, Optics
G6 Rhino Howitzer (155mm Self Propelled Artillery)
Price: 1750 Credits
Armament: 155mm Cannon (AP / HESH Rounds)
Health(Max Upgraded)/Armor(Max Upgraded): 550 HP / 550 Armor ( HP / Armor)
Speed (k/h):
Armor Class: Medium / Heavy (Deployed)
Weaknesses: AVRE Mortar Tank (1 Hit K/O) , Mammoth Tank Railguns , Titan Railguns , Aircraft ,
Strengths (Rating against): Defenses (10/10) , Buildings (10/10) , Light Armor Vehicles (4/10) , Heavy Armor (4/10)
Special Notes/Tactics: The now "Go-to" Arty piece for clever Nod players. With the recent nerf's on the Koksan and high price point/deploying delay on the Pion.. the G6 has found itself to be extremely useful in the latest patch. For starters, it can fire on the move which is a huge bonus over these other required "deployment" arty pieces. Second off, it can deploy to strengthen its position and drive up hills with its large torque figure. To make best usage of this unit, employ it when your team has the upper hand or is pushing.. your mobility will help to keep pace/support and your cannon will help soften up any heavy vehicles or infantry that get in your way. As soon as you get within range of the enemy base, you're going to want to start hitting buildings immediately to shift the enemy's focus from defending against your rush.. to repairing GDI buildings. This means you're ether going to take out a building or allow your units to hit harder because GDI is scrambling to fix their stuff. More points to you. Keep in mind the most important thing with this unit is finding a great position to set up in! Just enough out of combat but still in the fight. If you're with a rush and cannot find a good position to set up in.. don't! Having mobility is a great defense in its own right!
If you're really hardcore, get a Nod Tech and G6 Arty. Go outside the enemy base and find a great position where it's more difficult for them to get to you or attack (Hills work great). Press T then quickly hop out and plant proximity mines around your vehicle in front and on the sides. Call in !ammo if you need to. Start hitting a GDI structure and go hard. If you encounter a vehicle (ORCA's included) use right click to fire a powerful HESH round (Great against heavy armor). Hop out as you start taking damage and repair your Arty. When the G6 Arty reloads, hop back in and kill whoever was dumb enough to attack you. If they try to steal your vehicle, they will die to the mines. If they are nearby, hop out and burn them (right click rep gun) to death. With practice, you can one man army a base with this tactic. Works incredible when you have a friend/you can use the !wep command to get some weapons.
Weakspot(s): Rear , Optics, Tires
Infrared Stealth Tank
Price: 4100 Credits
Armament: Laser Blast / Charged up Laser Blast
Health(Max Upgraded)/Armor(Max Upgraded): 540 HP / 540 Armor ( HP / Armor)
Speed (k/h):
Armor Class: Medium
Weaknesses: AMX-13 90mm , Mammoth Tank Railguns , Titan Railguns, Mobile Sensor Arrays , Aircraft , P.I.C.s , Carl Gustav Recoiless Rifles , EMP Grenades , Challenger 2 , M1A1Abrams
Strengths (Rating against): Infantry (10/10) , Power Armor (10/10) , Light Armor Vehicles (9/10) , Buildings (9/10) , Heavy Armor (6/10) , Defenses (5/10)
Special Notes/Tactics: The ultimate all around support unit and incredibly deadly. The infrared tank is an asset to anything it participates in. To start off, the laser blast is a fast firing short/medium range weapon that will burn to death any infantry it encounters whilst dealing great initial damage. The charged up laser blast gives this stealth'd unit a great long range punch that is useful for hitting heavy unit weak spots or sniping from behind in a large Nod rush. Be aware though that this unit cannot face off in direct open combat against Titans or Railgun mammoths unless you're planning on taking cover. Once the armor is gone, you're skating on thin ice. Use this unit in any situation you please, you honestly could only use this unit if you really wanted to. However, if GDI is about to rush heavy vehicles only and or aircraft, this may not be the best option.
A noteworthy tactic is the fact that three of these units will be able to quickly take down a building and hold their own versus and other type of unit. If your team is floating on credits and want an effective stealthy rush, it's something to consider.
This unit does have the ability to win most 1 v 1 fights against anything that isn't a Mammoth Tank or Titan. To do so however, you'll need to be at full health, use the left click until the enemy is almost dead at red health and finish him off with a right click charged laser. Immediately after retreat and refill your health.
Weakspot(s): Optics , Tank Treads , Laser Glass on top
2S9 Nona (120mm Mortar)
Price: 1200 Credits
Armament: 120mm Mortar Cannon (Press T to deploy)
Health(Max Upgraded)/Armor(Max Upgraded): 480 HP / 480 Armor ( HP / Armor)
Speed (k/h):
Armor Class: Medium
Weaknesses: Vehicle on Vehicle Combat , Aircraft
Strengths (Rating against): Defenses (10/10) , Buildings (10/10) , Infantry (6/10)
Special Notes/Tactics: Heavily under utilized. The Nona is an amazing amphibious unit with the ability to decimate GDI buildings at will from across the map. It's also able to hit buildings without a direct LOS (Line of Sight). Meaning you can hide behind walls for days and destroy GDI buildings with ease. The best bet however is pulling up to the GDI base while your team has the field or is rushing.. then drive until you can barely see the GDI base through the fog. Press T to deploy, start right clicking and you'll send some care packages to GDI from halfway across the map. The range really is that long! Most important bit though, you're going to have to use your reticle to aim as that's where your mortar is going. If it doesn't hit, try to aim up a bit and so on until you find that sweet spot. You'll know you're hitting a GDI building by looking at your points. If they're going up, you're doing good. If they stay the same, you're missing. If they stay the same after 5 shots, you're out of range. If you see a vehicle, run. There is nothing this vehicle can kill that is armored besides buildings.
Weakspot(s): Top , Turret, Rear, Tank Treads
2S7 Pion (203mm Nuke Artillery)
Price: 6000 Credits
Armament: 203mm Nuclear Warhead
Health(Max Upgraded)/Armor(Max Upgraded): 640 HP / 640 Armor ( HP / Armor)
Speed (k/h):
Armor Class: Medium
Weaknesses: Any type of combat
Strengths (Rating against): Defenses (10/10) , Buildings (10/10) , Heavy Armor (4/10) , Light Armor Vehicles (3/10)
Special Notes/Tactics: The quintessential game ender. This bad boy deals a little under 1/3rd the damage of a beacon nuke with each shot while deployed. The armor on the Pion is fair, although your real defense is finding a position to hide behind while your team does the fighting for you ahead. Speed is actually ok given the size. The deployment waiting time is also fairly long but manageable with proper reading of the battlefield. Once you find a suitable place to set up, lob your warheads into any GDI rush or building. The infantry caught in your wrath will burn to death or be 1 hit K/O'd leading to massive kill streaks and whorage. Vehicles will be subject to a consistent reminder to get out of the area or suffer. There is no better way to destroy GDI's morale than the 2S7 Pion. However, an important aspect to realize is that you need to be constantly hitting something at all times to get the best bang for your buck. As soon as the area of your targets are dead you have to advance forward or relocate to hit another area without hesitation. If not, then GDI will be able to regroup and you can guarantee that everyone will be seeking you out as target number 1.
Be aware that any combat will result in death.. 6000 credits is not to be squandered.
Weakspot(s): Treads, Cannon, Rear
F.A.V. 50. Cal (Fast Attack Vehicle)
Price: 200 Credits
Armament: 50. Cal Machine Gun
Health(Max Upgraded)/Armor(Max Upgraded): 150 HP / 150 Armor ( HP / Armor)
Speed (k/h):
Armor Class: Light
Weaknesses: Everything
Strengths (Rating against): Infantry (7/10) , Aircraft (5/10)
Special Notes/Tactics: A battle ferry at the end of a day. This vehicle really is meant to just transport you around the map as fast as possible. However, there are some hidden quality's this vehicle has that aren't always recognized.. mainly the Machine Gun. Use the .50 Cal against infantry to score 1 hit K/O head shots. Also bask in that sweet sweet long range that is useful for hitting aircraft if you can avoid return fire. When finished driving to wherever you want, destroy the vehicle by placing a timed C4 on it upon exit or drive it off a cliff and hop out when you land.
Aside from the obvious offensive infantry capability, use this vehicle as a distraction to allow your units to maneuver into position while everyone is trying to hit you. You can also use this vehicle to hop out, fire hop in, reload your infantry weapon while driving and hop out again. The other main purpose I would give this vehicle is using it with a Nod fanatics. Assuming you can move next to a vehicle or infantry, you can hop out and blow yourself up. Likewise, you can use this vehicle to drive next to a Mammoth 36 inch and plant dynamite as a Nod Tank Ace.
Weakspot(s): Everywhere
Mobile Tracked Repair Vehicle
Price: 1250 Credits
Armament: Super Repair Gun
Health(Max Upgraded)/Armor(Max Upgraded):
Speed (k/h):
Armor Class: Light
Weaknesses: Nearly everything. Not meant for combat.
Strengths (Rating against): Repairing Vehicles (10/10) , Repairing Structures (9/10)
Special Notes/Tactics: The ultimate annoyance in any Nod rush for GDI. This vehicle can single handily make almost any rush unstoppable. Being incredibly small and hard to hit, you can whisk around from vehicle to vehicle repairing your team while they do the business. Often times skipped, this unit will grant a large rush a much larger chance of success than anything else. However, if a rush is consisting of less than 4 units than you should get another rush unit for more firepower. The reason is that your repairs will be rendered irrelevant because your teams firepower cannot destroy the GDI building as they will repair once they notice your rush. Your rush (lacking the proper firepower to quickly destroy said GDI building before GDI starts repairing) will then be destroyed regardless if you fix them as a Mobile Tracked Repair Vehicle. Be aware that a Titan can one shot this unit so it's invaluable to stay out of the fight or hide behind your rush units. Also note that if the rush you're trying to cover is a fast moving rush, you may have to move forward in advance a bit and hide behind cover so that you and your team reach GDI base at the same time because you'll be too slow to keep up. (This is rare)
Weakspot(s): Repair Gun , Treads
OT-34
Price: 600 Credits?
Armament: 74mm Main Cannon , 12.7mm Coaxial Machine Gun , Coaxial Flame Thrower (A.I. Controlled)
Health(Max Upgraded)/Armor(Max Upgraded):
Speed (k/h):
Armor Class: Medium
Weaknesses: Heavy Armor Vehicles such as Titan, Mammoth Tanks, Challenger II. Aircraft , Defences , Anti-Tank Weaponry like Personal Ion Cannon or Carl Gustov
Strengths (Rating against): Light Armor Vehicles (7/10) , Infantry (5/10)
Special Notes/Tactics: The pride of the motherland. From Russia with love comes the OT-34 with an ok main gun, ok Coaxial and often forgotten until it's to late flame thrower. This tank actually has a pretty good cost to usage ratio and is one of the best starting tanks on Nod that you can purchase. Especially potent for dealing with infantry at close range, the Tank on Tank capabilities of the OT-34 are poor-average at best. You're going to need to hit the rear armor of anything costing more than 1000 credits on GDI. Late game this unit will be killed instantly from heavy armor on GDI if not unable to do anything against them. Also of note is that this tank will break in half from any dedicated Anti-Tank weapons.
Treat this as a great starting unit to harass Forgotten SIlos in the field, take the field or as a low cost transport able to defend itself if need be while en-route.
Weakspot(s): Rear , Top , Treads
Black Hand Light Laser Tank 75mm
Price: 1600 Credits
Armament: Charged up Laser
Health(Max Upgraded)/Armor(Max Upgraded):
Speed (k/h):
Armor Class: Medium
Weaknesses: AVRE Mortar Tank (1 Hit K/O) , Mammoth Tank Railguns , Titan Railguns , Challenger II , Aircraft , Mammoth 36 Inch Tank
Strengths (Rating against): Defenses (8/10) , Buildings (8/10) , Light Armor Vehicles (7/10) , Infantry (5/10) , Heavy Armor (5/10)
Special Notes/Tactics: A lighter tank that reaches full potential when upgraded and in the right hands. The Black Hand Light Laser tank is typically skipped in favor for the Infrared Stealth Tank. However, if you find yourself in this tank you can very quickly maneuver around the battlefield and deal great damage to units on foot or tread alike. A hidden weapon of this tank is first and foremost its speed.
The best usage of this tank is going to be making quick, powerful hit and run shots while taking advantage of your small size to hide and reload. If you can nail this tactic down you can gain veteranancy. Combine this with alloy armor upgrades and you can then survive more hits which will allow you to sneak behind Mammoth Tanks and circle them. Use this tactic when 1v1 a Mammoth 36 Inch Tank. This tank is a great capacity as support to any other unit so get this if you feel like moving fast and kicking ass with your teammates.
Whilst you shouldn't have to much of a problem with Light Armor Vehicles, be aware when squaring off with GDI heavy armor. There are plenty of units that can half your health if not outright 1 hit kill you. Wait for a Titan Railgun or a Mammoth 36 Inch to fire before going out and attacking them. Never try to 1v1 a Titan Railgun unless you're buying time for your team to do something. Same goes with a Mammoth Railgun. However, if you're supporting your team you will find your laser a great addition while GDI is distracted dealing with your teammates.
Weakspot(s): Top , Rear
Infiltrator Melta
Price: 950 Credits
Armament: Twin Melta Guns
Health(Max Upgraded)/Armor(Max Upgraded):
Speed (k/h):
Armor Class: Light
Weaknesses: Fast vehicles, Infantry, Aircraft
Strengths (Rating against): Defenses (3/10) , Buildings (2/10) , infantry(, Light Armor Vehicles (7/10) , Anti-Aircraft (4/10) , Heavy Armor (10/10)
Special Notes/Tactics: Every bike type having really low armor. But this tiny boy wealding great fire power. It melts heavy armor like microwave oven melts cheese. With great speed it fastly comes closer to slow ones and starting "eating" them. Still you must be praying that there no any other enemy vehicles or any EMP troop. Also you must notice that melta Inf. low range.
Use it only when some GDI player trying to show his superrior armor and fire power by picking something like mamonth tank(reilgun, 34 ench, whatever). just remember to attack closely to enemy, making it unable to shoot you.
Weakspot(s): Top.
9K52 Luna-M (V2)
Price: 950 Credits
Armament: Ballistic V2 Missile
Health(Max Upgraded)/Armor(Max Upgraded):
Speed (k/h):
Armor Class: Light
Weaknesses: Direct Combat with any tank , Personal Ion Cannons , Combat from Rear of Vehicle
Strengths (Rating against): Defenses (10/10) , Buildings (10/10) , Mammoth 36 Inch (7/10) , Ships (7/10) , Heavy Armor (4/10) , Infantry (4/10) , Anti-Aircraft (4/10)
Special Notes/Tactics: Stupid powerful for the price. If you can master the aiming and hit targets every time, you'll essentially have a mobile machine of death. The Luna is a very powerful and fast missile launcher that should be used against any structure you lay your eyes on. However, you can also use it with incredible effect against mammoth 36 inch Tanks should you desire due to how large they are. The main weaknesses of this unit are going to be any type of sustained combat or fire you take as the long reload and firing of your rocket can only do so much in close quarters. Some unknown weaknesses of this unit however is the cost of missing your target. If you keep missing your target you will not only give away your teams position but also be wasting time/energy when you could have gotten an easier to use unit. Of course the risk is up to you.. but this is not an easy unit to master if you can't aim for shit. All this being said you can blow up 34% of an AGT per shot. Shoot 3 missiles and it's game.
Weakspot(s):
Elbrus 9K72 ICBM
Price: 6000 Credits
Armament: intercontinental Ballistic Missile
Health(Max Upgraded)/Armor(Max Upgraded):
Speed (k/h):
Armor Class: Light
Weaknesses: Any type of combat whatsoever , Aircraft
Strengths (Rating against): Defenses (10/10) , Buildings (10/10) , Ships (10/10) , Long Range Infantry Kills (5/10)
Special Notes/Tactics: Considered the heaviest damage dealing unit in-game, the Elbrus has a missile ready to win the game and vengeance against GDI forces. This unit however cannot escape any combat it finds itself in, therefor it's highly recommended only using this unit in combination with a Stealth Generator or when your team has complete control of the map and about to win. Compared with the Pion, this unit fairs a lot better in being used to 1 hit kill structures.. However, to 1 hit K/O a building you will need to land 3 missiles on the target. The most notable advantage of this unit compared with the Pion is that the accuracy from the missile is incredible at long range. In addition, you can strike very very far away from wherever you're set up.
Therefor, in order to use this unit most effectively to take down a building. Have 2 Elbrus's, 1 Stealth Generator and your team attacking whatever building you're about to strike. When your missiles land you'll kill the defenders inside and blow up said building. Something of note is that the Luna (V2) can kill the AGT in 3 shots as well.. however the range and accuracy is not guaranteed unless you're up close and aiming correctly. The best infantry to use this vehicle with is of course AA specialists and 1 Laser Chain Gunner. (Stealth gen is AA, 1 Elbrus is AA and the other Elbrus is a Laser Chain Gunner.) While it's implied you're not supposed to be spotted because you have the stealth generator on your side, in a pinch and if spotted you can tell your teammates to hit whatever ORCA comes at you with the AA. At that point you should be able to finish them off with your laser chain gunner (infantry included). Be aware that if your teammate hops out of the Stealth Generator that you will be unstealthed. Therefor have a teammate that can calculate the risk needed to destroy nearby aircraft if you know they haven't spotted you yet.
Weakspot(s): Missile
Mobile Stealth Generator
Price: 2100 Credits
Armament: Stealth Generator
Health(Max Upgraded)/Armor(Max Upgraded):
Speed (k/h):
Armor Class: Light
Weaknesses: Any type of combat , Mobile Sensor Arrays
Strengths (Rating against): Helps your team in any situation. Some more than others..
Special Notes/Tactics: The Mobile Stealth Generator really is self explanatory. The best tactics to use it with however, is covering a rush and staying in the middle avoiding combat. Crush infantry if the opportunity arises. While you might want to jump out and help your team, you need to be aware that doing so will de-cloak everyone you're covering.
However, if you find your airstrip destroyed or you pick one of these up from a crate you can use this vehicle to transport yourself as a spy stealth'd to the enemy base in a pinch.
Weakspot(s): Stealth Generator , Treads
ASU-57mm
Price: 300 Credits
Armament: 57mm Anti Tank Gun
Health(Max Upgraded)/Armor(Max Upgraded):
Speed (k/h):
Armor Class: Light
Weaknesses: Any type of combat or hits on the vehicle , some vehicles can 1 shot this tank.
Strengths (Rating against): Defenses (7/10) , Light Armor Vehicles (7/10) , Heavy Armor (5/10) , Buildings (3/10)
Special Notes/Tactics: Affectionately nicknamed "The Cricket". This diminutive small tank packs quite the punch if used correctly. Buy this tank at the start of the match to attack enemy base defenses. With a little bit of time you'll be able to take down Pillboxes, ADATS and turrets outside of their firing range or if you're in their blind spots/behind cover. Utilize the ASU small size to stay hidden and hit tanks from the rear with your left click rounds, you'll do steady damage greatly helping your team. To really hit home, use right click rounds when you're closer to your target (As the range is smaller).. this will pierce mammoth tank armor and really shred any tank down to its core. Lastly, don't try to use this tank against main structures unless you have to as the cannon is just too weak to do any real damage. You're better off getting another tank to do the dirty work.
Weakspot(s):
Black Hand Light Tank 75mm
Price: 1550 Credits
Armament: 75mm Anti Tank Gun
Health(Max Upgraded)/Armor(Max Upgraded): 450 ( ) / 450 ( )
Speed (k/h):
Armor Class: Light
Weaknesses: Underwhelming in any capacity. Don't purchase.
Strengths (Rating against): Underwhelming in any capacity. Don't purchase.
Special Notes/Tactics: Non instant hit higher range version of Bkack Hand Laser Tank. All the same, just be sure to buy this instead of Bkack Hand Laser Tank only at open sight maps.
Weakspot(s):
Mobile Sensor Array
Price: 1550 Credits
Armament: Stealth Detecting Radar , M1919 Browning Turret (Driver has to be inside vehicle for it to fire , A.I)
Health(Max Upgraded)/Armor(Max Upgraded):
Speed (k/h):
Armor Class: Medium
Weaknesses: Any type of combat
Strengths (Rating against): Stealth Detection , Infantry (5/10)
Special Notes/Tactics:The Mobile Sensor Array is an absolute staple in both GDI and Nod armament. Upon purchasing this vehicle, drive to a location you would like stealth detected (typically in-base or hidden mid field) and press "T" to deploy. After deploying you'll then be able to see stealth units as they have an arrow pointing above them. Particularly useful if the enemy team has picked up a spy. Be aware that the machine gun on this vehicle will only fire if you're inside.
Weakspot(s): Rear , Treads
M579 Fitter Repair Vehicle
Price: 300 Credits
Armament: Repair Gun
Health(Max Upgraded)/Armor(Max Upgraded):
Speed (k/h):
Armor Class: Light
Weaknesses: Any type of combat
Strengths (Rating against): Fixin' things!
Special Notes/Tactics: Typically purchased within the first seconds of the game, the Fitter Repair Vehicles (FRV for short) is best used when you have a large player game and your base is spread out. The ability to quickly capture your multiple base silos (And any forgotten silos outside the base!) will lend to giving you and your team a head start. After capturing your silos, go for any Forgotten Silos outside your base and hold them as long as possible. Late game, this unit is typically traded in favor of the mobile tracked repair vehicle. Although it should be noted you can deploy this next to your service depot to help repair vehicles with high hp that are badly damage.
Weakspot(s): Wheels , Repair Arm
Tesla Tank
Price: 1600 Credits
Armament: Tesla Coil , DKsH .30 cal Machine Gun (A.I.)
Health(Max Upgraded)/Armor(Max Upgraded):
Speed (k/h):
Armor Class: Medium
Weaknesses: Direct Combat from Tanks , Personal Ion Cannons , FV005 Stage II
Strengths (Rating against): Defenses (8/10) , Buildings (7/10) , Light Armor Vehicles (7/10) , Heavy Armor (5/10) , Infantry (5/10)
Special Notes/Tactics: An instant classic, the Tesla Tank greatly compliments any rush as an acting support vehicle. On it's own in the wild, it can contend against light vehicles or heavy armor but it's not recommended. First off, you'll need to take advantage of this unit's great range. Use this constantly to strike units from afar then hide behind cover while you're reloading. Second, the targeting order for this unit should be Lightly Armored Vehicles, Defenses, then Heavy Armor while assisting your rush of team on the enemy base. When there are no targets in sight, start hitting the enemy buildings. Try to avoid infantry if you can.. although if you have to fight them, your Tesla coil will deal some good damage along with burning zap damage to bring in the pain. Your A.I. machine gun will assist you as well. While you can take some hits on this unit, you have to be aware that once your armor is gone (and it depletes quickly from hits) you'll be 1 shot away from destruction. Avoid Personal Ion Cannons at all cost.
Weakspot(s): Tesla Coil , Treads/Wheels , Rear
Phase Tank
Price: 1800 Credits
Armament: Dual Firing Missiles (Right click for Anti Air)
Health(Max Upgraded)/Armor(Max Upgraded): 400 ( ) / 400 ( )
Speed (k/h):
Armor Class: Medium
Weaknesses: Direct Combat from Tanks of any kind, Personal Ion Cannons , FV005 Stage II (Can be 1 shot K/O)
Strengths (Rating against): Light Armor Vehicles (7/10) , Defenses (6/10) , Buildings (6/10) , Heavy Armor (5/10), Aircraft(9/10), Infantry(7/10).
Special Notes/Tactics: To be treated as a "Medium Stealth Tank" , the phase tank fills in the role of doing everything quite capably but not really excelling at anything with exception to Light Vehicles. Use this vehicle to take the field yourself, lasting a long time by doing Hit & Run tactics and harassing the enemy everywhere you can (Killing the Harvester constantly being a great example). While holding the field by yourself, you can also join in any rush your team forms because you'll be able to provide support in any situation. I would recommend hitting light tanks because you'll do the most damage to them and also help keep your team moving. Once all light tank targets are eliminated, help your team take on heavy tanks by providing more firepower combined than they can handle. I would honestly not recommend fighting against infantry or aircraft if you can help it but it's your call. It shouldn't be difficult to avoid either due to being stealth. To last a long time in the field, you will have to do hit and run or duck/cover tactics. Taking consistent fire from any tank will ensure your destruction.
Weakspot(s): Tesla Coil , Treads/Wheels , Rear
T-62
Price: 1800 Credits
Armament: Dual 115mm Cannons
Health(Max Upgraded)/Armor(Max Upgraded): 765 (1015?) / 765 ( )
Speed (k/h):
Armor Class: Heavy (front) , Medium (Everywhere else)
Weaknesses: Personal Ion Cannons , Aircraft , 36 Inch Mammoth Tank , GDI Rangers
Strengths (Rating against): Defenses (10/10) , Buildings (9/10) , Light Armor Vehicles (9/10) , Heavy Armor (8/10) , Infantry (6/10)
Special Notes/Tactics: The best all around unit on Nod currently with upgrades to ensure relevance late-game. The T-62 is controversially powerful in every capacity. Buy this tank when you are either low on cash, or want to give a decisive firepower punch to your team's rush. Usage against defenses and buildings are easy, this tank can barely outrange the AGT along with every other Defense GDI has. Therefor you can solely use this tank to take out most of GDI defenses if they aren't paying attention. Usage against buildings is also very effective.
In terms of Tank/Tank Combat, you'll want to use your long range to fire at tanks then hide behind cover. In addition, your front armor is incredibly strong.. so be sure to be facing tanks head on. Slowly but surely you'll melt away your opponent and they will either retreat or die.
For Light Armor Vehicles, they will try to use their speed as an advantage against you.. However, you can offset this by charging at them to ensure they don't get away from your dual cannons. Keep hitting and driving towards them whenever you see a light tank and you'll kill them quickly. The long range/damage of your cannons should ensure a clean guaranteed kill.
For infantry, try to avoid combat. If you cannot, get in close(er) range so that when you fire, your shells go directly where you're telling them to. The reason being is that you can one shot kill any infantry with this freaking tank. Seriously, try it out. However don't rely on it all the time or you may find yourself with more than you can handle. Be aware that once your armor is gone, your tank is 2 hits away from death.
Upgrades to this tank will give it turret armor and side armor plating to help protect it more.
Weakspot(s): Middle Turret Ring, Treads/Wheels , Rear , Optics
T-54
Price: 1550 Credits
Armament: 100mm
Health(Max Upgraded)/Armor(Max Upgraded): 675 ( ) / 675 ( )
Speed (k/h):
Armor Class: Medium
Weaknesses: Mammoth Tank Railgun , Personal Ion Cannons , Challenger II , Titan Railgun
Strengths (Rating against): Light Armor Vehicles (6/10) , Defenses (5/10) , Heavy Armor (4/10)
Special Notes/Tactics: A soviet medium tank that is a little below average against everything thrown at it. It is worth in my opinion saving up the the T-62 instead. However, if you find yourself with this tank use the speed and higher rate of fire to your advantage to constantly be maneuvering around the battlefield taking up positions. The best example being is using this tank on Ridge Warfare at the start of the match to hold the forgotten tiberium silo, or to harass harvesters at the start of the match. While not the star of the show in any capacity, it does have the ability to be a great side kick or do needed offensive tasks elsewhere during the fight.
Weakspot(s): Gun Barrel, Treads/Wheels , Rear
BDRM-2 AT
Price: 500 Credits
Armament: 5 "3M11 Flute Missiles" (Left Click Tracking , Right click higher R.O.F. + Bullet Drop and slightly lower damage)
Health(Max Upgraded)/Armor(Max Upgraded):
Speed (k/h):
Armor Class: Medium
Weaknesses: Sustained Combat , Personal Ion Cannons , Bernadini X1A , Aircraft , Infantry
Strengths (Rating against): Light Armor Vehicles (7/10) , Heavy Armor (5/10) , Defenses (5/10) , Infantry (5/10) , Buildings (4/10)
Special Notes/Tactics: Recently buffed to incredible effect, the BDRM-2 AT is finally a capable hit and run unit. Representing a great bang for the buck at the start of the match, this vehicle should be used for patrolling the field (or water) to take care of any light armor threats by attacking them and hiding during a reload.
I would however go straight for the harvester with this unit (Hop out and throw a Timed C4 if you can as well). After killing the harv, go for some defenses if the opportunity arises although your main goal should be to kill any GDI light vehicles you find or buy time for your team to get vehicles and start hitting GDI base. If you encounter any Infantry, be sure to use right click missiles on them and retreat as you'll die from sustained fire.
Early game you can gather 4-5 of these units and take out a GDI building in one go. Very useful for maps where defenses are not properly covering an area.
Late to Mid game this unit's usefulness will start to deteriorate more and more as GDI fields heavy armor. While the tracking missiles are nice, they simply cannot stand up to heavy armor effectively. Most importantly though, your BDRM will be torn to shreds if you take fire from any tank GDI has that survives your hits. Use your hit and run tactics to survive as long as you can. Be mindful that while the BDRM2-AT is great against light vehicles, a light vehicles speed can match yours and will kill you if you take enough hits. Pick your prey.
Weakspot(s): Missile Rack, Treads/Wheels , Rear
Microwave Tank
Price: 1350? Credits
Armament: Microwave cannon (Low Frequency {1 shot} , High Frequency {3 Shot Burst}
Health(Max Upgraded)/Armor(Max Upgraded):
Speed (k/h):
Armor Class: Heavy
Weaknesses: Long/Medium Range Combat , Aircraft
Strengths (Rating against): Light Armor Vehicles (7/10) , Heavy Armor (5/10) , Infantry (3/10)
Special Notes/Tactics: An interesting vehicle, the Microwave Tank's main purpose is to disable vehicles and in turn kick the driver out for 20 seconds. However this is a lot easier said than done. For one, the range of this tank is very minimal. Second, the disable effect only works on vehicles with 30% health.. what this means is that you have to be in a group that's able to kick GDI tanks ass to even be able to effectively use this tank. Third, the armor and hp on this tank is really bad for having to be a close range attacker.
This tank really is only useful then against light vehicles as the Armor and HP on their chassis is significantly less than something like say a Mammoth Tank or Titan. Sadly though, the same light armor vehicles are usually too fast to effectively be zapped into submission or is one shot away from a normal tank to bother justifying this unit.
You can use this against infantry but it's not recommended unless absolutely necessary. The range and rate of fire is so trash it just doesn't make sense unless there is some guy running around you need to deal with.
It's in my honest belief that this tank should be skipped in favor for a T-62 or some other tank to help add to your team's rush. Assuming , you can even disable the opponents tank you'd be better off using a T-62 to simply destroy the last 30% of your enemies health while still being able to fight other full health tanks down the line at long range. Any large vehicle that you want to use this tank against doesn't make sense because you're just a couple hits from killing it.. or said tank will just kill you when you get in range of them. Don't buy this.
Weakspot(s): Microwave Gun ,
Six Wheeled BDRM
Price: 500 Credits
Armament: .30 cal Machine Gun
Health(Max Upgraded)/Armor(Max Upgraded):
Speed (k/h):
Armor Class: Heavy
Weaknesses: Heavy Armor , Light Armor harrasment , Personal Ion Cannons
Strengths (Rating against): Suicide Rushes into enemy base (9/10) , Infantry (4/10)
Special Notes/Tactics: The Renegade staple.. BDRM APC. Soley meant first and foremost to get you and all 8 passengers wherever you need to by water or land and unload to cause chaos. This unit should not be used offensively in any capacity and instead as a one way ticket straight to GDI base for 500 credits. You can use this against infantry but even with superior aim the weapon is garbage at best.. most importantly it's not meant to be used as an offensive unit. Do note that this vehicle can enter water which should help aid you in attacking the enemy base. There are also some maps where infantry might not be able to hop out if you're in a weird position.. so before you unload try to move back and forth a bit if you have time to help unload everyone. If you're looking for the fastest way to transport yourself across the map, this is not the way. This is however a 500 credit amphibious way to transport your team. Also be aware that driving an APC is a major red flag to the other team that a rush is coming. Consider using anouther vehicle that can carry a lot of people but doesn't look like an APC.
Weakspot(s): Turret Hatch , Treads/Wheels , Rear
Six Wheeled BDRM (Splitfire)
Price: 1250 Credits
Armament: 13mm Laser Gun (Firefly Laser Turret)
Health(Max Upgraded)/Armor(Max Upgraded):
Speed (k/h):
Armor Class: Heavy
Weaknesses: Heavy Armor , Light Armor harrasment , Personal Ion Cannons
Strengths (Rating against): Suicide Rushes into enemy base (9/10) , Infantry (7/10) , Light Vehicles (4/10)
Special Notes/Tactics: Refer to the "BDRM Nod APC" section for APC Tactics..
The Nod BDRM Splitfire ups the ante for using the APC. With what essentially is the Firefly Laser Rifle mounted on top you're now able to combat infantry quite effectively by burning them to death and giving an initial damage with every shot. Although I still would not recommend using an APC for battle even with an upgraded gun.. you can use this unit combined with a Laser Chain Gunner by yourself to ensure you kill an extremely good player with power armor. Assuming you can sneak up behind said player or get them to an open range, you can continuously burn the person to death.
In the capacity of rushing, the whole entire point of being in an APC is not to be seen and take damage only when critical/unavoidable (Example, from the AGT). While yes, you can fend off light vehicles with this unit while transporting your team it is irrelvent because your armor and position will be compromised. Use this unit if there is an infantry unit out in field you have to really kill.
Weakspot(s): Turret Hatch , Treads/Wheels , Rear
Devil's Tongue Flame Tank
Price: 850 Credits
Armament: Dual Inferno Cannons (Right Click for Fireball)
Health(Max Upgraded)/Armor(Max Upgraded):
Speed (k/h):
Armor Class: Medium
Weaknesses: Tank Combat , Base Defenses , Aircraft , Personal Ion Cannons , EMP Grenades
Strengths (Rating against): Buildings (10/10) , Infantry (6/10) , Defenses (6/10)
Special Notes/Tactics: Fast, deadly and powerful in every regard. The Devils Tongue Flame Tank is a guaranteed win for those that can infiltrate GDI base. This unit has unlimited ammo from its dual cannons which can melt a building by itself in about 10 seconds without repairs. Furthermore the fireballs from the cannons deal incredible on-par damage that can also burn units inside a building that are repairing. Use to your effectiveness. Avoid tank combat at all costs.. it's just not worth it compared to the buildings you could be killing.
To use this unit best you're going to want to either make sure all the defenses are down, go into a blind spot in GDI's base or go in a group. Preferably all the above. If you cannot hit a building with your main flame cannons, use right click fireball to hit the building. Do not fire your cannons in the air for fun as they are very noticeable.. doing so will give away your position and alert GDI to your actions.
This unit is typically used for suicide rushes.. if you know you're going to die (and as a result cannot hop out to repair your tank) purchase at least a $100 Tank Crew to auto repair your vehicle by 5 hp every 3 seconds. This will give you a tiny bit more time while hitting a building and could be the difference between destroying it or dying. If you were to hop out of your tank to repair it.. you would die or have your vehicle stolen, so don't use a technician or engineer.
Weakspot(s): Flame Tanks
Blackhand Flame Tank
Price: 1600 Credits
Armament: Dual Inferno Cannons (Right Click for Fireball)
Health(Max Upgraded)/Armor(Max Upgraded):
Speed (k/h):
Armor Class: Heavy
Weaknesses: Tank Combat , Base Defenses , Aircraft , Personal Ion Cannons , EMP Grenades
Strengths (Rating against): Buildings (10/10) , Infantry (7/10) , Defenses (6/10) , Power Armor (4/10)
Special Notes/Tactics: Fast, deadly and powerful in every regard. The Blackhand Flame Tank is a guaranteed win for those that can infiltrate GDI base. This unit has unlimited ammo from its dual cannons which can melt a building by itself in about 10 seconds without repairs. Furthermore the fireballs from the cannons deal incredible on-par damage that can also burn units inside a building that are repairing. Use to your effectiveness. Avoid tank combat at all costs.. it's just not worth it compared to the buildings you could be killing. Due to the extra armor, this unit does gain extra marks for infantry and is able to take on power armor if need be.
To use this unit best you're going to want to either make sure all the defenses are down, go into a blind spot in GDI's base or go in a group. Preferably all the above. If you cannot hit a building with your main flame cannons, use right click fireball to hit the building. Do not fire your cannons in the air for fun as they are very noticeable.. doing so will give away your position and alert GDI to your actions
The Blackhand Flame Tank is a slightly slower but more armored version of the Devils Tongue Flame tank. It is best to use this unit when you are sure that you'll be able to avoid tanks in the field and speed isn't of the essence. Using this tank means you can stand up to way more punishment while inside GDI base, allowing you to hit buildings longer. This is only true however if you can avoid combat in the field.. so judge how much speed means to you in return for extra armor.
This unit is typically used for suicide rushes.. if you know you're going to die (and as a result cannot hop out to repair your tank) purchase at least a $100 Tank Crew to auto repair your vehicle by 5 hp every 3 seconds. This will give you a tiny bit more time while hitting a building and could be the difference between destroying it or dying. If you were to hop out of your tank to repair it.. you would die or have your vehicle stolen, so don't use a technician or engineer.
Weakspot(s): Flame Tanks
Wiesel 20mm
Price: 600 Credits
Armament: 20mm Reischmetal Gun
Health/Armor: 250 HP / 250 Armor
Speed (k/h):
Armor Class: Light
Weaknesses: Direct Combat with Tank Units , Personal Ion Cannons
Strengths (Rating against): Infantry (8/10) , Aircraft (8/10) , Power Armor (7/10) , Light Vehicles (6/10) , Heavy Vehicles (3/10)
Special Notes/Tactics: Able to refill infantry that enter inside the tank.
A great starting unit with crazy capability if you can keep it alive in the field. The Wiesel 1 is incredible under the right hands. To start, you can 1 shot infantry in the head and any hits landed on GDI infantry will result in burn damage. This really helps when dealing with Power Armor later on in-game. The gun's range is also immense meaning it can fulfill it's AA role effectively. Fighting tanks with this unit, you're better off selecting light armor targets first to help soften them up for your team then switching your attention to heavy armor. Although your primary focus should be infantry and aircraft if they ever arrive.
A hidden weapon of this unit (besides being able to refill people that enter) is its size. In urban maps such as Orca Heights you can use your small size to an incredible advantage by going through infantry tunnels and taking cover behind things other units cannot. Try sneaking this unit through tunnels on the map. You may find a new game winning strat..
Weakspot(s): Turret Hatch , Treads/Wheels , Rear
SU-85
Price: 450 Credits
Armament: 85mm Anti Tank Gun (Left Click = Normal Armor , Right Click for close range Heavy Armor)
Health(Max Upgraded)/Armor(Max Upgraded):
Speed (k/h):
Armor Class: Medium
Weaknesses: Heavy Armor , Personal Ion Cannons , Infantry , Aircraft
Strengths (Rating against): Defenses (7/10) , Heavy Armor (7/10) , Light Vehicles (6/10)
Special Notes/Tactics: A good bang for the buck in the right hands. The SU-85 is a Soviet Tank destroyer that at the start of the match should be used when a GDI rush is incoming or to attack GDI defenses. Late game you can use this tank to help fend off a GDI invasion when low on funds or harass tanks on the battlefield from long range.
At the start of the game, this tank will be able to kill anything GDI fields on the battlefield effectively. The main priority if you know that a GDI rush is coming, is to get this unit into the best position outside of your base as quickly as you can. Your goal is to fend off whatever rush is coming in and have the GDI rush split up forces to attack your heavily defensive position or be seriously damaged from your shells. In addition you are trying to buy your team time to help prepare against the onslaught that is approaching.
You can also use this unit against defenses if GDI isn't posing a huge threat. Late game use this tank for long range support or your special right click which is great against Mammoth Tanks. Your armor isn't that great though so don't go seeking this tank if you have a lot of credits. Go for a T-62 instead.
Weakspot(s): Underside, Treads/Wheels , Rear , Gun Barrel
Stridsvagn 103 155mm
Price: 2400 Credits
Armament: 155mm Cannon , M240 (Right side coaxial)
Health(Max Upgraded)/Armor(Max Upgraded):
Speed (k/h):
Armor Class: Heavy
Weaknesses: Mammoth 36 Inch , Light Armor harassment , Personal Ion Cannons , Infantry , Aircraft
Strengths (Rating against): Long Range Combat (8/10) , Heavy Armor (7/10) , Base Defenses (7/10)
Special Notes/Tactics: The Swedish answer to GDI forces. The Stridsvagn is meant to go against GDI heavy armor at long range along with in cover. With the low profile you should be able to find a multitude of spots to ambush incoming or passing GDI units while staying hidden if not covered from returning fire. In addition, the armor is quite good which should help with survivability. This is where you main firepower is going to come from, constantly/consistently hitting slow moving GDI units in cover while your team is fighting off the invasion as well. In the end you're going to either destroy the armor of whatever you're attacking so much they will retreat or redirect GDI's main rush towards your position (upon which you should retreat or relocate again if you cannot kill said unit). Set your targeting priorities to be long range attacking against GDI slow moving Heavy Armored units.
In terms of weaknesses the Stridsvagn has quite a few going for it. The unit just cannot aim up to hit things attacking from above. In addition the unit has no forgiveness with aiming, meaning you have to be on point direct with wherever your reticle is aiming. This problem is increased the father away you are since tiny movements mean a big change where you'll shoot. To overcome this, get into position and start calculating where your shell will land or aim at large targets only. Personal Ion Cannons (and to a lesser extend infantry) will ruin your day but ultimately should be avoided as it's to much of a hassle to score a kill. Aircraft is off the table unless they're low and far away. In terms of tanks, you'll be circled by fast light tanks if you're not careful. Heavy tanks such as the Titan Railgun , Mammoth Railgun , Tortoise 38pdr should be killed from as long a range as possible while in cover. The Mammoth 36 inch is a special occasion however as the dual cannons can seriously land some damaging hits from far away if you're not careful. This simply trails back to the advice of only attack from long range while you're in cover. With practice and a little bit of luck, any shots from enemy vehicles will hit whatever cover you're in... unable to kill your tank. Base defenses can be killed with this tank but it's a pain in the ass if a Construction yard is up. Use a T-62 instead.
Weakspot(s): Turret Hatch , Treads/Wheels , Rear
AAI RDF Light Tank
Price: 1200 (?) Credits
Armament: 75mm gun {5 shots per mag}/M249 Coaxial MG
Health(Max Upgraded)/Armor(Max Upgraded):
Speed (k/h):
Armor Class: Medium
Weaknesses: Mammoth 36 Inch, Titan Railgun, TOW Humvee, Challenger II, Close Combat with Heavy Armor, Aircraft
Strengths (Rating against): Light Vehicles (7/10) , Defenses (7/10) , Heavy Armor (6/10) , Infantry (5/10)
Special Notes/Tactics: A bargain tank destroyer, the AAI RDF utilizes its 5 round burst of 75mm shells to bring GDI Light vehicles to their knees. This vehicle should be bought when and if GDI is fielding a lot of armor early game. The low price will allow you to buy a vehicle that can tear up Light armor but also assist your team taking down heavier threats mid-game. Don't try to hit heavy armor by yourself as you will die to superior firepower. Late game this unit loses out in usefulness to the T-62 but at the start, you can really use this tank to hold the field and get off some good shots at defenses. If you're lucky enough, you can one shot infantry but be aware of your long reload time.
Weakspot(s): Turret Hatch , Treads/Wheels , Rear , optics , under armor
SU-122-44
Price: 1250
Armament: 122mm Gun
Health(Max Upgraded)/Armor(Max Upgraded):
Speed (k/h):
Armor Class: Heavy
Weaknesses: Heavy Armor , Light Armor harassment , Personal Ion Cannons , Explosive Charges of any kind , Aircraft
Strengths (Rating against): Heavy Armor (5/10) , Light Armor (6/10)
Special Notes/Tactics: This is not a bad tank. The gun does very acceptable damage, the range is quite good and the armor holds up against many types of damage. The only problem is that there are far better tanks in-game.
The only reasonable situation you would ever find yourself in using this tank is if your Airfield got blown up and you acquired this vehicle from a crate or random chance. In that case you need to be aware of your rear at all times as turning movement is very limited. Next up, you should be using this unit in a defensive role at best where you hit units far out from your base and fall back to repair at the repair facility. If your team is rallying back and your airfield is still lost then use this unit to take out GDI defenses or harass their harvester. The long range from the cannon will enable you to help out where needed against structures or large vehicles while maintaining a safe distance.
Weakspot(s): Turret Hatch , Treads/Wheels , Rear


Recommended Comments
There are no comments to display.
Join the conversation
You can post now and register later. If you have an account, sign in now to post with your account.
Note: Your post will require moderator approval before it will be visible.