Search the Community
Showing results for tags '4 - Competent'.
Found 13 results
-
Author: moonsense715 Skill level: 4 Introduction This tutorial will show you how to allow players to play with custom content on your server, without affecting their core game files. What does this mean? You can modify maps, preset settings, everything on your server (with the exception of client-side script updates). When players join your server, the custom content will be downloaded for them automatically on the "Joining Game" screen. If they hop on to other servers or you disable the custom content, then the clients will play normally, without the modifications. This can be ideal if: You run a server and want to change lots of things, but have no means to update the core game files of clients (e.g. a C&C Renegade server). There is a special event (Halloween, Christmas, Game Night, etc.) and you want to put custom models, sounds, etc. on a server but only temporarily. You are a developer, want to change lots of balance settings, distribute the changes to testers VERY fast, then do it again 10 minutes later, etc. For this tutorial we will distribute a custom objects.ddb file to players. 1. Prepare your files After you're done with your changes in LevelEdit/Mammoth, save your objects. Then, create a totally empty level. I named mine ObjectsMix.lvl and exported it to ObjectsMix.mix (try to avoid name conflicting, objects.mix and objects.ddb might not like eachother). Now this is a completely empty level. If the level does not contain your new objects.ddb yet, use XCC mixer or RenegadeEx to put your modified objects.ddb into this mix file. Your file is complete, named ObjectsMix.mix. 2. Create the package for players To play your custom modifications, players will need to download special package files. For them (the players), these will NOT be downloaded to their game files (Data) folder nor their Documents folder, but rather to AppData\Roaming or somewhere else. Copy your ObjectsMix.mix next to your FDS (the game server), next to the server executable file (e.g. server.exe). You should have serverside script files already if you run a server, along with PackageEditor.exe. If you don't, get them (ssgm files). Stop your server and open a command line in this directory. Enter these commands: PackageEditor uninstall "ObjectsMix" PackageEditor update "ObjectsMix.mix" 1.0 Westwood The first line makes sure any previously installed packages with the same name are gone. The second command installs your package. You can change the version and the author name if you want, but it's not necessary. 3. Upload your package to a server You need a web server to upload your ttfs packages to. Your game server will tell the players' clients to go here and download any needed packages. Grab the generated ttfs folder from your game server directory (it will be next to the debug folder, search for it), and upload it to your web server. It should be reachable via http calls and the file lists must be viewable inside the ttfs folder. For example, you could put them here: http://mysite.com/ttfs/ Go ahead and visit the link (well obviously not this one above, but YOUR server's ttfs link). If you can't see the file list, it's setup wrong. Ask your administrator to make it viewable, or add a .htaccess text file inside the ttfs folder and make it contain this single line: Options +Indexes Now you should be done. 4. Make your server use the package You thought you were done? No! You only created the package so far, now you need to use it. Open your tt.cfg file. Take a look at the example below. gameDefinitions: { FirstMap: { mapName = "RA_FirstMap"; packages = ["ObjectsMix"]; }; }; rotation: [ "FirstMap", "RA_SecondMap" ]; downloader: { repositoryUrl = "http://mysite.com/ttfs/"; }; You need to define which maps use this new package (which is just a modified objects.ddb file essentially). Do this in gameDefinitions. In the example, one map (RA2_FirstMap) uses it only. If you want all maps to use it, add them all to the gameDefinitions in a similar way. The mapName is the full name, the packages can contain multiple packages, separated by commas. Remove the prefix from the rotation if you have a game definition for a map. NOTE: If you are trying to just add a new MAP that players need to download, just make the mapName and packages the same (e.g. packages = ["RA_FirstMap"]), the map itself is the package in this case In the repositoryUrl, define the URL where the players' clients will download your packages from. The link you have from Step 3 should go here. Make sure to restart your server after you've modified tt.cfg! Congratulations! Players who join your server will automatically download the packages you defined. If you want to stop using the custom content on your server, just remove ObjectsMix from the packages in gameDefinitions.
-
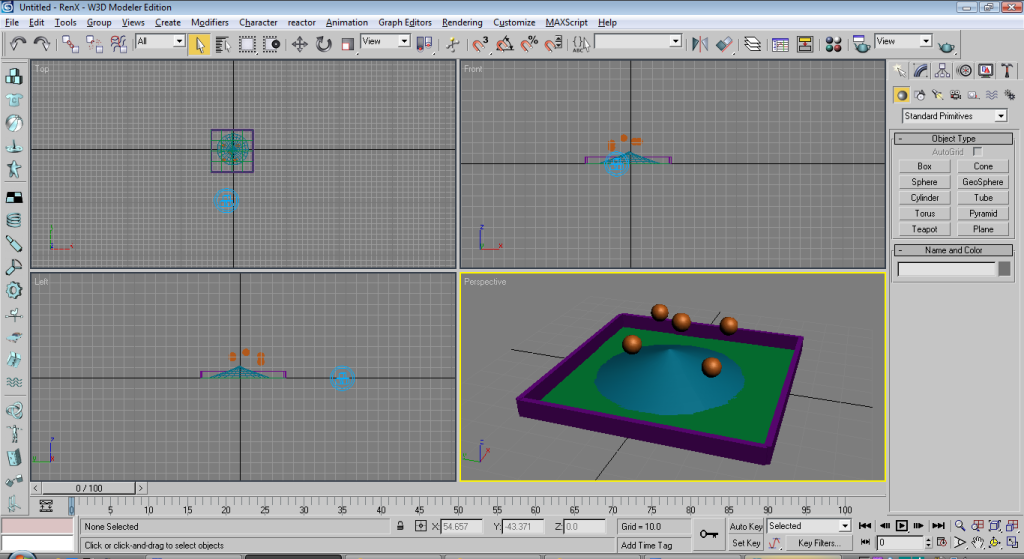
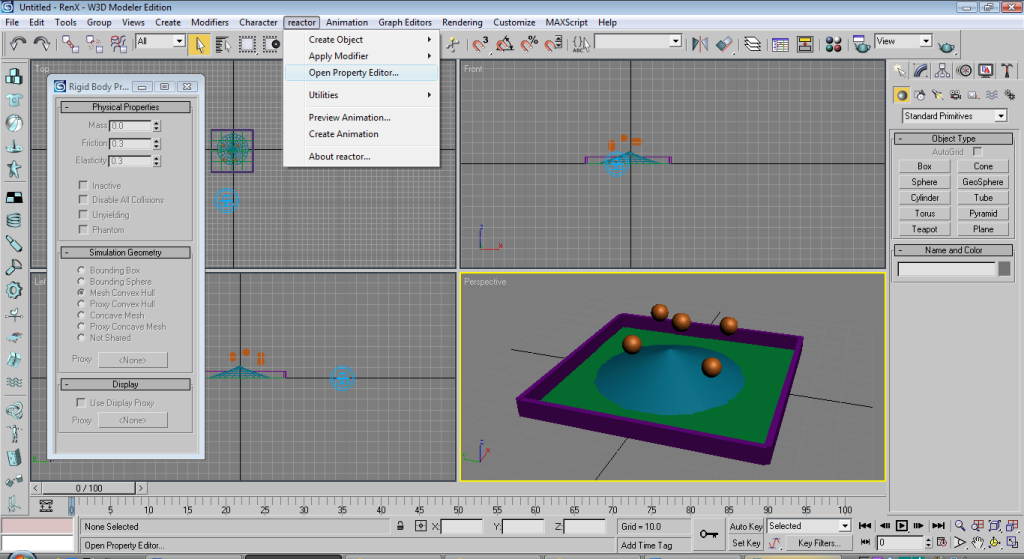
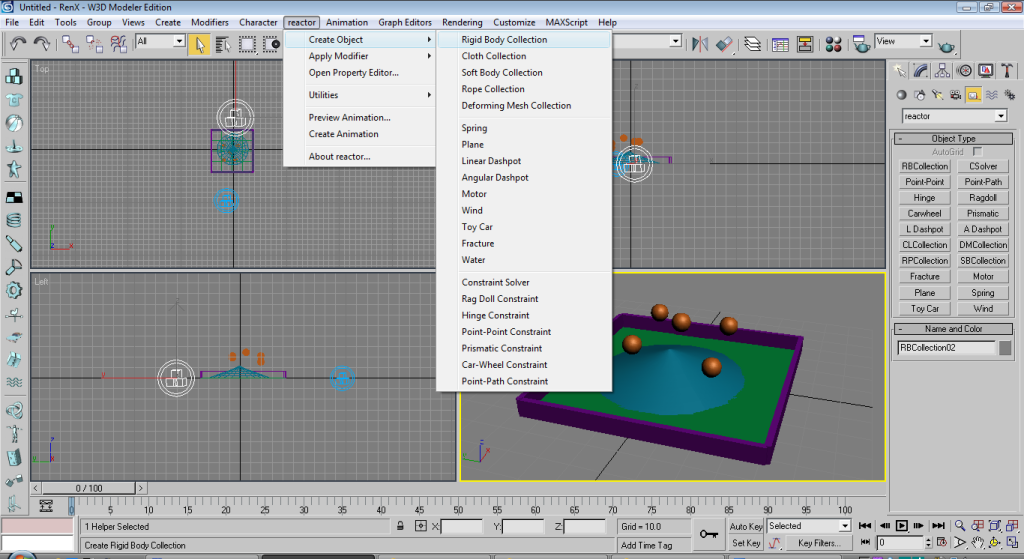
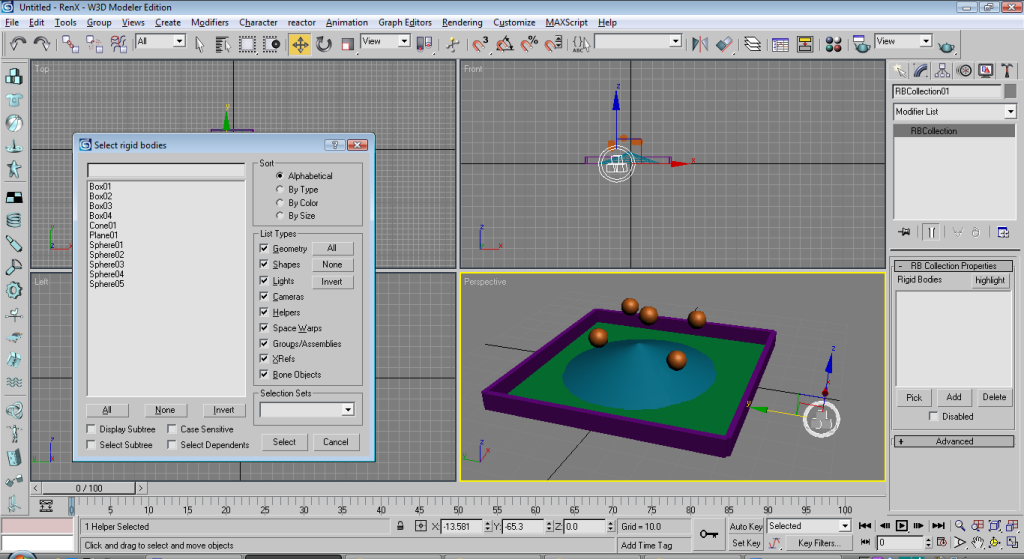
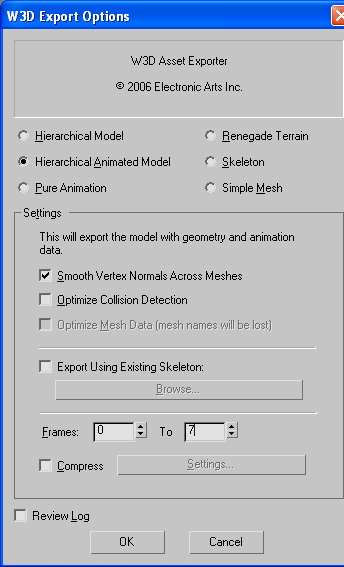
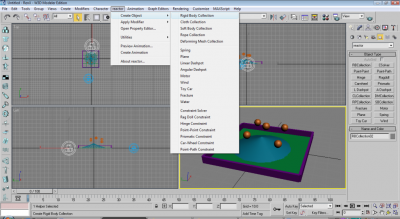
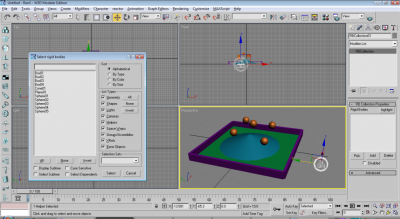
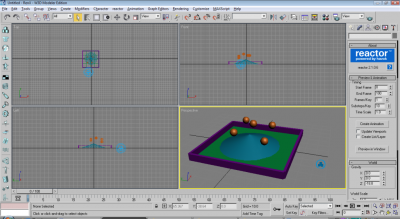
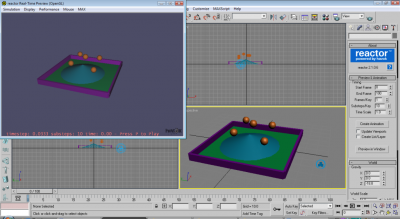
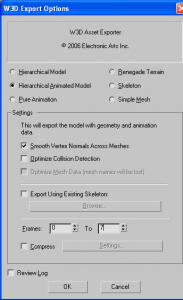
 Author: cuddling, minor editing by GeneralCamo Skill Level: 4 Hello fellow modders! Today im going to go though on how do you animate objects in 3dsmax using reactor and exporting it into W3D Things you will need: Yourself and a computer 3dsmax 6 or newer (8 is preferred) Reactor comes with the software itself, so you do not need to worry about downloading it. Now, what do you need reactor for? Basically it is to create realistic looking animations in a 3d world, best used or destruction animations or animations that involves lots of objects colliding with one another. For this tutorial, we'll just go through some basics. We will make some spheres and roll off a cone. 1. Setting up objects in 3dsmax Start up 3dsmax. I assume you are completely new to reactor but not 3ds and so we'll get started using basic objects. Create a plane 50 x 50 at the origin. This is our "ground" where our objects will fall to. Next, create some basic objects that you will like to make them "fall". A bunch of spheres will do just nicely, so make like 5 of those things of apporiate size above the plane itself. To make things more interesting, put a cone in the middle of the plane, so that the balls will hit and roll off. Now, you might want to wall them in to prevent the balls from falling off the edge of the plane entirely, build a couple of walls around the edges of the plane. This is of course entirely up to you, if you want them to fall off, don't put them there. 2. Assigning reactor properties to objects in 3dsmax Now we are going to set up the collision settings for reactor in 3ds. At the top of the program, you should see a tab called "reactor". Click on it and select "Open Property Editor". A box should appear. This controls the property settings of the objects that you are going to use for reactor. Select the 5 spheres (together) and give them a mass of 50. Select the walls, the cone and the plane and give them a mass of 200, and check the box "unyielding". This would mean they will never move and only objects will collide with them. Leave all of them at Mesh Convex Hull, except for the plane, which should be a concave hull. In this tutorial this is not very important and it is only in more advanced reactor settings you will need to play around with the different simlation geometry. 3. Setting all objects up as a rigid body collection. A rigid body collection is a collection of objects that has rigid body properties, such as the objects we have in the scene at the moment. Go to Reactor > Create Object > Rigid Body Collection. Place it anywhere in the scene, preferbly somewhere convinent. After selecting it, go to the modify tab (The one at the right side) and click on "Add". A window like the one shown below should appear. As we are using all of our objects in this tutorial, go ahead and select all of them. They should now appear in the box under the Rigid Body Properties in Rigid Bodies. 4. Finishing up reactor The last step is to set up how you want reactor to process the animation. Go to tabs at the right side. Select Utilities, and click on the reactor box. You should now be directed to the screenshot below. I'll quickly go through the basic stuff. Start Frame: This is where you want reactor to start the animation. End Frame: This is where reactor will stop (For this I set to 200) Frames/Key: This is where reactor will insert a keyframe at every number of frames. If you put 5. At every 5 frames there will be a keyframe. Leave the rest of the "Timing" properties at default. Create Animation: creates the animation in 3dsmax. Note that this is irrevesible. Preview Animation: previews the animation before you create it. So you can fine-tune it till your expections. Gravity: What can I say, its gravity. Unless your world has some weird forces around, you will want to leave x and y at 0. For z, it is up to how strong your gravity is. The larger the value, the more force your objects are pulled down towards the world. For W3D, you will want to set this to -18.8. The normal gravity at -9.8 feels very light. World Scale: 1m to 1.0 in max. Don't ever change that. Col. Tolerance: This is one of the most important property in reactor's utilities. This is the "minimum distance" between each object. The lower it is, the closer each object has to be before it considers it "colldied". Unfortunely, this cannot be set to 0, so for now put it as 0.02 (This is 2cm in W3D, hardly noticable) Leave the rest at defaults, they are not needed for now. Go ahead and hit Preview, a window should come up that has your objects in it. Press P to play the animation and R to reset. When you're happy enough, click on "Create Animation" to create it. 5. Exporting to W3D Finally, we want to export it as a W3D file. Go to Files > Export and select W3D asset as the type of file to export. Select "Hierachical Animation Model' To check whether did it work, go to w3d viewer and open the file. Select the animation and it should play like what it showed in 3dsmax. Congratulations! You have just done your first reactor animation and successfully export it as a w3d animation file which is ready for use in Level Editor. This is of course still very basic, and reactor is capable of processing much more complex and realistic animations if you know what to do.
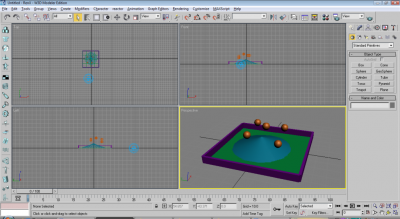


-
Author: moonsense715 Skill level: 4 Welcome to the second chapter of the tutorials that will show you how to add and configure more sophisticated bots to your maps. In this lesson, we will activate the player-logic AI system and tell bots how to attack in groups. If you are a mapper, you will be able to fully setup your map to support bots. This tutorial assumes you know the basic concepts about the advanced bots. If you haven't seen the corresponding tutorial yet, it is strongly recommended you check it out. You can find it here. 1. Adjust unit presets Let's set up the presets for the bots so they fit the requirements. Whether you are a mapper or a game core builder, you will have to edit them differently. A) If you are just creating a map: You will have to work with the existing presets. If any of their settings do not meet the requirements or your needs, you will need to clone the original preset into a new Temp preset, edit that and use it for the bot system. Note that if you Temp a preset, it will cost 0 credits for the bots and require no production buildings or tech level, unless it is placed on a Temp purchase list, overriding the regular one. If a preset is already configured properly, you can just use it. B) If you are building a game core: Since you are building the core preset list, you can outright forget Temp presets or having duplicate presets just for bot usage. You can use the same presets for bots that players purchase and use. Make sure all presets you wish bots to use are configured to fit their battle role. Now for the requirements. Select a soldier preset that you want the bots to be able to play as. Look at the attached scripts on the Scripts tab. Make sure there is NO MS_AI_Behaviour script present. If this is OK, rejoice! Bots can use this preset, you don't need to touch it. Otherwise, make these changes. Attach a MS_AI_Preferences script and adjust the parameters so the unit prioritizes and shoots the right targets. Note: You can skip attaching this script, the bot then will automatically attach it ingame at runtime with the default parameters. Do this for every preset that you want bots to use. If for whatever reason you want a bot to use a different weapon with a unit than the one players have, use the MS_AI_Replace_Weapon script. Attach it multiple times, if more weapons need replacing. Although if you are working with Temp presets already, you can just change the weapon on the Settings tab. Otherwise, using the same presets for bots and players is recommended for better maintainability. The MS_AI_Preferences script almost has the same parameters as MS_AI_Behaviour, but it has no ObjectiveType. Therefore this script solves 2 things: 1. There is no need for duplicate presets, one for players and one for bots, since the preferences script does not activate the AI on the unit on startup. A controller script will. 2. Every preset can become offensive or defensive, so you dont have to create one preset for an offensive variant, and one for a defensive one. Great, you have the bot presets ready! 2. Create bot purchase lists In this system, the bots go into battle after choosing a unit they want to use, just like players. They take a look at a collection of presets, which we are going to define now. Thanks to this, we can block bots from buying certain units on specific maps, or only allow a few for special gameplay. All up to our imagination. Note: skip this step if you want to let bots use ALL of the presets that players can buy, including resource collector vehicles, support units, etc. Warning: at least the existence/creation of an Engineering Infantry purchase list is recommended! Otherwise, you will see bots try to repair buildings with damaging weapons. Alternatively, you can set the engi list parameter to "AUTOENGINEER" to let the game automatically find all the presets that can heal buildings already existing on the map. If you have also skipped adjusting the MS_AI_Preferences scripts on all the units, the bots will definitely be using some units the wrong way (harvesters will think they can shoot, deployable units will try to fire a weapon that only works in deployed mode, etc). We have to define 4 different purchase lists for the bots per team: Offensive Infantry (place characters on this) Defensive Infantry (place characters on this) Engineering Infantry (place technicians, engineers, any repairing characters on this) Vehicles (place vehicles on this) Scroll down to twiddlers. These twiddlers might already exist and be usable, in which case you don't need to create new ones (check the available twiddlers, all lists for both teams must be present). If they already exist, and your map does not require to change the available bot units, skip this step. First, let's create the Offensive Infantry twiddler for Allies. Select Twiddler and hit Temp or Add (as described at "Adjust bot presets"). Name it (e.g. BotInfantryAllied), then switch to the Settings tab. Click Pick Presets. (edit list) Select Object->Soldier in the Preset Type dropdown. Now you need to add presets to this twiddler list. To add a preset, double click it in the Preset Pool. It should then appear in the Selected Preset(s) list. You can remove the preset by double clicking it in the Selected Preset(s) list. Add all the Allied/GDI infantry presets that you want bots to use. Remember: they all should have the MS_AI_Preferences script on them (you should have set these up in the previous step)! Click OK then OK again to finish editing the Twiddler. Create an offensive infantry twiddler for the other team as well (Soviets/Nod). If you want the defensive infantry to choose from a different list, create lists for them too (otherwise they can just use the offensive list). Also create a vehicle twiddler for both teams. Lastly, create an engineering infantry twiddler for both teams (place soldier presets on this, ones that have weapons to repair buildings, don't put anything else on this list - in APB, these twiddlers contain only 2 presets, the Technician and the Engineer). Note: bots spawn as the same preset players do (e.g. Rifle Soldiers). You don't need to add these startup units to the twiddlers! You can add a preset multiple times to a twiddler. The more times a preset is on the list, the higher the chance the bot will use it (if it has enough credits for that preset). If a barracks or war factory is destroyed, the presets now unavailable to players will also become unavailable to the bots automatically. These lists are merely for fine-controlling what bots are allowed to use, and you, the mapper can decide that. Right, you are done with the lists! 3. Setup bot player controllers You could now ask: "How will the bots appear on the map?" It's time to make that happen. In the previous tutorial, we have placed our soldiers and vehicles (or their spawners) manually. This time we will make use of the same spawn positions where players start, so we don't have to define separate positions for the bots. In this tutorial, all the bots will have a controller. This is a script that every bot will have a unique copy of, belonging only to them. It will keep track of available credits, help decide what is buyable and ultimately control the spawning and vehicle purchasing procedures. The controller script for every bot is MS_AI_Player_Controller. We are not going to configure or create them manually, because that will be the job of a global bot controller script. But for the sake of tutorial completeness, and because they actually work individually too, you can read here what it can do: To create the bot controllers and with it, spawn the bots, we will use the MS_AI_Player_Count_Controller script. This script will create/delete the individual bot controllers, driven by MS_AI_Player_Controller. First, create an invincible, editor-only preset. To do that, Temp the Object->Simple preset, set its model to o_davesarrow.w3d, make it have Blamo skin/shield on the Settings tab, and tick IsEditorObject. Now go to the Scripts tab and attach the MS_AI_Player_Count_Controller script. Set the Count parameter to 12, so you will have 6 bots per team ingame (feel free to change the count, this is just an example). Set the next 8 parameters (4 lists for both teams) to the purchase twiddler preset names that were set up in the previous step. (Leaving any list param as the default USEPLAYERPURCHASELISTS will make bots use all units from the purchase lists. Recommendation: set the Engineering ones at least or set them to AUTOENGINEER to make the game find infantry that can repair buildings automatically.) Leave the last 2 parameters as default (USEPLAYERSPAWNERS), so the bots will start at the player spawn positions. Alternatively, they can start at any object preset if you prefer them not to share spawning positions with players. In such case, set this param to the name of that object and make sure there is at least as many of these across your map as many bots should be able to play. Note that the bots are aware of buildings being attacked and will switch to defensive/repair duties automatically. Bots will be removed/added one by one as players join/leave the game, so the total sum of players ingame (Count) will be the number of human players and bot players added together. So if the Count parameter is set to 12, and there are 6 players ingame, then 6 bots will be spawned. If all those players leave, 6 new bots will appear one by one. Finish editing your controller preset (OK) and place it somewhere/anywhere (Make). Save and export your map. You should notice that bots will join the game and start buying available units. Good job, you've got your bots setup to spawn, then buy infantry and vehicles! 4. Organize group attacks Right now your bots act individually and never cooperate with eachother in a group rush, which are normally more effective. Teamwork is often needed for victory in team-based games such as APB and TSR to name a few. So now let's teach bots how to do group attacks. We will have to define gathering positions for both teams. Bots will "register" themselves for a group rush. At the gathering points, they will wait for eachother to catch up (some units are slower than others, some are faster than the average), before running to the next gathering point and then the next. After reaching the last point, they will all be "released" to do their primary objective. If many bots went together, this can be a massive attack on the enemy base with many infantry/vehicles. This rarely happens with individual attacks, so this is our goal with the group attack. First let's create an invincible editor-only preset to be the "host" of the script we'll be using. Get the settings up like you did for the player count controller script, but without attaching that script. Now, pick a position around the Allied/GDI base and place (Make) the preset there. Unlike before, we will attach the script on the placed objects this time. So double click the object you just placed, and attach MS_AI_Rally_Point on the Scripts tab. Parameters: Team: 1 (Allied/GDI gathering point) NodeGroup: 0 (this is a gathering point/node in the attack route of index 0, there can be multiple attack routes in both teams, indexing is 0,1,2, etc.) NodeNum: 0 (this is a 0 indexed node in this attack route = the first gathering position, order indexing is 0,1,2, etc.) If we stopped here, bots would gather at this position and then run to their primary objective (if the objectives are setup right, this should be the enemy base) without waiting for eachother. So if the objective is far away and the bots have different speed, this could make the group rush uneffective. Now create another Rally Point the same way as before for Allies, somewhere inbetween the Allied and Soviet bases. So place another instance of your editor only preset, and attach MS_AI_Rally_Point, but this time, set NodeNum to 1 (bots will first run to Node 0, then to Node 1 and so on). Place the last Rally Point next to the Soviet base, outside of the range of any existing defenses (otherwise they will get damaged while waiting). Set NodeNum to 2 to finish creating this attack route (the highest NodeNum is always the last position in a given attack route). Now create 3 Rally Points for the Soviet/Nod bots as well. Do the same steps as before, but set Team to 0. You can create more than 1 attack route for both teams so bots can use more of your map. For a second route, just create Rally Points and set the NodeGroup parameter of all belonging points to 1. If you define yet another attack route, set the NodeGroup to 2, and so on. Bots will randomly choose one attack route and carry on following your defined positions. You also have the ability to randomize the gathering positions a bit. Let's say you have a NodeGroup 0 but want the first gathering position to be randomly chosen from 2 different positions. To do that, just place an object with NodeGroup 0 and NodeNum 0 twice, and move them to different positions. Bots will choose one of them randomly, and then move on to NodeNum 1 (for which you can also define multiple locations). As for how the bots decide which one of them will join the group attack and when: - There is only 1 grouprush per team at a time. - The first rush registration starts at mapstart and a new one starts when the current group reached the last Rally Point or if they all died while trying to get there. - Once half of the bots on a team have registered for the rush (also a maximum limit of 8 bots), the registration closes and the bots will begin running towards the Rally Points. - While the registration is open, all offensive bots will join it after spawning immediately. Congratulations, you are done! 5. Optional: Bot names You have probably noticed that all the bots have a nickname tag: "Bot". If you want them to have individual names, this is the section you are looking for. Create a new text file, and name it bot_names.cfg. Copy this into it: [BotNames] BotName0=[Bot]Benny BotName1=[Bot]John So far you have 2 special bot names set up (feel free to change those 2 names). Using the "BotNameX=Name" syntax (where X is an index number), you can set as many as you wish, but make sure the indexing starts with 0. The AI Player Count Controller script will hand these names to the spawned bots randomly, but each name will only be given to just one bot at a time. If there are more bots ingame than names, the rest of them will get the default "Bot" name. You are done with everything now, please go and enjoy the bot battles you've just added to your map =) Q & A My bots are acting weird when seeing enemies/getting within attack range. Why? Make sure the primary weapon's Range it is using is always higher than the Max_Attack_Range script parameter. Bots refuse to attack my base defense/building. What did I do wrong? If it's a Simple/Vehicle object: - Either attach the MS_AI_Building script to it, or - Create a file called bot_config.cfg. and put this into it: ; List simple objects, base defenses, etc. here that need bot repairs but you cannot attach the bot building ; script to them for some reason (e.g. old games, no level sources) or you are lazy to do it in LE/Mammoth ; Replace the names with your preset names that should be attacked/repaired by bots, you can have more. [BotTargets] Target0=my_base_defense Target1=my_random_building ; Uncomment the settings below if you wish the game to create w3d models at the objective/target locations. ; This way you can check if something is wrong. ; Replace the entries in TargetModel/DebugObjectiveModel with model names that exist in your game. [Debug] ;EnableBuildingTargetsDisplay=true ;BuildingTargetModel=v_spotlight ;BuildingDebugObjectiveModel=o_davesarrow Bots have super good accuracy, they are too hard to fight against. Is there a way to nerf them? Increase the WeaponError value on the Settings tab of the preset. This will only affect bots, not players.
-
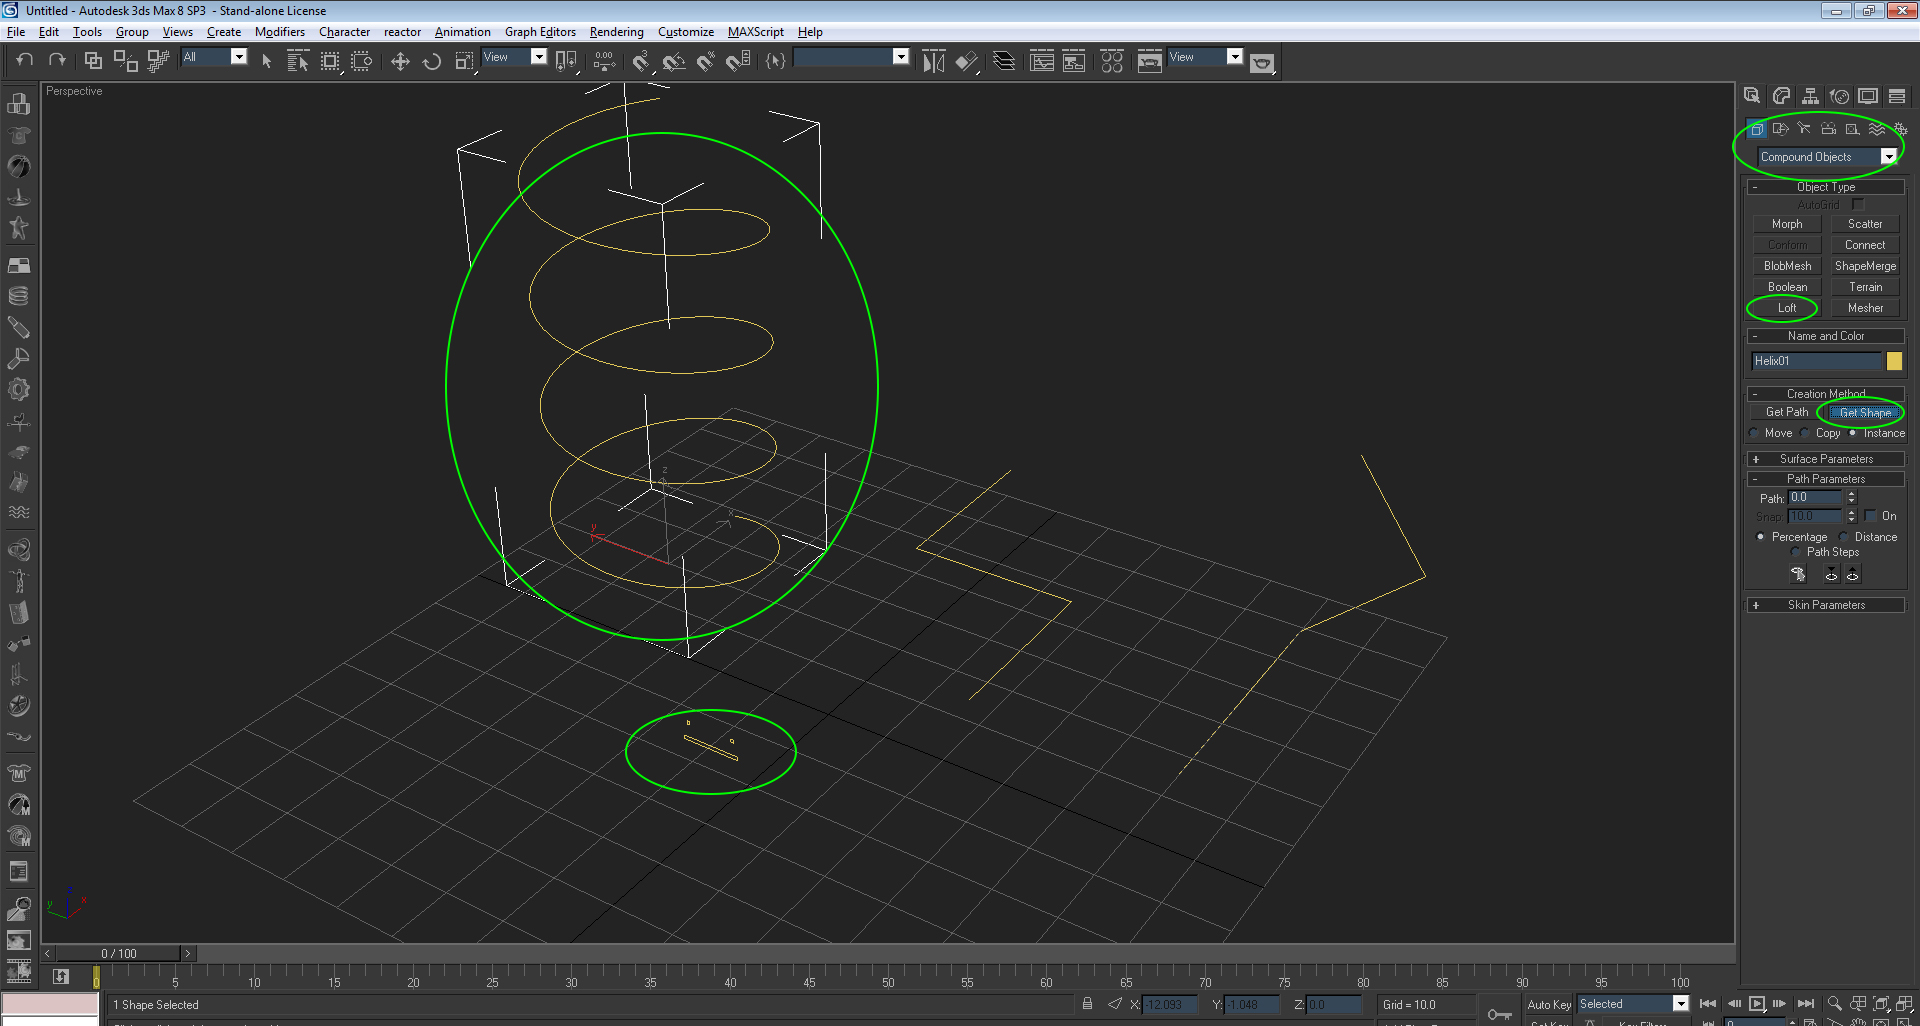
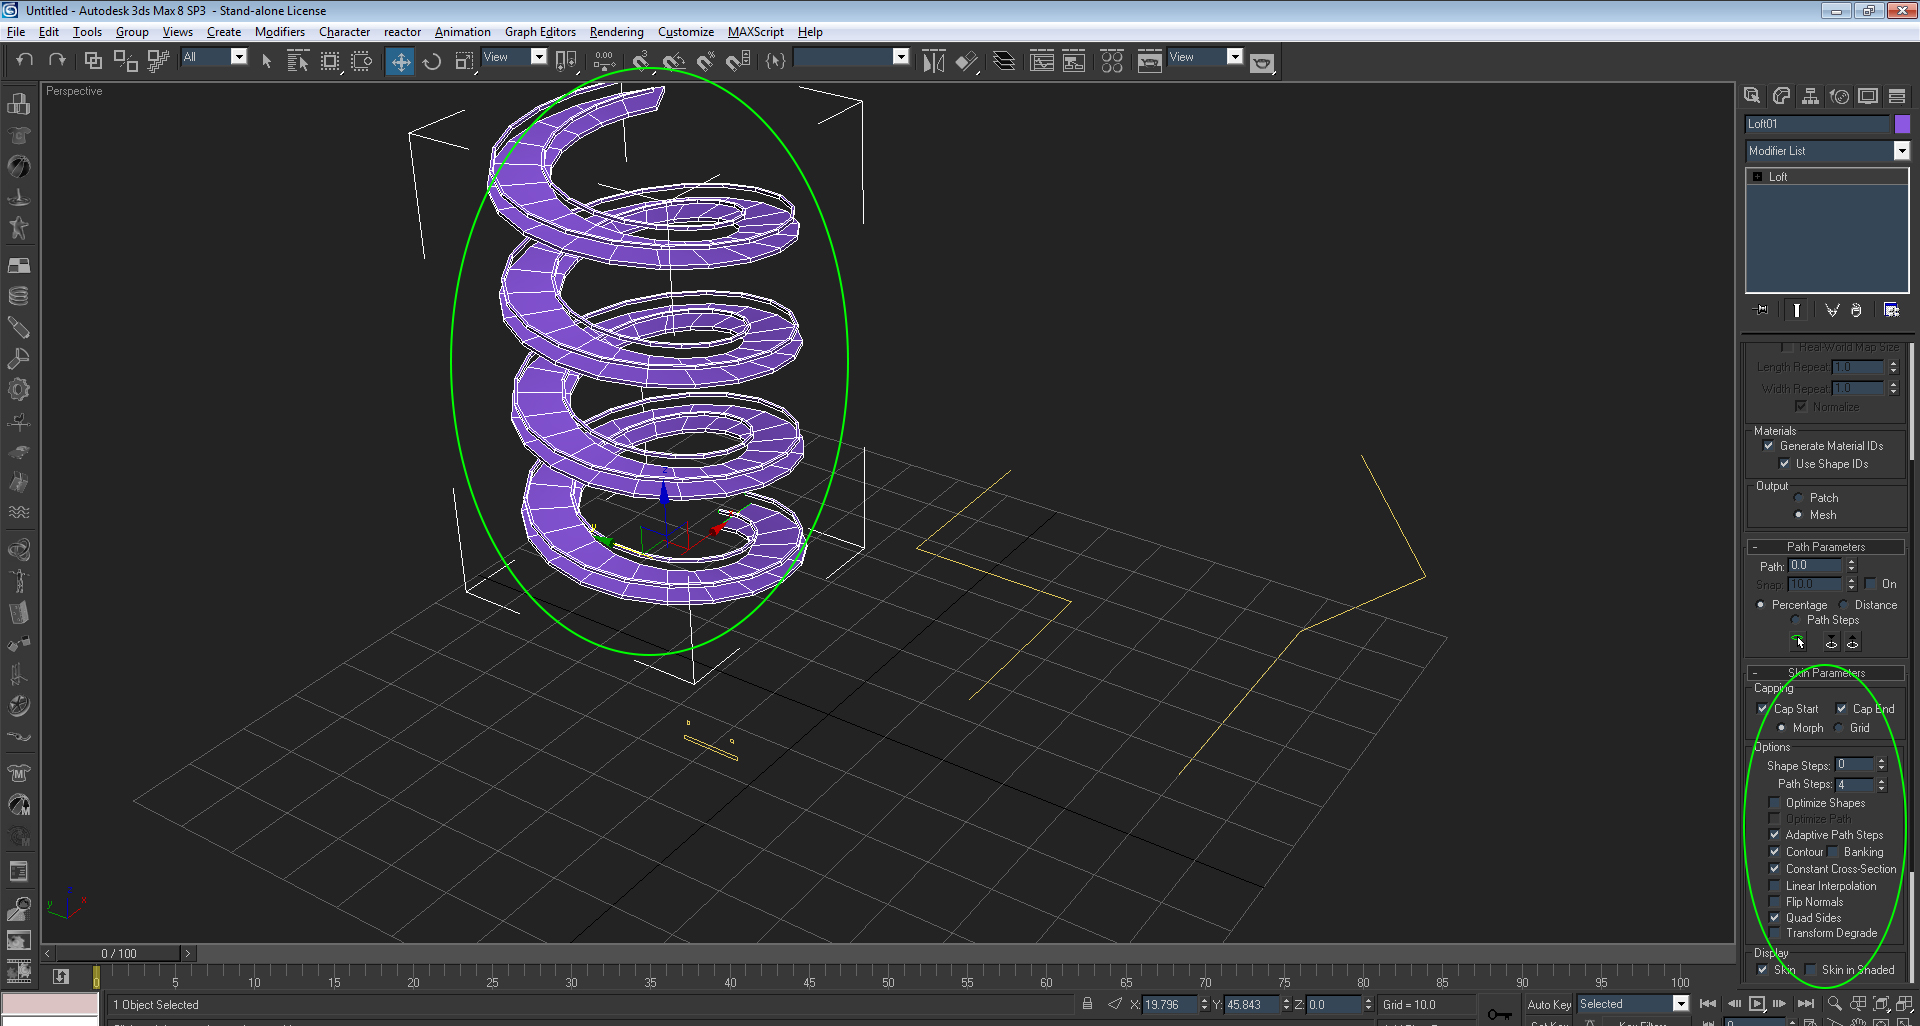
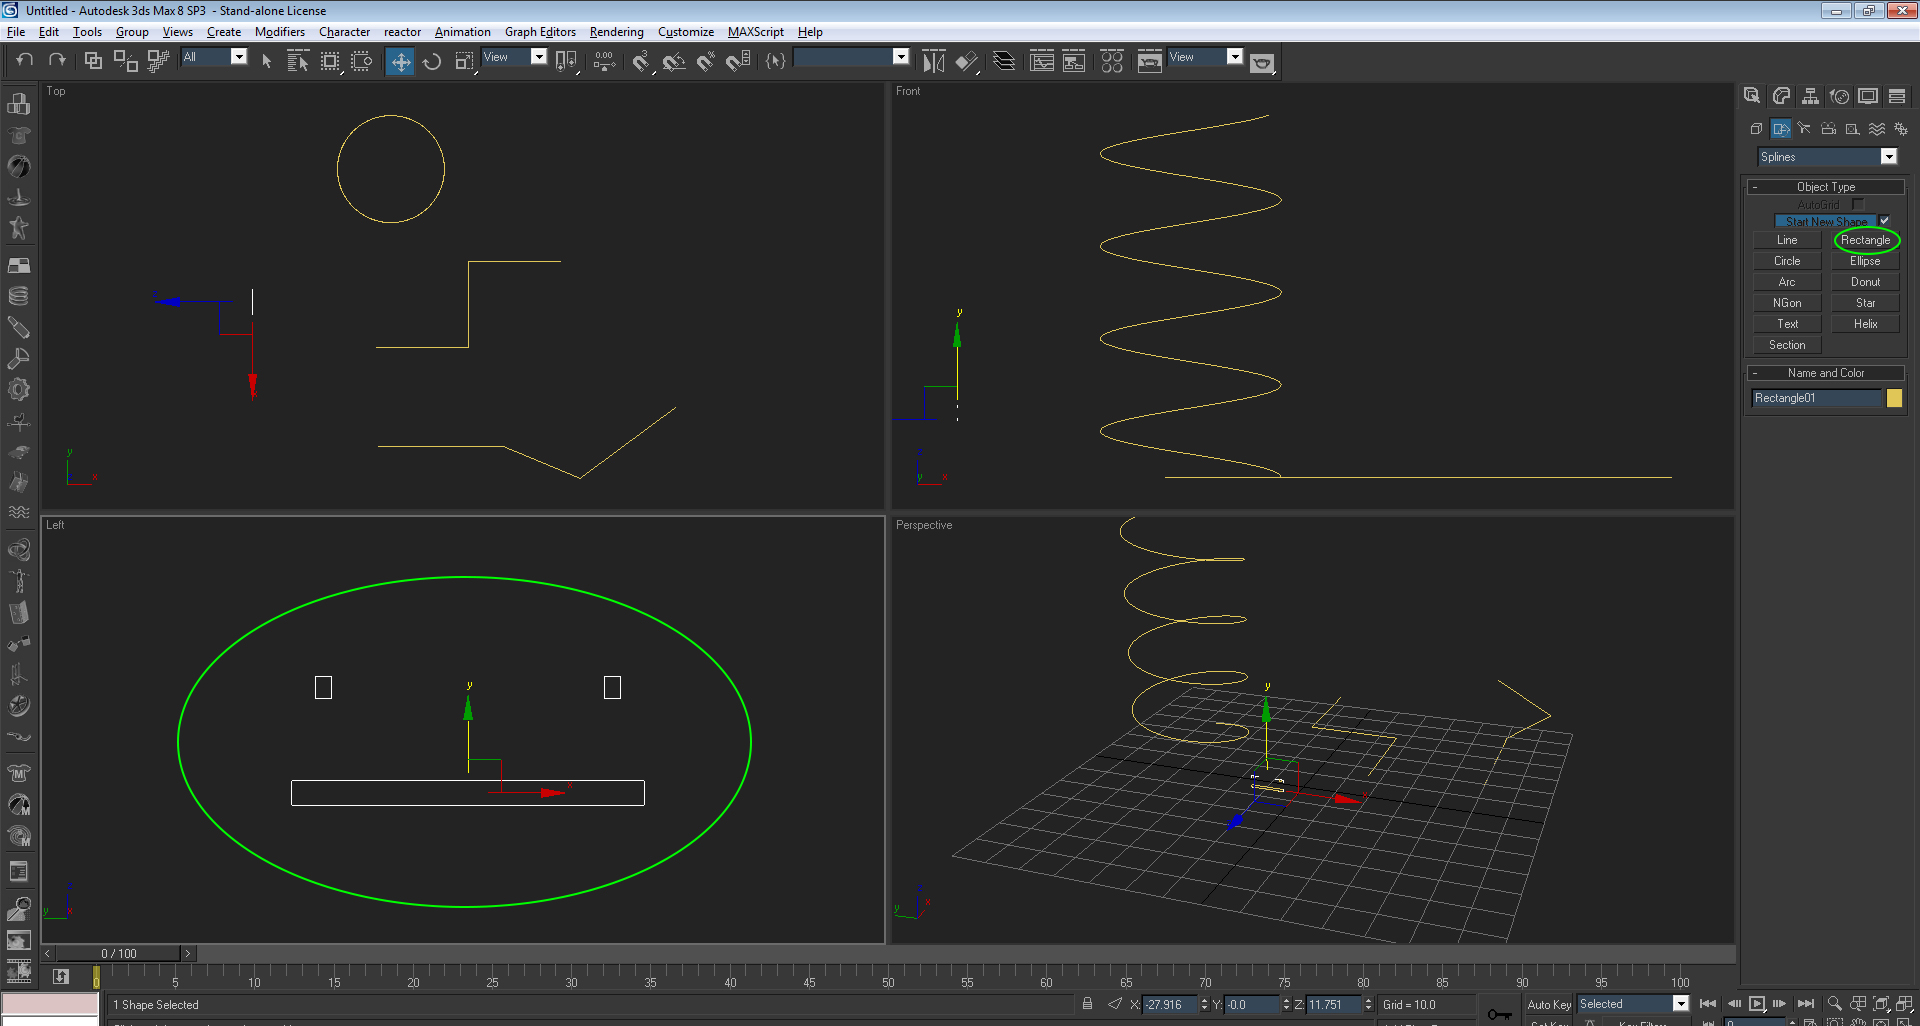
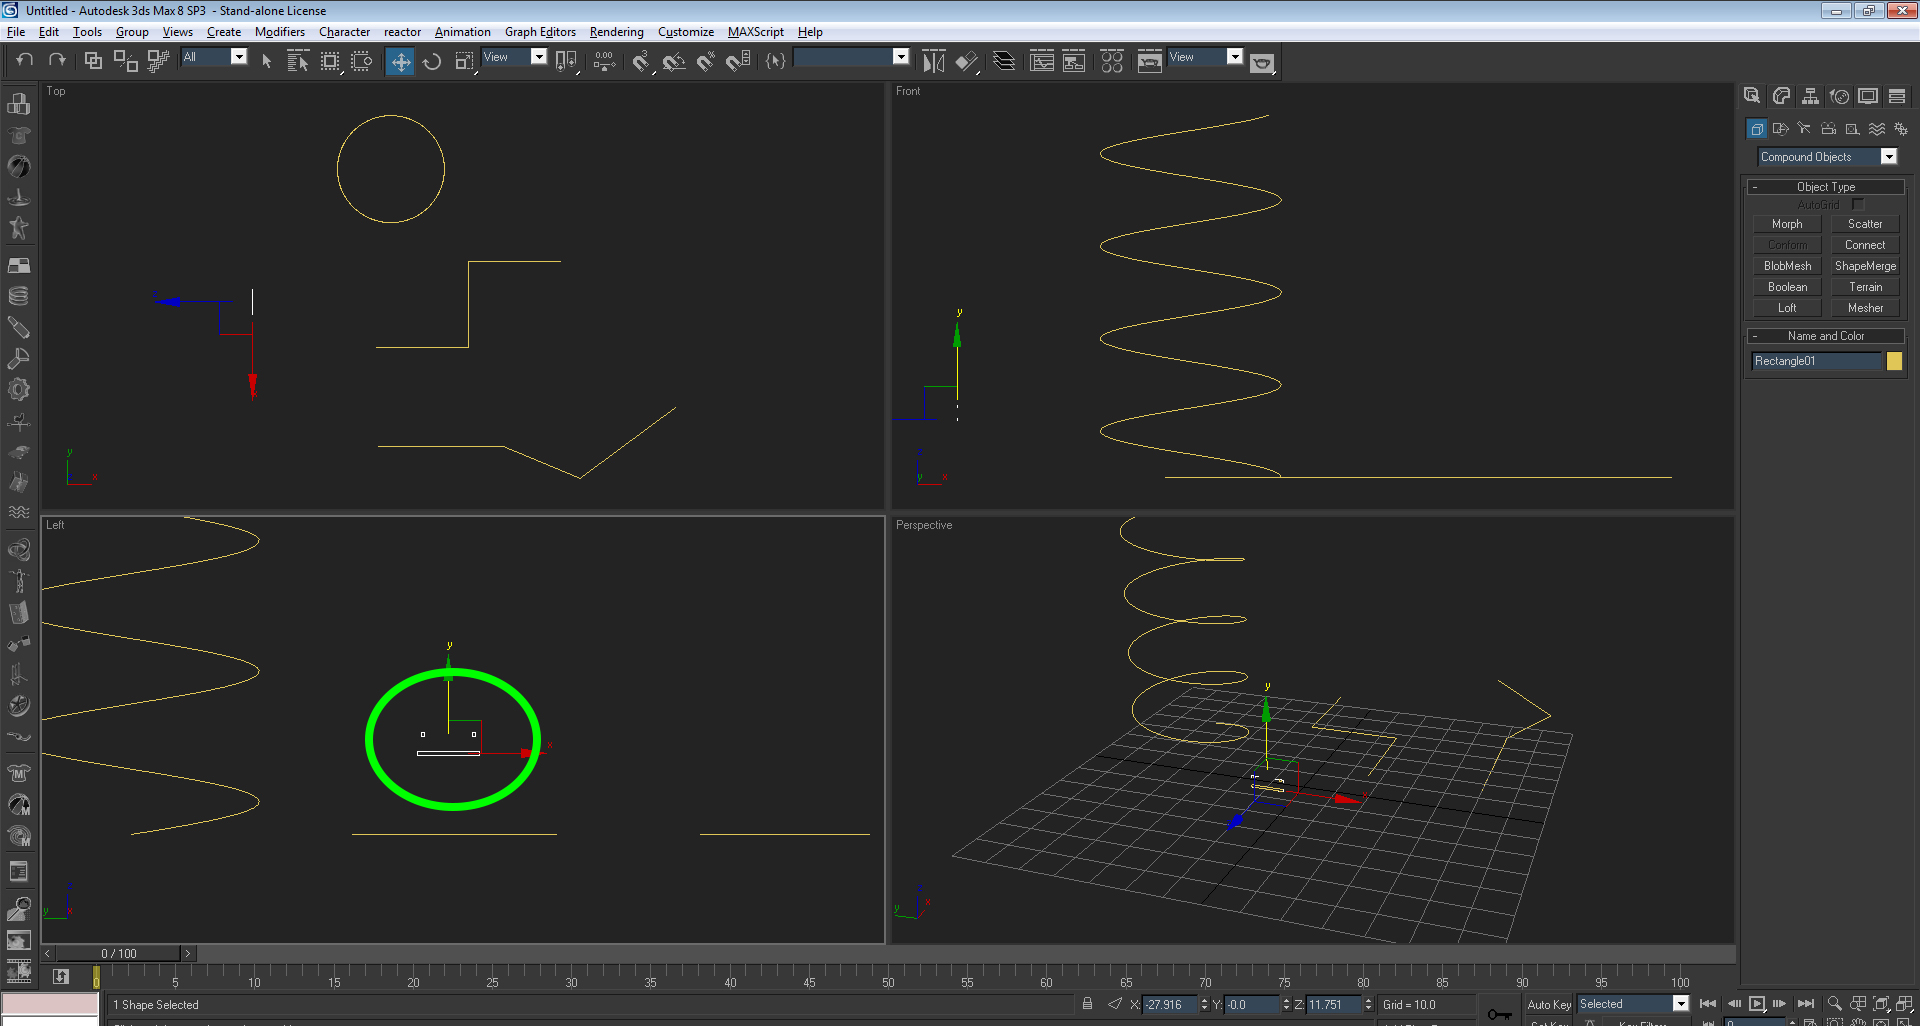
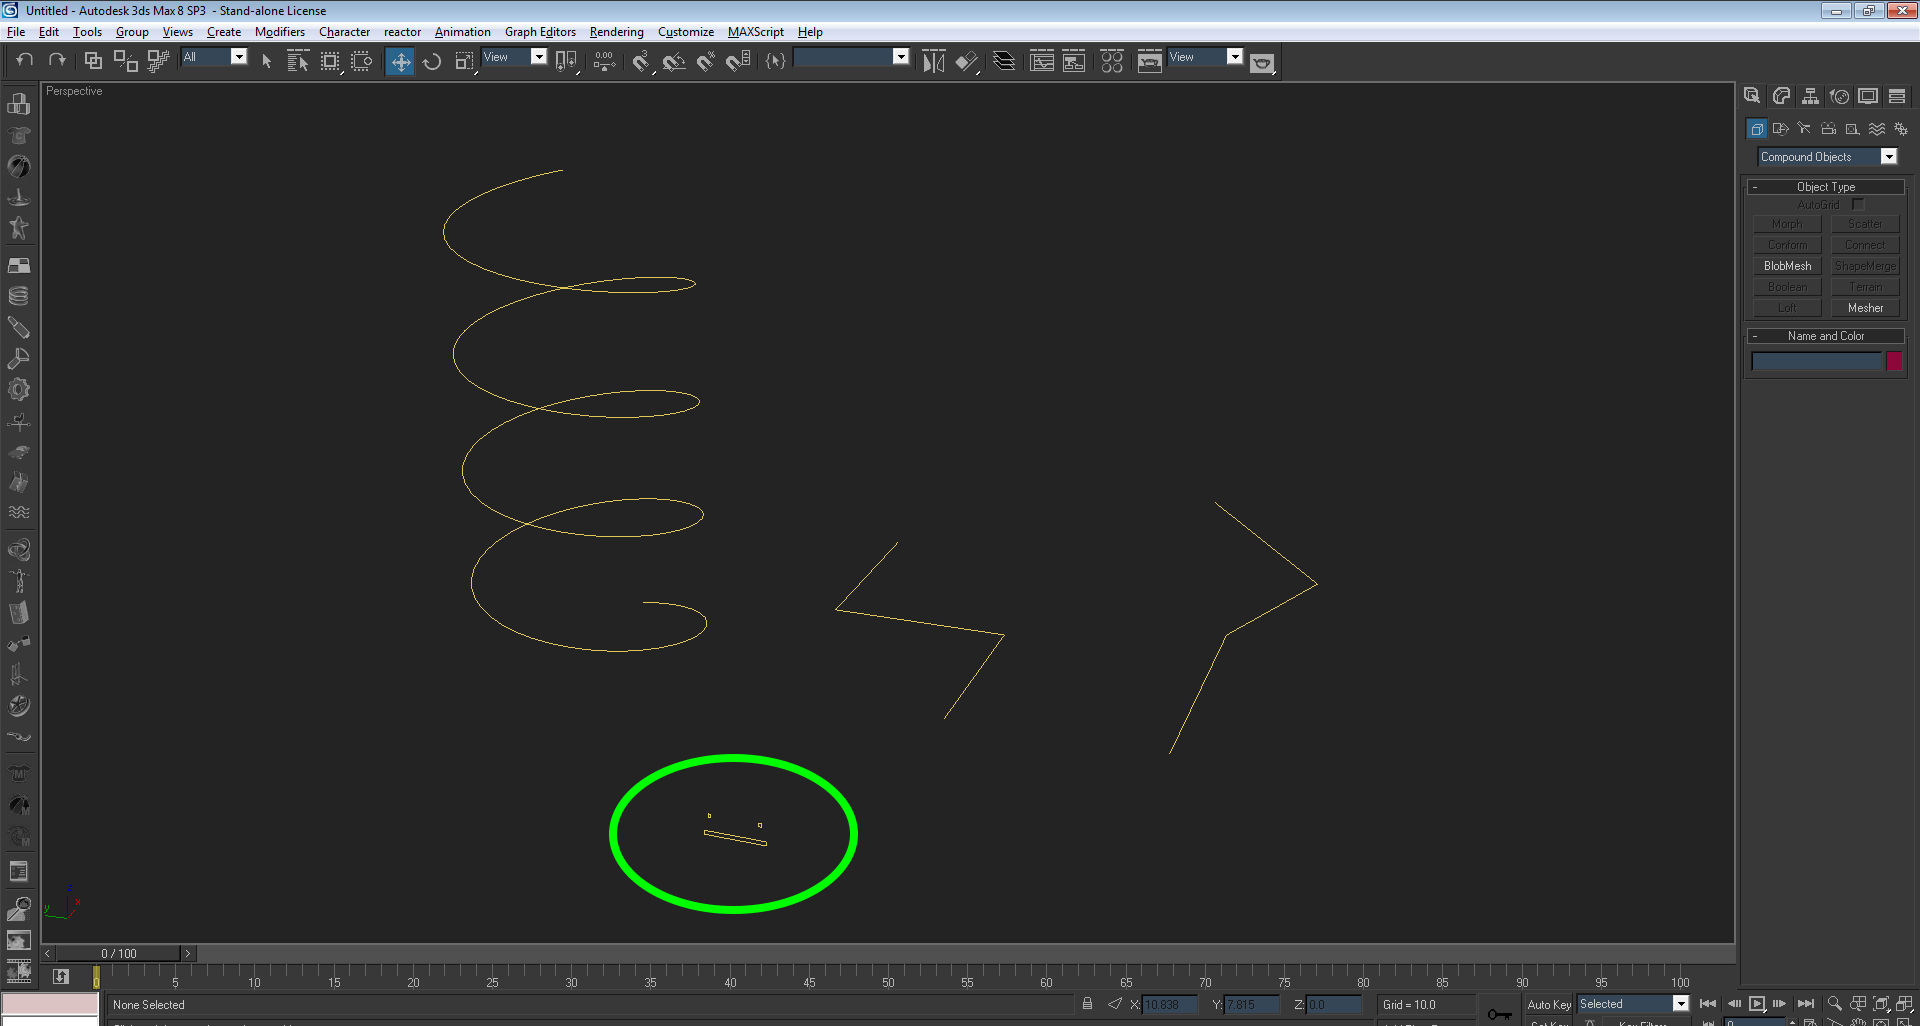
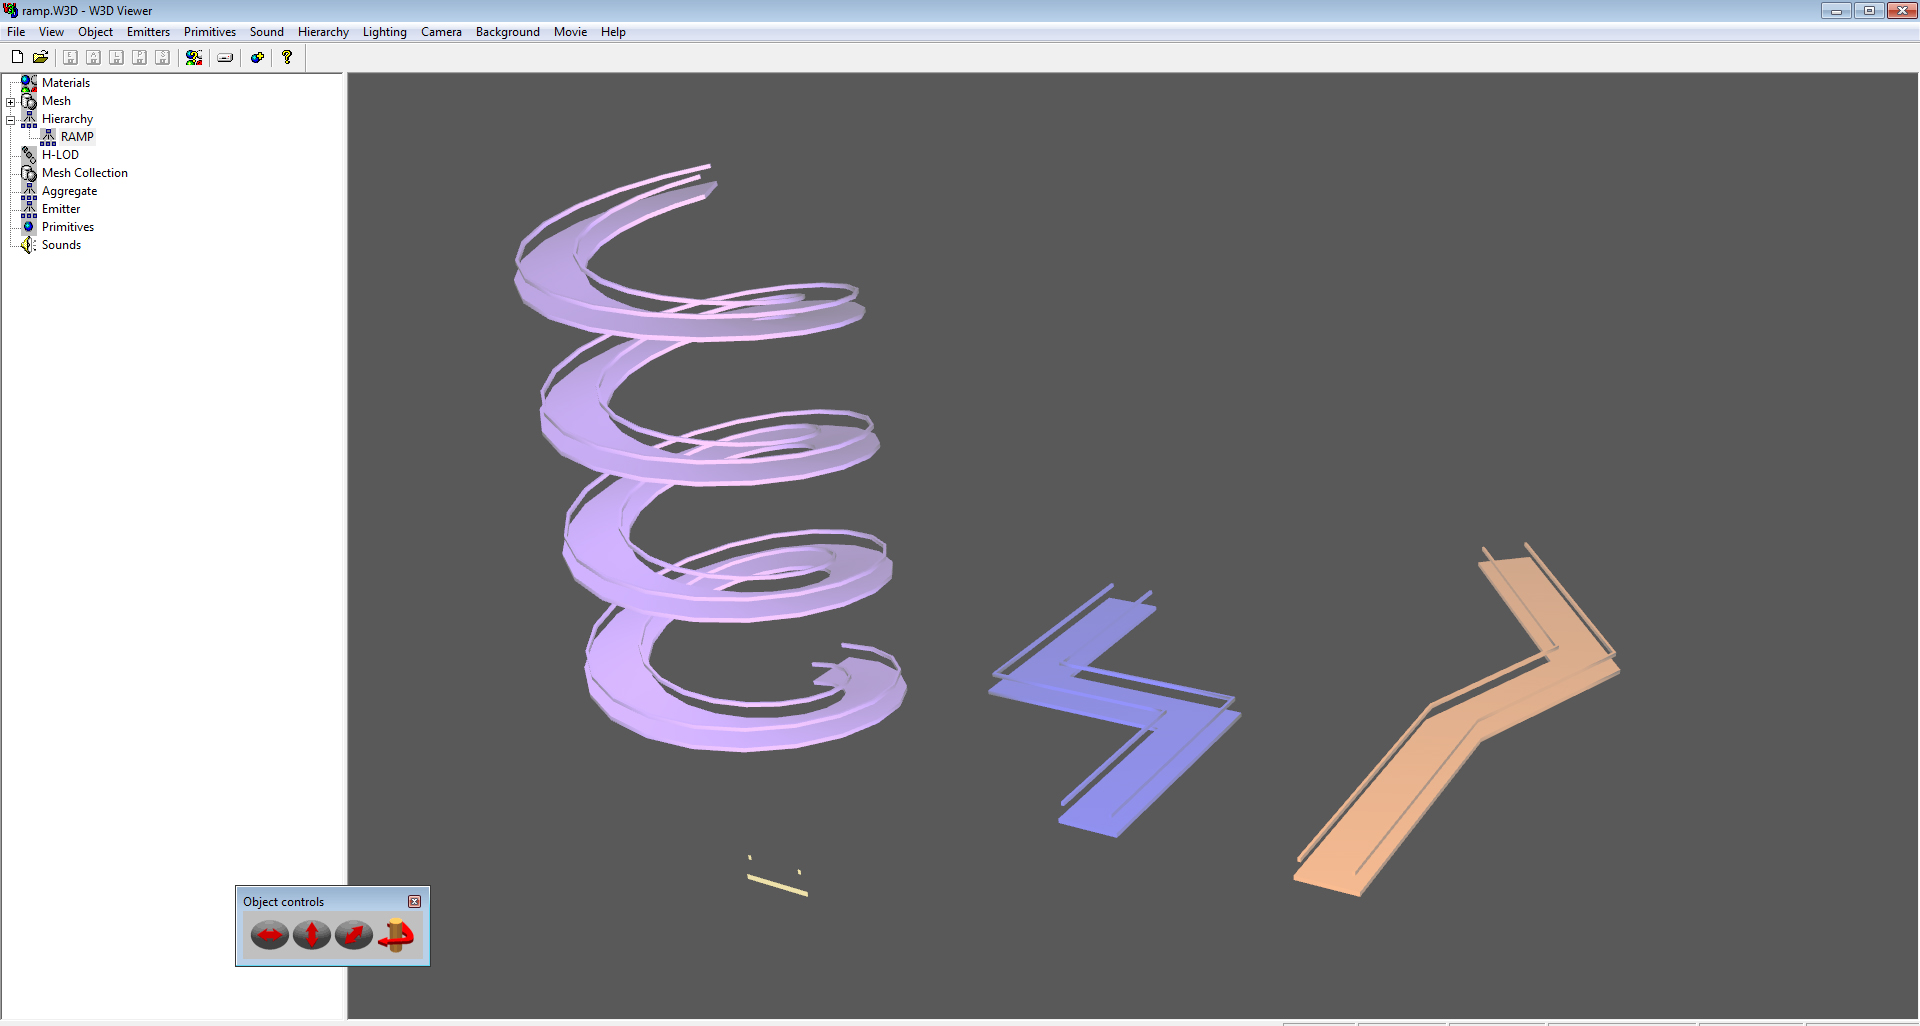
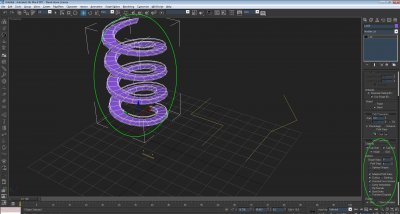
 Quick tutorial to create ramp structures like spirals, catwalks etc. Cuts down modelling time to seconds. I am showing the basics of splines and loft tools for use W3D maps. Here is my maxfile with my splines I wish to make into climbable ramps, catwalks with rails. The circled spline is made up of rectangle splines oriented upright on the Z-axis, it makes the general form I wish to create for my helix, line splines above! Here I've selected the helix spline, with it selected press the 'geometry' button and where the 'standard primitives' rollout is click on 'Compound Objects' and select 'Loft'. Press 'Get Shape' under 'Creation Method' with instance on. Then click on the rectangle splines that make up your ramp. catwalk shape.. Once the loft has been completed it will give you a mesh to work with, my image shows the correct settings used for the helix ramp. Just copy my settings. Simply copy the same steps from the helix onto the other line splines and you will achieve the same results! Modelled in seconds! not hours! Completed and working in W3D viewer! Experiment and you can make some awesome things with this method!
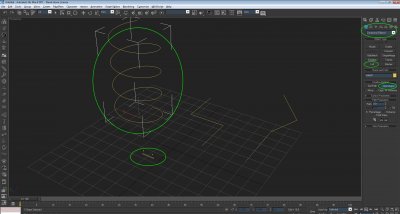

-
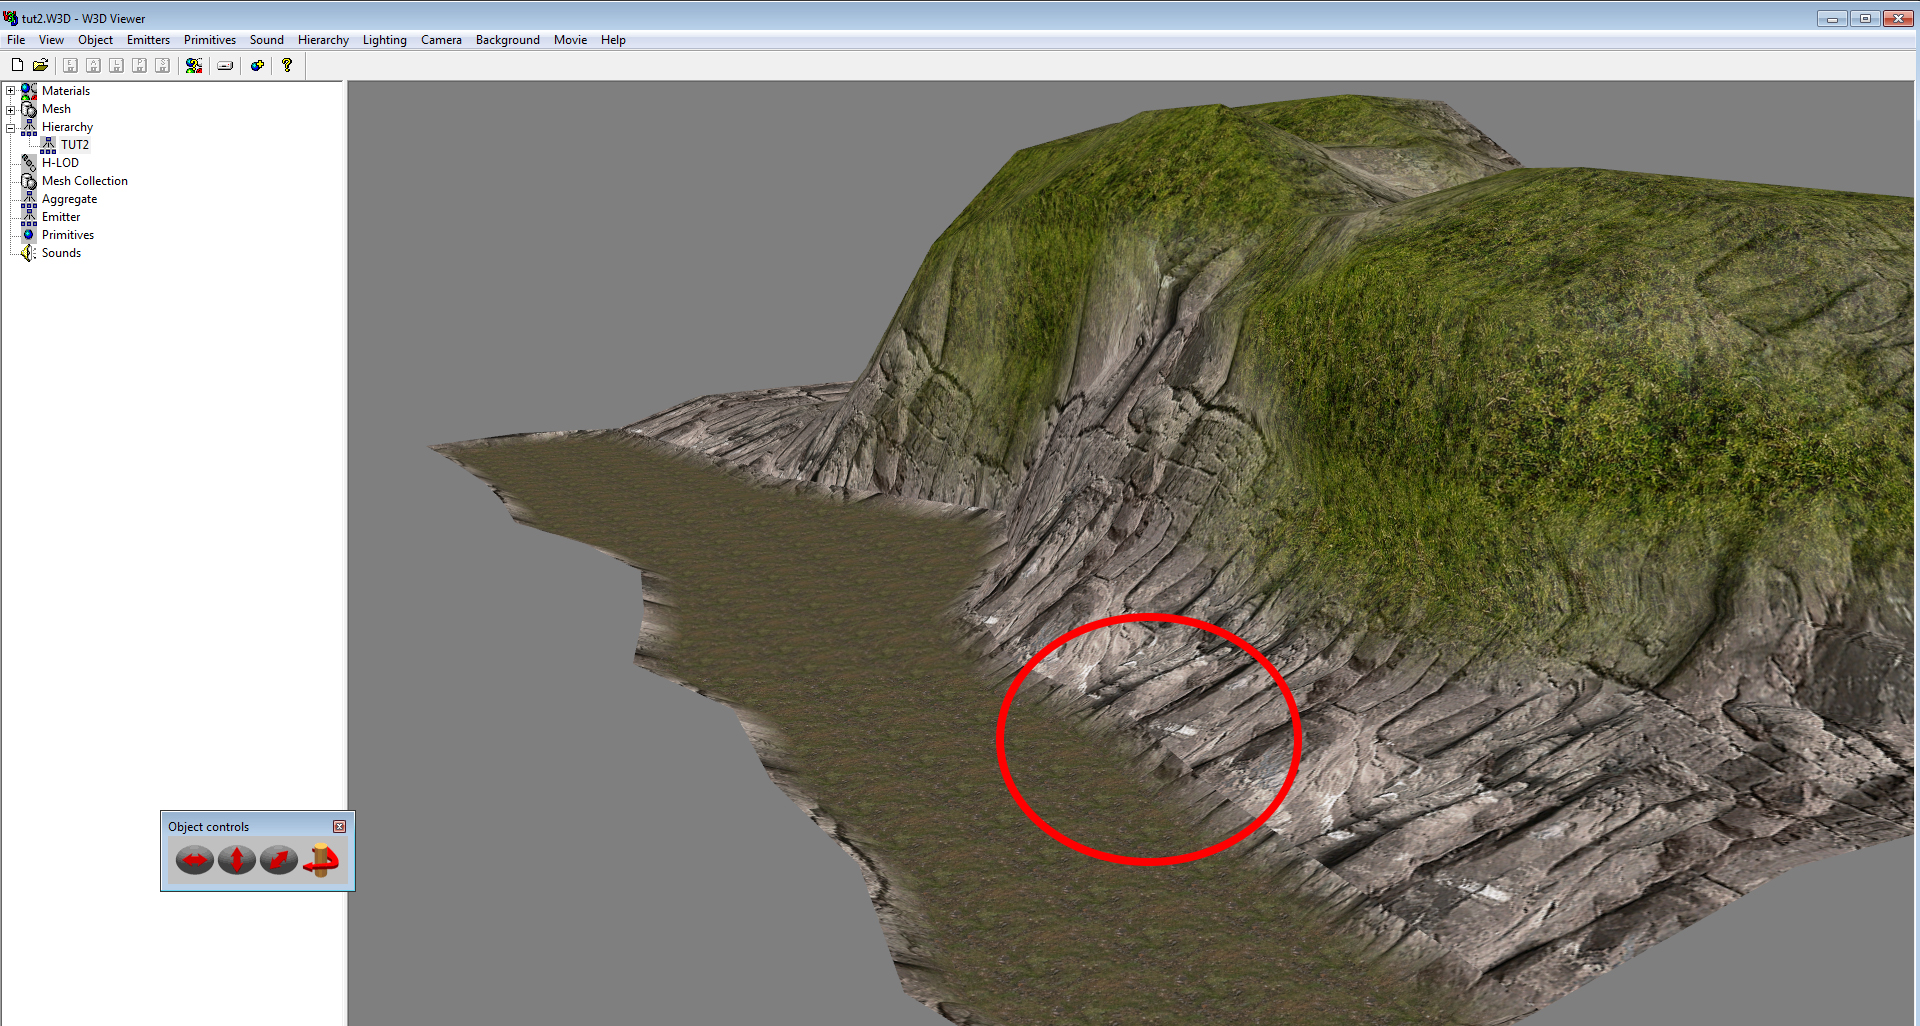
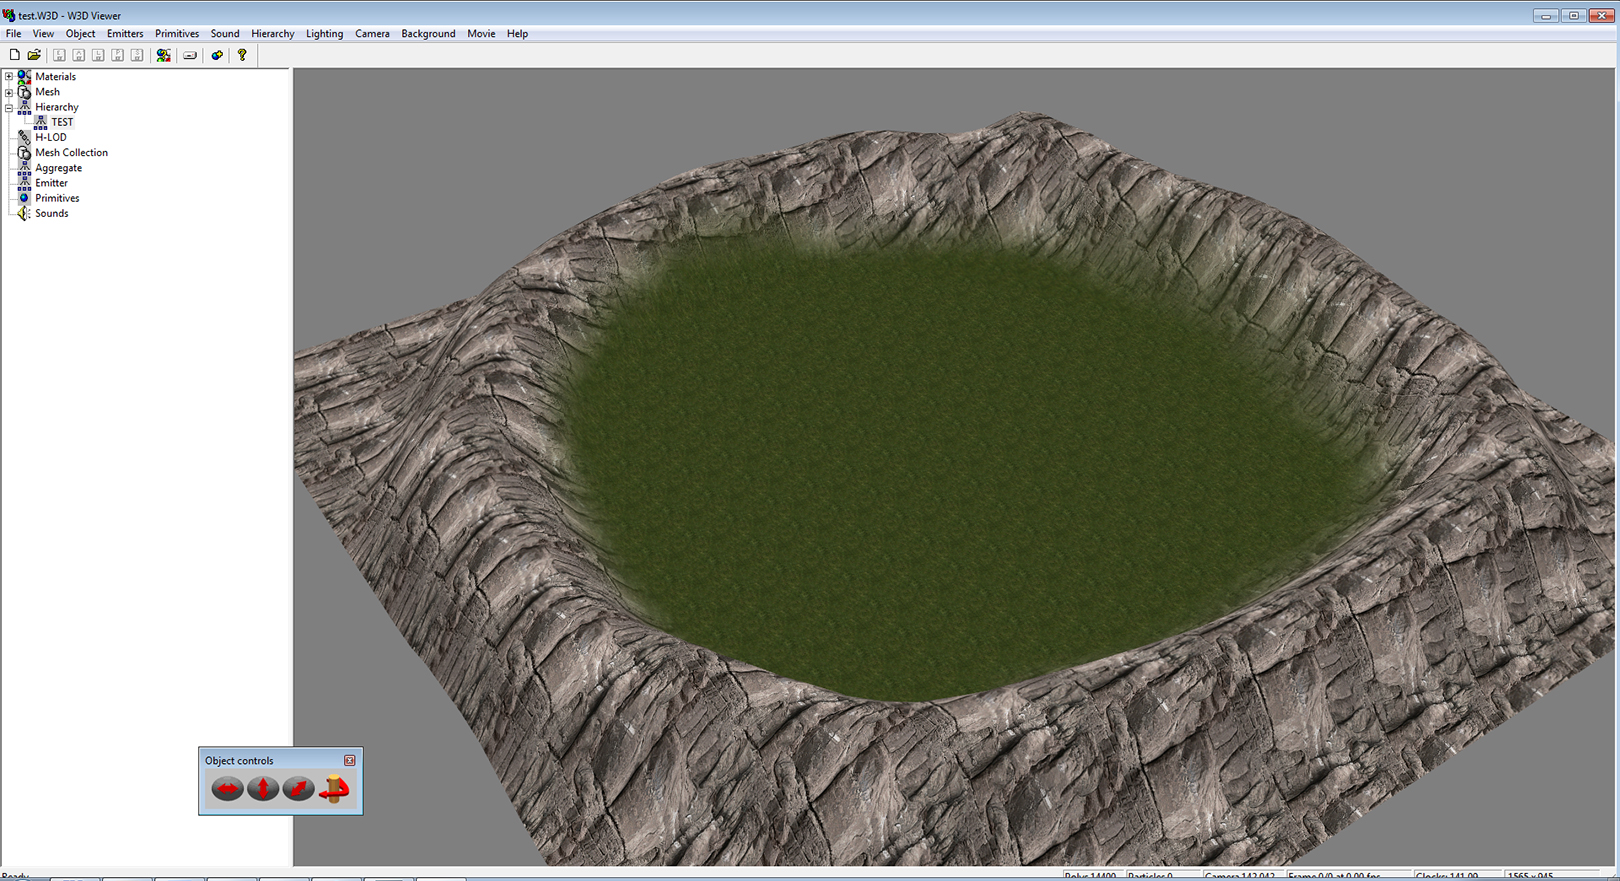
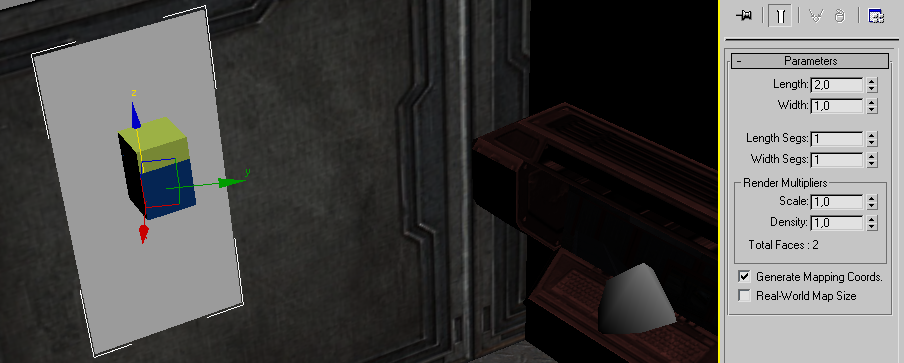
This tutorial will cover how to align materials in max to have proper alignment for alpha blends, etc. Pretty much fixes issues with seams on objects in scene. This is a section of my test map that I am having issues on seams. The alpha blended section materials do not align properly and cause it to look unsatisfactory. This gif basically shows how to align all materials in the scene to x,y,z coordinates to 0,0,0. Basically all we do at this point is right click each object that has a material and select 'Gizmo' from the roll out, once selected the small yellow material box will show up.. at that point we will click on the x,y,z boxes on the bottom of the application and it will automatically set it to 0. Do this for every other box. Repeat for all objects that are textured (you will need to apply the gizmo to all UV modifiers to work properly and make sure that all materials have the same UV scales, e.g cliff has a scale of 15x15 planar, all other objects that share that texture must match.) After the gizmo adjusting this is the final product! Very nice!
-
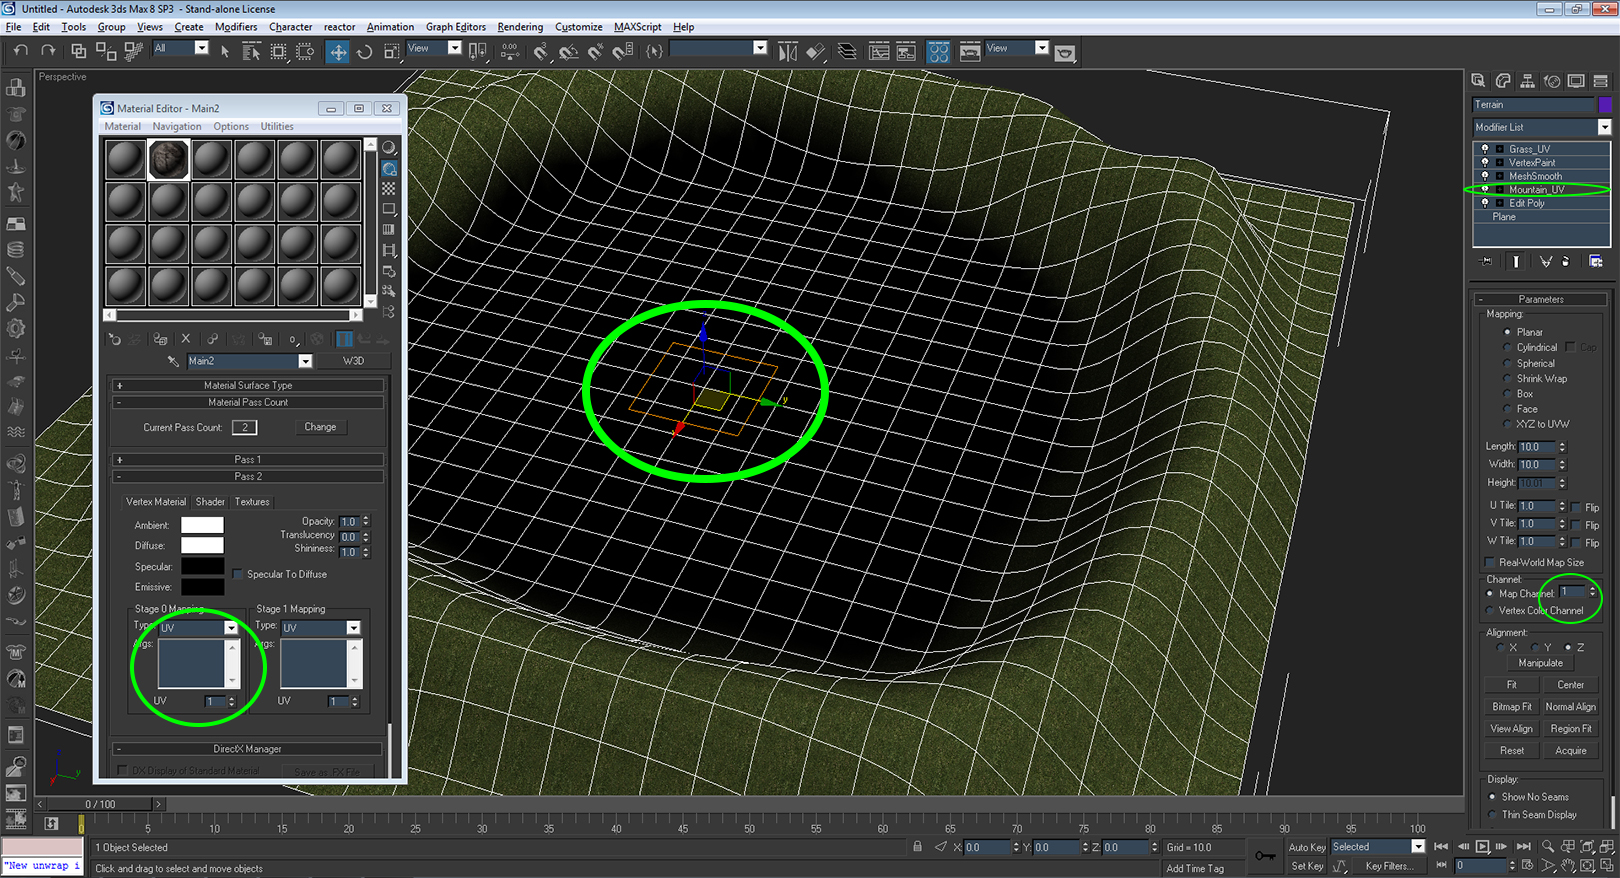
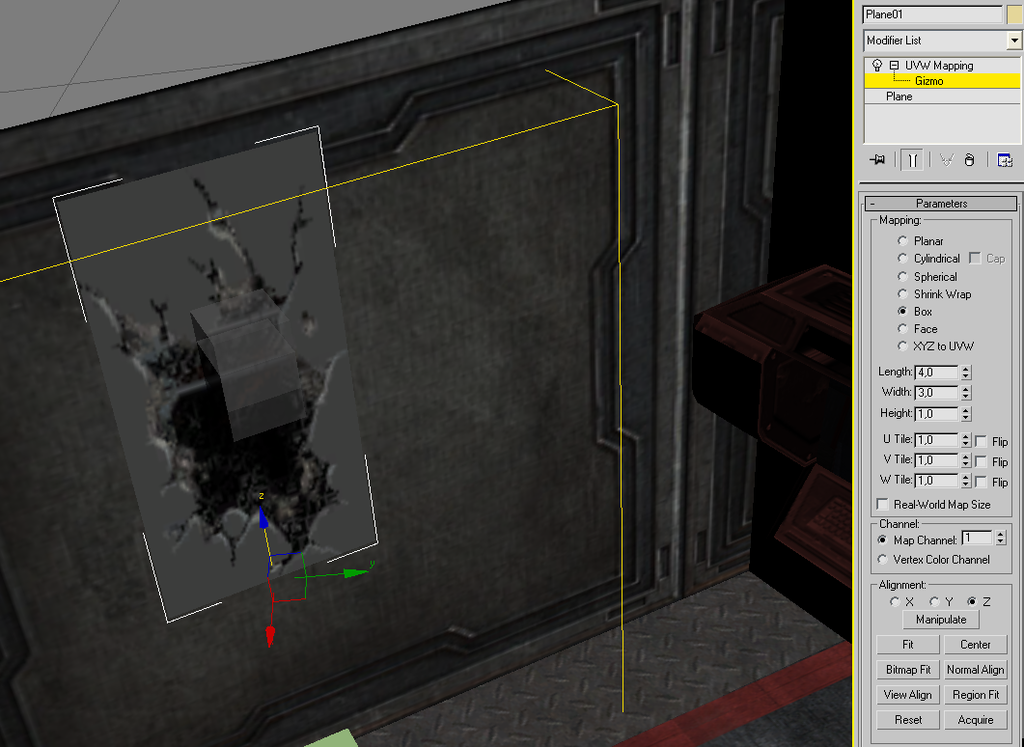
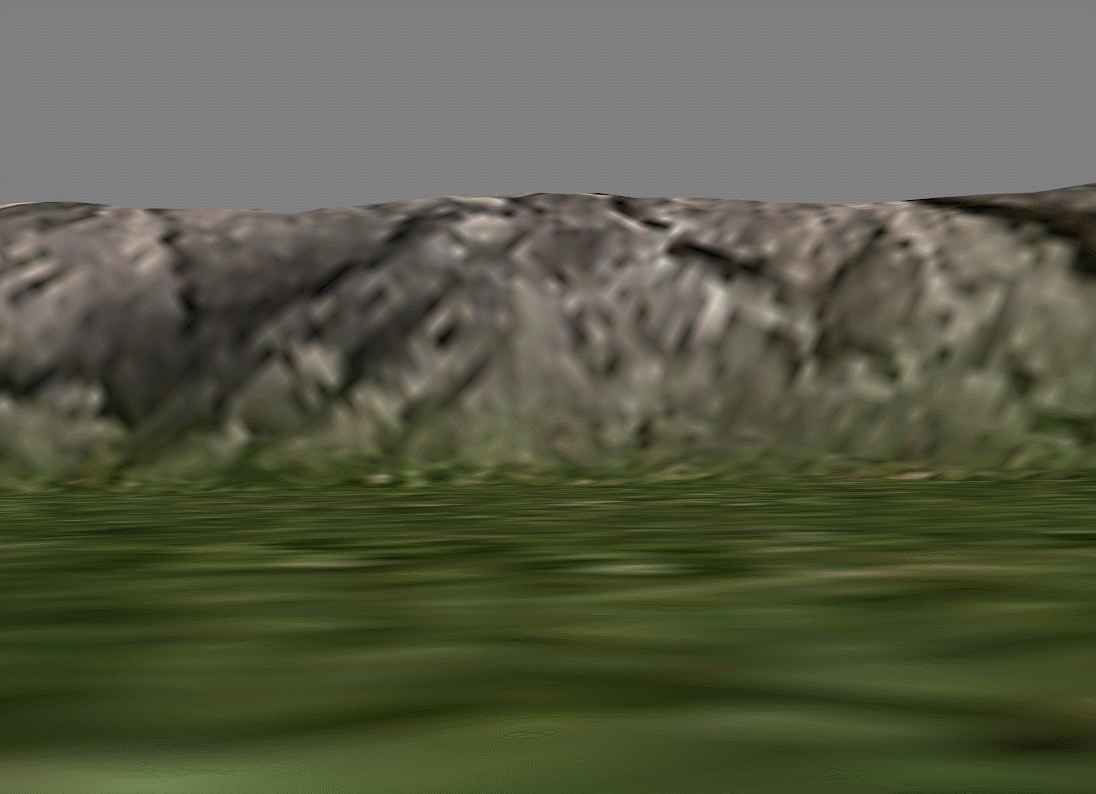
So this tutorial is a short one. Will basically show you how to setup multiple UV scales for an object by using multiple passes. This is useful for terrain texturing, alpha blending. Allows the artist to properly scale different textures, for instance a mountain texture with a grass texture and not be overly stretched and look horrible. 1. This is my start file with default UV mapping modifier. Textures are stretched and will not look good at all ingame! 2. So I will return to my max file and make adjustments. At this point we want to adjust the grass first. Let's first start by applying a UV mapping modifier to the mesh. Set your parameters to your liking, here I used a planar with 3x3 scale. Make sure to apply the UV pass to something other than default pass '1', also make sure to set the UV pass to the same number as set in the material modifier. All green circles. The orange box in the middle is our scale of the grass texture! Our results on the second screenshot is much better than what we started off with. 3. Next we will adjust the mountain cliff texture to something more refined. Same steps as above (2). Although I left the cliff texture to the default '1'. I made sure to scale the texture a bit bigger, here I used 10x10 planar. You may have to play with the settings and find your own preference! The results are much better than the default we started with. Now we have the cliff and grass textures separated and can now be adjusted individually! 4. After some further adjustments to UV scales I have a completed terrain with proper flowing textures and looks great! Here is the final results! 5. GIF animation of texturing work completed! From beginning to final progress!
-

4 - Competent Adding special effects and rigging a character
moonsense715 posted a topic in Characters
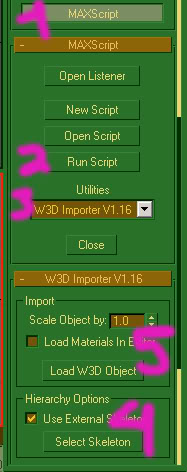
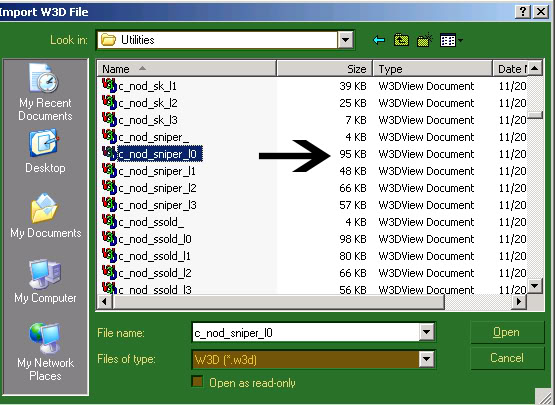
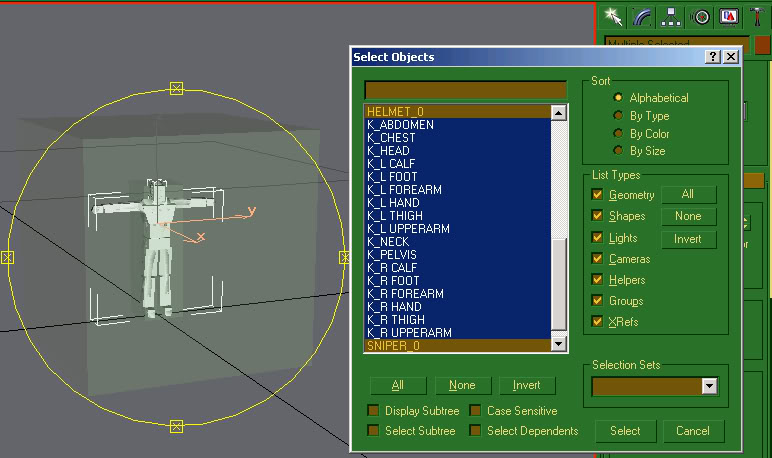
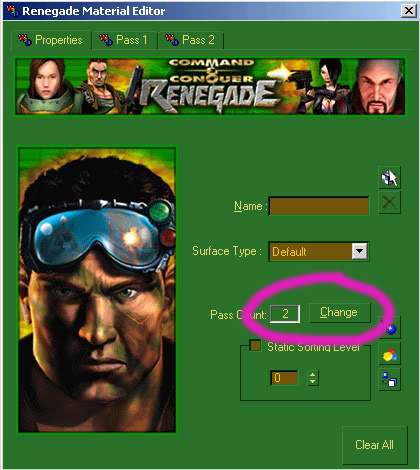
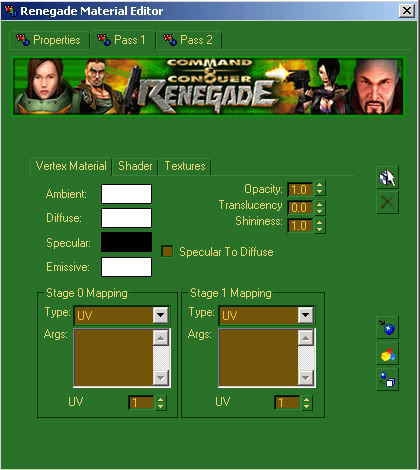
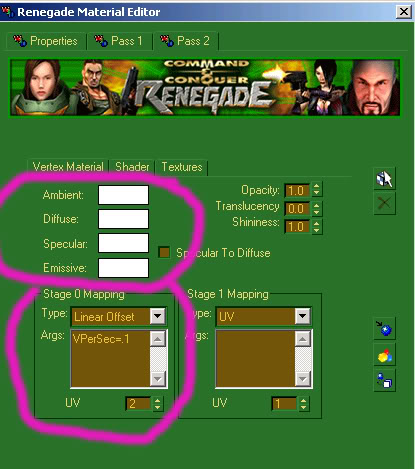
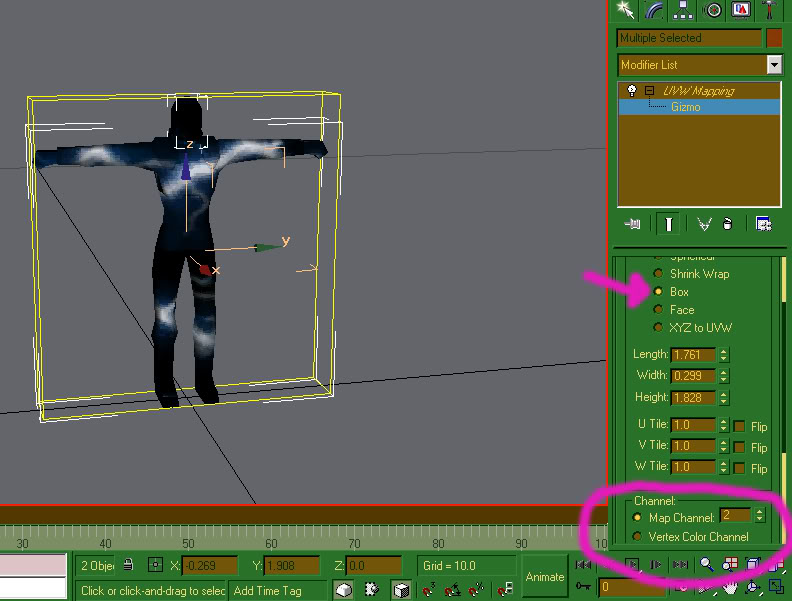
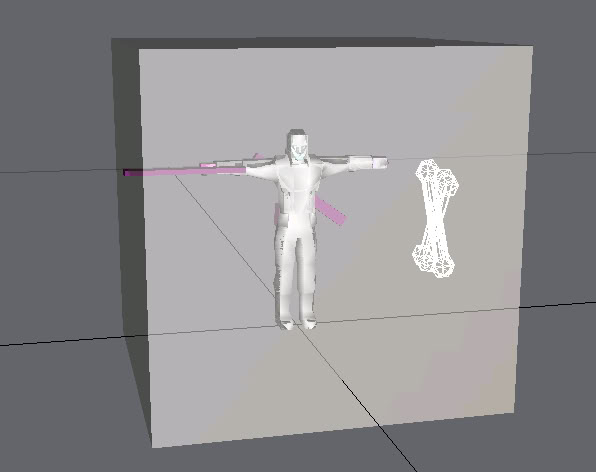
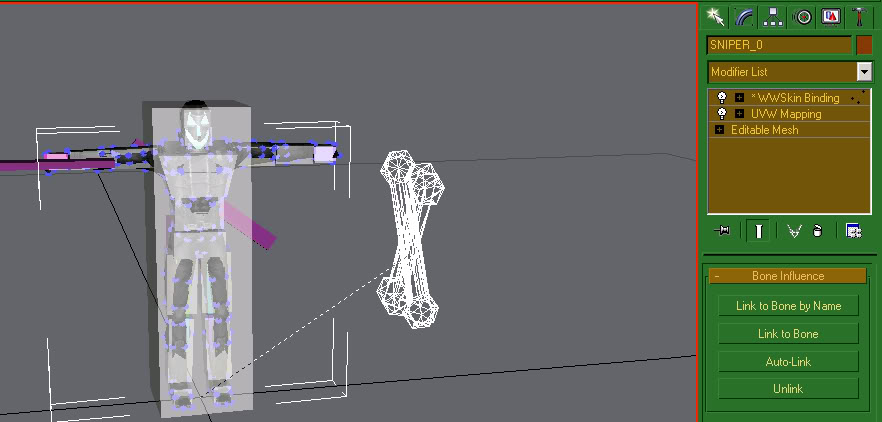
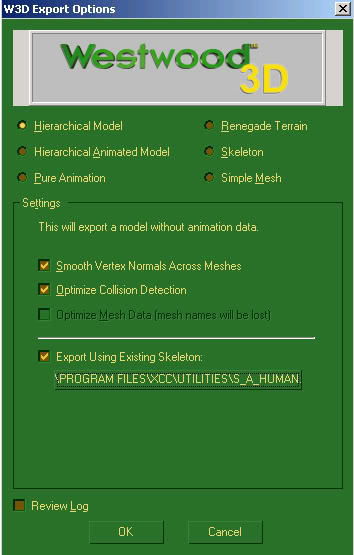
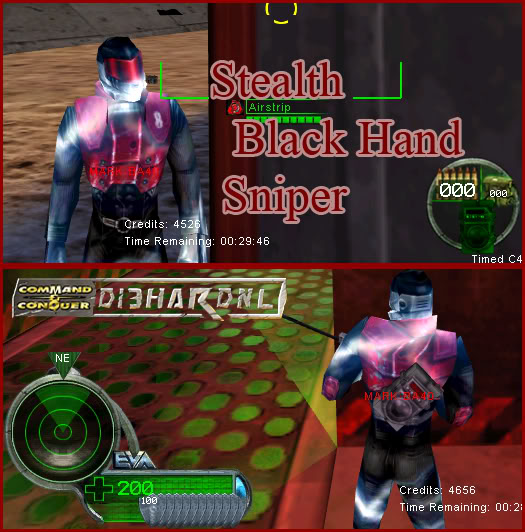
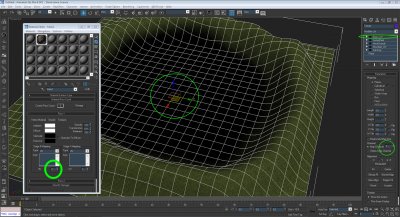
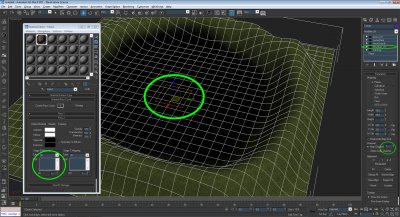
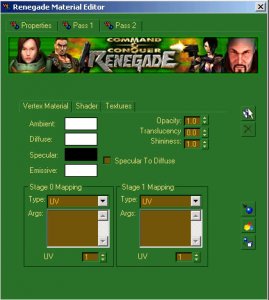
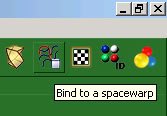
Author: Di3HardNL Skill level: 4 This tutorial was made on request by Di3HardNL. It explains how to add texture effects to a character in RenX. You will also learn how to bone a character. If you don't understand this tutorial properly, you can download the final product and Gmax scene in the attachment. GL. If you use the same w3d importer as me follow these steps ( You can download file in attachment) -Open Renx -Follow steps of the picture above, 1- Go to hammer press Maxscript -> Run script -> select the w3d importer. Before you open a character you must load the skeleton first(step 4). For male characters select s_a_human.w3d. For female s_b_human.w3d. Then load the actual character model you want to edit. -Open the right file, this one is for the nod sniper. (c_nod_sniper_l0.w3d - first export this file from XCCMixer) -Delete everything except for the character meshes. So delete everything except Helmet_0 and Sniper_0 -Re-apply the original texture (c_nod_sniper.dds) First open the .dds file in any photo editing program and save it as .TGA. Otherwise you can't apply it in RenX. -Now we are going to add the moving effect (stealth effect) to this character. Open stealth_effect.dds in your photo editing program. Edit this file the way you want. Save as .TGA (Don't name it stealth_effect but something else) To apply this to your character use the same settings as mine: - 2 Passes Pass 1 Vertex Material: Shader: Don't have to change anything here Textures: Set the character texture as stage 0 texture. Pass 2 Vertex Material: Shader: Set blend mode as 'Add' Textures: Set the moving effect (Stealth effect) as stage 0 texture. You can position the texture for the moving effect (if you have UV 2 selected in material settings) by selecting BOTH meshes and then click 'Modifiers' -> 'UV Coordinates' -> UWV Map. In the right side at the MODIFY tab you can see some numbers. I suggest simply click on 'box' MAKE SURE MAP CHANNEL = 2 (Because UV = 2 in material settings) Now the character is done, only we will have to re BONE it again. In Renx go to 'File' -> 'Merge' and open the Male.gmax scene. (Located in Renegadepublictools folder -> 'HowTo' -> Characters. I also attached that file to this post. Press 'H' and delete the following files: body_0 (this is the body file for the havoc which you imported with male.gmax) head (head file for havoc) Boundingbox Now select the mesh Sniper_0 Press the 'bind to spacewarp' button Now click and hold on the mesh Sniper_0 and release the mouse when you are on the bonething. Notice the right menu now (go there by clicking on the blue button on the right, the 'modify' tab. Now select the 'select object' button, and select ALL those blue dots. Just click and hold mouse over the character to select them all. When you selected them all press the 'Auto-link' button on the right menu. When you did that select the Helmet_0 mesh and do the same thing as we did for the Sniper_0 mesh. (Where we started 'bind to spacewarp') BUT after you selected all the blue dots don't click on Auto-link, but on 'link to bone' Now press 'H' and select c_head and click on 'pick' Now your character is all set and done to EXPORT it. Go to File -> Export and save it in your renegade DATA as c_ag_nod_sniper.w3d 'export using skeleton' Here you must select s_a_human.w3d END RESULT + FILES IN ATTACHMENT Stealth BlackHand - Gmax Scene - W3d Importer - Di3HardNL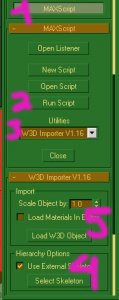


-
4 - Competent Using existing hand animations on custom weapons
moonsense715 posted a topic in Weapons
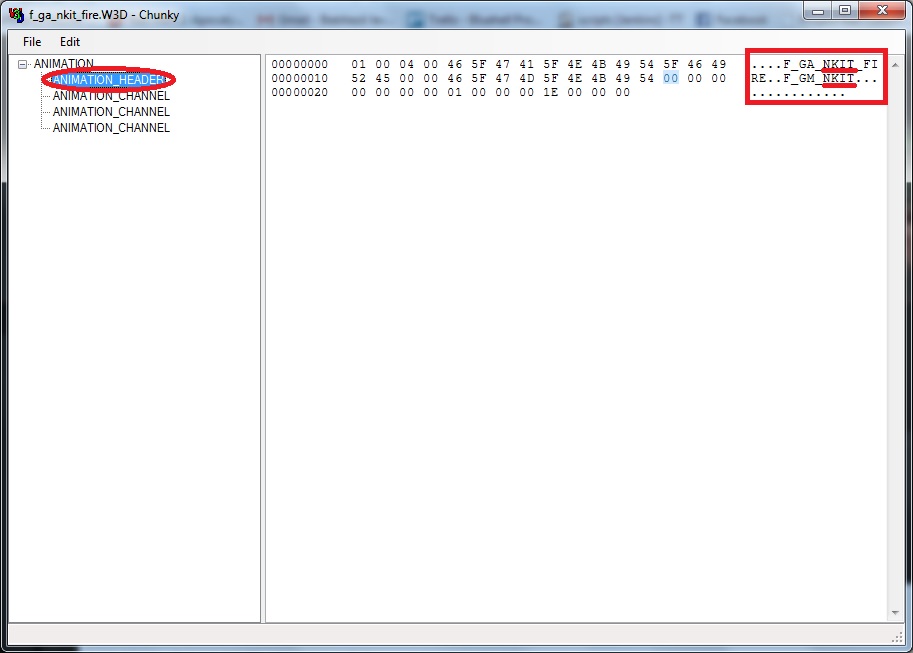
Author: Oblivion165 Skill level: 4 In this tutorial I will show you how to use the original Westwood weapon animations on your custom weapon. It works for any weapon in any W3D game though, not just the Renegade ones. For example, some of the TS: Reborn weapons were animated this way. Step 1: Load Renegade (or any other W3D game) and find a weapon that fits your guns style. The Nod laser rifle from Ren is a safe bet because it uses the most generic reload animation. Step 2: Using RenegadeEx (or XCC Mixer), extract all the animations associated with this weapon. IE: f_gm_lsrr, f_ha_lsrr_(enter/exit/fire/idle/reload), w_lsrr, w_lsrr_b Step 3: Rename all the ANIMATION filenames (f_ha = hand animation) to your weapon's 4 letter abbreviation, in my case with the thompson from Roleplay 2, to f_ha_thom_enter and so on. Leave the gun model parts alone. Step 4: Open these files in your favorite hex editor, if you don't have one then I would suggest UltraEdit. In each file, find and replace all ascii (text) that says LSRR to THOM. (replace THOM with your weapon's 4 character abbreviation) Save all files with these changes. Alternatively, you can download and use Chunky, which was designed for w3d. Open the files with it one by one, expand ANIMATION and select ANIMATION_HEADER. You can rewrite the 4 letter abbreviations on the right side panel, highlighted on the picture. (If your keyboard switches to Insert mode, you can switch it back to normal by hitting the Insert key on the keyboard) Once done, save the file with a new name that fits your weapon's abbreviation and continue with the next animation file. Step 5: Import the original weapon model into RenX using the W3D Importer. (Start with f_gm_lsrr) -Select all the bones around the model and uncheck export geometry. -Merge your new model into Renx (with the imported weapon still intact) and line up your model to fit over the original renegade model as best as it will go. Hide or delete the original model (NOT the bones). -You may wish to change the box named "mz_lsrr1" to something more related to this Thompson, you can find all the muzzle flashes using RenegadeEx by simply searching for mz_. For this model I will use "mz_chain3", this chain gun muzzle flash matches this Thompson much better. -Export as f_gm_thom and repeat for the w_thom and w_thom_b versions of the model. (W_thom_b will not need any of the bones.) Step 6: Create the weapon presets in LE and test in game, you may need to move the weapon model around to get it to fit in the players hands just right. Enjoy.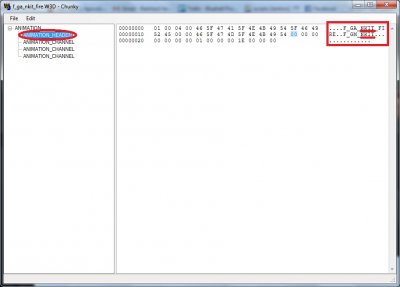
-
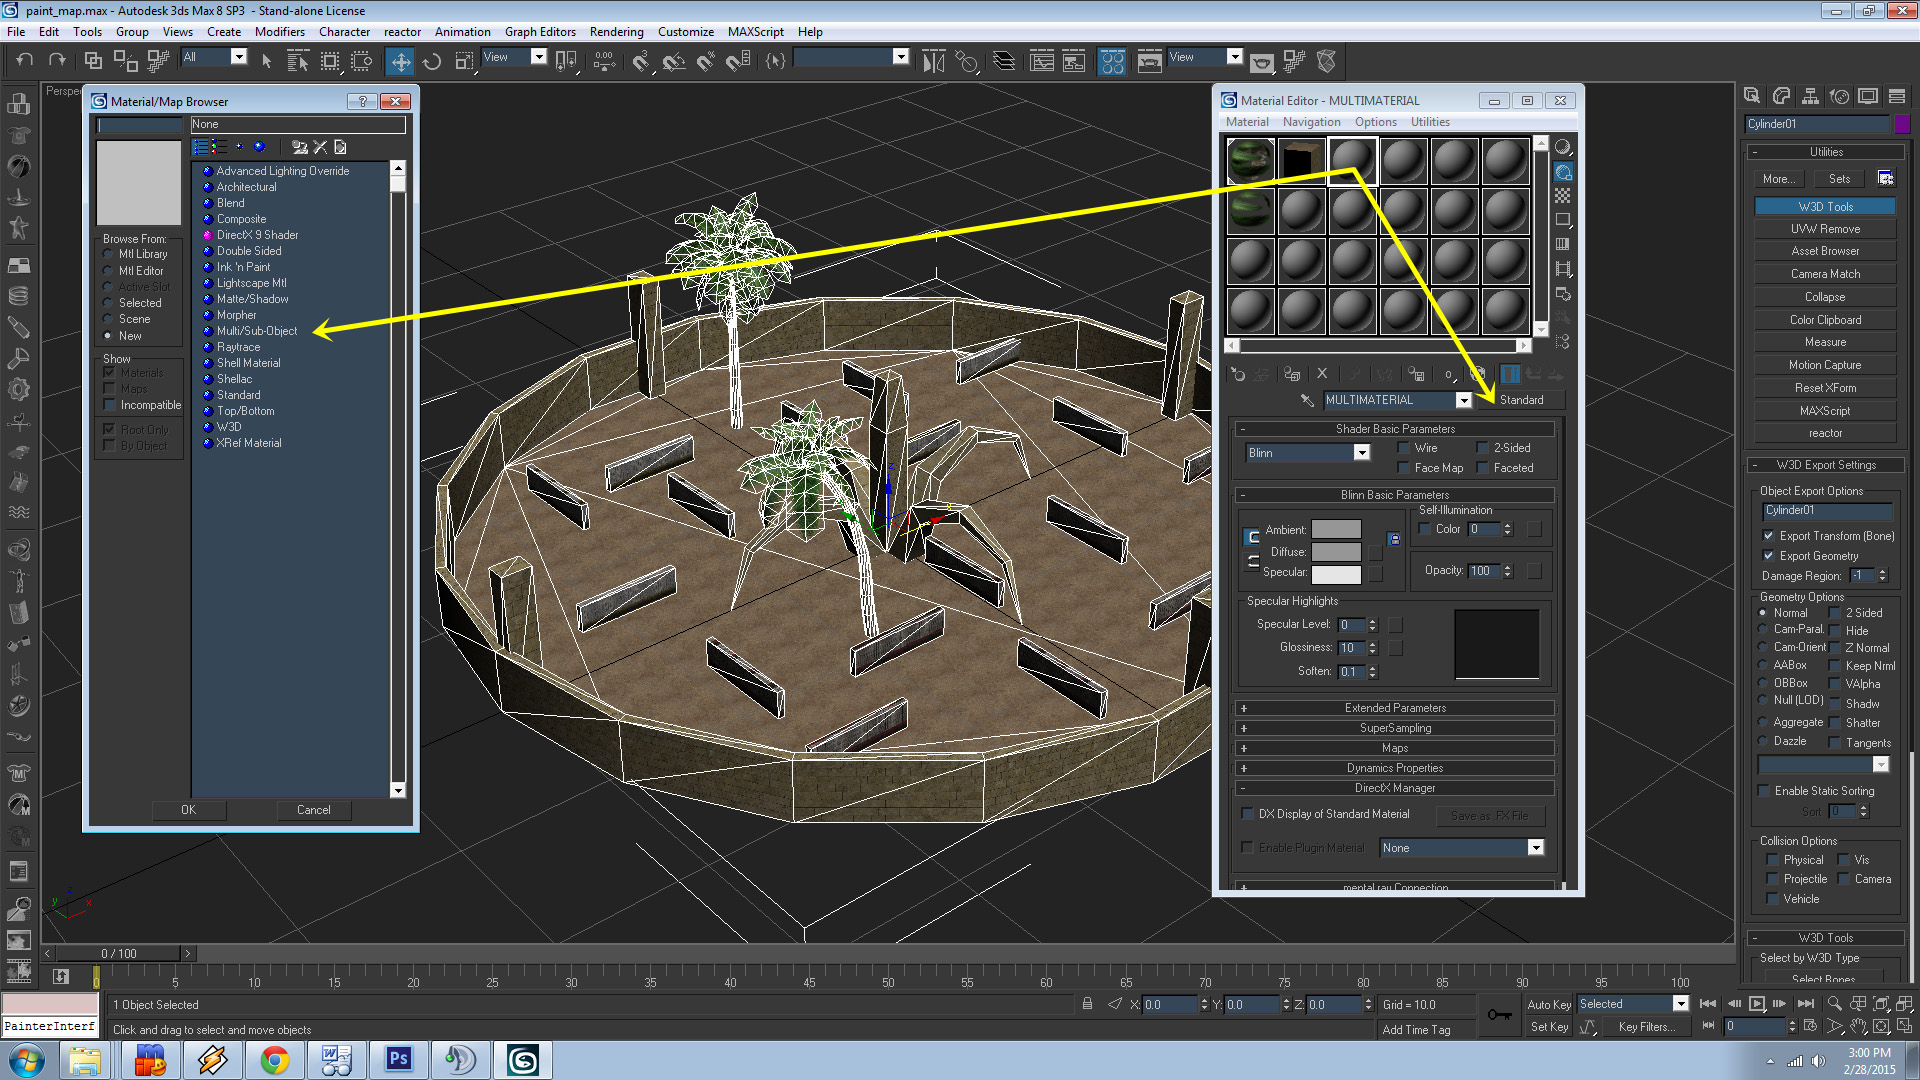
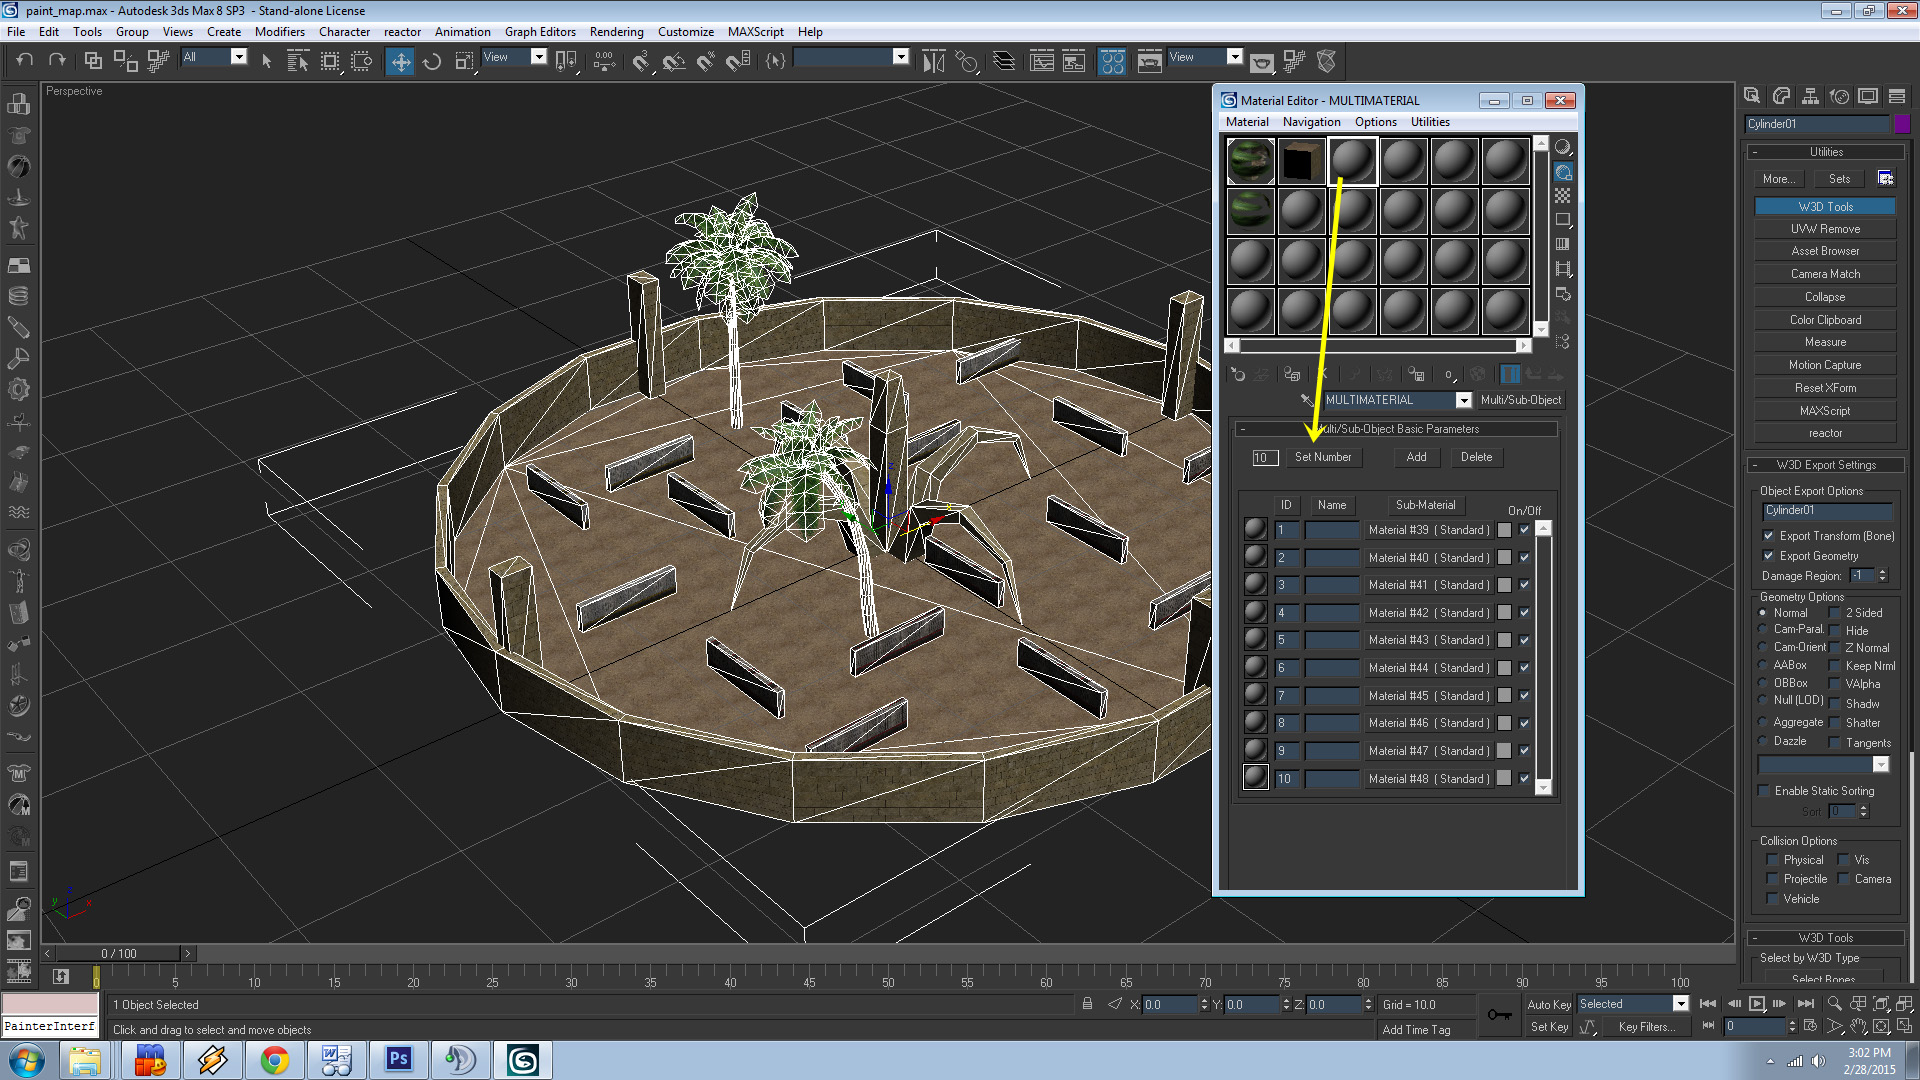
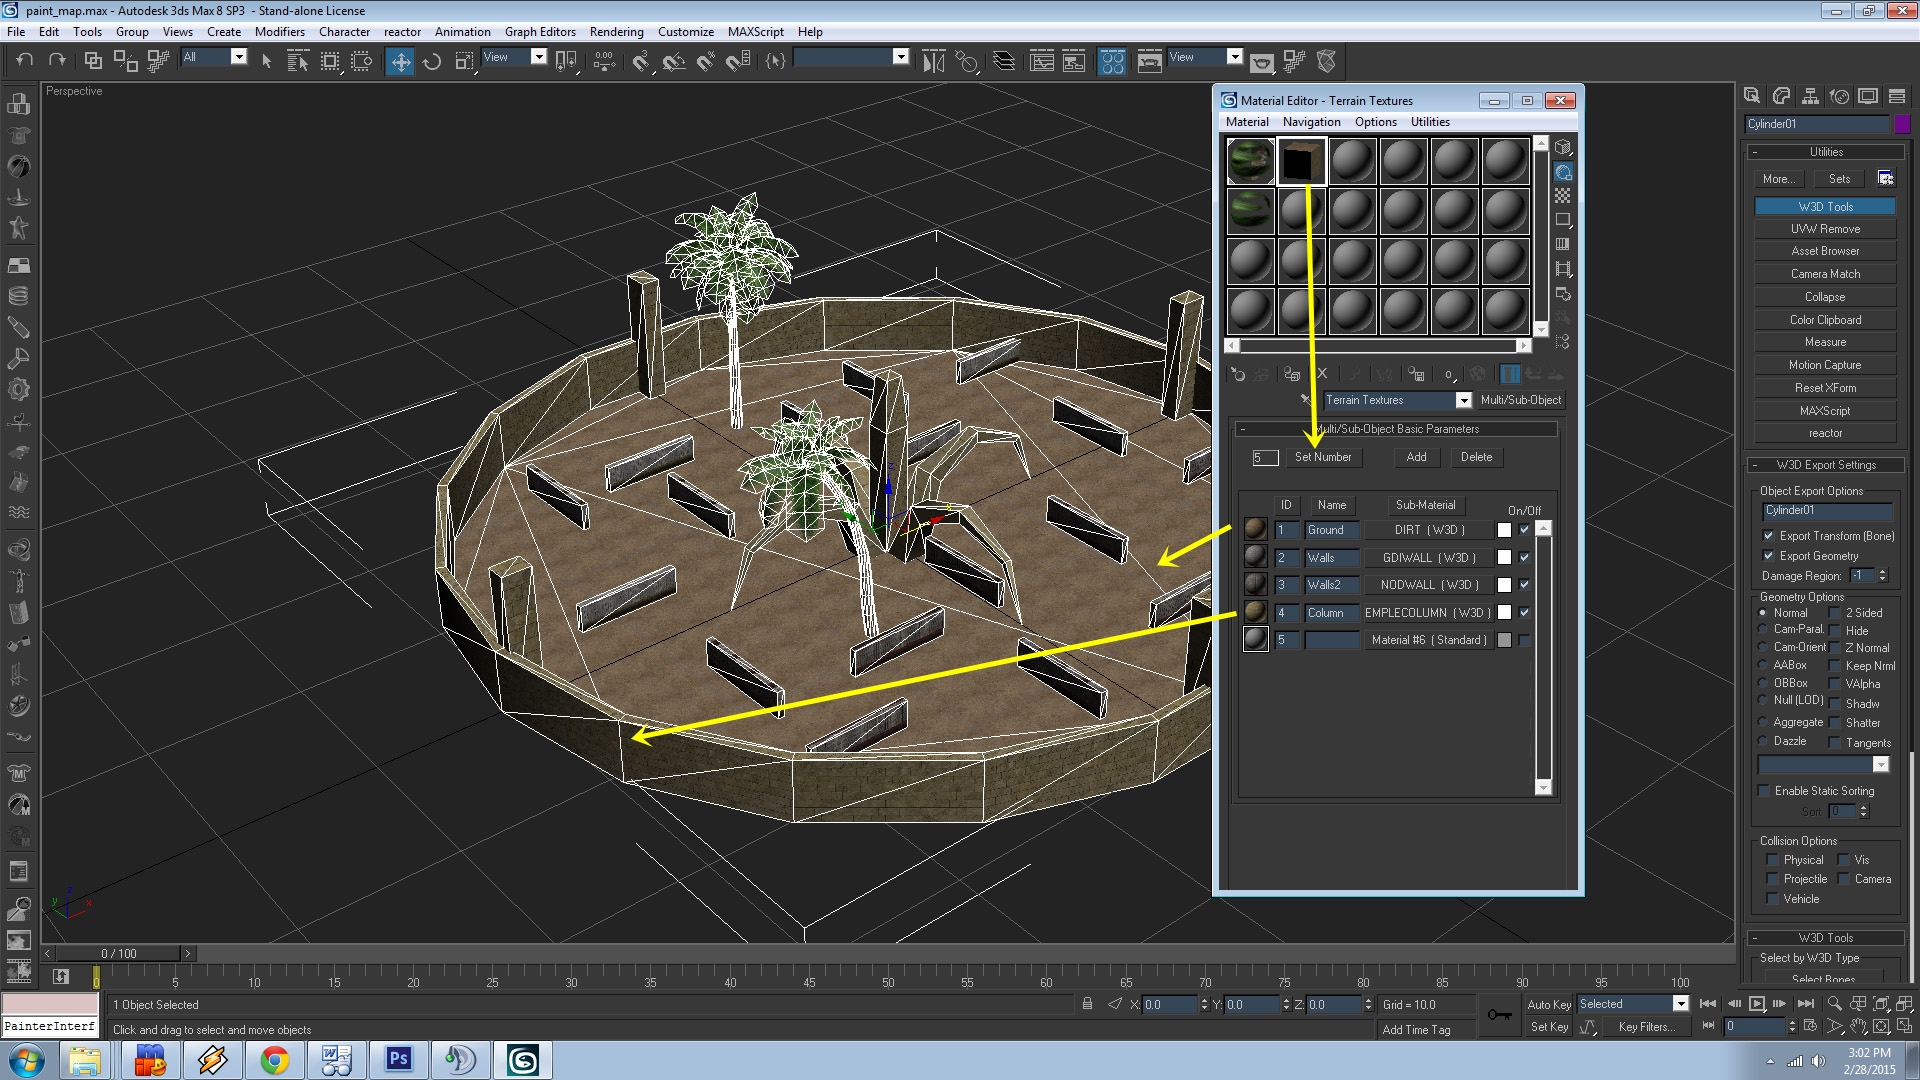
This tutorial was written on how to use multiple materials on a single mesh or simply for better organization and flow of level materials within Max 8. Some westwood models incorporate this method.. I believe it was to streamline the original lightmapping process **Should mention this texture method is best used sparingly. It can effect frame rates not used properly. Here is my level i want to texture with a multi material. The terrain mesh is a single mesh that i want to use a ground and wall texture on it.. Next we need to create a new material slot, Choose an empty material and click on on "Standard" and choose "Multi-Sub Object" from pop-up Once created the material will load up up to 10 different slots, You can adjust the number of materials as needed from the "Set Number" tab. This where our normal W3D materials would be set and placed normally. By clicking the individual "Sub-Material" will bring you to your actual material Here is my completed material list i will use for my level. Using this method can give you unlimited amount of texture slots, instead of using individual material spheres in the material editor window. Here is how to apply materials to your object while using Multi Materials, Simply drag and drop onto selected polygons/mesh Thanks and enjoy!


-
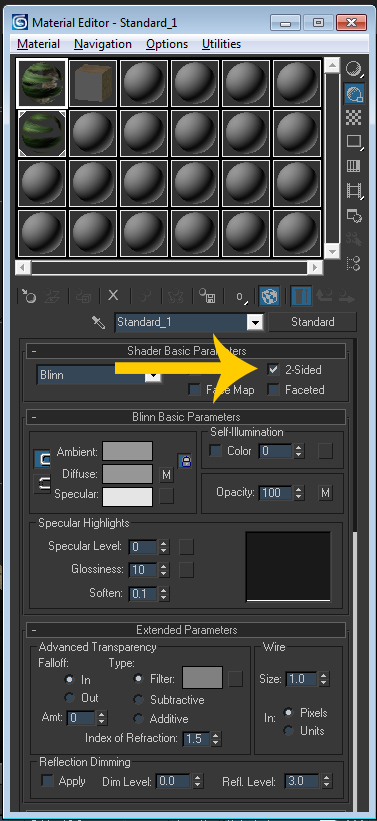
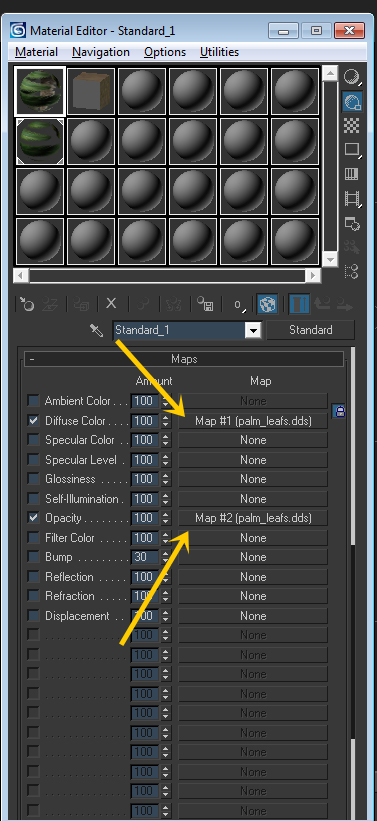
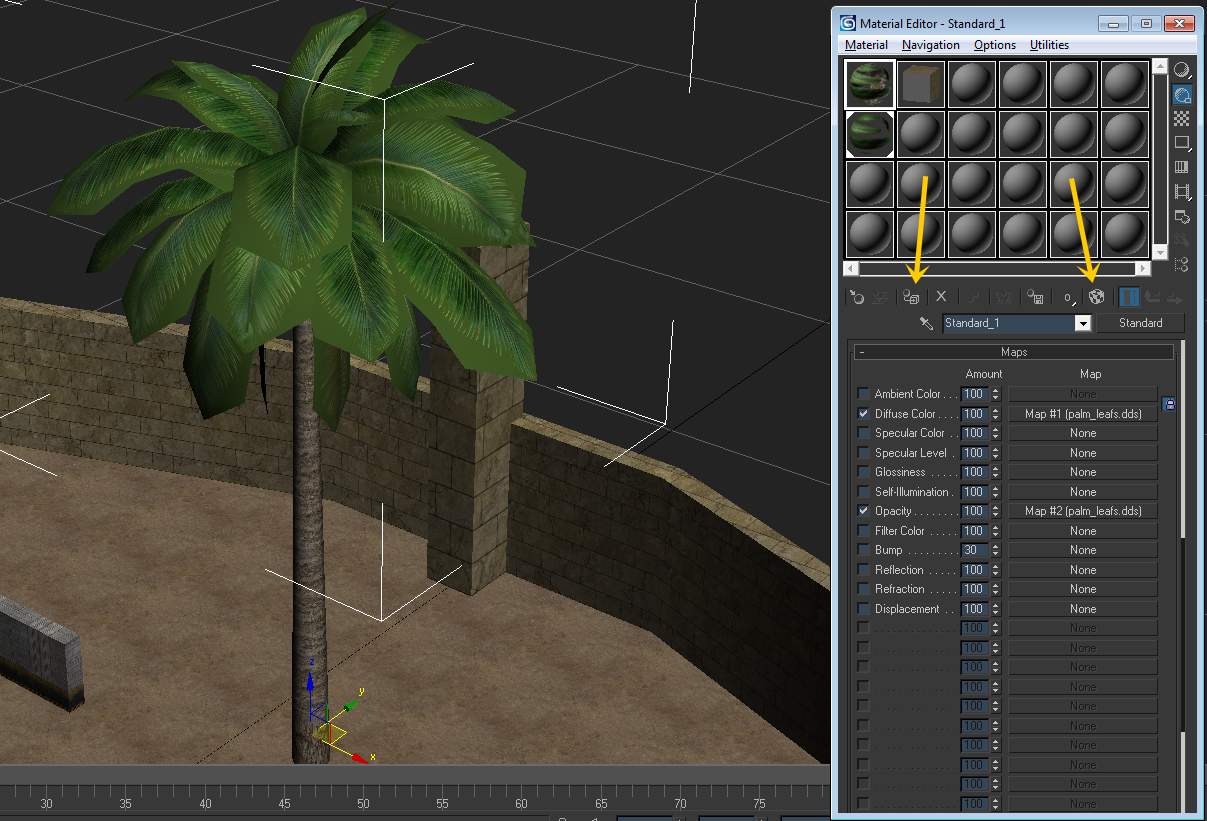
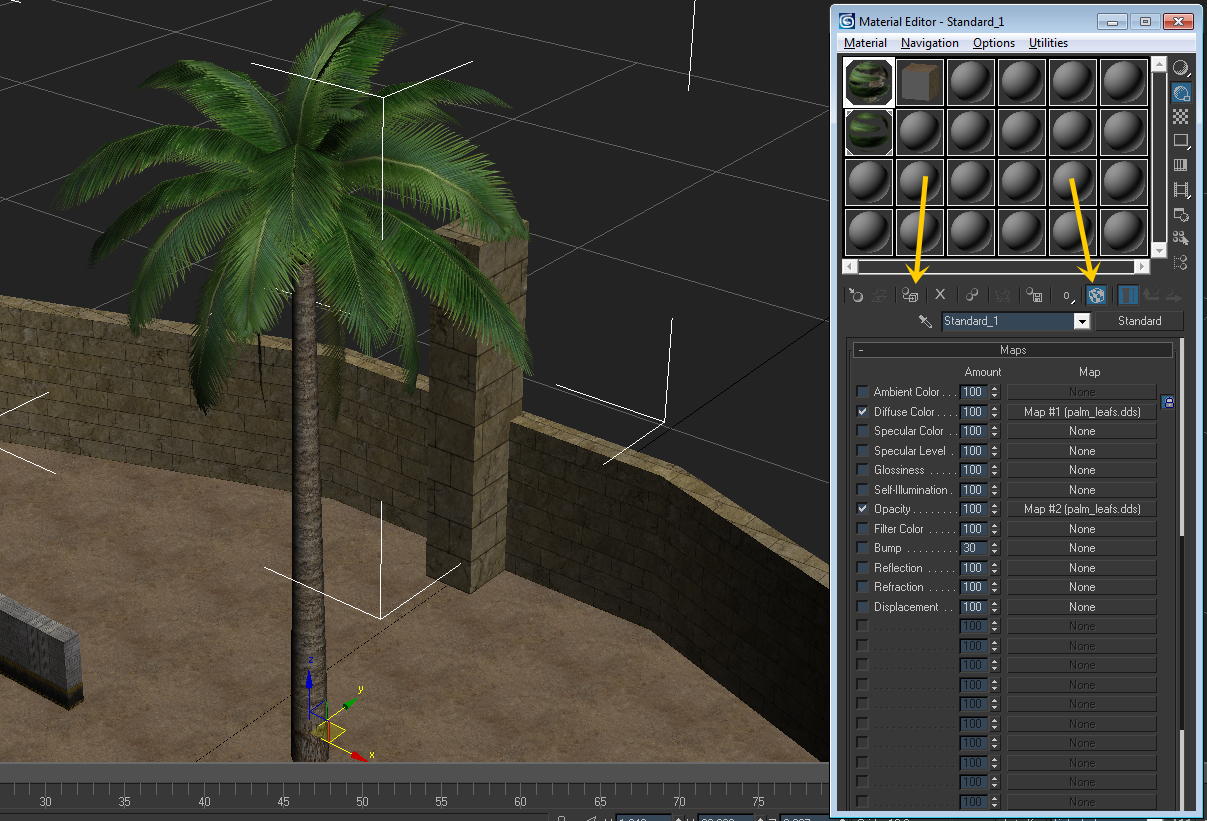
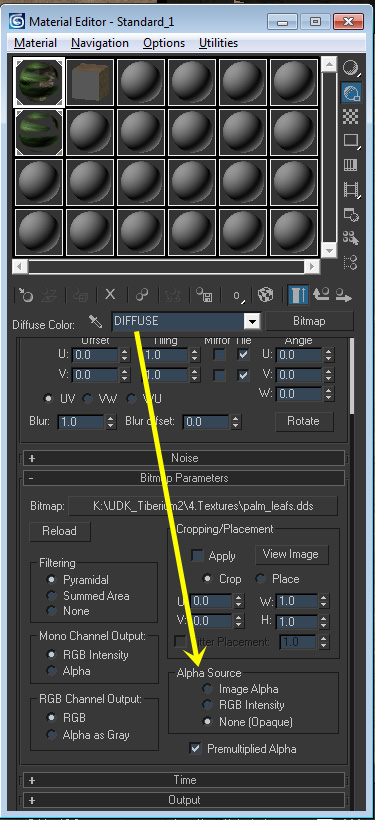
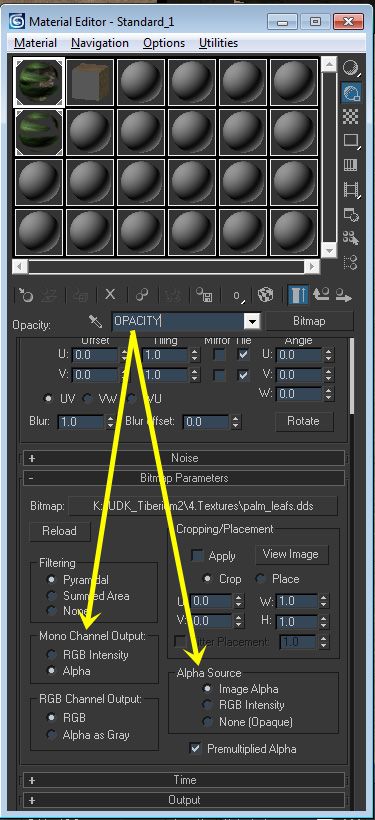
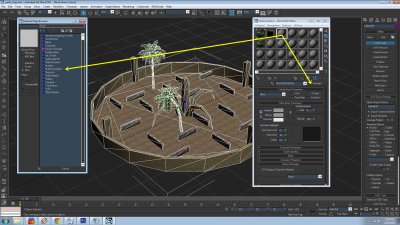
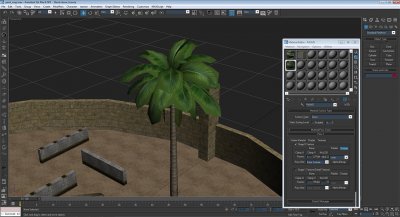
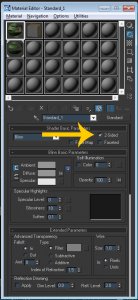
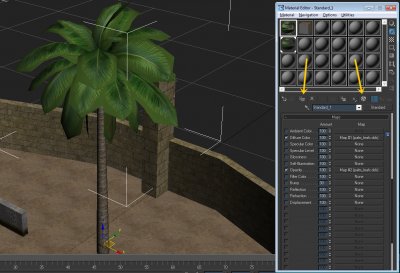
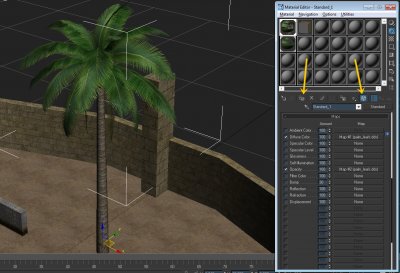
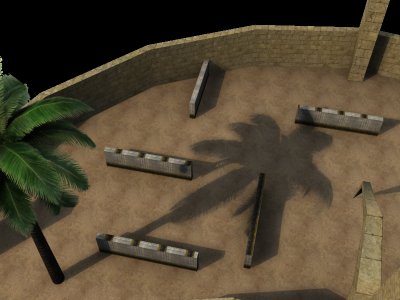
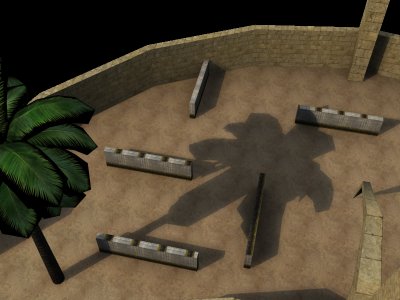
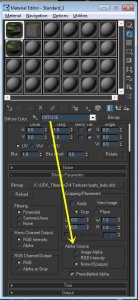
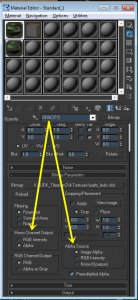
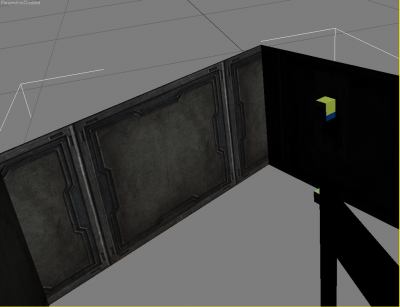
This is just a spin off tutorial created for the lightmap tutorial. This mainly covers how to properly cast shadows of trees,plants, foliage etc in 3DSmax for rendering or lightmap purposes. Open your scene that contains your mesh. Here I have a level I wish to lightmap. I want to have the palm tree cast a shadow on the terrain using the existing alpha channel created for it. Normally W3D materials in max do not render with alpha channels. Here is the W3D material that does not have the channel enabled. **Aritst Notes: You will need a W3D material and a Standard Max material for this setup We will need to create a standard max material for rendering and viewport previews. First off bring up the material editor and click a empty slot, Under "Shader Basic Parameters" click 2-sided. Then click the "Maps" rollout. Set the the "Diffuse Color" to your desired bitmap texture while in diffuse make sure the alpha source is set to opaque, Click "Opacity" and set the bitmap texture to the same texture as diffuse, as this contains your alpha channel. While in opacity, make sure to set the "Mono Channel Output" to Alpha. Once completed apply the standard max material to the desired mesh you wish to display the alpha enabled mesh. Make sure to click the "Show Map in Viewport" button (looks like a checkered box) After applying the max material the mesh should now properly display your texture alpha channel in viewport and renderer. **Aritst Notes: If you see just a grey mesh you need to click on the "Show in Viewport" box to enable Final render results: W3D material on LEFT and Standard Max Material on RIGHT. As you can see the alpha channel material will give me very good results for my lightmap rendering or scene renders! Remember to revert the Standard Max material to a W3D material upon exporting, as max materials do not function properly in Renegade Goodluck and enjoy!

-
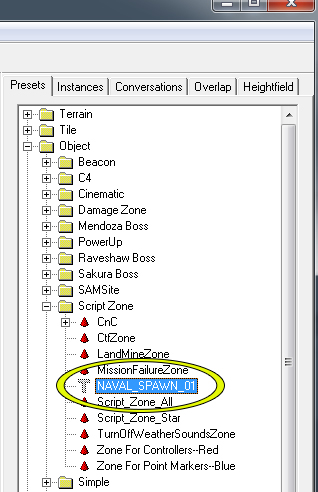
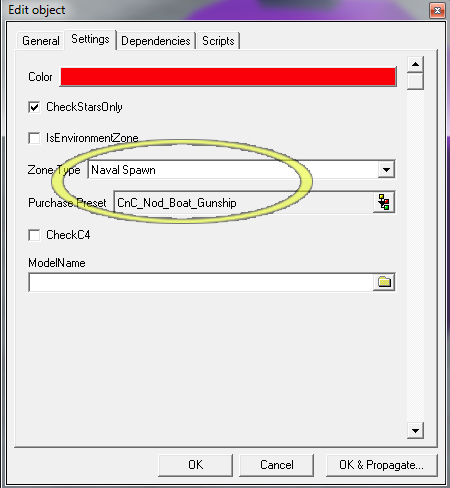
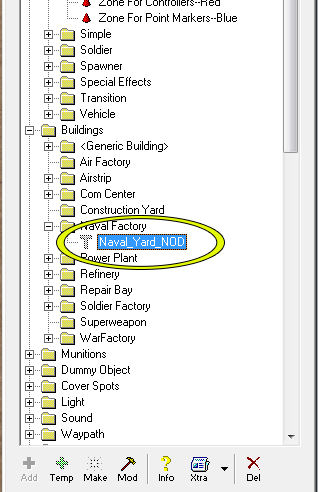
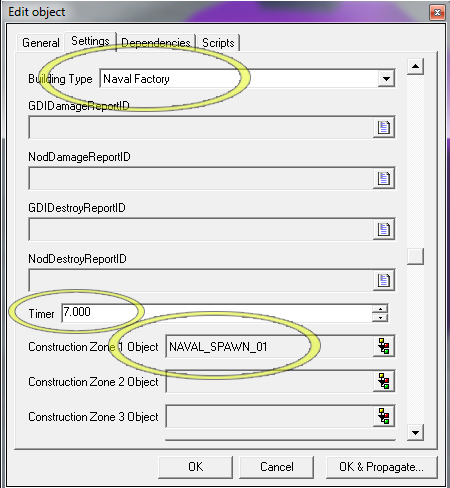
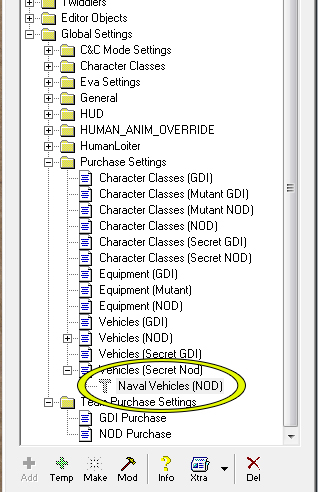
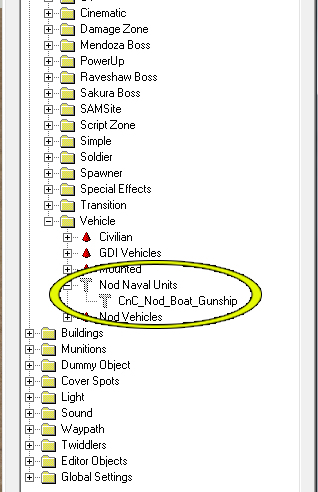
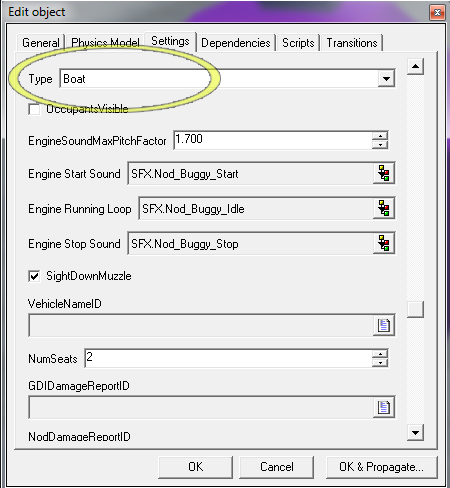
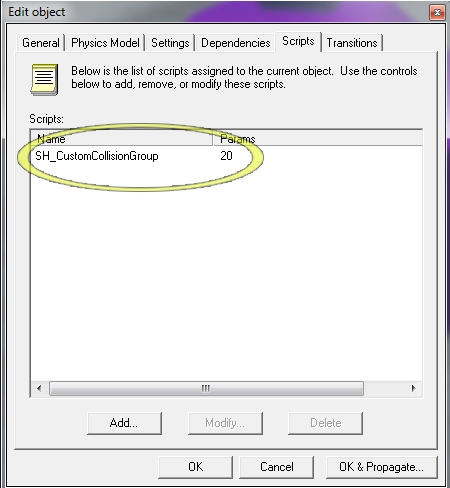
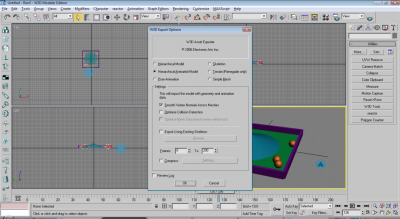
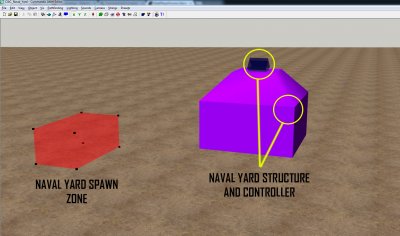
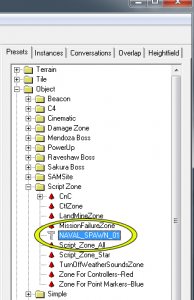
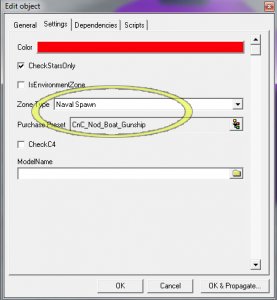
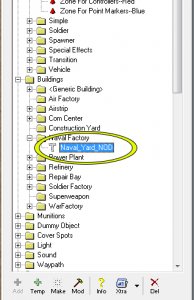
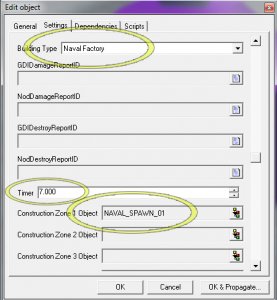
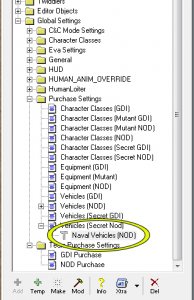
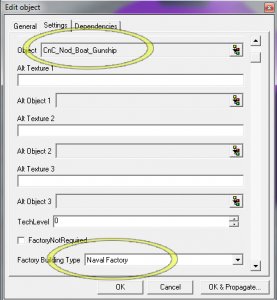
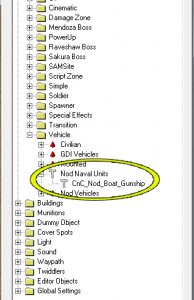
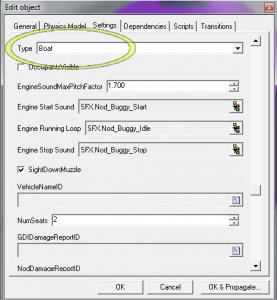
Author: Mauler, Jonwil, Generalcamo Skill level: 4 This tutorial will show how to set up naval yards. It assumes you have properly set up boats/subs/naval transports and the various blockers per https://secure.w3dhub.com/forum/index.php?showtopic=414729#entry606272 It also assumes you have properly set up the sidebar per https://secure.w3dhub.com/forum/index.php?showtopic=414727 It doesn't cover all aspects but gives you an outline to the basics. The tutorial leaves out certain aspects of regular building creation components. It is written for experienced mappers. A few limitations: Amount of different boat types is currently limited to 6 per team. Preparation Ok, so the first thing you will want to know about is the NavalFactoryVehicleLimit keyword in the per-map tt.ini file. This works just like the AirFactoryVehicleLimit and VehicleFactoryVehicleLimit and sets the number of naval vehicles that can be built at once. You need to create an ini file. If your map is named C&C_MyMap, the ini file should be named C&C_MyMap_tt.ini. Alternatively, if you are creating a standalone mod, the ini file should only be named tt.ini. [General] NavalFactoryVehicleLimit=8 Create the naval unit presets1. Creating a naval yard structure is exactly the same process as a regular structure, Proceed to load up a map level in LE containing a naval yard. 2. Create naval unit preset, and once completed goto>settings and select type as "Boat". 3. Add TT's custom collision script to naval unit, Depending on collision type as per graph shown here, this instance requires collision group 20. So using 4.0 scripts and beyond you want to use "SH_CustomCollisionGroup" Create the spawn zones 4. Now that our preset boat is done, let's complete the naval yard components. We will need a controller and a spawn zone. Let's start with the spawn zone for the naval unit. Under the Object>Script Zone tab create a preset for our spawn location. 5. While still editing the spawn preset goto>Settings and make sure zone type is selected to "Naval Spawn" and that your naval unit preset is placed into the "Purchase Preset". (Create one script zone preset for each naval unit type you have.) Next up, place these zones in your level near your naval buildings. The center point of the zone is the center point where the naval vehicle will spawn so if the vehicle is a sub, this needs to be below the water surface, if its a surface ship it needs to be above the water surface. The size of the zone should match the size of the vehicle it spawns. If there is something in the zone it will not spawn the vehicle, and the player will be refunded. Create the Naval Yard controller 6. Next is our controller for the naval yard. Create a new preset under Buildings>Naval Factory for your new controller. 7. Once completed click on the "mod" button and goto the presets settings. Make sure the "Building type" is Naval Factory and set the timer to 7.00 (default renegade build time). The timer value controls the amount of time before the naval vehicle spawns (i.e. it's a construction delay so naval vehicles don't spawn instantly). The Construction Zone settings need to be set to the zone presets you created above (the ones for each unit type). If you have less than 6 boat types for your naval factory, leave the extra ones blank. Add the naval units to the purchase list 8. Now all that left is the actual purchase options! Create a new preset under "Global Settings>Purchase Settings" and add your naval vehicles' purchase settings.. set your parameters normally, making sure that the "Factory Building Type" is set to "Naval Factory". 9. Done! Now get ingame and test that baby out! This is my example level without water

-
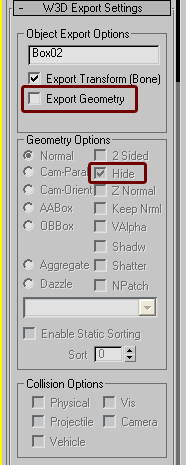
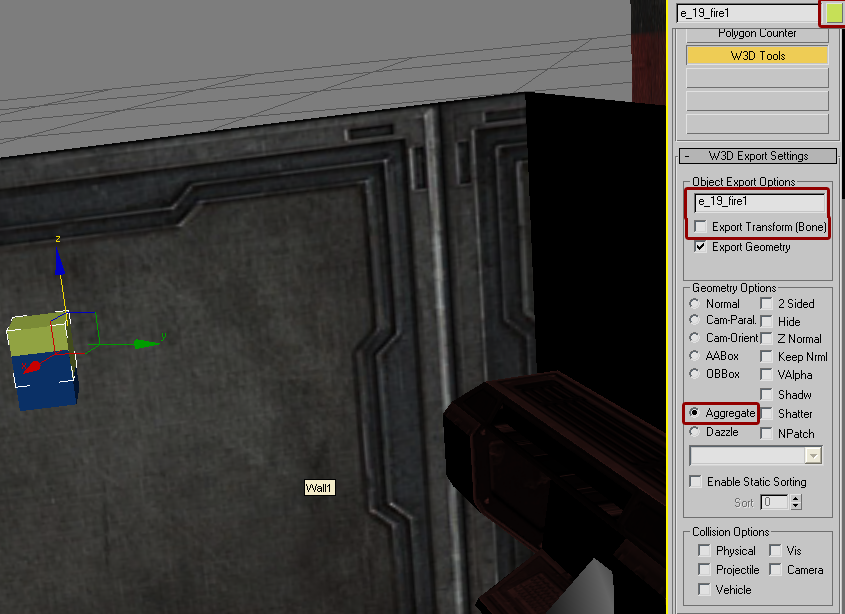
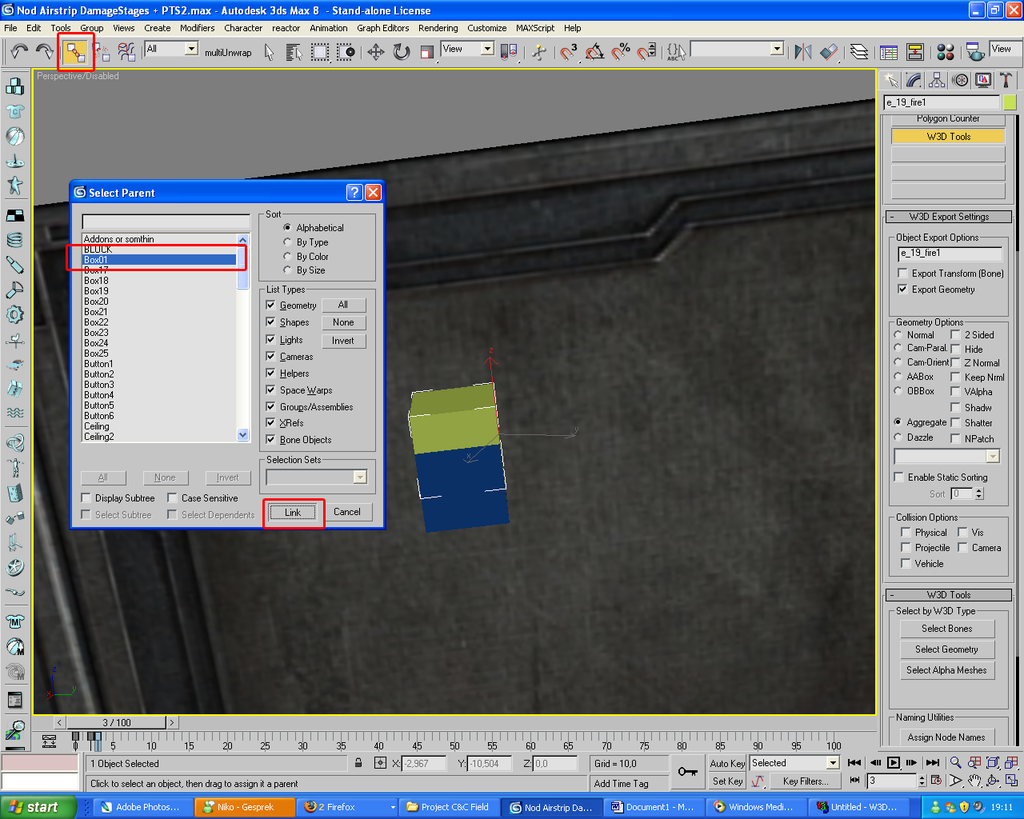
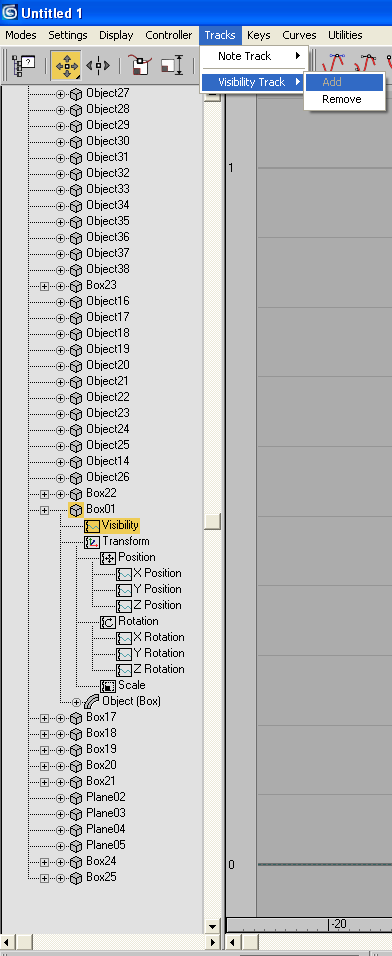
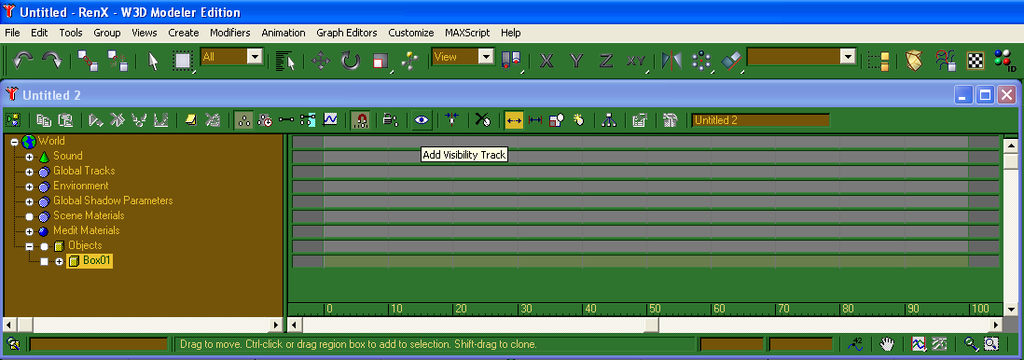
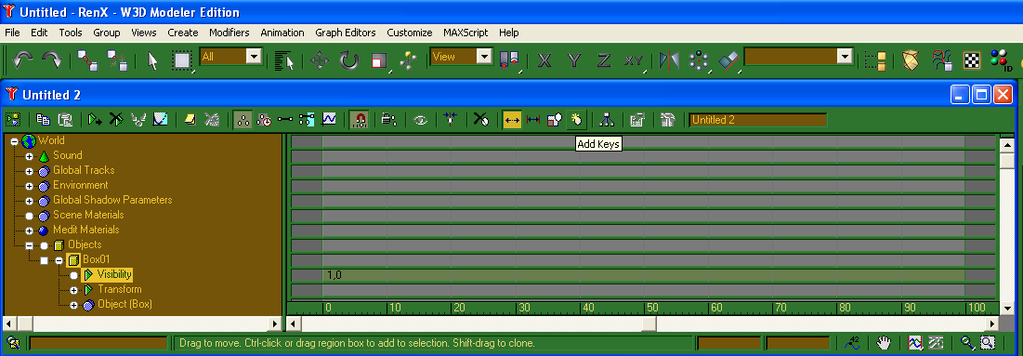
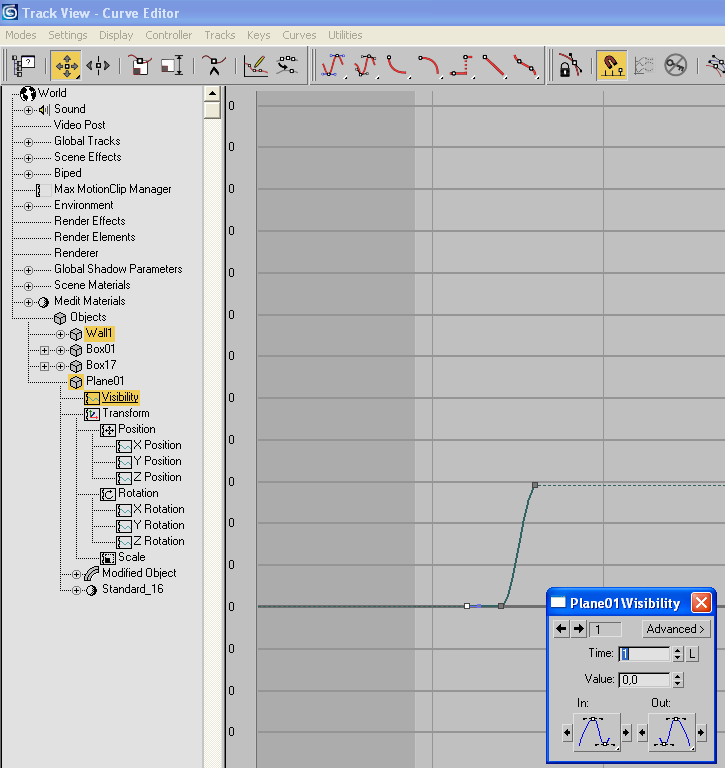
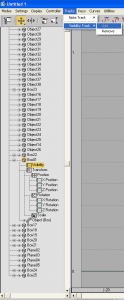
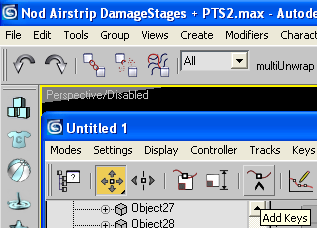
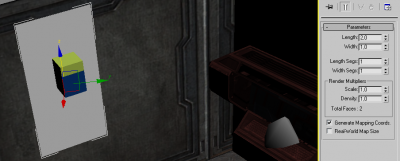
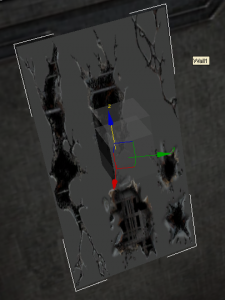
Author: Di3HardNL Skill level: 4 So you have made a building interior and/or exterior. But when you destroy it it looks exactly the same as first. What we are going to do in this tutorial : Add damage emitters to your building Add damage cracks textures to your building Change the texture (color) look when the building gets destroyed. In the Advanced Building Tutorial by Leaubi there was already explained how you could add damage emitters to your building, but it was not really clear how you could do it. My screenshots are shown in 3DS Max, but it works exactly the same in RenX. As sample I use my Airstrip interior. 1. Add damage emitters to your building This is very simple once you know how to do it. Create a box the size doesnt really matter but I use 0,3x0,3x0,3 Get this box in the position were you want to have an emitter for when the building is damaged. Select this box and go to W3d Tools First check the box Hide then Decheck the box Export Geometry Now clone this box (Tab Edit -> Clone) as Copy Name this box as the emitter you want to use. For example an existing emitter in Renegade e_19_fire1.w3d. First move the box a little up, replace its color so you can see difference between the boxes. Then apply the following settings Now link the box e_19_fire1 to the other box. Click the Link button then press H and select your box. In my case box01. Now you have an emitter set up. Now we must indicate when it pops up. Select your box (NOT EMITTERBOX) in my case box01. Then click on Graph Editors tab in top menu. Then click New Track View Now add a Visibility Track In 3ds Max like this : In RenX like this : Now you must select Add keys In 3ds Max / RenX: Now while Add Keys selected click anywhere in the graph track area. Click 3 times in different positions. For the first key select time 0 and value 0 For the second key select time 2 and value 0 For the third key select time 3 and value 1 (same screen for 3DS Max and RenX) The stock renegade buildings have 5 stages. Time 0 = 100 HP Time 5 = Destroyed Value 0 means invisible Value 1 means visible We selected for Time 3 value 1. So that means when the building is in the 3rd stage (nearly destroyed) the emitter will pop up. Now you know how to create an emitter and how to timeactive it for buildings! Down in this tutorial you will find how you have to export your building. Tip: If you want to use more then 1 emitter just select the 2 boxes and clone them again. The animation will be copied and it will keep linked to each other. The only thing you have to do is setting up the W3d Options (Tools) again. 2. Add damage crack textures to your building I simply use an existing crack texture provided by the makers of Renegade. It has an alpha channel which we need to keep. Open it in photoshop to see/modify it. its name is alpha_crack1.dds But you need a .TGA texture. HERE is the .TGA of it. If you want to edit it, make sure when you save it again save as 32 Bit, or else the alpha channel will be gone. Simply create a Plane with measurements 2 length 1 width. Place it as close as possible against the wall for your emitters (if you have any) Now put the texture on it, as we use alpha_crack1.tga now. You will see its kinda stretchy We can fix this by selecting the plane and go to Modifiers -> UV Coordinates UVW Map Select the following settings to have 1 crack. After you applied this settings select Gizmo And use the Move tool and use it by moving by the z Axis down. In materials of this crack make sure you set in Pass1 -> Shader -> Blend Mode : Alpha blend Now your crack texture is ready. For the trackview do exactly the same as we did for the emitter. So just scroll up and repeat the steps from Now we must indicate when it pops up Down in this tutorial you will find how you have to export your building. 3. Change the texture (color) look when the building gets destroyed. For this you need to have already existing meshes (wall, floor ceiling etc.) with textures applied. I use as a sample the wall i use for my Airstrip interior. This is the texture i use for the wall Open the texture in Photoshop and change its color. I use CTRL+ALT+U to replace colors. Result is this texture Now get back to your modeling program select your wall mesh and clone this wall, as copy. Now set your new texture to this clone. Now you have 2 meshes, but we have to indicate when they pop up again. You have learned how to use the trackview now, but these two meshes have different settings, since we want the new texture to pop up when the building is destroyed. Select the wall mesh for NORMAL texture and use the following settings in trackview: For the first key select time 0 and value 1 For the second key select time 4 and value 0 For the third key select time 5 and value 0 Select the wall mesh for DAMAGED texture and use the following settings in trackview: For the first key select time 0 and value 0 For the second key select time 6 and value 1 For the third key select time 7 and value 1 Thats it! Make sure all your meshes have Physical, Projectile and Camera selected. Now export as Hierarchical Animated Model Frames 0 To 7. Check out your result ingame. I have a video on youtube where i used these methods. Check it out here -> I hope I helped some people alot with this tutorial, if you got any problems send me a message or something! markreijrink@hotmail.com Happy modding!


-
Author: Westwood Studios Skill level: 4 By Greg Hjelstrom Buildings in Renegade are a collection of terrain meshes and static animated objects that are set up as Building Aggregates in the level editor. A logical building controller is created and placed in 3d space in the level editor. This controller collects all meshes near the building controller that have a matching prefix in their name. Building Controller Building controllers are defined and instantiated in the level editor. They can be found in the Presets tree under the top-level Buildings folder. The building controller defines the game-logic attributes of the building such as health and shield type. A key setting in the building controller is the MeshPrefix string. All meshes in the vicinity of the building controller whose names contain a prefix that matches this prefix will be tracked by the building controller for damage purposes. All BuildingAggregates in the vicinity whose names match this prefix will be animated according to the damage state of the building. Exterior Meshes Meshes that are part of the exterior of a building should be named like this: <MeshPrefix> ^ <unique mesh name> For example, an exterior mesh for the gdi weapon factory might be named mgwep^011. The ^ symbol indicates that it is an exterior mesh. Interior Meshes Meshes that are part of the interior of a building should be named like this: <MeshPrefix> # <unique mesh name> The # symbol is used to indicate that the mesh is part of the interior. Remember that all w3d mesh names must be less than 16 characters long. When a bullet hits either an interior or exterior mesh of the building, damage will be applied to the logical building controller. Building Aggregates A building aggregate is a special type of animated static object (tile) that plays different segments of its animation depending on the damage state of the building controlling it. These are set up in the Tiles sub folder of the Presets tree in the level editor. The model and preset for a building aggregate should contain the mesh prefix that the building controller expects. To make a tile which is a building aggregate, you create a tile and select BuildingAggregate as its physics model type. There are many settings in the building aggregate that can be used to do things that the shipping version of Renegade does not currently do. For example, you can create truly destructable buildings by simply making a huge destruction animation and setting it up as a building aggregate. Have Fun!