

W3D Exporter
The final part of the W3D plugin for max is the W3D Exporter.
Each object in the Max scene that is not hidden will be considered for export. A utility plugin is used to set the export options. Each mesh can have its transform exported for the animation system and/or its geometry exported. This separation exists due to the way the motion capture data comes into the system. There are often meshes in the system which are only there to provide transforms and vice-versa; there are meshes that are rigidly connected to those "transform-only" meshes. The exporter basically allows you to reduce the number of transforms that have to be calculated by the animation system.
Each object that is exported will have its name associated with it. One limitation of the w3d file format is that these names be 15 characters or less. If you try to use a longer name, it will be truncated when it is exported. If two objects with the same name are loaded, only the first object will be kept.
It's a good idea to configure your button sets, in the utilities panel in max, to display it by default. This way, you wont have to look under the "more" section every time you want to use it.
Here is a description of the various tools associated with exporting your selections to W3D.
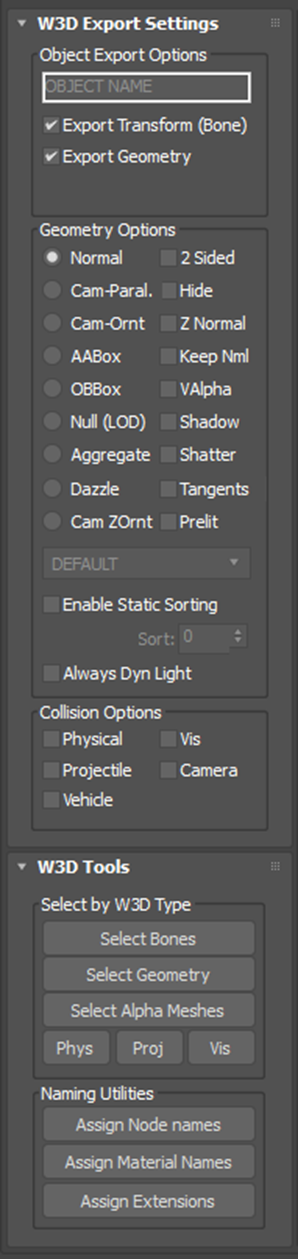
| Object Export Options: | General Export Options |
|
|---|---|---|
| Selection Window: | Displays the name of what you have selected. | |
| Export Transform (Bone): | Check this to only export a bone or animation. | |
| Export Geometry: | Check this to only export a mesh or geometry. | |
| Geometry Options: | These options allow your exported geometry to have different characteristics. You can select multiple options from choices on the right. | |
| Normal | Default mode, just a normal mesh with no specific characteristics. | |
| Cam-Parallel | Aligns the object to the near clipping plane of the camera, for example, if an object moves around the scene, it will remain parallel to the viewport. Kind of like a strafing effect. | |
| Cam-Orient | Aligns to the local X axis of the Camera: This makes the object always face toward the camera so where ever the object or camera is, the camera will always be facing the x-axis. | |
| AABox | This mesh is to be used as an axis aligned collision box. | |
| OBBox | Use this if you're exporting a bounding box. | |
| Null (LOD) | Indicates that its a NULL LOD object. Null LODs will not be rendered. | |
| Aggregate |
Export this mesh as a reference to another W3D. This lets you include other W3Ds, such as particle effects, in other objects. E.g. if you have a particle W3D called smoke_fx.w3d, then naming the mesh as smoke_fx would put that particle W3D there when the model is loaded. You can have multiple aggregate meshes with the same name (if you need more than one instance of the W3D), but these aggregates need to have Export Transform unticked and linked to a bone that is in the position you want the other W3D in. |
|
| Dazzle | Use this option to export a Dazzle. Set the dazzle type in the list below. | |
| Cam-ZOrient | Like Cam-Orient but is oriented in the Z axis only. Only usable with current versions of Renegade. | |
| 2Side | Enable/Disable two sided rendering for the entire mesh. | |
| Hide | Use this option to make your geometry hidden, e.g. a bounding box. | |
| ZNrm | Uses normals that point in the +z direction. | |
| VAlpha | With this checked, your mesh will have a "vertex alpha", which is created from the grayscale values of the vertices that you have given to them in max. NOTE: texture blend mode must be "Alpha Blend" in order for this to work. | |
| Shadw | The mesh is not rendered normally, it is used to generate shadows only. | |
| Shatter | For use when your objects may need to shatter, such as glass. | |
| Tangents | Use this when you are exporting for Renegade and need tangent/bi-normal data. | |
| Prelit | Set this to cause the mesh to be ignored by the light generation code. Only usable with current 5.0 versions of Renegade. | |
| Enable Static Sorting |
Tells the game engine not to sort those polygons. The value you enter into the Sort spinner next to it defines which batch to render them in. |
|
| Always Dyn Light | Tells Mammoth's static vertex lighting code to skip this mesh, and instead just render it using the dynamic lighting that dynamic objects (such as vehicles and characters) use. Only really useful for terrain objects. Only usable with current 5.0 versions of Renegade. | |
| Collision Options: | You can select the physical characteristics for your geometry that you are exporting. | |
| Physical | Select this for a surface that another object (such as a character or a vehicle) can't move through. | |
| Projectile | Select this if a projectile can hit it. | |
| Vehicle | Select this if you wish a vehicle not to proceed through or past it. (If a mesh has Physical ticked, you don't need to tick this! Use this for things that you want infantry to move through, while not letting vehicles through.) | |
| Vis | Select this when exporting your "Vis" areas. A vis area is a specific area within the cameras view, where the computer will not draw in geometry past that point until you crossed over into another Vis area. | |
| Camera | Select this in case you don't want the camera to go through it, or get stuck in it. | |
| Select by W3D Type: | Rather than Manually selecting objects in your scene to be exported, you can use these buttons select specific items for you. | |
| Select Bones | Selects all the bones in your scene. | |
| Select Geometry | Selects all the geometry in you scene. | |
| Select Alpha Meshes | Select all Alpha Meshes in your scene. | |
| Phys | Select all Physical Objects in your scene. | |
| Proj | Select all objects that are affected by projectiles in your scene. | |
| Vis | Select all Vis objects in your scene. | |
| Naming Utilities: | A convenient way to name a selected set. | |
| Assign Node Names |
Opens the "Generate Node Names" window. This allows you to assign a root name, prefix and suffix. After setting your preferences, all of the selected objects in your scene will be renamed in sequence according to the node name. Artist Note: You may want to de-select "Assign Collision Bits" because it will override what you already have selected, in the collision options box. |
|
| Assign Material Names | Opens the "Generate Material Names" window. This allows you to assign a root name to your materials, After setting your preferences, all of the materials you affected will be renamed in sequence according to the node name. | |
| Assign Extensions | This will append an extension to your currently selected objects. LOD 0 should be your highest poly model, with increasing LOD numbers going to your lower poly models. Damage models should be extension numbers 1 and up. | |


Recommended Comments
There are no comments to display.
Join the conversation
You can post now and register later. If you have an account, sign in now to post with your account.
Note: Your post will require moderator approval before it will be visible.