

Aggregates are simply hierarchical models that have render objects tied to their bones. The viewer provides a UI to attach/remove these bone-objects, and is capable of saving these definitions to a W3D file that is compatible with the current asset manager. In other words the user can load a tank model, tie a smoke emitter to the muzzle of the tank, and save this 'aggregate' to a W3D file. When the game loads the W3D file, the emitter will automatically be tied to the muzzle of the tank with no extra effort from the programmer. In this case the emitter is controlled by the visibility state of the bone. In other words if the bone is invisible, the emitter will stop emitting particles, if the bone then becomes visible, the emitter will start emitting particles. Particle emitters are not the only type of object that can tied to a bone in an aggregate, any valid render object can be.
|
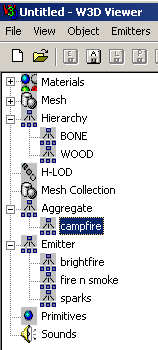
"Campfire" is the name of this aggregate, It's made up of the following individual scene elements.
1 Bone
All of these combined scene elements go into making the aggregate. Remember to use proper naming conventions for whatever project your on. To Create an aggregate: You must have at least one item in the asset display under "Hierarchy", (the rest you can add later). Select that Item and notice on the that "Hierarchy" becomes visible on the main menu. Click Hierarchy > Make Aggregate from the main menu. Enter a name for your aggregate and hit ok. Now you can select your aggregate from the asset display window. To Save or Export your aggregate: Use the export aggregate button located on the main toolbar of W3D. Alternativley you can go File > Export >Aggregate from the main menu. Be sure to export often so as not to lose valuable work from changes that were made. To Add or Remove items from your Aggregate: Select your aggregate from the asset display window and on the main menu, click on Aggregate > Bone Management. This opens the Bone management window which allows you to add or remove items from your aggregate. To Open an Aggregate: When you open an Aggregate, your opening the set of files that go into making that aggregate. Here are some more controls that become available once you have selected an aggregate from the asset display window: |
||
| Aggregate | |||
| Rename Aggregate | Allows you to rename your aggregate | ||
| Bone Management |
Pops open the bone management box which allows you to attach or remove objects from your bones. To scene objects to bones: Select the name of your bone in the hierarchy display window inside the bone management display window. Select the object you wish to attach to the bone from the drop down list and click "Attach". Hit "OK" to close the window and confirm the changes. To remove scene objects from bones: Use the hierarchy display window to expand the list and select the object you wish to remove from the bone, Click "Remove" and hit "OK" to close the window and confirm the changes. |
||
| Auto Assign Bone Models | This will attempt to find assets, currently loaded in the view, that have the same name as a bone inside the hierarchy. If a match is found, the viewer will attach the object to the bone. | ||
| Bind SubObject LOD | Makes all objects have the same LOD as main object. | ||
| Generate LOD |
Generates a L.O.D. (Level of Detail) LOD models are simply a collection of hierarchical models that can be switched between to meet the current polygon 'budget'. The 'budget' is the number of polygons that can be rendered on a machine in a reasonable frame rate. For faster machines this 'budget' is higher resulting in better looking models. The user can save this LOD by using the "Export" option under the File submenu |
||


Recommended Comments
There are no comments to display.
Join the conversation
You can post now and register later. If you have an account, sign in now to post with your account.
Note: Your post will require moderator approval before it will be visible.