
Introduction
W3D 5.1 supports Metallic Roughness Physically Based Rendering, or PBR for short. PBR means that the visual properties of a surface are physically plausible, as such that realistic results are possible under all lighting conditions. If this sounds alien to you, then check out this brief introduction to PBR on YouTube, by GarageFarm Academy:
(Note: W3D 5.1 does not support Height maps, but future versions may.)
For instructions on how to use any of the software mentioned in this guide, please use the documentation provided by these tools, or look up some basic tutorials on how to use them. It shouldn't take anyone long to get a basic understanding of these tools, and most seasoned artists already know how to use them.
In order to make PBR look correct in W3D, you will need to configure your project for it and this includes implementing Image Based Lighting, or IBL for short. This guide will cover the basics of how to implement PBR correctly, how to export your texture maps, and how to apply them to your models.
>>> Step 1: Configuring Your Project and Using IBL
Go to your project INI file directory, and locate RendererFeatures.ini. If this file does not exist, then create it.
Add the following parameters and set them as true:
SpecularEnabled=true
PbrIBLDiffuseEnabled=true
PbrIBLSpecularEnabled=true
Next, we need to create an IBL file to correctly light the environment.
For this, you will need to obtain or create a HDRI skybox file. You may need to invest into licencing some, but I will attach an example for you to work with, here: HDRI-Sky-Example.7z
You will need to generate the correct files out of this HDRI skybox texture. We do this using an open source application called IBL Baker. Grab it from their Github page, here (Note: Click the green Code button and select Download ZIP): https://github.com/derkreature/IBLBaker
Open the application by running IBLBaker.exe in the bin64 directory. This will load an example scene. Next, click Load Environment and select your HDRI file.
Configure the Specular Resolution to 1024, and the Diffuse Resolution to 512. Leave the rest as default. Select Save Environment to export the files we need. Note: There is a slight oddity with the application, it may not export anything unless you pre-select another file (could be anything) within the Export directory. If your Export folder remains empty after saving, try selecting a random file first before pressing Save in the Windows Explorer menu.

Now, go into the Export directory, and you should see several files. Some for MDR, and some for HDR. Delete all the files containing MDR, as well as the Brdf file, as we do not use these. What you should be left with is the following 3 files (where xx is the name you gave it):
| xx DiffuseHDR | size: 15 MB |
| xx SpecularHDR | size: 64 MB |
| xx EnvHDR | size: 256 MB |
Name these files as such:
- xx DiffuseHDR -> ibl_diffuse
- xx SpecularHDR -> ibl_specular
- xx EnvHDR -> env
- Additionally, download this ibl_brdf_lut.7z file and alongside the above files, place them inside your .dat file of preference.
These files will act as your default IBL. You can also do an IBL environment per level, and to do this you repeat the process of making the above three files, but naming them with your level name as a prefix, for example: TS_TaintedLegacy_ibl_diffuse. Note: The ibl_brdf_lut file only needs to exist in your .dat structure.
You can tune the IBL intensity by adjusting your level ambient lighting in Mammoth. Note: Mammoth doesn't understand IBL, so unfortunately you're working blind as of 5.1.
That concludes the configuration phase.
>>> Step 2: Implementing your PBR Assets
You can create new PBR assets, or licence ones in various locations on the Internet. For this guide, lets say you licenced some PBR assets and you now wish to transport them to W3D. For this part I will assume you know how to handle geometry data.
Locate the textures of the asset you wish to import. We need to figure out what texture packing format was used.
Be on the look-out for these files:
- Albedo, also called Color
- Normal
- Occlusion
- Roughness
- Metallic
- Specularlevel
- Possible other maps you may encounter that we can use: opacity, emissive
- Other maps you may encounter, we do not support.
Ideally, all these PBR textures are separate, but it is possible that some are pre-packaged, for example, this would often be the case when working with assets made for other game engines. Some packed textures may be named with ORM or ORT as a suffix, in these instanced you're looking at packed textures for Occlusion - Roughness - Metallic, or Occlusion - Roughness - Translucency, respectively. Naturally most of these pre-packed textures we cannot use, so you will need to use an image manipulation software such as Photoshop or GIMP to Decompose the RGB channels into separately exportable layers.
Now that you have your individual texture files, it is time to package them. You can once again use image manipulation software such as Photoshop or GIMP to pack the textures, or you can use Adobe Substance Sampler to import them as a material, and then export them using Adobe Substance Painter. I would recommend the latter because it allows you to more easily iterate on the texture.
Note: If you obtained assets using a Specular-Glossiness PBR workflow as opposed to the Metallic-Roughness one W3D uses, then I strongly recommend the Adobe Substance route as it will automatically convert texture maps to whatever the output requires.
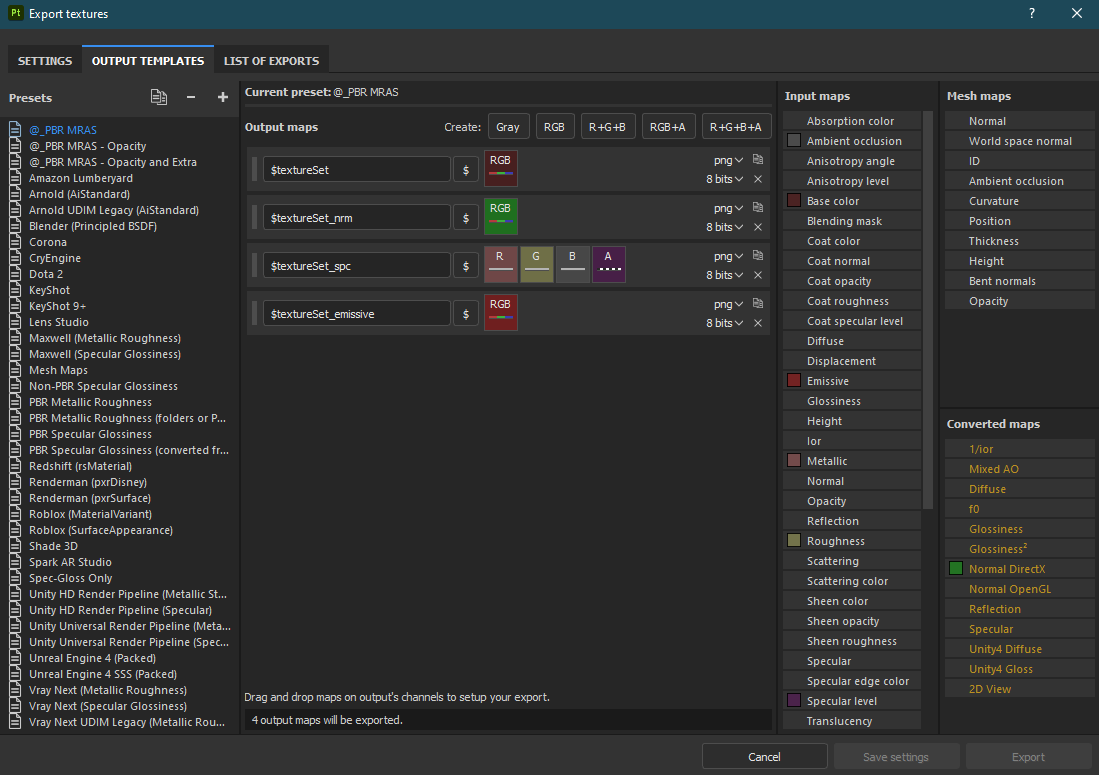
As an example, here is what your output template should look like in Adobe Substance Painter:
 (Note: If you wish to include alpha, then simply create an additional template with alpha in the A channel of the base color map.)
Re-pack your textures as follows:
- Color map: YourTextureName - export as BC1 DDS. In case your texture contains alpha, use BC3 instead.
- Normal map: YourTextureName_nrm - export as BC5n. Please make sure you use a DirectX Normal map.
-
PBR map: YourTextureName_spc - export as BC7. Ensure the following:
- Red channel: Metallic
- Green channel: Roughness
- Blue channel: Occlusion
- Alpha channel: Specular Level
- Emissive (if present): YourTextureName_emissive - export as BC1.
Ensure you export using the highest DDS compression quality, or you will get very pixelated results. I also recommend exporting using Kaiser mipmaps for a bit better looking textures at distance. Note: Using GIMP? Please use the Nvidia Texture Tools instead, as GIMP exports with very poor DDS compression, and doesn't support some of the formats we use.
Once the textures are ready in DDS format, open 3DS Max and create a new W3D material. Leave everything default except for:
- Shader -> Sec Gradient -> Enabled
- Textures -> Publish & Alpha Bitmap enabled.
On the model itself, go to W3D Properties and:
- Enable Tangents
- Enable Always Dyn Light (note: If this is a dynamic object like a character or vehicle, you can skip this)
Export your W3D file as you wish it, but make sure you enable Export MikkTSpace-compliant Tangents in the export menu. This is important, otherwise your assets will have various errors.
Now simply load your asset into a level with the correct configurations, and... it just works.
Good luck!

Recommended Comments
There are no comments to display.
Join the conversation
You can post now and register later. If you have an account, sign in now to post with your account.
Note: Your post will require moderator approval before it will be visible.