Leaderboard


Popular Content
Showing most liked content on 02/15/2023 in all areas
-
Version 1.0.4
495 downloads
Introduction: This is a refresh of an old project started by Gen Blacky (aka Mr. Z) with help from Slave and ErroR. It is a project that converted the first person weapon models to replace the original Westwood third person and back carried models. Read Description for complete list of changes. Batch script for personalizing/customizing, and Readme.rtf are included. In this refresh of the project, there are multiple fixes: Global Weapon Fixes and Changes: 1. Used the first person models (as is without scaling) for third person, back carried, and pickups to fix scaling inconsistencies 2. Welded all the vertices on the weapon polygons; doing this fixed micro gaps 3. Brightened the beams, displays, flares, and lights for first and third person models 4. Added reflection to all digital displays, laser beams, rifle scopes, and laser rifle's crystal (in XXXX_alt folders) 5. Removed all beams, display textures, flares, and lights from back carried models for proper (not in use/powered down) appearance 6. Made all the weapon flares, and lights cam-parallel 7. Made the weapon muzzle flashes that weren't in separate mz_xxxx#.w3d files brighter and cam-parallel 8. Fixed the smoothing groups; doing this fixed poorly shaded and visible triangles 9. Fixed all the back carried models' rotation and pivots Auto Rifle: 10. Added the missing front faces and texture 11. Fixed texture wrapping on the weapon's chassis 12. Fixed texture wrapping on clip 13. Fixed third person hand position C4-Proximity: 14. Fixed the back carried model's orientation to match the original model's ***Included an alternate model with the arms fully extended out C4-Remote: 15. Fixed the straps not being 2-sided on the side opposite to the remote 16. Fixed the back carried model's orientation to match those of the other weapons C4-Timed: 17. Fixed the rotation of the third person model so that the C4 now appears upright 18. Fixed the back carried model's orientation to match those of the other weapons Chain Gun: 19. Moved the back and front meshes closer to the weapon's chassis to remove small gaps 20. Fixed texture inconsistencies on the chain belt and gun handle 21. Scaled the chain mesh by -0.55% to appear more fitted 22. Fixed the chain mesh not having inner faces 23. Adjusted the chain texture's VPerSec from 7.0 to 10.0 to match the rotation speed of the weapon's barrels 24. Modified the non-rotating cylindrical meshes to rotate with the barrels Chem Sprayer: 25. Fixed texture inconsistencies 26. Removed gaps between the tip, top bridge, and canister 27. Fixed goo mesh's texture inconsistencies, they are now seamlessly wrapped 28. Scaled canister's goo1 mesh by -0.80% to appear more fitted 29. Fixed the reload animation, pc000 and pc001 weren't removing with the clip f_cm_chem due to not having checked only export geometry and unchecking transform bone 30. Fixed the back carried model to have the goo1 and goo2 mesh texture 31. Fixed third person hand position ***Included an alternate model with reflective glass over the clip canister Flamethrower: 32. Made the torch2 flame muzzle cam-parallel 33. Enhanced the brightness of the torch flame 34. Fixed the trigger missing faces on the right side of the weapon 35. Fixed third person hand position Grenade Launcher: 36. Removed a gap between compressor canister and launcher chassis 37. Resized the clip to remove large gaps and appear fitted 38. Resized the f_cm_gren clip to match Ion Cannon Beacon: 39. Moved the locks closer to the center to remove gaps 40. Moved the panel pieces on third person model to remove gaps 41. Rotated the third person model to match the remote C4's hand position 42. Rotated the back carried model to match the C4'(s) facing ***Included an alternate model that has the locks and dish parts fully extended, now matches the deploying animation ***Included an alternate model with the missing lock lights added back in Laser Chain Gun: 43. Removed a gap between gun barrel rotor and gun chassis 44. Changed the topbeam texture's VPerSec from 1 to 10 to match the barrel rotation speed 45. Fixed the firing animation to match the rate of fire, to behave more like a chain gun, and removed gaps and mesh clipping seen in the original animation Laser Rifle: 46. Made the crystal's color more saturated to prevent the reflective layer from washing out the color Nuclear Strike Beacon: 47. Moved feet vertices to fix overlapping/clipping 48. Extended the 4 receivers out on third person/world model Personal Ion Cannon: 49. Removed a gap between the scope and gun chassis 50. Fixed clipping between the rotor and scope 51. Fixed the muzzle flash for first person but it doesn't appear after every shot 52. Fixed third person hand position Pistol: 53. Fixed the reload animation, the clip wouldn't drop from the weapon due to having an incorrect pivot hierarchy order 54. Fixed broken vertices on clip 55. Fixed bad texture wrapping on clip Rail Gun: 56. Removed a small gap between suppressor support and barrel Ramjet Rifle: 57. Removed a small gap between hydraulic and gun barrel 58. Fixed third person hand position Repair Gun: 59. Removed gaps between canisters and tubes 60. Fixed the third person model's muzzle flash so that the two smaller flashes are no longer cam parallel and fixed their rotation, so they don't clip through the weapon Rocket Launcher: 61. Removed a small gap between screen and launcher chassis 62. Resized the launcher loader to remove large gaps Shotgun: 63. Centered the back carried model 64. Fixed third person hand position ***Included an alternate model that has no stock ***Included an alternate back carried model that has the stock folded to match the original back carried model Sniper Rifle: 65. Changed the white light back to red to match the original model 66. Removed a gap between scope and rifle chassis 67. Fixed the texture wrapping on the clip 68. Replaced the individual clip model f_cm_snip with the one that's actually used on the weapon 69. Fixed third person hand position ***Included an alternate back carried model with the scope lid in the closed position Tiberium Auto Rifle: 70. Changed the white lights back to green to match the original model ***Included an alternate model with an edited texture that has the canister's color changed to grayscale, added an animated goo mesh over the canister similar to the effect on the Chem Sprayer Tiberium Flechette Gun: 71. Removed unnecessary faces from the inside of the weapon model ***Made the clip glass clear and reflective Volt Auto Rifle: 72. Fixed the animated electric texture on the right side of the weapon 73. Removed gaps between the electric currents and the weapon's chassis 74. Made the electric currents 2-sided 75. Fixed the pivot orientation of the flares on the first person model ***Included an alternate model with a glass cover over the electric currents ***Included an alternate model with a red beam styled to Westwood's original model This package contains a batch file for easy install/customization, and a Readme for installation. Please enjoy and if you should use this in any mod or on a server please give credit to everyone involved in this project. ***Update 03/31/2022: Fixed credits for Gen Blacky and ErroR, misspelled names in credits.txt; Added another alternate Volt Auto Rifle that has a red beam styled to the original Westwood version. ***Update 04/04/2022: Adjusted the height of the p_bone for pickup models to prevent spawned weapons from falling through the ground (only noticed this happening on some maps). ***Update 04/08/2022: Adjusted the height of both the p_bone and worldbox for pickup models (centered them directly to the model) to fix multiplayer weapon spawners. ***Update 08/19/2022: Fixed Alpha channel bug on the Laser Rifle's crystal, added 2 more alternate models: 1-Alternate for Chem Sprayer with reflective glass over the clip canister; 2-Alternate for Ion Cannon Beacon with the missing lock lights restored, Extended the 4 receivers on the Nuclear Strike Beacon out further, wrote a batch script to help personalize/customize the installation, merged changelog.txt and credits.txt into the Readme.rtf file.1 like -
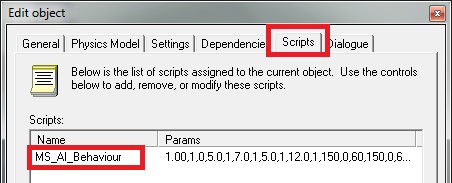
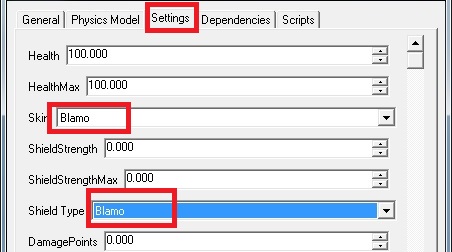
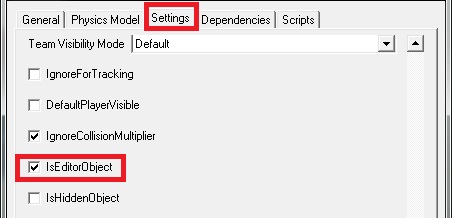
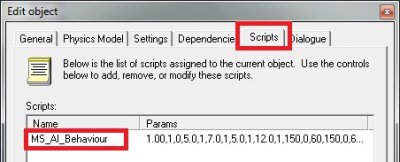
Author: moonsense715 Skill level: 4 Welcome to the second chapter of the tutorials that will show you how to add and configure more sophisticated bots to your maps. In this lesson, we will activate the player-logic AI system and tell bots how to attack in groups. If you are a mapper, you will be able to fully setup your map to support bots. This tutorial assumes you know the basic concepts about the advanced bots. If you haven't seen the corresponding tutorial yet, it is strongly recommended you check it out. You can find it here. 1. Adjust unit presets Let's set up the presets for the bots so they fit the requirements. Whether you are a mapper or a game core builder, you will have to edit them differently. A) If you are just creating a map: You will have to work with the existing presets. If any of their settings do not meet the requirements or your needs, you will need to clone the original preset into a new Temp preset, edit that and use it for the bot system. Note that if you Temp a preset, it will cost 0 credits for the bots and require no production buildings or tech level, unless it is placed on a Temp purchase list, overriding the regular one. If a preset is already configured properly, you can just use it. B) If you are building a game core: Since you are building the core preset list, you can outright forget Temp presets or having duplicate presets just for bot usage. You can use the same presets for bots that players purchase and use. Make sure all presets you wish bots to use are configured to fit their battle role. Now for the requirements. Select a soldier preset that you want the bots to be able to play as. Look at the attached scripts on the Scripts tab. Make sure there is NO MS_AI_Behaviour script present. If this is OK, rejoice! Bots can use this preset, you don't need to touch it. Otherwise, make these changes. Attach a MS_AI_Preferences script and adjust the parameters so the unit prioritizes and shoots the right targets. Note: You can skip attaching this script, the bot then will automatically attach it ingame at runtime with the default parameters. Do this for every preset that you want bots to use. If for whatever reason you want a bot to use a different weapon with a unit than the one players have, use the MS_AI_Replace_Weapon script. Attach it multiple times, if more weapons need replacing. Although if you are working with Temp presets already, you can just change the weapon on the Settings tab. Otherwise, using the same presets for bots and players is recommended for better maintainability. The MS_AI_Preferences script almost has the same parameters as MS_AI_Behaviour, but it has no ObjectiveType. Therefore this script solves 2 things: 1. There is no need for duplicate presets, one for players and one for bots, since the preferences script does not activate the AI on the unit on startup. A controller script will. 2. Every preset can become offensive or defensive, so you dont have to create one preset for an offensive variant, and one for a defensive one. Great, you have the bot presets ready! 2. Create bot purchase lists In this system, the bots go into battle after choosing a unit they want to use, just like players. They take a look at a collection of presets, which we are going to define now. Thanks to this, we can block bots from buying certain units on specific maps, or only allow a few for special gameplay. All up to our imagination. Note: skip this step if you want to let bots use ALL of the presets that players can buy, including resource collector vehicles, support units, etc. Warning: at least the existence/creation of an Engineering Infantry purchase list is recommended! Otherwise, you will see bots try to repair buildings with damaging weapons. Alternatively, you can set the engi list parameter to "AUTOENGINEER" to let the game automatically find all the presets that can heal buildings already existing on the map. If you have also skipped adjusting the MS_AI_Preferences scripts on all the units, the bots will definitely be using some units the wrong way (harvesters will think they can shoot, deployable units will try to fire a weapon that only works in deployed mode, etc). We have to define 4 different purchase lists for the bots per team: Offensive Infantry (place characters on this) Defensive Infantry (place characters on this) Engineering Infantry (place technicians, engineers, any repairing characters on this) Vehicles (place vehicles on this) Scroll down to twiddlers. These twiddlers might already exist and be usable, in which case you don't need to create new ones (check the available twiddlers, all lists for both teams must be present). If they already exist, and your map does not require to change the available bot units, skip this step. First, let's create the Offensive Infantry twiddler for Allies. Select Twiddler and hit Temp or Add (as described at "Adjust bot presets"). Name it (e.g. BotInfantryAllied), then switch to the Settings tab. Click Pick Presets. (edit list) Select Object->Soldier in the Preset Type dropdown. Now you need to add presets to this twiddler list. To add a preset, double click it in the Preset Pool. It should then appear in the Selected Preset(s) list. You can remove the preset by double clicking it in the Selected Preset(s) list. Add all the Allied/GDI infantry presets that you want bots to use. Remember: they all should have the MS_AI_Preferences script on them (you should have set these up in the previous step)! Click OK then OK again to finish editing the Twiddler. Create an offensive infantry twiddler for the other team as well (Soviets/Nod). If you want the defensive infantry to choose from a different list, create lists for them too (otherwise they can just use the offensive list). Also create a vehicle twiddler for both teams. Lastly, create an engineering infantry twiddler for both teams (place soldier presets on this, ones that have weapons to repair buildings, don't put anything else on this list - in APB, these twiddlers contain only 2 presets, the Technician and the Engineer). Note: bots spawn as the same preset players do (e.g. Rifle Soldiers). You don't need to add these startup units to the twiddlers! You can add a preset multiple times to a twiddler. The more times a preset is on the list, the higher the chance the bot will use it (if it has enough credits for that preset). If a barracks or war factory is destroyed, the presets now unavailable to players will also become unavailable to the bots automatically. These lists are merely for fine-controlling what bots are allowed to use, and you, the mapper can decide that. Right, you are done with the lists! 3. Setup bot player controllers You could now ask: "How will the bots appear on the map?" It's time to make that happen. In the previous tutorial, we have placed our soldiers and vehicles (or their spawners) manually. This time we will make use of the same spawn positions where players start, so we don't have to define separate positions for the bots. In this tutorial, all the bots will have a controller. This is a script that every bot will have a unique copy of, belonging only to them. It will keep track of available credits, help decide what is buyable and ultimately control the spawning and vehicle purchasing procedures. The controller script for every bot is MS_AI_Player_Controller. We are not going to configure or create them manually, because that will be the job of a global bot controller script. But for the sake of tutorial completeness, and because they actually work individually too, you can read here what it can do: To create the bot controllers and with it, spawn the bots, we will use the MS_AI_Player_Count_Controller script. This script will create/delete the individual bot controllers, driven by MS_AI_Player_Controller. First, create an invincible, editor-only preset. To do that, Temp the Object->Simple preset, set its model to o_davesarrow.w3d, make it have Blamo skin/shield on the Settings tab, and tick IsEditorObject. Now go to the Scripts tab and attach the MS_AI_Player_Count_Controller script. Set the Count parameter to 12, so you will have 6 bots per team ingame (feel free to change the count, this is just an example). Set the next 8 parameters (4 lists for both teams) to the purchase twiddler preset names that were set up in the previous step. (Leaving any list param as the default USEPLAYERPURCHASELISTS will make bots use all units from the purchase lists. Recommendation: set the Engineering ones at least or set them to AUTOENGINEER to make the game find infantry that can repair buildings automatically.) Leave the last 2 parameters as default (USEPLAYERSPAWNERS), so the bots will start at the player spawn positions. Alternatively, they can start at any object preset if you prefer them not to share spawning positions with players. In such case, set this param to the name of that object and make sure there is at least as many of these across your map as many bots should be able to play. Note that the bots are aware of buildings being attacked and will switch to defensive/repair duties automatically. Bots will be removed/added one by one as players join/leave the game, so the total sum of players ingame (Count) will be the number of human players and bot players added together. So if the Count parameter is set to 12, and there are 6 players ingame, then 6 bots will be spawned. If all those players leave, 6 new bots will appear one by one. Finish editing your controller preset (OK) and place it somewhere/anywhere (Make). Save and export your map. You should notice that bots will join the game and start buying available units. Good job, you've got your bots setup to spawn, then buy infantry and vehicles! 4. Organize group attacks Right now your bots act individually and never cooperate with eachother in a group rush, which are normally more effective. Teamwork is often needed for victory in team-based games such as APB and TSR to name a few. So now let's teach bots how to do group attacks. We will have to define gathering positions for both teams. Bots will "register" themselves for a group rush. At the gathering points, they will wait for eachother to catch up (some units are slower than others, some are faster than the average), before running to the next gathering point and then the next. After reaching the last point, they will all be "released" to do their primary objective. If many bots went together, this can be a massive attack on the enemy base with many infantry/vehicles. This rarely happens with individual attacks, so this is our goal with the group attack. First let's create an invincible editor-only preset to be the "host" of the script we'll be using. Get the settings up like you did for the player count controller script, but without attaching that script. Now, pick a position around the Allied/GDI base and place (Make) the preset there. Unlike before, we will attach the script on the placed objects this time. So double click the object you just placed, and attach MS_AI_Rally_Point on the Scripts tab. Parameters: Team: 1 (Allied/GDI gathering point) NodeGroup: 0 (this is a gathering point/node in the attack route of index 0, there can be multiple attack routes in both teams, indexing is 0,1,2, etc.) NodeNum: 0 (this is a 0 indexed node in this attack route = the first gathering position, order indexing is 0,1,2, etc.) If we stopped here, bots would gather at this position and then run to their primary objective (if the objectives are setup right, this should be the enemy base) without waiting for eachother. So if the objective is far away and the bots have different speed, this could make the group rush uneffective. Now create another Rally Point the same way as before for Allies, somewhere inbetween the Allied and Soviet bases. So place another instance of your editor only preset, and attach MS_AI_Rally_Point, but this time, set NodeNum to 1 (bots will first run to Node 0, then to Node 1 and so on). Place the last Rally Point next to the Soviet base, outside of the range of any existing defenses (otherwise they will get damaged while waiting). Set NodeNum to 2 to finish creating this attack route (the highest NodeNum is always the last position in a given attack route). Now create 3 Rally Points for the Soviet/Nod bots as well. Do the same steps as before, but set Team to 0. You can create more than 1 attack route for both teams so bots can use more of your map. For a second route, just create Rally Points and set the NodeGroup parameter of all belonging points to 1. If you define yet another attack route, set the NodeGroup to 2, and so on. Bots will randomly choose one attack route and carry on following your defined positions. You also have the ability to randomize the gathering positions a bit. Let's say you have a NodeGroup 0 but want the first gathering position to be randomly chosen from 2 different positions. To do that, just place an object with NodeGroup 0 and NodeNum 0 twice, and move them to different positions. Bots will choose one of them randomly, and then move on to NodeNum 1 (for which you can also define multiple locations). As for how the bots decide which one of them will join the group attack and when: - There is only 1 grouprush per team at a time. - The first rush registration starts at mapstart and a new one starts when the current group reached the last Rally Point or if they all died while trying to get there. - Once half of the bots on a team have registered for the rush (also a maximum limit of 8 bots), the registration closes and the bots will begin running towards the Rally Points. - While the registration is open, all offensive bots will join it after spawning immediately. Congratulations, you are done! 5. Optional: Bot names You have probably noticed that all the bots have a nickname tag: "Bot". If you want them to have individual names, this is the section you are looking for. Create a new text file, and name it bot_names.cfg. Copy this into it: [BotNames] BotName0=[Bot]Benny BotName1=[Bot]John So far you have 2 special bot names set up (feel free to change those 2 names). Using the "BotNameX=Name" syntax (where X is an index number), you can set as many as you wish, but make sure the indexing starts with 0. The AI Player Count Controller script will hand these names to the spawned bots randomly, but each name will only be given to just one bot at a time. If there are more bots ingame than names, the rest of them will get the default "Bot" name. You are done with everything now, please go and enjoy the bot battles you've just added to your map =) Q & A My bots are acting weird when seeing enemies/getting within attack range. Why? Make sure the primary weapon's Range it is using is always higher than the Max_Attack_Range script parameter. Bots refuse to attack my base defense/building. What did I do wrong? If it's a Simple/Vehicle object: - Either attach the MS_AI_Building script to it, or - Create a file called bot_config.cfg. and put this into it: ; List simple objects, base defenses, etc. here that need bot repairs but you cannot attach the bot building ; script to them for some reason (e.g. old games, no level sources) or you are lazy to do it in LE/Mammoth ; Replace the names with your preset names that should be attacked/repaired by bots, you can have more. [BotTargets] Target0=my_base_defense Target1=my_random_building ; Uncomment the settings below if you wish the game to create w3d models at the objective/target locations. ; This way you can check if something is wrong. ; Replace the entries in TargetModel/DebugObjectiveModel with model names that exist in your game. [Debug] ;EnableBuildingTargetsDisplay=true ;BuildingTargetModel=v_spotlight ;BuildingDebugObjectiveModel=o_davesarrow Bots have super good accuracy, they are too hard to fight against. Is there a way to nerf them? Increase the WeaponError value on the Settings tab of the preset. This will only affect bots, not players.
 1 like
 -
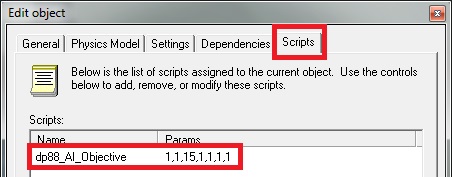
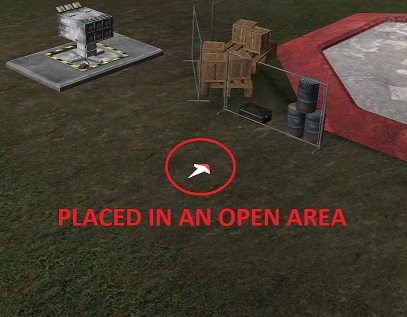
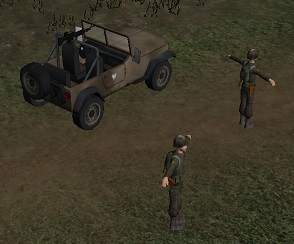
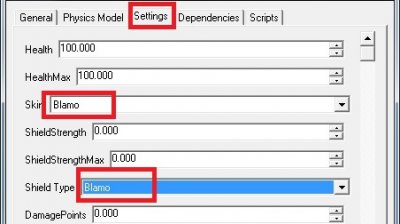
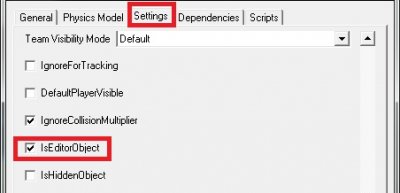
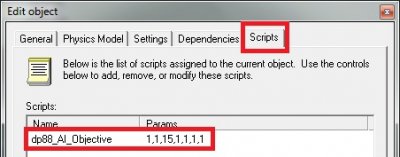
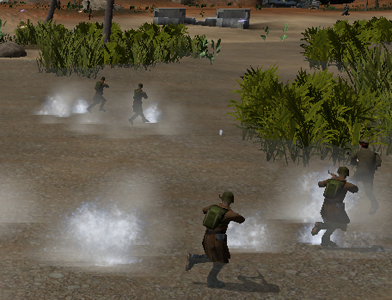
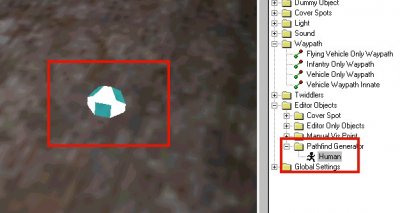
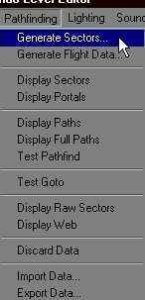
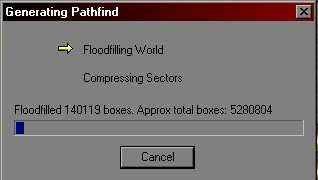
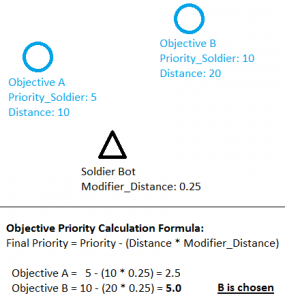
Author: moonsense715 Skill level: 3 Welcome to the first chapter of the tutorials that will show you how to add and configure more sophisticated bots to your maps. In this lesson, we will place a few very simple bots and give them objectives to do. They won't shoot regular base buildings or do anything too interesting for now. Optionally, you can also learn how to fine tune objectives and bot behaviour. - Wait, what are bots?! Bots are computer controlled objects (characters, vehicles) that do a task given to them. They don't need an actual human player to control how they behave. The most typical bots in a lot of W3D games are the mobile resource collector vehicles (Ore Truck, Tiberium Harvester) and the static base defenses (turrets, pillboxes, obelisks, sam sites). 1. Setup bot presets Start the Level Editor if you haven't already and open your project. Make sure you have generated pathfinding! In the preset tree, go to Objects -> Soldier, and click on a soldier preset you would like to appear on your map as a bot. Then, click Temp. (Note: if you are making a .mix map for a game, always use Temp to add new presets. If you are editing a game core so the presets are available on every map in the game, use Add! In case you are creating a standalone .pkg map, you can use both.) Give this new preset a name (for example MyAwesomeBot). We will use a script to apply the AI. Switch to the Scripts tab. Add the script MS_AI_Behaviour to the list and hit OK. Don't modify the parameters for now. Click OK again to finish your new bot preset. Create another temp preset by doing the same steps again, but this time, pick a soldier preset from the other team, so they can fight eachother. If you want to go a little further, pick 1-1 vehicle preset as well for both teams and do the same steps to have a few bot vehicle presets set up. Now that you have the presets ready, let's place them. Click on each preset and hit Make. You can move them around after placing to change their position. I recommend you place the bots into their own bases, but at least keep the two teams away from eachother if there are no bases on your map. If you want the bots to respawn after dying, you'll need to create spawners. Please read the spawner tutorial here. (You will need to place new spawners and delete the placed presets, since the spawners will create them dynamically.) You're done setting up and placing your bots! 2. Add AI Objectives Without objectives, bots will just wander around the position where they started and shoot enemies they see. You will want to give them objectives to run to and find, positions to defend, buildings or vehicles to attack. This is done by creating AI Objectives. Alright, you have your bots sitting in their bases. If you export and play your map now, the bots will shoot enemies that get close to them, but they will not do anything specific otherwise. To change this, we will tell them to run into the enemy base! First, let's create an objective for Team 1. For this tutorial, this is going to be the Allied team, while Team 0 is the Soviets. On the preset list, scroll down to Simple and Temp it. Give it a name, e.g. MarkerObjectiveAllied. On the Physics Model tab, pick a w3d model's ModelName, e.g. o_davesarrow.w3d. Go to the Settings tab, make sure IsEditorObject is ticked, so this model can only be seen in LevelEdit. Also make sure the object cannot die, set the Skin and Shield Type to Blamo (if there is no Blamo, pick one that is invulnerable to attacks). Switch to the Scripts tab and attach the script dp88_AI_Objective. This is the marker that tells bots "Come closer, your objective is here!" The preset we are creating is the "host" of the objective script, we will place it somewhere on the level so bots know where the objective is. Note that this is not the target that they will shoot, just a go-to location. This particular objective will be permanent and will not change position during the game. Now, set up the parameters like so: Team: 1 (= Allies/GDI) Type: 1 (= Offensive) Range: 15 Priority_Soldier/Light_Vehicle/Heavy_Vehicle/Aircraft: 1 (set all of them to 1) Place this marker in the Soviet/Nod base somewhere on open ground (not inside a building). Now the Allied bots will know where the Soviet base is, and they will keep running here. What about the Soviets, you might ask? Well, let's not let them down, and add an objective for them too. Do the same steps you did for the Allied objective, but this time, make sure the Team parameter is 0 and that you place the object in the Allied base. Good job! If you go ingame now, the bots will run to eachother's base and shoot enemy characters and vehicles. 3. Optional: Dynamic AI Objectives, Priorities Static objectives, the ones we placed is one thing, but let's see what else we can do here. In LevelEdit, place any vehicle object or vehicle spawner on your map, so that you can drive the vehicle ingame. Now, double click to edit the vehicle object that you placed in the scene, or edit its preset in the preset tree (only if it's a Temp preset!). Add the dp88_AI_Objective script for Team 1 on the Scripts tab with the same parameters as before, but change the Priority_Soldier parameter to 100. Head ingame and test your map, play as Soviets (team 0). Enter the vehicle you edited and drive around ingame, somewhere away from your base. You will notice that the Allied soldier bots will run after your vehicle and find you no matter where you are (as long as you are within the pathfind grid). Now you know how to tell bots to find a moving object. This can be very useful if you know what you want to do in your map/game. If there are multiple objectives for the same team on a map, the bots will consider 2 things: What's the priority of the objective? If two objectives are roughly the same distance away, the higher priority one will be picked. How far is it from their current location? If two objectives have the same priority, the one that's closer will be picked. After analyzing, each bot will choose the optimal objective. For example, they will most likely pick an objective 10 meters away with priority 1 instead of another one 100 meters away with priority 2. If the priority calculation for a particular objective ends up being negative (e.g. priority too low or distance too high), it will be treated as a 0.0001 priority objective (so it's positive). Keep this in mind when setting priorities for multiple objectives, as they can end up being the same value. Note: after a bot chooses an objective, it will not change it, not even if a higher priority one appears. It will keep its chosen objective as long as the script-wielding object is alive or until dp88_AI_Objective is removed from it by other scripts. 4. Optional: Bot Targeting Priorities Remember in the first steps, when we attached the script MS_AI_Behaviour but did not touch the parameters? Let's look at them now. The priority system was created by @danpaul88, and lets you tell your bots what to shoot, how to shoot them, and in case of multiple targets, which one to shoot at first. MS_AI_Behaviour implements this system. The full description of the parameter list is here: Priority_Infantry: Base targetting priority for infantry targets, or 0 to ignore infantry Weapon_Infantry: Weapon to use against infantry targets: 1 for primary fire, 2 for secondary fire Splash_Infantry: Determines if we should try to damage infantry with splash instead of hitting them directly. This is useful for slow / inaccurate weapons which do splash damage: 1 to enable, 0 to disable Priority_Light_Vehicle: Base targetting priority for light vehicle targets, or 0 to ignore light vehicles Weapon_Light_Vehicle: Weapon to use against light vehicle targets: 1 for primary fire, 2 for secondary fire Priority_Heavy_Vehicle: Base targetting priority for heavy vehicle targets, or 0 to ignore heavy vehicles Weapon_Heavy_Vehicle: Weapon to use against heavy vehicle targets: 1 for primary fire, 2 for secondary fire Priority_VTOL: Base targetting priority for flying targets, or 0 to ignore flying targets Weapon_VTOL: Weapon to use against flying targets: 1 for primary fire, 2 for secondary fire Priority_Building: Base targetting priority for building targets, or 0 to ignore building targets Weapon_Building: Weapon to use against building targets: 1 for primary fire, 2 for secondary fire Max_Attack_Range: Maximum distance at which the unit can engage enemies when using primary fire Min_Attack_Range: Minimum distance at which the unit can engage enemies when using primary fire Preferred_Attack_Range: Preferred minimal distance, the unit will try to move within this range when using primary fire Max_Attack_Range_Secondary: Maximum distance at which the unit can engage enemies when using secondary fire Min_Attack_Range_Secondary: Minimum distance at which the unit can engage enemies when using secondary fire Preferred_Attack_Range_Secondary: Preferred minimal distance, the unit will try to move within this range when using secondary fire Modifier_Distance: Priority modification to apply based on distance to target. Higher values will favour targets which are closer to the unit, good for less accurate weapons and slow vehicles Modifier_Target_Damage: Priority modification to apply based on damage a target has already sustained. Higher values will favour targets which have already been damaged in combat, picking them off first Modifier_Target_Value: Priority modification to apply based on the value of the target. Higher values will favour targets with a higher purchase cost, good for hard hitting weapons DebugDeprecated: No longer in use Detects_Stealth: Determine whether this unit can detect stealthed enemies or not: 1 to enable, 0 to disable ObjectiveType: What type of objectives this unit will run for, valid values are 1 (Offensive), 2 (Defensive) or 3 (Engineering). All non-flying vehicles are treated as light vehicle unless they have one of the marker scripts on them: dp88_AI_Marker_HeavyVehicle - Bots will use the Heavy_Vehicle preferences against them dp88_AI_Marker_Building - Bots will use the Building preferences against them dp88_AI_Marker_Repairable - All bots except Engineering bot types will ignore them It is important to know that NEGATIVE PRIORITY is usable for any target type. The more negative a type priority is, the more chance the bot will pick that as the target. When this happens, the bot will still shoot these targets, but they will keep running towards their objective and will not chase them. Here's an example: Object A: priority = 1 and Object B: priority = -2 ---> object B will be shot and the bot will move towards its main objective. If a target type should not be targeted at all, then you should use 0 as the priority value. For practice, try configuring rifle soldiers so that they will prefer shooting soldiers even when vehicles are within their sight range. Make tanks shoot other vehicles first and not chase soldiers (negative priority). Make them ignore aircraft. Last, come up with something that makes sense for a unit. E.g. anti-tank infantry, anti-aircraft vehicles, etc. Play with the priority parameters until you are happy with your bot behaviours. Please keep in mind that Objective Priorities and Target Priorities are completely separate things, even though both are affected by the Modifier_Distance parameter. Objective Priorities are for telling bots where to run when there are no targets around to chase, while Target Priorities are frequent calculations of enemies that the bot currently sees, and decides which ones to shoot/chase. That's it for the first lesson, now you should have a basic knowledge of how the new bot system works.


 1 like