

Raap
-
Posts
1,636 -
Joined
-
Last visited
-
Days Won
67 -
Donations
0.00 USD
Content Type
Profiles
Forums
Events
Documentation
Bug Tracker
Downloads
Posts posted by Raap
-
-
Thanks for writing this up. I'm hoping we can find a more user friendly workflow for this in the future, that doesn't involve hacking away at the files.
0 -
7 hours ago, forg0ten1 said:
im not saying it has to be an exact clone of TS. I just don't see any need for a gun on the apc. I find the gdi apc to be a very fun unit to play, even without the gun, just because its so good at squishing people. Plus, if you add a gun to the gdi apc, wouldn't you have to add one to the Nod counterpart as well?
I think my main gripe is that you'd be changing the look of an iconic tiberian sun unit, even if it is only slightly
The Nod APC can dig, a very useful function that is difficult to counter. We're also considering giving it a harmful drill like the Devil's Tongue.
6 hours ago, forg0ten1 said:wouldn't that mean not visually changing the apc by adding a gun on top of it?
It's a very small weapon, it doesn't even the vehicle silhouette.
As for fun; This is subjective. For each person saying X is fun, there is someone saying X is not fun. The general assumption here is however, that units that "got nothing to do besides moving" is more likely to be considered not fun by more people.
Either way, play testing will dictate if this is a keeper or not. I'm personally optimistic, since the Mobile EMP overhaul did in fact see positive feedback, and those changes were made primarily for very similar reasons (with the added effort put into making it not a frustrating unit to fight as a Nod player).
0 -
13 hours ago, forg0ten1 said:
because i'd like to see reborn stick as close to tiberian sun as possible, within reason.
We're trying to not limit gameplay design for a shooter based on arbitrary restrictions such as "the RTS didn't do it". Remember, this is not an RTS.
We will respect the source material in terms of visuals and high level gameplay, but a lot of the combat and control mechanics must be tailored towards being suitable for FPS gameplay, otherwise you'd be left with a bunch of niche units only a few people would enjoy playing. Perfect example: The old Mobile EMP.
This should come to no surprise for long-term Reborn followers, as the game always deviated from source material for gameplay purposes. See for example the expanded infantry character roster. The only difference now is, TSR isn't getting more new units added, but the existing ones will be more refined and more fun, to more people.
0 -
Some context for the GDI APC gun, which is still in concept stages.
It is most likely going to be an auto cannon weapon, something no TSR unit has right now.
Damage-wise it will be worse at anti-infantry than the Wolverine, and worst against vehicles and structures than the Titan. It would be a sort of "sub-par jack of all trades, master of nothing". Useful to help finish off low health enemies, but mainly to help make the driver have something to do while driving. It's also a decent tool for communication; Being able to fire upon the intended target so the crew knows, without having to directly communicate, what the intended target is.
Being an auto cannon, it would mean it has a relatively low RPM (something like 1 round per 0.75 seconds, give or take).
1 -
In regards to maps, I can only say that you need to take everything you know about TSR maps right now, and delete it.
When we are further along, we will share more details.
0 -
In a lot of cases it was the GDI buildings that had more issues, compared to the Nod ones.
Expect to see more building updates when the game launches, especially in regards to optimizations.
0 -
On 9/7/2019 at 3:10 PM, wolf said:
3. They take a crap-load of time to create. All the trigger zones and scripts that need to be placed... and that doesn't even include modelling the maps
Basically, the justification just isn't there. So much work for something people run through maybe just once.
The Sole Survivor Renegade mod was fun - I remember the multiplayer. I do not remember the singleplayer, which indicates 2 possible things; That the singleplayer campaigns were not memorable nor replayable, or that I have a bad memory.
0 -
I'm a bit late here but let me clarify the main issues with singleplayer.
- There is no technical limitation. We can do singleplayer, we can do a whole lot of whatever we want, since we control the full engine codebase. Yes, some things are hard coded, but if someone has both the time and motivation, there isn't technically much stopping us from doing something.
- Why we've not seen singleplayer content in released projects yet, is simply because most of us as developers/designers do not feel much for it. Most of us prefer working on multiplayer games because of the replayability and social aspects.
But no, to re-iterate, right now I could make a singleplayer mission if I wanted to (I'd just have to check up on a few things). But I lack the time and have no motivation to do so, since I believe for our engine, multiplayer is the heart of it.
Something else to keep in mind is that while the engine has improved a lot over the years, we've not put any work into singleplayer stuff, so mechanically we're still very limited there. It would make more sense to create singleplayer games on a different engine.
AR will be using a little bit of singleplayer for a tutorial mission. (And you will want to play it, because AR works a little different from your typical C&C shooter!)
0 -
4 hours ago, Timeaua said:
Man guys. Is this the full Cold retraction 2 map I see in the first picture? Totally forgot about this map allthough it costed me a lot of time to build it without even releasing it
The maps we have selected for launch are receiving a lot of changes, especially in the realm of optimization.
If you're ever curious about whats being changed and why about that map, you should message ChopBam as he's the one tasked to it.
(I'm personally tasked with bringing Field, Cliffs, and Snow up to standards.)
0 -
Bzzzt.
Also, I've already updated the lightning-struck effect on both characters and vehicles (EMP blast), so it is now extra
crispyzappy.0 -
I'd suggest removing the older and duplicate files from that download page, at the moment the latest file is listed at the bottom.
0 -
@Pushwall Perhaps its time to consider just fully supporting AI in maps (all but HostileWaters I guess, I have no idea how the AI would be able to make sense of that, perhaps @moonsense715 has some ideas?). At this point I mainly see benefits to it. The negatives might be worked out as Moonsense improves the AI.
Even just 6 bots per team will improve the flow for skirmish exploration and might help populate the server a bit more easily since you actually have something to shoot at. Ideally we'd drop the bots out as matches begin to populate with players, but again, at this point I'd rather just have 6 bots per team permanently than none at all.
I also like how my 2016 posts in the topic are really not that true anymore, the AI IS better now. Far from perfect, but no longer purely idiotic.
1 -
Thank you for reminding me to enable gameplay is pending mode for my stuff.
") 1
1 -
I always updoot on Reddit, and I can plop down some Reddit gold for particularly shiny posts. But I have no social media accounts, so I cannot help there!
 0
0 -
On 7/16/2019 at 5:59 AM, thedisclaimitory said:
I like the graphical improvements to the main w3dhub engine I think it will improve the best in maybe 3-4 years or 2 if not less, but I like the way this engine is going and changing
There has not yet been a lot of graphical improvement to W3D itself, its mostly just gaining access to beter development tools as well as a growing expertise from the people using them.
We very recently gained support for Max 2017, this LOD workflow is just one of many benefits of this.
Edit: I made a very slight update to the guide to explain "Export Geometry" should be enabled on the Nullmesh object. I figured it'd go without saying since without this, you cannot enable "Null (LOD)", but now it should not cause any further doubts here. Geometry Options can never ben configured without the exporter set to, you know, export them.
And here is a general note: Any object not animated or part of W3D rigging logic should have "Export Transform (Bone)" DISABLED. It is a good practice to apply to all project assets. All these extra bones have a (not measured) negative impact on performance since they exist when they do not need to.
0 -
Here is a quick guide on how to properly add LOD to an asset for use in W3D, using the latest available tools.What you need for this guide:
-
3DS Max 2017 with W3D plugin.
-
The latest version of W3D Viewer.
-
A completed level art asset, for example a rock.
-
In the viewport, enable statistics. (Right click on the [ + ] sign, go to xView and Enable Statistics)
Step 1: Understanding How LOD WorksLevel of Detail (LOD) is a way to scale the detail based on the distance an object is from the player. It is an essential component in optimizing your game for players, and it should be employed frequently, on most art assets not considered part of the "main terrain mesh".For each LOD stage we require, we need a gradually lower detail art asset. Generally speaking we will need 3 versions of the art assets, but you can get away with just 2 for really small objects. Here is how this is supposed to look with 4 LOD stages:-
LOD 0: This is your main art asset, we will not be touching the art of this one past this point since this is the model players will see in close proximity.
-
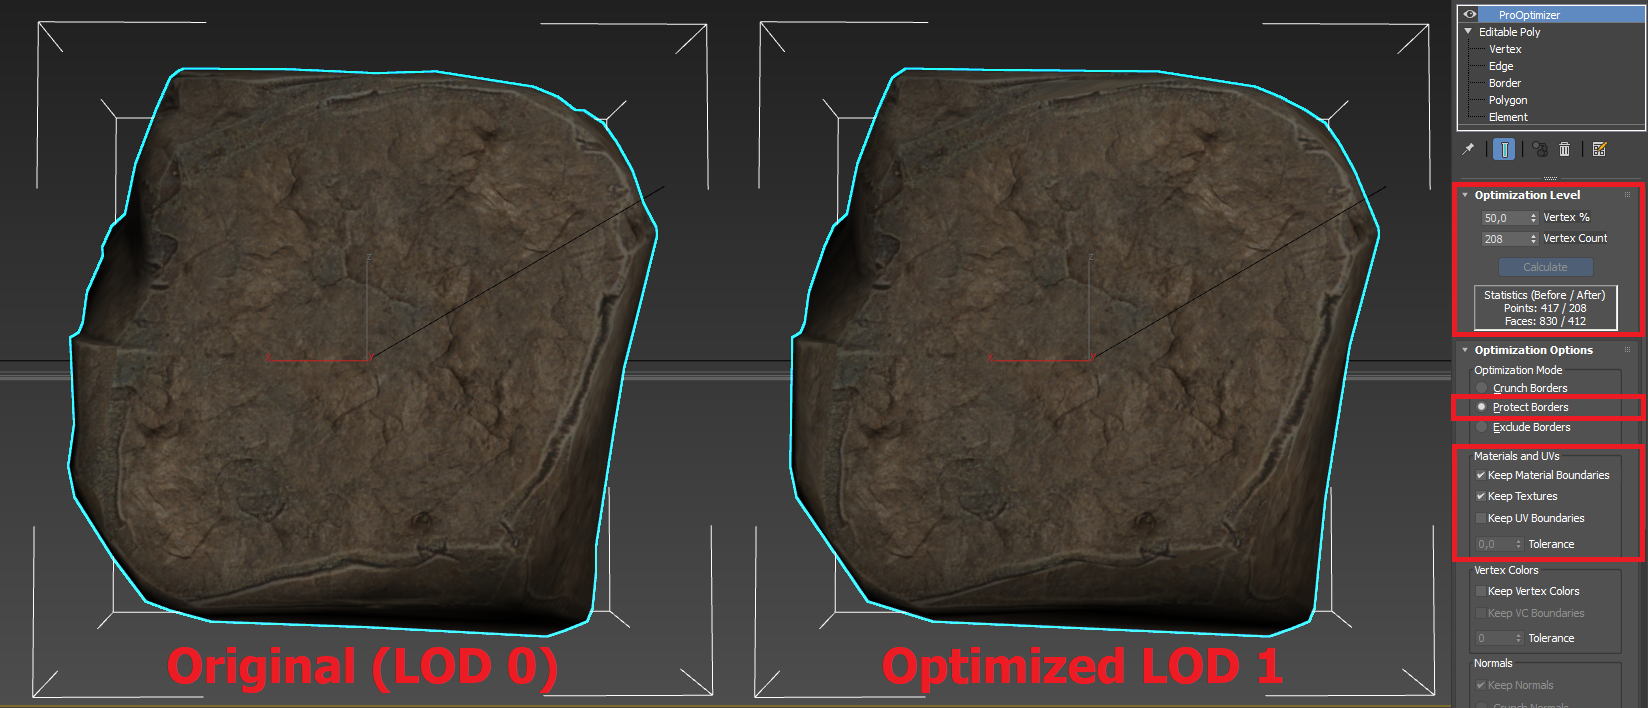
LOD 1: This is the next step, here we will tune the art asset with a first pass of ProOptimizer. This initial pass should see a big gain in terms of polygon count reduction while not visibly being too different.
-
LOD 2: Here we continue the gradual quality reduction of the art asset, keep in mind that players should not be seeing these models up close, so you do get a small margin of error worth of breathing space here, since players will not spot the occasional texture seam.
-
LOD 3: This is the null-LOD. This final stage must always exist as a safety-net. This stage does NOT use a clone of your art asset.
Ensure you name your assets to something logical, I recommend adding a suffix to each such as "_00" or "_01" to refer to what stage the art object is supposed to be.Step 2: Creating LOD StagesOpen your art asset in 3DS Max 2017.Note: If your art asset is made up out of several objects, you should group them before proceeding.Select your art asset, now clone it. This new clone is going to be our LOD 1 art asset. On the Modify tab of your newly cloned art asset, look for and apply the ProOptimizer modifier. This is the modifier we will use to generate LOD assets.For the first optimization pass, we want a result that reduces the polygon count by about 50%, the exact result will vary since it is up to you to determine if the LOD 1 stage looks like not too significant a departure from the original model. In general the main things you should be looking for are whether the outline of your LOD 1 art asset is still looking close to the original (LOD 0) art asset, and making sure no significant texture seams show up.Note: Please be aware that if your art asset uses vertex painting, you will be forced to undo that in order to prevent either really bad results, or barely any results. You will then have to redo the vertex painting on collapsed LOD art stages (never apply vertex paint on an object with an active ProOptimizer modifier in the stack).To get to 50% reduction, you will need to play with these settings (Click to enlarge): As you can see, the visible effect on the model and texture is very minimal. The outcome varies per art asset however, and if you get errors in certain spots, I recommend playing with both the percentage target, as well as the "Tolerance" value.Tip: To assist in comparing before/after, use the display toggle next to ProOptimizer (the eye icon), this will help you spot the differences without having to alter the ProOptimiser values back-and-forth.Next, clone the newly optimized LOD 1 art asset, this will become our LOD 2 asset. Pay attention that you continue to name these logically. Take another look at the ProOptimiser values, for this next asset we will want to hang around 20% budget. Repeat the process as described above and feel free to tweak the values to your liking. For LOD 3, the null-LOD, will will handle this in the next part.Note: If you spotted some smoothing issues in your asset post-optimization, you can collapse the modifier stack (so that the only thing you see on it is Editable Poly), and then apply a traditional Smooth modifier onto it, this will correct a lot of edge weirdness that your model may or may not be having.Step 3: Rigging the LOD Asset - 3DS MaxOnce your 'artistic' side has been completed, we need to ensure we rig the the asset in a way that W3D can understand what it is. Worry not, as this process is fairly straight forward.Select all your art assets, from all LOD stages. Go to the W3D properties located in the Utilities tab, and uncheck "Export Transform (Bone)".In regards to other W3D properties, please keep this in mind:
- LOD assets in W3D inherent their collision information from the LOD 0 stage. This means your LOD 0 asset should have the proper collisions applied. It is possible to use a separate collision mesh as well, as long as this is hooked into the LOD 0 stage down below.
- Other settings such as VAlpha should be applied to all art assets of all stages.
For each LOD stage, we will need to create a special bone. Create a small 1m box, and center it in the scene. We will call this box Origin.00.With Origin.00 selected, go to the W3D properties located in the Utilities tab, and uncheck "Export Geometry". Now clone this box 4 times so that you have 5 boxes in total, for LOD stages 0 through 3, and one more for the final null-LOD.Select the 5th box and rename it to Nullmesh, then go to the W3D properties, disable "Export Transform (Bone)" and re-enable "Export Geometry", and below Geometry Options check "Null (LOD)".With all the pieces created in the scene, we will now link them up. Select your art asset, and using the "Select and Link" tool located in the top menu next to the undo and redo buttons, link the art assets to their respective Origin bones. You can most easily do this by selecting them through the "Select by Name" dialog, also located near "Select and Link" at the top menu. So if done correctly, the LOD 0 art will be linked to Origin.00, and the Nullmesh should be linked to Origin.03.If in doubt, your hierarchy tree should look like this: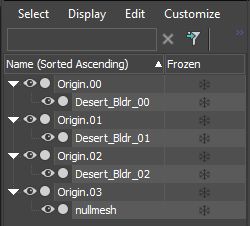 Now be sure you followed these steps correctly, always double-check. Save your scene and export it as Hierarchial Model with both Smooth Vertex and Optimize Collisions enabled.___________________________Update: The next part of the tutorial is obsolete. Instead, Max Screen Size values are applied within 3DS Max, by using the new MaxScreenSize input option in the W3D properties panel.Recommended average screen size values:LOD0: 1.0
LOD1: 0.3
LOD2: 0.2LOD3: 0.1
LOD4: 0.03 (null)You will have to tinker with the values depending on the asset. The general rule is, small objects should LOD earlier than larger ones.___________________________SpoilerStep 4: Rigging the LOD Asset - W3D ViewerOpen your freshly exported W3D file in the latest version of W3D Viewer.Maximize the W3D Viewer window and select your art asset located under H-LOD. This will be the LOD 0 art asset you are looking at.Note: In order to tell the game when to change to a lower LOD stage, we will need to set these stages up. This bit is really dependent on your own human optics. You need to determine yourself at what range, visually, should your art asset be making a LOD transition. The general rule of thumb here is, bigger objects should transition more slowly over long distances, while smaller objects should transition much more quickly. You do not want big rocks to transition into low detail or nullmesh at just 100m, and similarly you do not need a shrubbery to render past 50m. Its up to each individual project to set their own standards here.But for example purposes, we will set each stage transition 50m apart.With the model visible in the viewport, hold down your right mouse button and drag away from you, you will want to push the camera up to about 50m distance, as seen in the top left corner of the viewport. Then you need to press the [ key once. If you observed carefully, you will have spotted the model switching to LOD 1. Next up we need to tell W3D Viewer to 'save this location', we do this by hitting the Space bar once.Drag your mouse another 50m to 100m. Again press the [ key once to switch to the LOD 2 stage, and again hit the Space bar once to save this information.Lastly we need to set up the distance for the LOD 3 stage which contains our Nullmesh. This stage is a backup stage for large objects, so for big rocks we will want to move the camera to something far like 800m. But a small shrubbery, we will want this at 150m for this test. Pick what is relevant for your art asset here. Repeat the same steps, switching to the invisible Nullmesh via the [ key and once again saving that with the Space key.We're almost done now!The final step is exporting this LOD information. This means we have to create a new W3D file.- Navigate to File -> Export
- Select "LOD..."
- Select the file again you just opened (Yes, I know this makes no sense, unfortunately this is how it works)
- Then select the destination of the new file to be exported. Note you cannot overwrite the existing file, so save it in a different folder.
- Delete the old file, and rename your newly exported file to something that isn't all-caps.
- Verify if the new W3D file properly works, open it, select your H-LOD mesh, and under LOD in the top menu, enable Auto Switching. Once your camera goes beyond the previously assigned distances, you should see the model properly transition, confirming the asset is functional.
Note: If the asset appears to be switching LOD stages at different distances, this is because you do not have W3D Viewer maximized. LOD in W3D isn't actually based on distance in meters, but the size of the object based on your display view onto it. Because a non-maximized viewport is smaller, therefore the art asset appear smaller, you will see the LOD stages kick in sooner.
You can now create a preset in Mammoth that utilizes this new LOD asset in all the standard ways, no further tinkering is required in Mammoth.
Bonus Tip: LODed presets are excellent for usage with proxies. So all the time you spent creating this LOD asset, can be earned back by populating your level with this asset in 3DS Max via proxy. To make a proxy, create a preset in Mammoth containing the LOD W3D file, for example FancyRock1. In Max, open your LOD file and save the LOD 2 art asset as a separate file. Within this new file ensure it is not linked to any Origin bones. Remove all materials and merge all meshes, and ensure the pivot (not the mesh) is located at 0,0,0 of your new singular scene object. Name this object FancyRock1~01. You can now place this object around your level, and once loaded in Mammoth, all objects called FancyRock1~## will be replaced with the preset named FancyRock1, using the position and orientation from the proxy mesh. Once your project has a whole library of LOD assets available, creating new levels will take much less time.
Hopefully this will help some people understand how to create LOD assets using the latest tools for W3D. If there are any questions, ask them below.
2 -
-
Some proper object density in that desert map. I hope most of the terrain in maps has that much complexity to it.
") 0
0 -
On 6/21/2019 at 1:11 AM, Mojoman said:
I'm still waiting for Ray Tracing.
While modern-era graphics won't be a thing for TSR 2.0, graphics are still being worked on for W3D. Quite recently CMDBob introduced proper specular highlights which add a 'shine' to metallic objects that reflect light sources. I do not believe any of the TSR screenshots have this enabled (it is a relatively new feature).
0 -
Such an unusual-looking vehicle, that MEMP.
17 hours ago, Mojoman said:What's to stop the EMP from just becoming a MAD Tank? Something slow, rarely used effectively, and almost never bought? Utility vehicles don't have the best track record in W3D Games.
Keep in mind that APB, Reborn, AR, etc. are partially restricted to the gameplay design present in the RTS games, and some of those RTS mechanics do not always translate to suitable FPS gameplay. This is why sometimes, some representation liberties are taken, and some deviation might occur here as well for the MEMP if FPS gameplay demanded it. As for APB's MAD Tank, I think you should bring that concern to Pushwall. I'm all-in for an improvement pass on niche-gameplay units.
W3D as an engine isn't at fault here, it's just design-level decisions/restrictions that can prevent niche-roles from shining. Gameplay-wise there honestly is not a lot W3D can NOT do (it is why I still enjoy working with this engine).
2 -
Auto-detect the local language to apply it as default, but allow changing to another language via a configuration menu.
This is how most 'launchers' do it.
0 -
Turns out I'm one extremely terrible pilot. No more air planes for me!
1 -
6 hours ago, Raptor29aa said:
Good work guys. I am surprised at the speed in which you guys work, btw shouldn't there be a link to the Mammoth Editor?
Mammoth is not compatible with Renegade, it is specific to the 5.x code branch. You can currently test-drive it to create APB content in the APB SDK.
A W3D Dev Kit is still in the works, but I do not know what the current plans for that are, as it isn't quite ready yet for public usage.
0 -
Good post.
9 hours ago, OWA said:We're currently undertaking a pretty major overhaul of our codebase
[blurb]We've got big news for Renegade players, W3D Modders and fans in our big update for 2019! Come and read more right here![/blurb][thumb]thumb_w3d.0.png[/thumb]
That is putting it lightly. I suspect it will be a (very technical) topic of its own at some point. For those curious right now; It is effectively a process of rebuilding a gigantic portion of the codebase to be more optimal to work with for programmers and more closely follow modern game engine standards, and it will ultimately allow for a much more streamlined, modular, development approach.
4 hours ago, GraYaSDF said:Can you, please, make that W3D-plugin for 3D Blender, so we can rig animations and bones there. Anyway... it is GOOD update, and damn WWSkin is finally deprecated.
Sadly as Jon said we have no Blender plugin programmers. We also have no one around to test such plugin if it got made, as everyone here uses 3DS Max.
0 -
On 3/2/2019 at 11:56 AM, Abjab said:
(...)
Sorry to hear about your troubles. I guess that is one of the reasons I am still single, I do not think I can handle being told what to do outside of working hours.

Typically I also no not appreciate people ripping stuff and calling it their own, but the main usage of W3D importer is not to rip, it is for when your projects lost source files, so you'd have a way of retrieving 3D assets. This is very common for some of the older projects, as files do get lost over time when being handed over from one project manager to another project manager. Or sometimes an artist leaves and forgets to hand over some random files, etc.
If file security is a concern (and to me personally, it is because a lot of hours and money goes into art assets these days), the answer lies in data file encryption, so that W3D importing can still be done by people with a claim to those assets.
As for W3D importer, it is not pretty but it gets most of the job done. It typically breaks up all triangles so you have to weld everything again, this causes errors that you need to correct via applying a smoothing group. Animations also get imported per-frame, making adjusting them extremely painful. But it is good to have as an absolute backup option if you need to alter an old asset with a lost source file.
0
TS: Reborn News Update (3 October 2019)
in Tiberian Sun: Reborn
Posted
Any change is technically a violation of source material. But there comes a point where you have to make some changes. The source material is an RTS from 20 (!) years ago.
What is important here is that the changes do not violate the "feeling" of the universe. The EMP Cannon does not do this because it logically makes a hybrid of two source materials; The Mobile EMP vehicle, and the EMP Cannon defense structure. The latter does not exist in TSR so by merging it into the Mobile EMP, we effectively added something from the original source material into TSR.
Likewise, any other additions or alterations applied to TSR that deviate from the source material, are not necessarily bad, as long as they do not exceed the realm of plausibility, providing that the rationale behind the change(s) are well grounded.