GeneralCamo
-
Posts
1,460 -
Joined
-
Last visited
-
Days Won
26 -
Donations
0.00 USD
Content Type
Profiles
Forums
Events
Documentation
Bug Tracker
Downloads
Everything posted by GeneralCamo
-
 Author: Jonwil Skill level: 3 I have discovered how the "compute vertex solve" option in leveledit works and here are my findings: 1. The "Enable Filtering" and "Solve Selected Objects Only" checkboxes do nothing (probably why they are disabled) 2. The weather, sky and background settings under "Edit-Background Settings" in leveledit have no effect on the vertex solve what so ever. 3. The sunlight and ambient light settings under "lighting" in leveledit do affect the vertex solve. The ambient light in particular can be tweaked to give all the things in your level, dynamic objects/spawned items/etc included, a nice green or blue or red or whatever tint. 4. If the mesh has vertex colors set, they will be used. If the mesh has a material, it will use the diffuse and ambient settings from that material. 5. If the "occlusion enabled" checkbox is selected, some math happens that involves the vertex being lit, the position of the light currently being processed and possibly also the Far Attenuation settings. The results of this math (which I dont understand) are used to cast a ray into the scene. If the ray hits something, the vertex is not lit using that light. Seems to be to stop lights from lighting vertexes that they can't actually cast light onto because of obstructions in the way. This only checks for terrain or tiles that are in the way, not objects or anything else. 6. With the latest versions of scripts (dating back to somewhere in 2011 I think) you can now put Prelit=true into the "mesh user text" of a mesh (not sure exactly what that is in Max and I dont have Max running right now to check) to cause the lightmap code to not calculate shadows on that mesh. Note that the mesh will still be affected by ambient and diffuse(sun) lights. 7. With the latest versions of scripts (dating back to somewhere in 2011 I think) it will now correctly light meshes that have no vertex colors and that have an opacity of less than 1 (or 100% or whatever it is). This includes the glass for the renegade Hand of Nod and renegade Nod Airstrip, meaning you no longer need to hide those meshes before you light solve. 8. With the latest versions of scripts (dating back to somewhere in 2011 I think) it will now not apply lightmap data to mesh pieces that have bump mapping (this includes water on various stock Renegade levels and others, meaning you no longer need to hide those objects before you light solve). This fix is handled at load time meaning it works on all maps without even needing to re-run vertex solve or do anything special.
 -
Author: Jonwil, Generalcamo Difficulty: 5 Every physics object in Renegade has a collision group type that describes which other collision types it can collide with. Note that this has nothing to do with the W3D collision settings (physical, projectile, vis, camera, vehicle) that you set in gmax/3ds max. Collision types Scripts 4.x adds a number of new collision group types for various features including boats, subs, hover units, amphibious units and underground units. The full list of collision types (and the in-game numbers that represent them) is: Default = 0 Uncollideable = 1 Terrain Only = 2 Bullet = 3 Terrain and Bullet = 4 Bullet Only = 5 Soldier = 6 Soldier Ghost = 7 C4 = 8 Underground = 9 Soldier Only = 10 Soldier Bullet = 11 Terrain = 15 Water Surface = 16 Water Edge Block = 17 Water Edge Allow = 18 Beach Edge = 19 Naval Unit = 20 Beaching Unit = 21 Hover Unit = 22 Amphibious Unit = 23 Amphibious Unit Floor = 24 This image shows what collision types each collision type can collide with: Note that you can put any collision type on any object e.g. you aren't restricted to using C4 on just C4 objects. The names just indicate their intended purpose. Default preset collisions Terrain always has a collision type of "Terrain". Tiles by default have a collision type of "Terrain" by default but can be changed using the drop-down list in leveledit Objects (i.e. the stuff under "object" in leveledit) can have the script SH_CustomCollisionGroup added that will let you set the collision group using the numbers in the list above By default beacons will have a collision group type of "Terrain and Bullet" C4 will have a collision group type of "C4" Cinematic objects will have a collision group type of "Terrain" Powerups will have a collision group type of "Terrain" or possibly "Uncollideable" (I cant tell from the code which it is, seems to depend on whether its pre-placed in LE or spawned by a script/spawner) Special Effects objects will have a collision group type of "Uncollideable" Soldiers can have various collision groups at runtime depending on their state so using SH_CustomCollisionGroup on a soldier object will not work All objects not otherwise mentioned get collision type "default" For programmers Example from TS: Reborn This next part will describe how things are set up for amphibious and hover units in Tiberian Sun Reborn. Firstly, you need to create the vehicles. GDI Amphibious APC The only special thing you need for the amphibious unit (which is designed to be unit that drives along the ground but appears to be "floating" when in the water) is a copy of SH_CustomCollisionGroup on the vehicle with the value set to 23 (aka "Amphibious Unit") GDI Hover MLRS For hover units (which is for anything designed to travel on top of water and "hover"), you need a copy of SH_CustomCollisionGroup on the vehicle with the value set to 22 (aka "hover unit"). You will probably also want to make the wheel bones and such of your vehicle invisible so it appears to be hovering (The Hover MRLS in Reborn is set up as a tracked vehicle which seems to work best for hover vehicles rather than a wheeled vehicle) Hidden mesh for hovering -Next up you need special geometry on the map to make things work correctly. Firstly create a mesh (in a separate w3d file from the main terrain) for the "water surface" (this is what hover units will drive on top of). This shouldn't be the actual water surface with the texturing on it. It should have flags set to "hidden" and "physical collision" and nothing else. -Export this as "terrain" in gmax/max. Create a tile in leveledit and assign this mesh. It needs to be StaticPhys and needs to have IsNonOccluder ticked, Collision Group set to "water surface" and "visibility mode" left at "default" -Then place your tile on the map like you would with any other tile. Hidden mesh for the Amphibious APC Next up you need to create another similar mesh for the "Amphibious Unit Floor". This is what the amphibious unit will drive on when in the water (so it should be placed such that the vehicle appears to be floating on the water surface when its driving on it, below the water surface) It should be created just like the "Water Surface" mesh above with the same flags and settings except that it should have Collision Group set to "amphibious unit floor". Note that it is the size/position of the vehicle's Worldbox (which for vehicles has Physical collision ticked), not the geometry itself (which doesn't have Physical collision ticked) that determines how low or high the vehicle rides. For example, the Reborn Amphibious APC has a larger worldbox with more worldbox underneath the vehicle than usual so that when it drives on the "amphibious unit floor" it will achieve the desired height so it appears to be floating on the top of the water. The boats in APB (including the naval transport) have part of their structure (the nit that is underwater) sticking out from below their worldboxes so that when they ride on the "water surface" mesh, part of the geometry sits underneath the water. The submarines in APB have any part that is visible above the water when its surfaced to be protruding above the worldbox (as the water surface will act as a "lid" and keep the worldbox from moving past it) Generic naval unit setup The vehicles Ok, now for the tutorial on naval units. Other than the aforementioned worldbox changes, they are just like any other vehicle. The boats (including naval transports) are set up as tracked vehicles (with invisible wheels). The submarines need to be set up as VTOL vehicles so the can move up and down in the water. The only other setting required is to set the "type" as appropriate (either Boat or Sub depending on what you are making). Everything else is as normal for vehicles. As for scripts, both boats and subs require SH_CustomCollisionGroup with a setting of 20 aka "naval unit". Units that can come onto the beach but not onto land more generally (i.e. naval transports) need a setting of 21 aka "beaching unit". The naval-colliding meshes For the water surface in the naval logic, you need to make the actual visible water surface a separate mesh. You need 2 meshes: One facing up for the top surface (which will dictate how low into the water boats will go) One facing down for the bottom surface (which will dictate how high up subs will go) and is what people in submarines see when they are underwater. They need "physical" collision ticked and nothing else (technically they dont NEED to be 2 separate meshes but it should be totally fine to have them separate). Export them as terrain. In LevelEdit, you need to make this as a tile with StaticPhys, "IsNonOccluder" ticked, "water surface" collision and "default" visibility mode and place it in your level. Blockers Next up, you need a blocker around the edge of the water (this will limit where naval vehicles can go, so they won't leave the water and roll around on the normal ground). This should also be "physical" collision only and should be hidden so it cant be seen. In-game, it's the same as the water surface (StaticPhys etc) except that it needs either collision group: "water edge (allow)" (if you want to allow soldiers and normal vehicles into the water) or "water edge (block)" (if you want to block soldiers and normal vehicles from entering the water) Finally, if you have any vehicles with "beaching unit" set on them, you need another blocker further in (just like the water edge) with "beach edge" collision group. This concludes the tutorial on collision detection and how to use it to build boats, submarines, naval transports, amphibious units and hover units. Anyone with questions on all this stuff (or if you are having problems getting it working), feel free to post here or hit me up on IRC/IM.
-
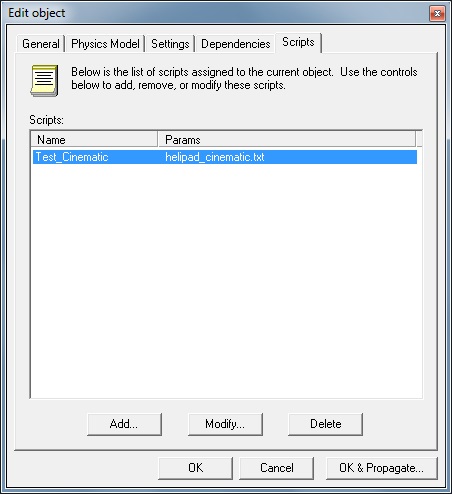
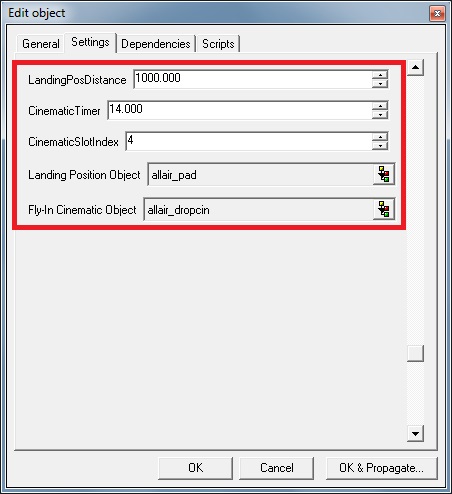
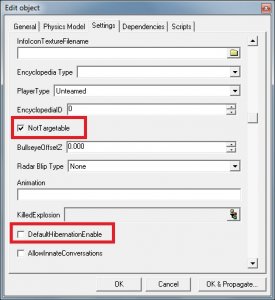
Author: Jonwil, Generalcamo Skill level: 3 This tutorial will show you how to make functional helipads and make the helicopters arrive to the helipad and link them to it instead of the War Factory. Note: It will be totally separate from the weapons factory/airstrip in that you will be able to buy helicopters even if the war factory/airstrip is down and you will be able to buy ground vehicles if the helipad is down. You can even have someone buying a helicopter and someone else buying a ground vehicle at the same time. 1. Setting up the sidebar Firstly, in order to use this functionality you need to be using the sidebar in your map. Follow this tutorial (https://secure.w3dhub.com/forum/index.php?showtopic=414727) to set up the sidebar. You also require a scripts build that supports this feature. Copy its content to your game folder (not Data) and overwrite all. Also copy ttle.dll, memorymanager.dll and shared.dll to your root LevelEdit folder, where LevelEdit.exe is sitting. Restart LE if it was running. 2. Prerequisites You also need to include a helipad_cinematic.txt (you can give it a different name) file and xg_hd_htraj.w3d in your map mix file or always.dat. Open the C&C_MyMap_tt.ini file you made in the sidebar tutorial and add the following: VehicleFactoryVehicleLimit=10 AirFactoryVehicleLimit=6 If you want to set a global limit that applies to all maps, put these into tt.ini instead of the mapspecific ini file. This sets the limit of the vehicles and helicopters players can buy, feel free to change these limits. 3. LevelEdit work To set up the helipads, first you need to put a building on your map to act as the helipad. Create it like any other building (give it MCTs, PTs, damage aggregates and whatever else you want for it) Then open leveledit and open your map. 3.1 Cinematic preset Create a new preset underneath "simple". This will be the helipad fly-in cinematic object. Untick the "DefaultHibernationEnable" checkbox. Tick the "NotTargetable" checkbox. Tick the "IsEditorObject" checkbox. Tick the "IsHiddenObject" checkbox. Leave all the other settings at the default. Attach the script Test_Cinematic to this object and give it the parameter helipad_cinematic.txt 3.2 Landing object preset Next, you need to create a landing position preset with whatever name you like. This will determine where the helicopters will fly in at and do nothing else. You will need one preset for each team (the fly-in cinematic preset is used by both teams). Make this one a copy of the Dave's Arrow preset with no changes to the settings and you are done. Now you should have the presets ready that can not be seen ingame but act as the landing position. If you can't find a Dave's Arrow preset, don't panic. This preset is used to place objects in LevelEdit that do not appear ingame. You can make one by creating a simple object, DecorationPhysics type and the model is o_davesarrow.w3d. On the settings page, tick IsEditorObject, untick DefaultHibernationEnable and you are done. 3.3 Building preset Next, go to buildings and then air factory. Create an instance of this (one for each team). If you dont see air factory in the list it means you dont have 4.1 installed properly. Set this preset up as for any other building with all the usual settings and scripts you want. Make sure to set the building type to "helipad" Set LandingPosDistance to 1000 Set CinematicTimer to 14.0 Set CinematicSlotIndex to 4 Set Landing Position Object to the landing position object preset created earlier. Set fly-in Cinematic Object to the fly-in cinematic object preset created earlier. No special scripts are required for this building. Once you have done this, place the helipad building controllers as per normal for buildings. Then place several (2 or 3 works good) of the landing position objects (for the right team) around the helipad at ground level. (these will determine where the helicopters land at). You can't have more than one helipad per team, the logic doesn't support it. Now you need to set up the war factory/airstrip to not build helicopters anymore and to have them be built at the helipad. If you have helipads on an individual map, create temp presets of the war factory and airstrip (or if you are already using temp presets, open them). If you are making a full game, mod the normal presets. The only change you need to make is to tick the BuildGroundOnly checkbox. 4. Finishing touches For all maps using the helipad, you need to tick the allow flying vehicles checkbox under edit-level settings in LE. Note: this tickbox does not need ticking at all from scripts 5.0 onwards. Do not forget to set a proper flight roof (blocker) or the players will be able to fly out of the map.


-
Author: Jonwil, Generalcamo Skill level: 3 You will want to download the sidebar textures for this tutorial. Now that scripts 4.1 allows you to use the sidebar stand-alone in a Renegade map or standalone mod, its time to write a tutorial for how its done. The first thing you need to create are textures for the sidebar. Included in the sidebar.zip file are some example textures from Tiberian Sun: Reborn as well as a source Photoshop file provided by Chronojam to show how it all fits together. You need to create a top half texture, bottom half texture and up and down arrow textures. They can be the same for both teams or different for each team. Then, you need to create an ini file. If your map is named C&C_MyMap, the ini file should be named C&C_MyMap_tt.ini. Alternatively, if you are creating a standalone mod, the ini file should only be named tt.ini. In this file put something like this [General] AlternateSelectEnabled=false NewUnpurchaseableLogic=false VehicleBuildingDisable=false GDIUpArrowTexture=gdisidebarup.tga GDIDownArrowTexture=gdisidebardown.tga GDIBackgroundTexture1=gdisidebar1.tga GDIBackgroundTexture2=gdisidebar2.tga NODUpArrowTexture=nodsidebarup.tga NODDownArrowTexture=nodsidebardown.tga NODBackgroundTexture1=nodsidebar1.tga NODBackgroundTexture2=nodsidebar2.tga sidebar=true Obviously the names of the textures should match the names you gave them when you created them. You can also optionally add the following if you want sounds to play when sidebar items are purchased: sidebarSoundsEnabled=true sidebarRefillSound=xyz sidebarInfantrySound=xyz sidebarVehicleSound=xyz Or for team specific sounds: SidebarInfantrySoundNod=xyz SidebarInfantrySoundGDI=xyz SidebarVehicleSoundNod=xyz SidebarVehicleSoundGDI=xyz The sounds need to be 2D sound presets created in LE. (obviously replace xyz with the name of the sound to use). The sounds are played whenever something is purchased (i.e. double click etc) Note that the sidebar does not display any text on top of the icons except for the cost so you will need to either rely just on the pictures or you will need to add text to your icons. Also note that all players using your map will require scripts 4.1 (as will the server) in order for this to work. Also, the sidebar does not allow you to purchase beacons (unlike the PTs) so if you want beacons to be purchasable, you will have to add separate terminals to let you do that (there are plenty of scripts to make that happen) If you wish to use the new tech level features of the sidebar, continue reading. First, in the C&C_MyMap_tt.ini file (or whatever), put this line at the end after the others NewTechLevel=true Then in leveledit, go to Global Settings then Purchase Settings. For each of Character Classes (GDI), Character Classes (Nod), Character Classes (Secret GDI), Character Classes (Secret Nod), Vehicles (GDI), Vehicles (Nod), Vehicles (Secret GDI) and Vehicles (Secret Nod), create a temp preset copy (or if you already have one, edit it). What you need to change is the Factory Building Type for each entry. For soldiers, set it to Soldier Factory. For vehicles, set it to Vehicle Factory. If you are using my helipad tutorial (to be posted shortly) set helicopters/air units to Helipad. If there are units you don't want on the sidebar (e.g. the secret hidden extra vehicles), set their object to none. The usual enable/disable for extras (EXTRAS console command etc) will not work with the sidebar. All of the hidden extras will be displayed be default otherwise. That should be all you need to do, no extra scripts are required, the engine logic behind NewTechLevel=true will do all the work of making the items vanish from the sidebar when the relevant building is destroyed. This should be all you need to know in order to use the sidebar in your map or mod. If you have any questions, post here (or talk to me on IRC/IM) and I will do my best to answer them.
-
5 - Advanced Guide to new Lighting Features in scripts 4.x
GeneralCamo posted a topic in Miscellaneous
Author: Jonwil, Generalcamo Skill level: 5 Light solve improvements -Firstly, a bug has been identified in the vertex solve code related to meshes with bump mapping such as water. With the fixes provided by 4.0, you no longer need to hide water meshes before you run "compute vertex solve". -Secondly, another bug was identified whereby meshes that have no vertex colors and have an opacity of less than 1 set in their material settings would be treated as though the opacity was set to 1. This has been fixed The most well known example where the opacity bug can be seen is with the glass in the nod airstrip tower. With the new fixes, you will no longer need to hide any of the glass on the stock renegade buildings (including the air tower and the hand of nod) before you run "compute vertex solve". -Thirdly, 4.0 adds a new feature to the vertex solve code that lets you completely disable vertex solve on a particular mesh. This is intended for meshes where the vertex solve still screws up even with the above 2 features as well as for vertexes that contain pre-calculated lighting baked into the w3d file. (such as lightmap textures) To use it, you select the mesh in 3DS MAX and open the "Properties" dialog. Then you click on the "User Defined" tab. In that box you type "Prelit=true" (without the quotes). This will cause the vertex solve code to completly ignore this mesh (i.e. its essentially same as hiding the mesh before you vertex solve) The process is similar in Gmax/RenX. NOTE: If you are using the Prelit=true feature on a mesh that is part of anything other than terrain, ALL the meshes in that w3d file need to be Prelit=true otherwise it will screw up when you run the vertex solve. Buildings and lights Before we go into some of the deeper and more complicated stuff, here is some information about w3d you might need to know: Buildings have a prefix set in the building definition Meshes that contain the building prefix followed by the ^ character are exterior meshes for that building Meshes that contain the building preset followed by the # character are interior meshes for that building Buildings can also have lights associated with them. Lights will match the building if the name of the light (which is taken from the .wlt file, see below) matches with the mesh prefix of the building. Lights in Renegade can come from 2 places, they can be directly placed into leveledit or they can be placed via a .wlt file Every light in renegade has a "group ID" and a name. A .wlt file is a file that is associated with a terrain .w3d file and contains one or more groups of lights. When a .wlt file is loaded into leveledit, the lights are given names matching the .wlt filename. The first group of lights in the .wlt file are given a "group ID" of 0, the second group is given a "group ID" of 1 and so on. When a building is initialized, it creates 4 lists (actually 5 if you count the building aggregates but that doesn't matter for this discussion) and fills them with the appropriate data. The InteriorMeshes list contains all the interior meshes for the building. The ExteriorMeshes list contains all the exterior meshes for the building. The PowerOffLights list contains all the lights with a name that matches the building and a "Group ID" of 1. The PowerOnLights list contains all the lights with a name that matches the building and a "Group ID" of 0. Meshes can have "Alternate materials" associated with them. This is basically a second set of material data stored in the .w3d file. (this second set of data may contain textures, shader settings, material settings, texture coordinates etc) When a building is destroyed, the alternate materials on both the interior and exterior meshes are enabled. When a building goes low power, the alternate materials on the interior meshes are enabled. When a building is destroyed or goes low power, all the lights in the PowerOnLights list are disabled and all the lights in the PowerOffLights list are enabled. With these fixes, we have also identified how to make Alternate materials and alternate lighting work. The alternate material feature will only work properly on terrain and will only work on meshes that are prelit (i.e. those that have "Prelit=true" set) The alternate lighting feature will only work properly if the meshes being lit all have Prelit=true set. Meshes which do not have Prelit=true (and therefore get lighting from the vertex solve) will probably not look correct when the lights switch to the "power off/dead" set of lights. Using alternate lighting To use the alternate lighting feature you do the following: (there may be other ways to generate .wlt files, I am only describing the way I know to do it) Load leveledit and create a blank map Place the building interior terrain for the building you want to add lights to at 0,0,0 (i.e. so that 0,0,0 in the building terrain is at 0,0,0 in the level) Create any light presets you like and place them anywhere in the level (but presumably they will be inside the building). These will be the "normal" lights Choose Lighting-Export... from the menu. Save the lights as e.g. normal.wlt (the name doesn't matter, I am using normal.wlt for this example) You can (if you like) save this level with the placed lights in it for later further work if you like (you dont need to though) Delete all your "normal" lights Place your "dead" lights (which will also be used when there is low power) Choose Lighting-Export... from the menu. Save the lights as e.g. dead.wlt (the name doesn't matter, I am using dead.wlt for this example) You can (if you like) save this level with the placed lights in it for later further work if you like (you dont need to though) Put wltmake.exe, memorymanager.dll, normal.wlt and dead.wlt in a folder. Open a command prompt and go to this folder. Run wltmake out.wlt normal.wlt dead.wlt. Instead of out.wlt in that command, use the name of your building interior mesh but with a .wlt extension (so if the building is mabar_int.w3d, the wlt file would be mabar_int.wlt) Copy the new output wlt file into your always.dat file or whatever (somewhere LE and the game can find it) Edit the preset for your building interior terrain and set m_LightFilename to the name of your new .wlt file Repeat steps #1 to #13 for all the buildings that need special lights Once that is complete, open up each map that contains the newly-lit buildings. Delete any instances of the building interior meshes (or of any terrain that proxies them in) and re-insert them into the level so that the lights get pulled in. Save and re-export the map. Enjoy your new lighting (hopefully) Don't forget: you can always also use animated Tiles to hide/show different parts or versions of your buildings. Note: Lights will only be affected up to 50 meters from the building controller, so for large buildings try to center the building controller for best results. Using alternate materials To use the alternate materials feature you do the following: Take your mesh in max or gmax and apply the "normal/alive" materials (including any light maps you may have created) Export this to a w3d file (lets call it normal.w3d for this example) Edit the mesh and apply the "dead" materials (including any light maps you may have created) Export this to another w3d file (lets call it dead.w3d for this example) Put both w3d files, memorymanager.dll, altmat.exe and w3dlib.dll in a folder. Open a command prompt and go to this folder. Run altmat out.w3d normal.w3d dead.w3d replacing out.w3d with the name of the output mesh you want (i.e. the name that matches the building you are working with) Place the new w3d file in a place that leveledit and the game will find it. Export your maps as normal Load the game and enjoy your new materials The things you can change between normal and dead materials are: -Vertex colors -Texture coordinates -All the values on the Vertex Material tab -All the values on the Shader tab -All the values on the Texture tab EXCEPT for the "Stage 0 Texture" and "Stage 1 Texture" checkboxes Changing anything else (including geometry or pass counts) will not work and may lead to crashes (in altmat or in the game). Remember that you can't rename a w3d file so make sure you use the correct output filename. -
You think big textures are the only thing the renegade engine should support to keep people on it. You are mistaken. How about things such as dynamic lighting normal mapping specular mapping modern tools actually having access to the source code of the engine. Sorry for bad grammar but I am typing this on a cell phone.
-
Granted, and it us awesome. But no one plays it. I wish I could go back in time.
-
Graphics can be fixed quickly, that is very easy to fix. It takes 5 minutes to change the lighting, or less depending on the size of the map.
-
She's a she, FYI. Kai has always been excellent at picking out balance points, and finding excellent ways to fix them too. She actually has positions elsewhere in the C&C community, hence why I know her personally. We also played Team Fortress 2 once or twice. I think they were lost around the time you decided to make maps in the 3.4.4 editor, which broke everything.
-
The 100 round magazine would be unlikely to be used, based on the fact that from what I can glean, the thing is unreliable. There is also a 50 round magazine, that would be more likely to be used.
-
Nope. 17
-
One Winged Angel has the Battle Fortress working in UDK as well: If any project has the potential to be successful on a new engine, it would be AR. They have most of their source files, most of their team members are quite familiar with UE, and since RA2 is much more popular (and easier for a new person to understand) than say, TD or TS, they would have the option of having a lot more people to work on it.
-
I'm going under the assumption that even though the conflict took place in the 90's, the technology level reflects that of the 00's or early 10's, similar to how Red Alert took place in the 50's, but had technology from the 80's.
-
Ah, I remember when you were working on Noddingham. With the new features from scripts 4.2, it could feasibly be finished. Though, with a lack of players, it would be difficult. Also, the ancient tools are difficult to work with. I still have the original source files from fjords you gave me. I figured out that adding two more temps to the thing would corrupt everything, and stopped what I was doing with them. I don't remember what it was though. Weren't you working on buildings for APB at one point? I know that radar dish for the airstrip came for the radar dome you began making for it.
-
Hey everyone. I just wanted to get a comprehensive list of the weapons used (or potentially used) in Tiberian Dawn. I have had plans for something for a long time, and may be able to implement it sooner than I expected. Here is a list of my current thoughts: GDI: Minigunner: Obviously not a minigunner. Sources that are currently available says that he uses a "GAU-3 ELIMINATOR". Apparently, this is supposed to be a Calico M-950: This honestly looks like a pistol to me (And actually, IS a machine pistol, classified as a carbine). I would honestly much prefer to use an M-900: Not only does it look closer to the render, but it looks more like something someone would use in a battlefield (the really awkward reload scheme aside) Commando: Alright, this one I am having trouble with. It looks like he is holding some kind of Pump-Action shotgun... but I have severe doubts about exactly how he is sniping infantry a screen away with a shotgun. Even slug rounds can't go that far. Let me know what you think about him. Nod: Minigunner: STILL not an actual minigunner. This one I am having a bit of trouble deciding what to give them, since they would be highly unlikely to use a Calico. Here are my current ideas: M4 Carbine AK-74 AK-12 Let me know what you think. Commando: I actually had a plan to retool the Nod Commando, to emphasize their reliance on stealth and infiltration. Instead of the Rambo Commando you see in TD, I was planning on replacing it with a Black Hand commando. I was planning on arming it with an MP5SD: My justification being that they are reliable, can fire even when submerged, and is suppressed. This is just the first part of my thoughts. Post your opinions on this so far.
-
But pointless. At that point, you would be better off with a new engine, rather than using OpenRA's. Remember that the logic used in TS/RA2 is not much different than C&C/RA, the difference lies in the graphics and some additional tags.
-
I can say this: Renegade X is currently planning a full open-source release. It's in the planning stage, but the build I have right now has scripts, maps, models, and everything else fully uncooked and ready to open in an included UDK. The intention is to allow modders and mappers the ability to create content for the game.
-
I'm thinking we should have "weekends" for games. My plan is basically to rotate each weekend. We play APB one weekend, TSR the next, and then ECW the next, and then we rotate.
-
Danpaul: If everything is hard-coded, then renegade stuff would need to be renamed to TSR stuff. If it is not hard-coded, it would probably be very easy, since TSR is using 4.2 (I think 5.0 is planned, but that was a long time ago).
-
It is very likely ECW will get this map, or at least a similar version to it.
-
I honestly think this should be brought to a new topic, rather than continue to ramble on here. I see some great discussion coming from this, just not here where it will get buried in the (hopefully) many updates.
-
...your lack of a wish causes you to die a slow death, feeling pain for several years until you lose all your dignity and forget all that you have ever loved. (This will teach you to make a wish) I wish people would make more wishes.
-
Well, I meant polygons do not matter as much as drawcalls do. You could feasibly create a model with 23,000 polys in Renegade and have it run with no performance drop. However, have a ton of those models without any LOD, then you will have a performance drop due to the amount of drawcalls.
-
Polys do not matter, draw calls do. Here is the paperwork written by TT regarding performance in w3d:
-
Though, I must admit, the name "w3d hub" sounds kind-of strange. That might be a topic for later though. As for Renegade X, I would wait a bit if I were you. Trust me on that. And as for Blackwolf... for those of you who do not know, he created several maps for Reborn, until he had enough and decided to.. "release" Reborn... along with APB and AR. Which he actually previously leaked when he was on the BHP testing team.