Mauler
-
Posts
73 -
Joined
-
Days Won
3 -
Donations
0.00 USD
Content Type
Profiles
Forums
Events
Documentation
Bug Tracker
Downloads
Everything posted by Mauler
-

3 - Intermediate Quick tunnels with splines
Mauler replied to Mauler's topic in Modelling, Unwrapping & Texturing
Those tunnels would also not be able to have proper looking light solve, due to the lack of polygons. It's better to have more polygons in your mesh than too little. At least on W3D. I do prefer to hand craft my terrain, personally. you have the ability to have as many polys as you wish just need to play with the settings to up the amount -
3 - Intermediate Quick tunnels with splines
Mauler posted a topic in Modelling, Unwrapping & Texturing
This tutorial is how to create natural style tunnels and man made style tunnels using splines. This method is very fast and makes modeling tunnels extremely fast and efficient. First create a spline with the line shape, this is in the 'Create' tab. Click on the 'Shapes' button and the Splines will show up. Click on 'Line' Start creating your tunnel shape. Here I am creating a linear tunnel that has sharp angles. More akin to man made tunnels. After finishing my spline shape, I will expand the 'Rendering' tab and adjust the spline for my tunnel mesh. Make sure to enable both render viewport and renderer. Then there is two choices of shapes of tunnel, radial and rectangle. Both have uses, here I am wanting more of a rectangle shape for my tunnel. I have set the scale to 6m by 6m. Totally up to you on your tunnel scales! You can also have rounded corners with the rectangular shape. Holding down the mouse button will create a bend. Releasing will continue linear shapes. Here I am using a radial shape instead for more natural type tunnels! Using the rounded corners can achieve great looking natural tunnels. Once you are happy with the shapes of the tunnels you can invert the mesh to give you a tunnel mesh! Simply convert to a editable mesh and select the mesh with the 'Element' button and it will select all polys, after that navigate to the 'Surface Properties' tab and click on the 'Flip' button under 'Normals' rollout. Repeat above step to achieve the same results on the man made tunnel! In conclusion, this tool is very powerful and can save hours of development time. This method is just a basic introduction to the splines. You can also edit the spline and have the tunnel follow the xyz coordinates to have multi-level tunnels that go up,down, and all around! Another great tool to use with this is to use 'Soft Selection' and truly have awesome looking tunnels that aren't all linear and have random dips and rises! Experiment and enjoy!

-
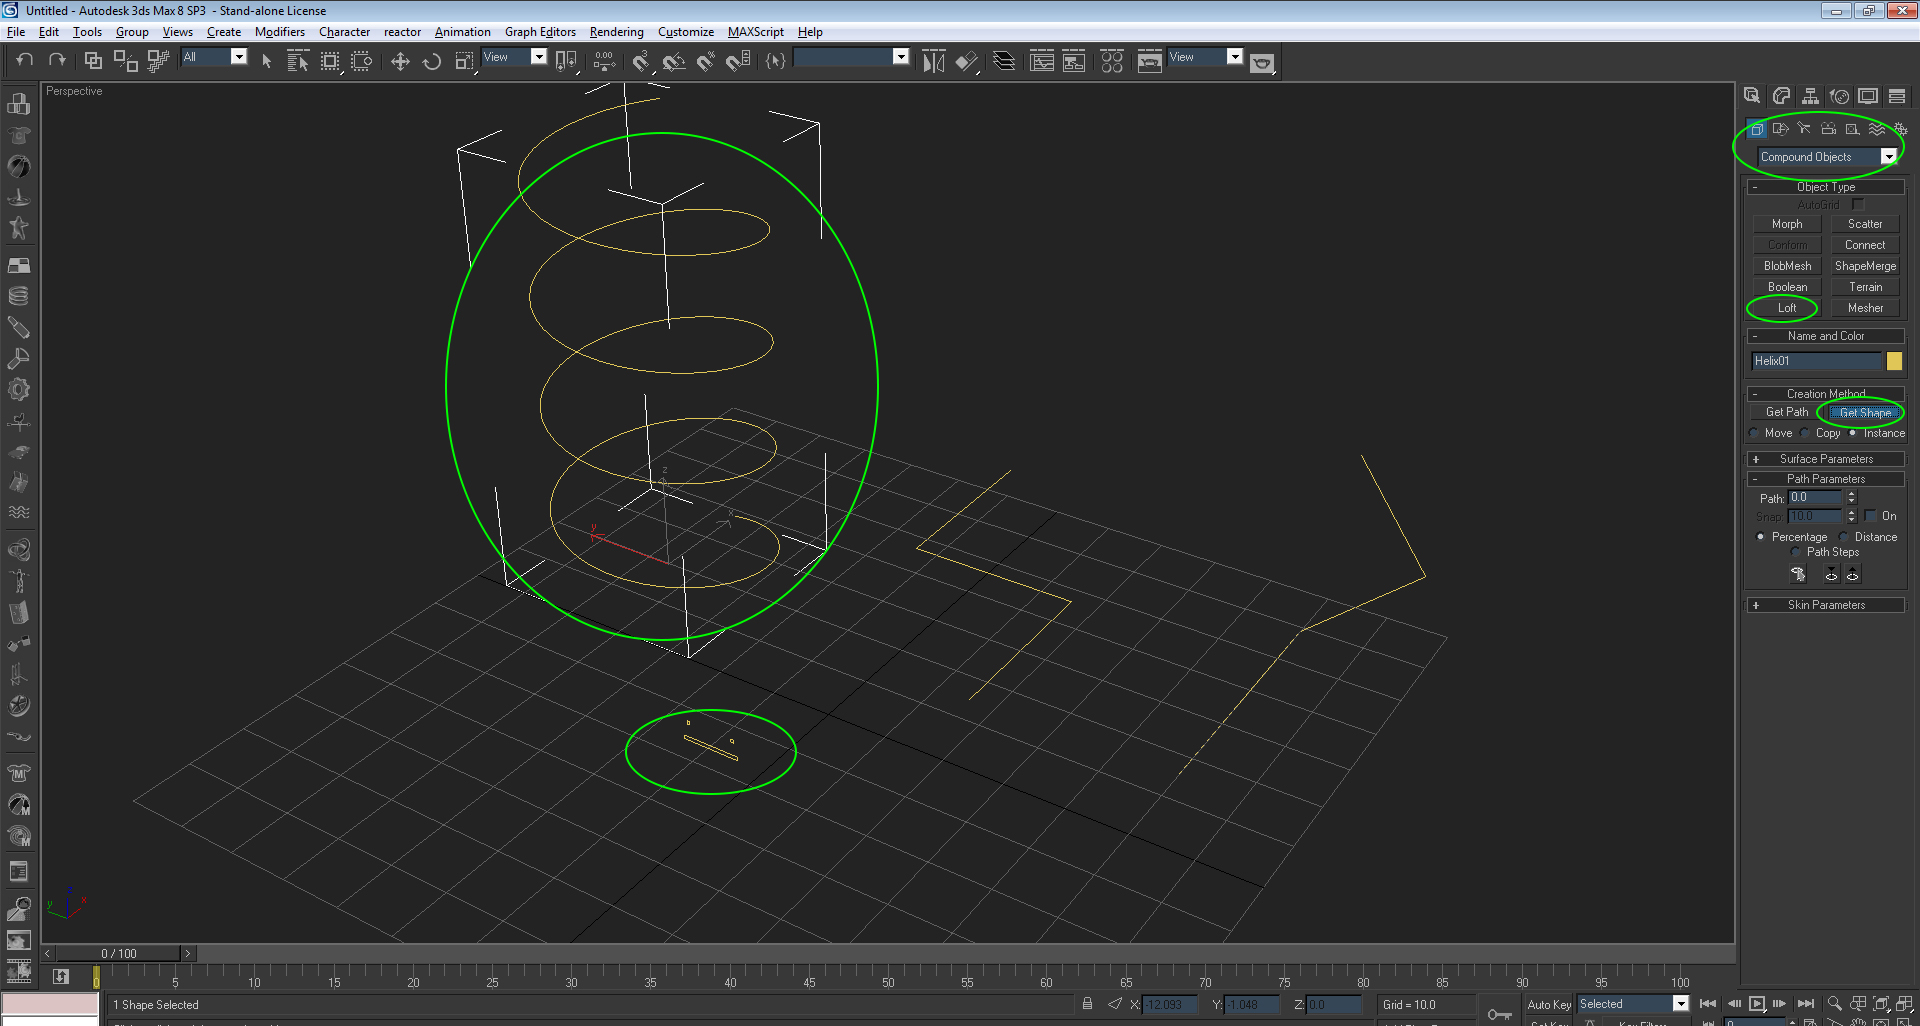
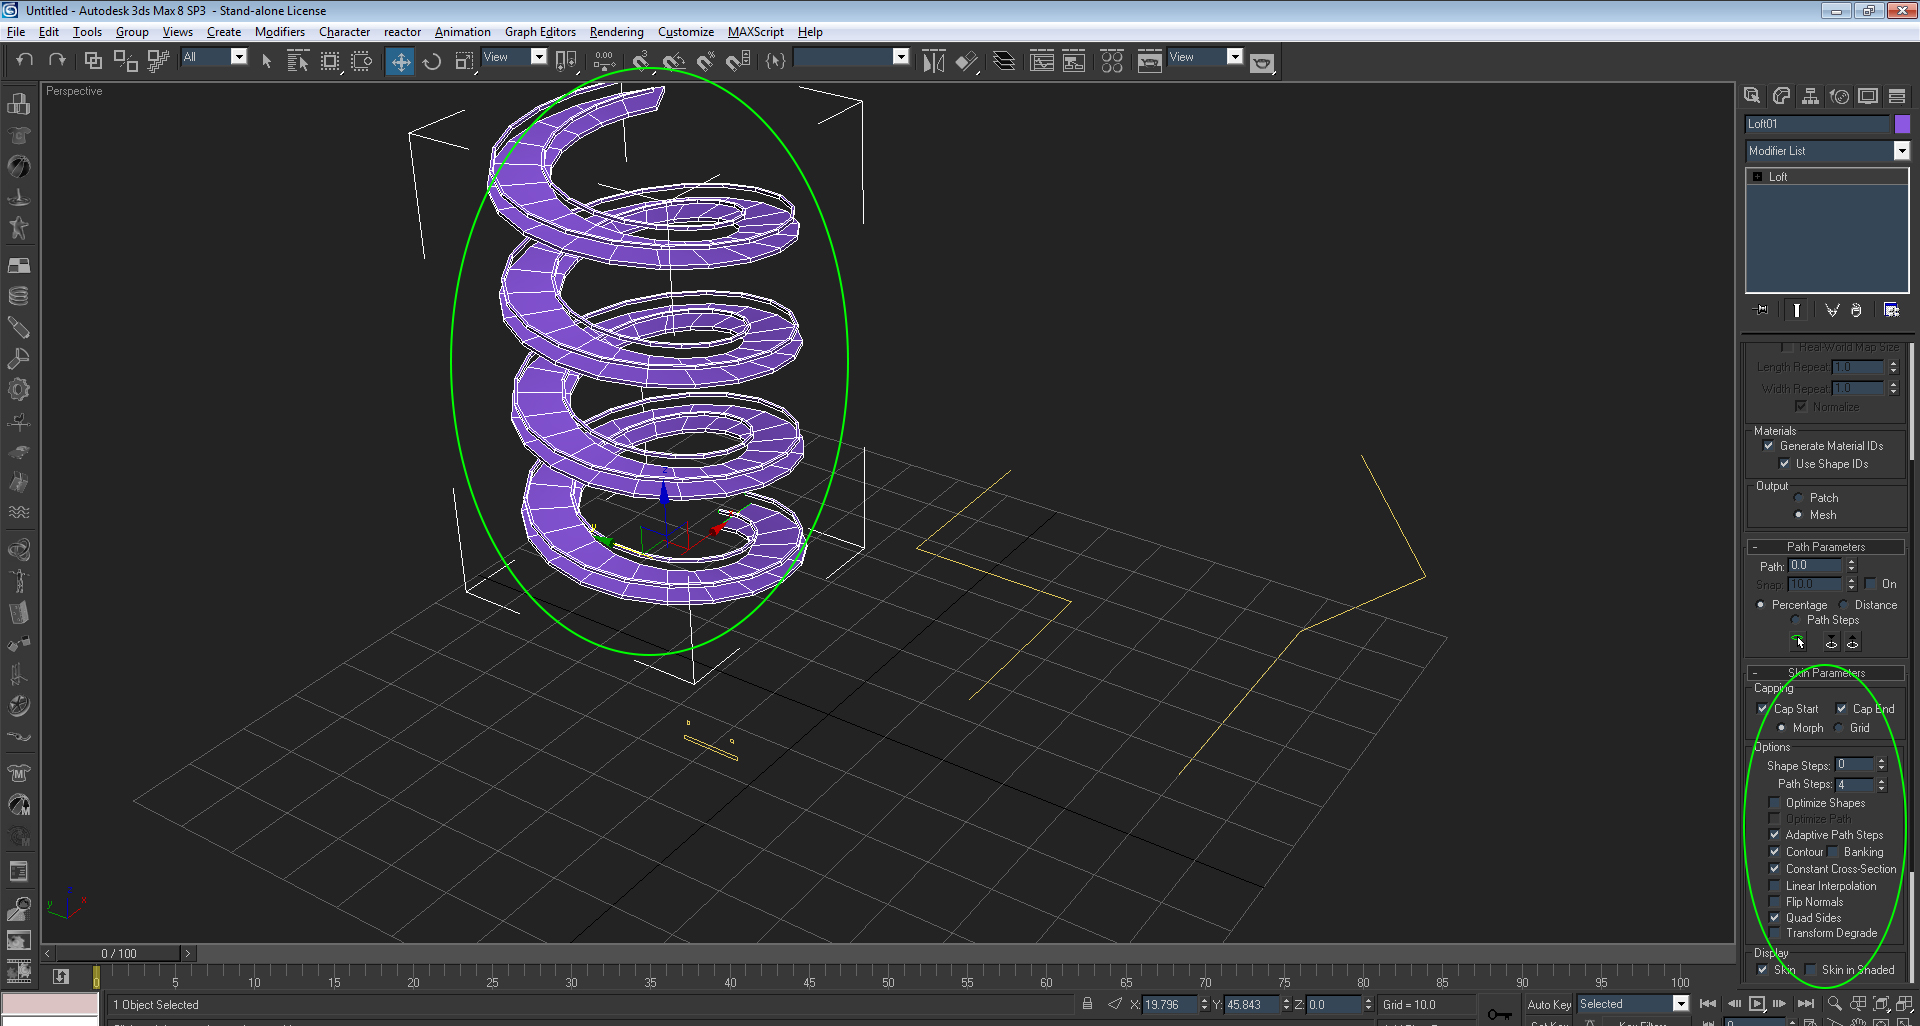
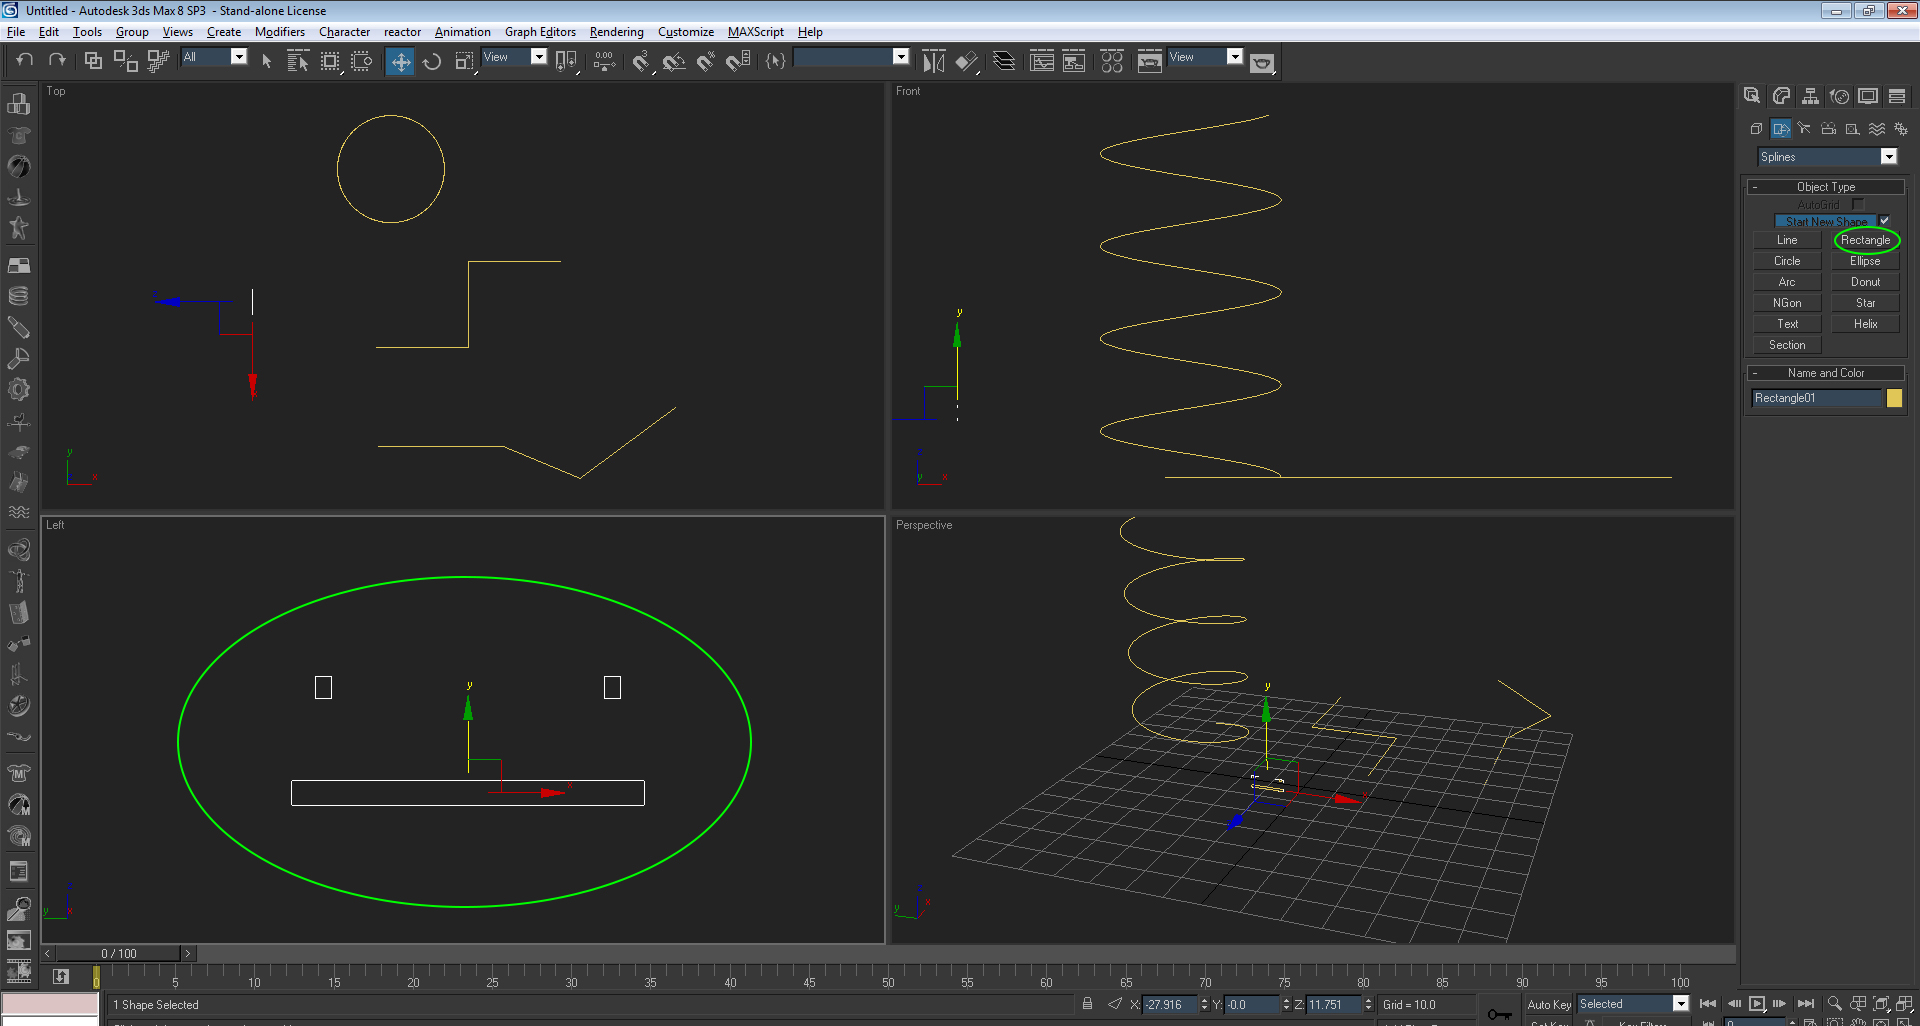
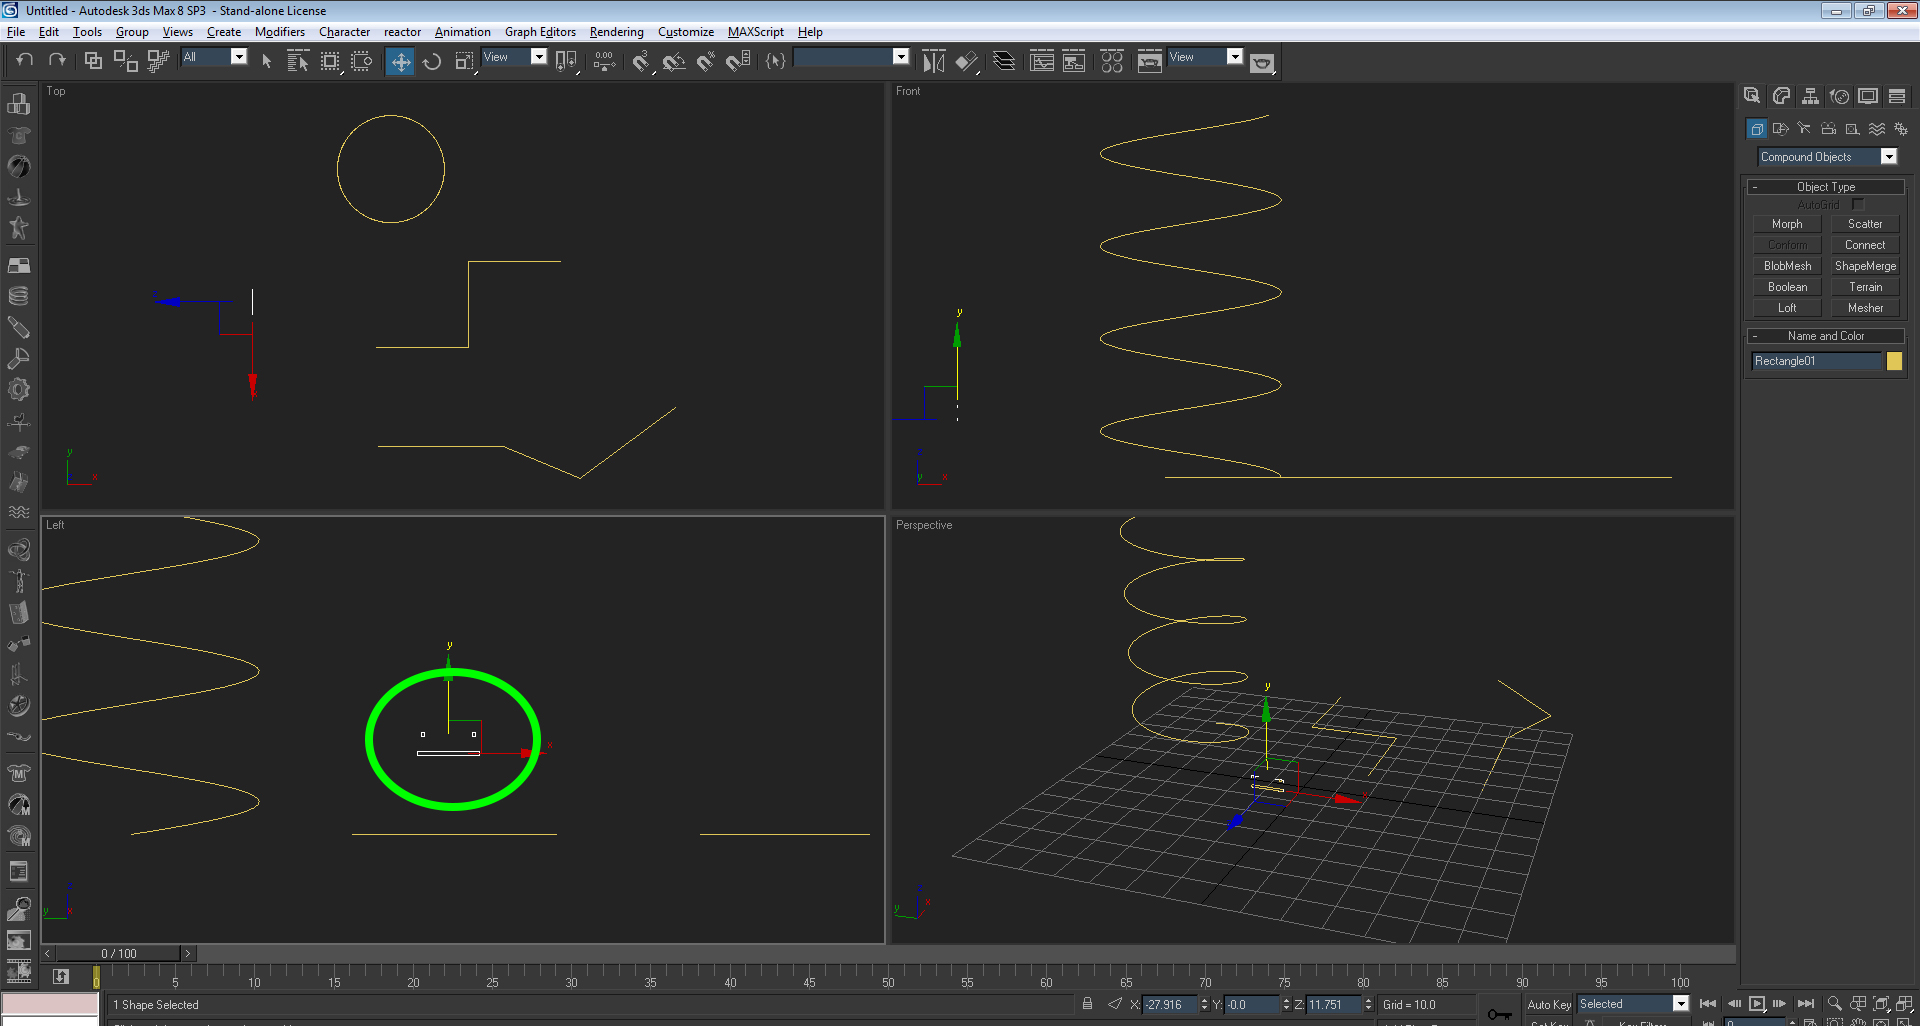
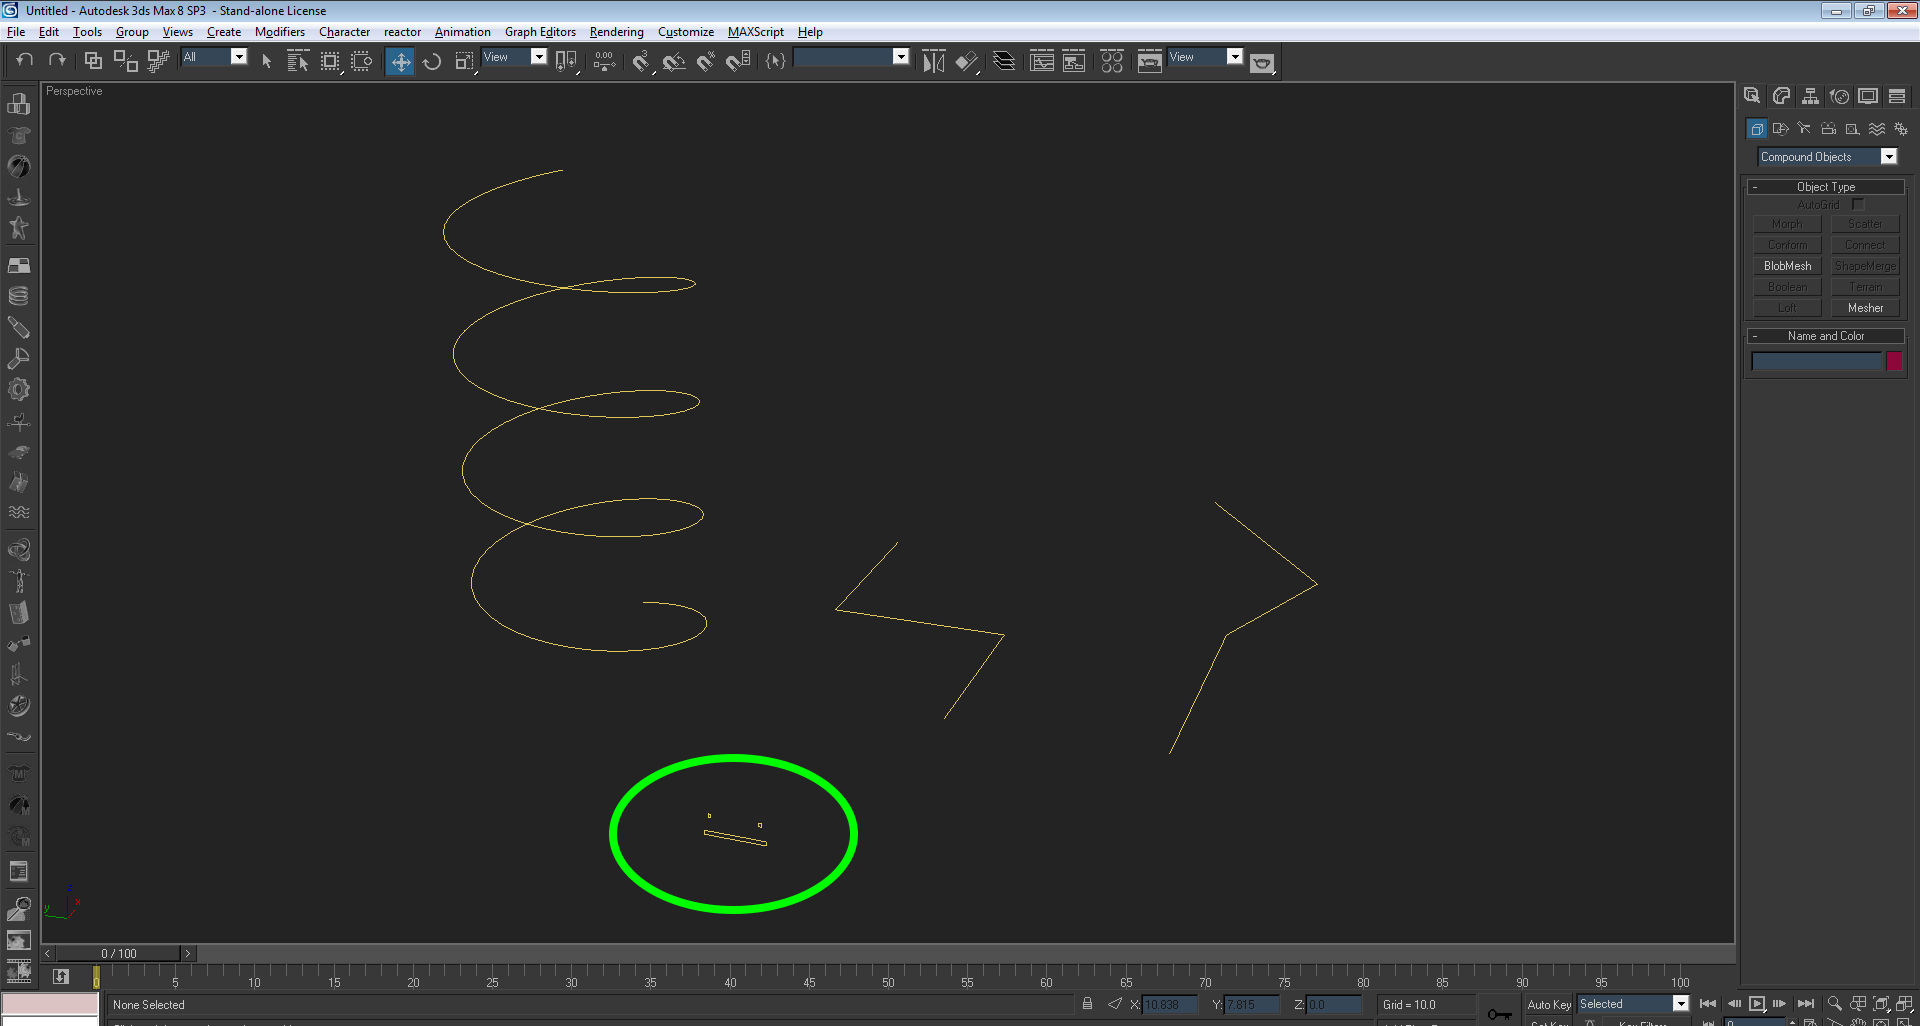
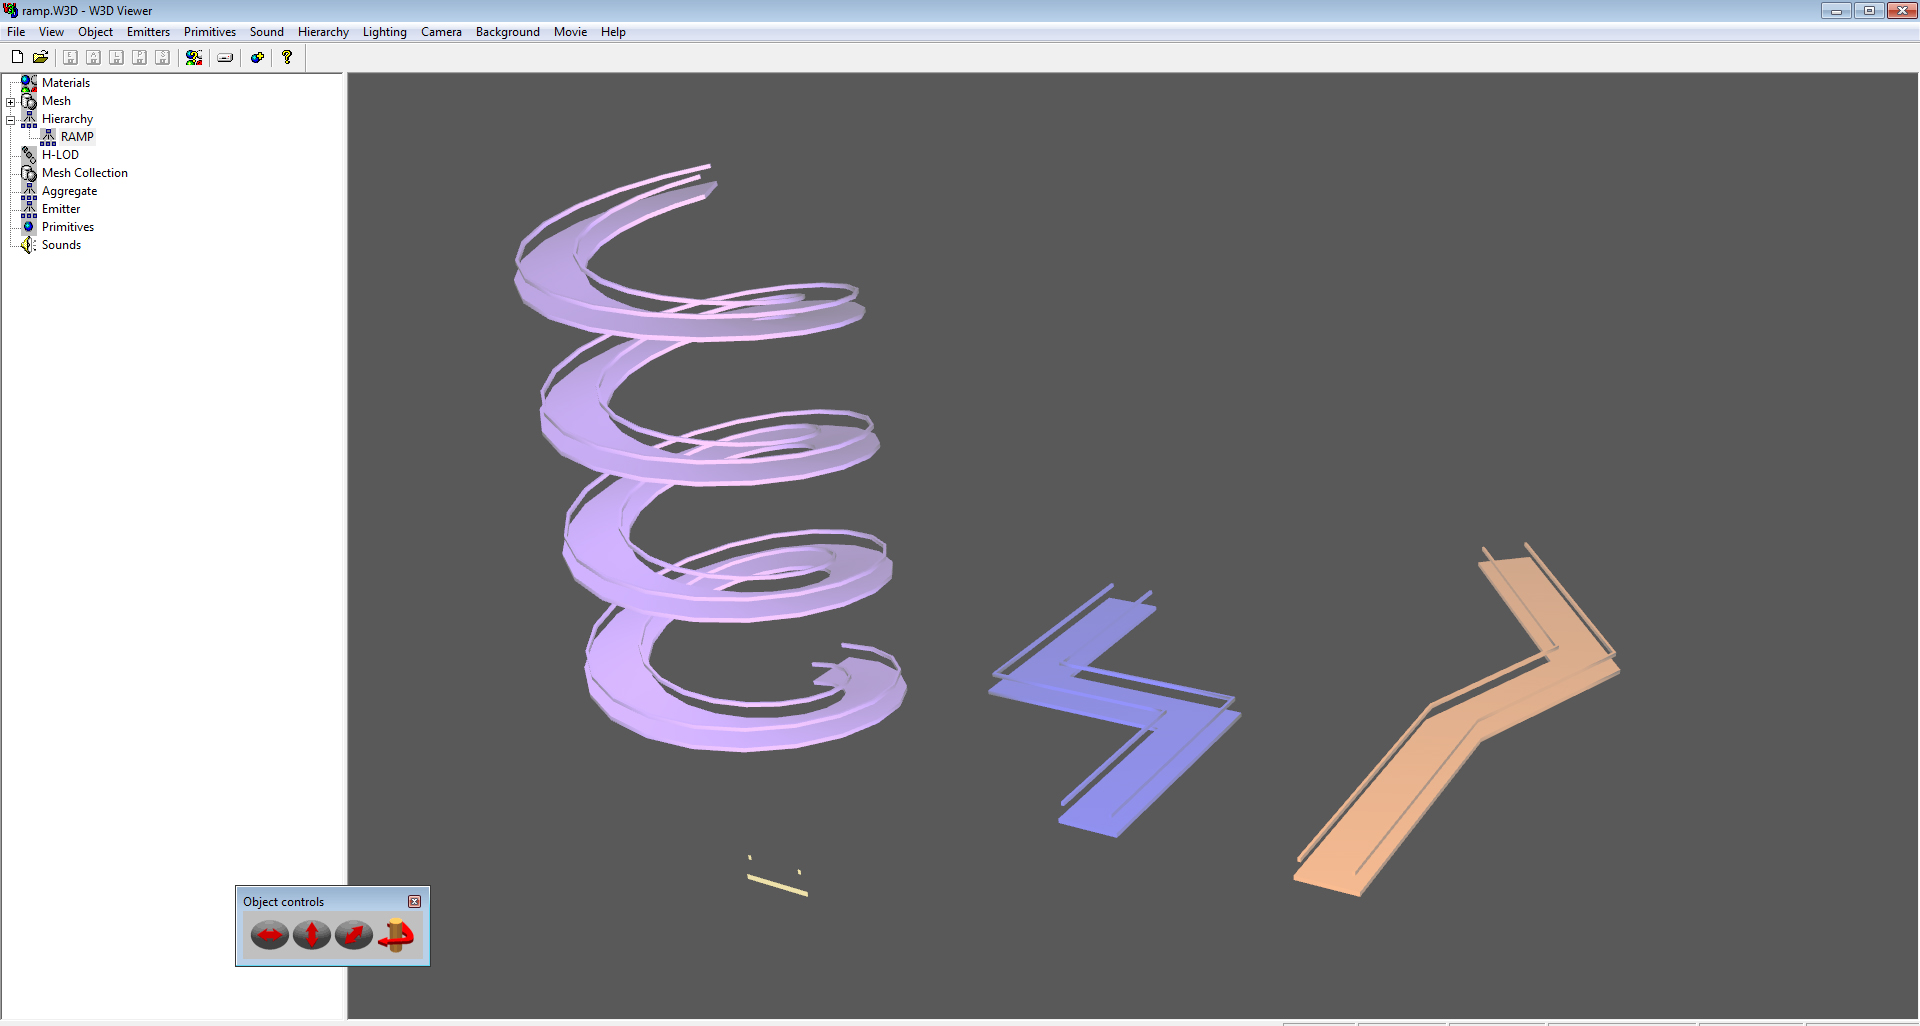
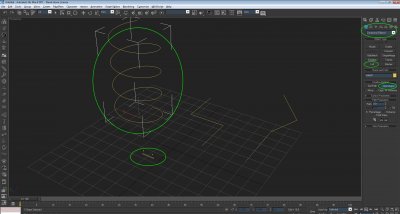
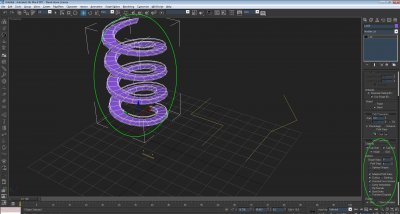
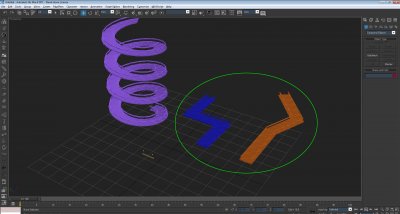
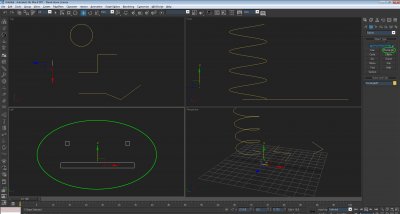
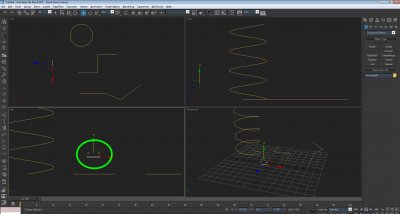
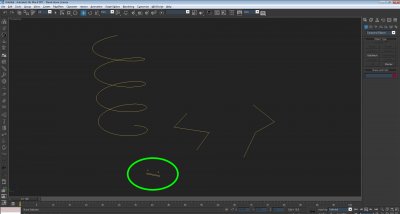
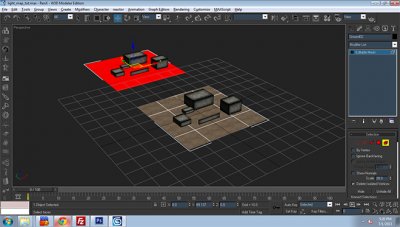
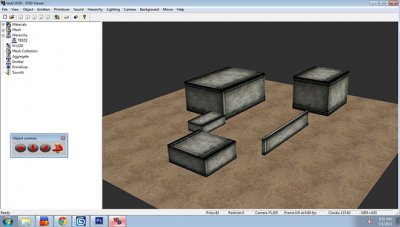
Quick tutorial to create ramp structures like spirals, catwalks etc. Cuts down modelling time to seconds. I am showing the basics of splines and loft tools for use W3D maps. Here is my maxfile with my splines I wish to make into climbable ramps, catwalks with rails. The circled spline is made up of rectangle splines oriented upright on the Z-axis, it makes the general form I wish to create for my helix, line splines above! Here I've selected the helix spline, with it selected press the 'geometry' button and where the 'standard primitives' rollout is click on 'Compound Objects' and select 'Loft'. Press 'Get Shape' under 'Creation Method' with instance on. Then click on the rectangle splines that make up your ramp. catwalk shape.. Once the loft has been completed it will give you a mesh to work with, my image shows the correct settings used for the helix ramp. Just copy my settings. Simply copy the same steps from the helix onto the other line splines and you will achieve the same results! Modelled in seconds! not hours! Completed and working in W3D viewer! Experiment and you can make some awesome things with this method!

-
4 - Competent Aligning textures in 3DSmax with Gizmo
Mauler replied to Mauler's topic in Modelling, Unwrapping & Texturing
Great, more info! Now others can learn more from these comments. -
This tutorial will cover how to align materials in max to have proper alignment for alpha blends, etc. Pretty much fixes issues with seams on objects in scene. This is a section of my test map that I am having issues on seams. The alpha blended section materials do not align properly and cause it to look unsatisfactory. This gif basically shows how to align all materials in the scene to x,y,z coordinates to 0,0,0. Basically all we do at this point is right click each object that has a material and select 'Gizmo' from the roll out, once selected the small yellow material box will show up.. at that point we will click on the x,y,z boxes on the bottom of the application and it will automatically set it to 0. Do this for every other box. Repeat for all objects that are textured (you will need to apply the gizmo to all UV modifiers to work properly and make sure that all materials have the same UV scales, e.g cliff has a scale of 15x15 planar, all other objects that share that texture must match.) After the gizmo adjusting this is the final product! Very nice!
-
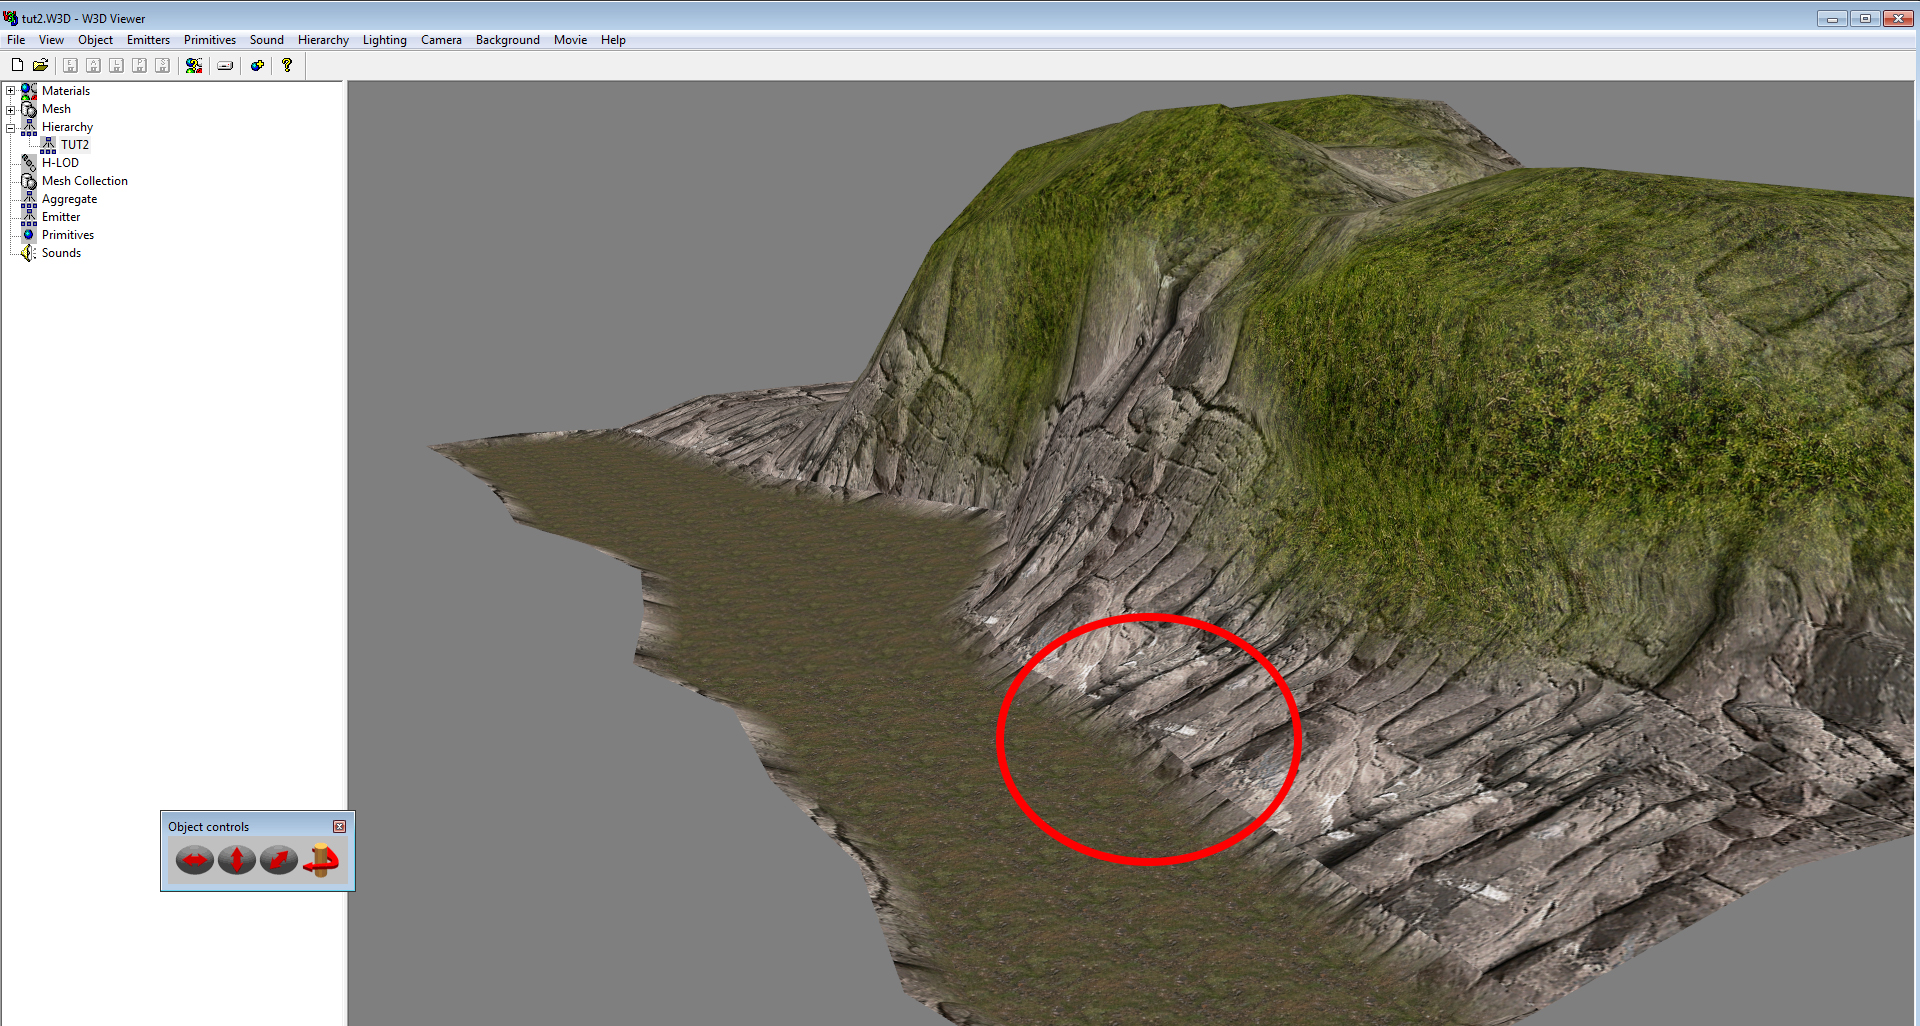
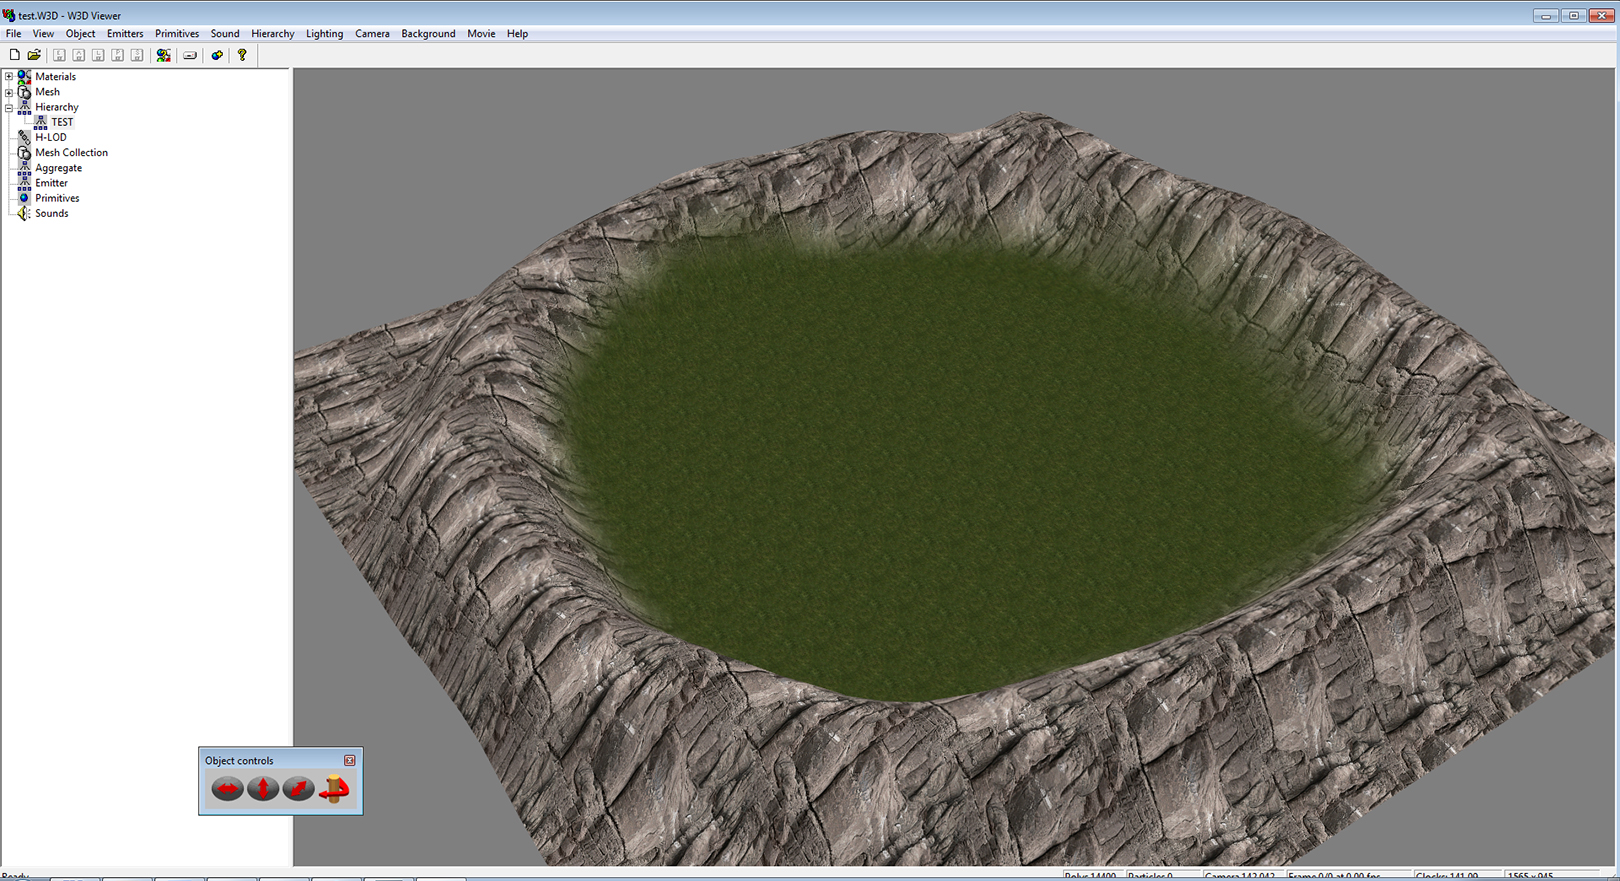
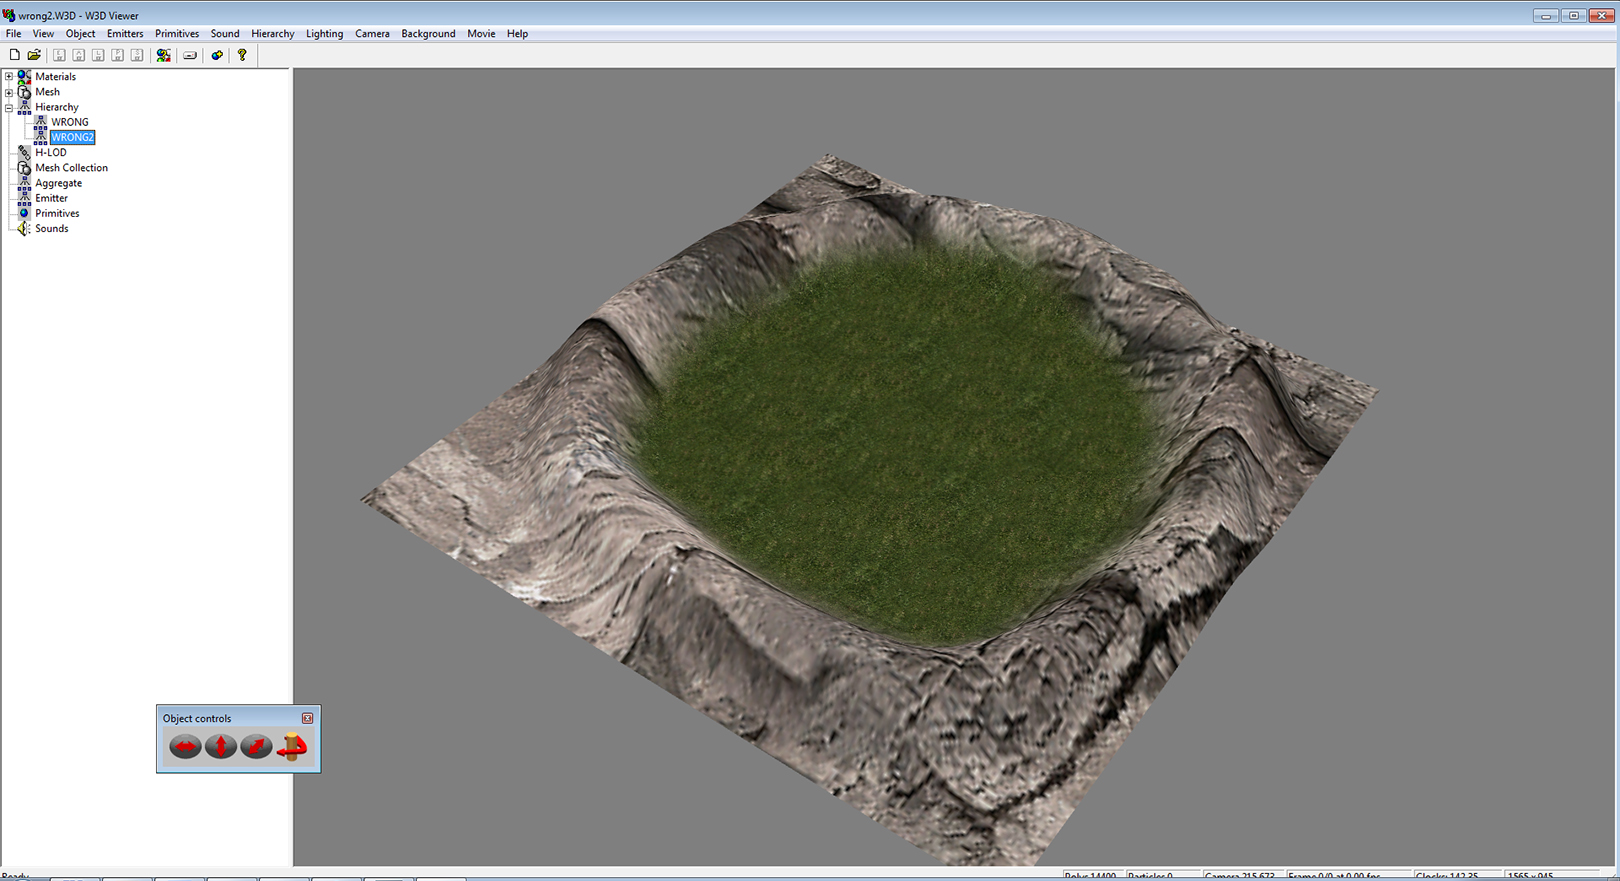
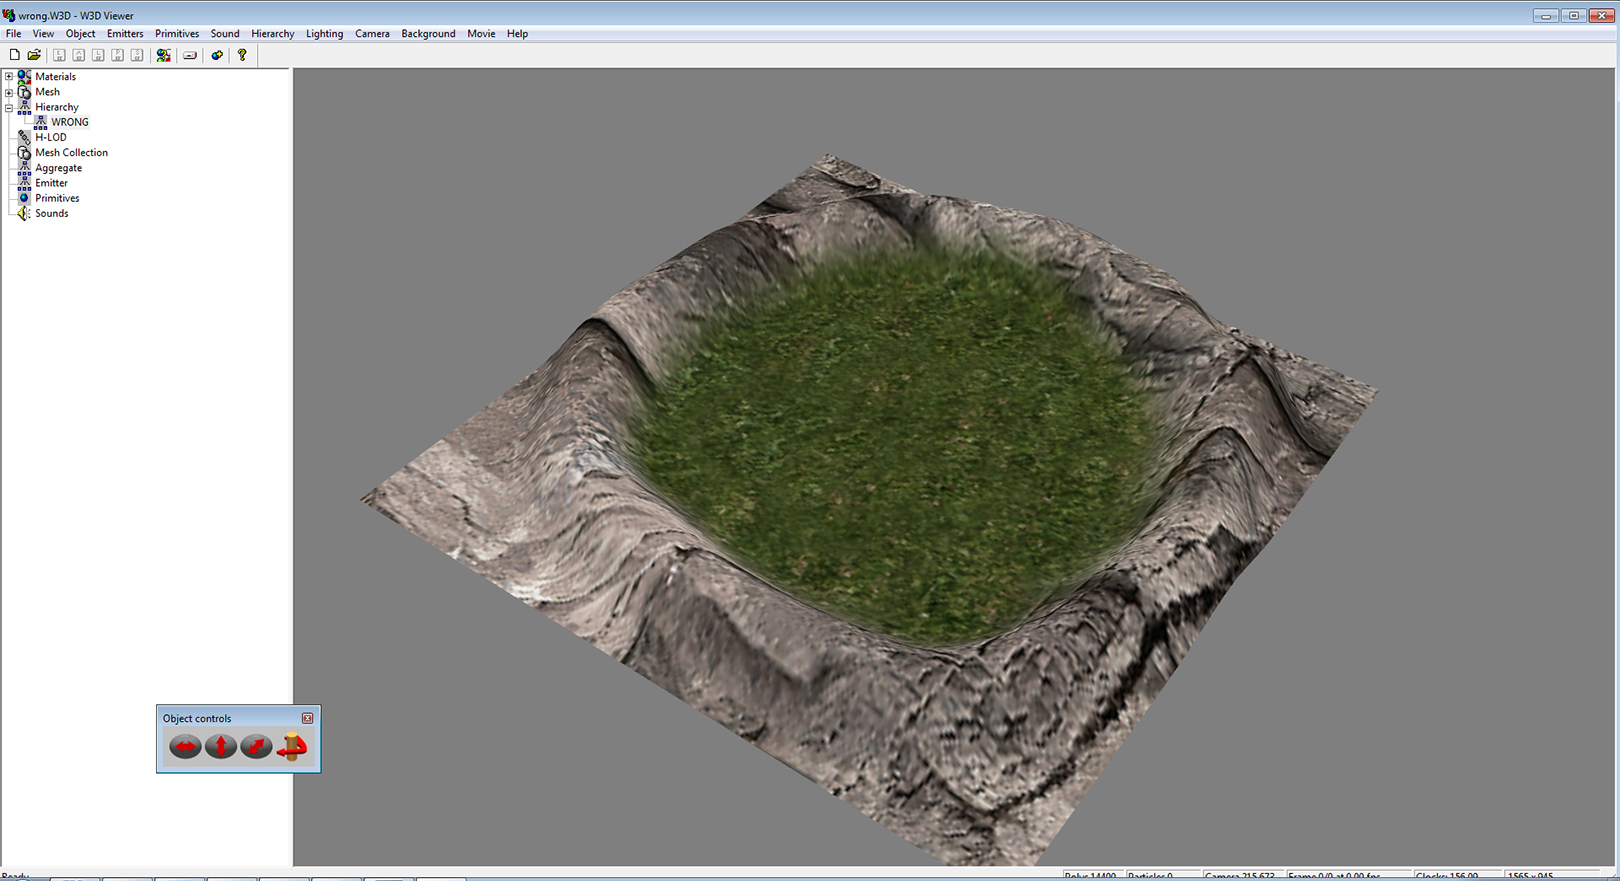
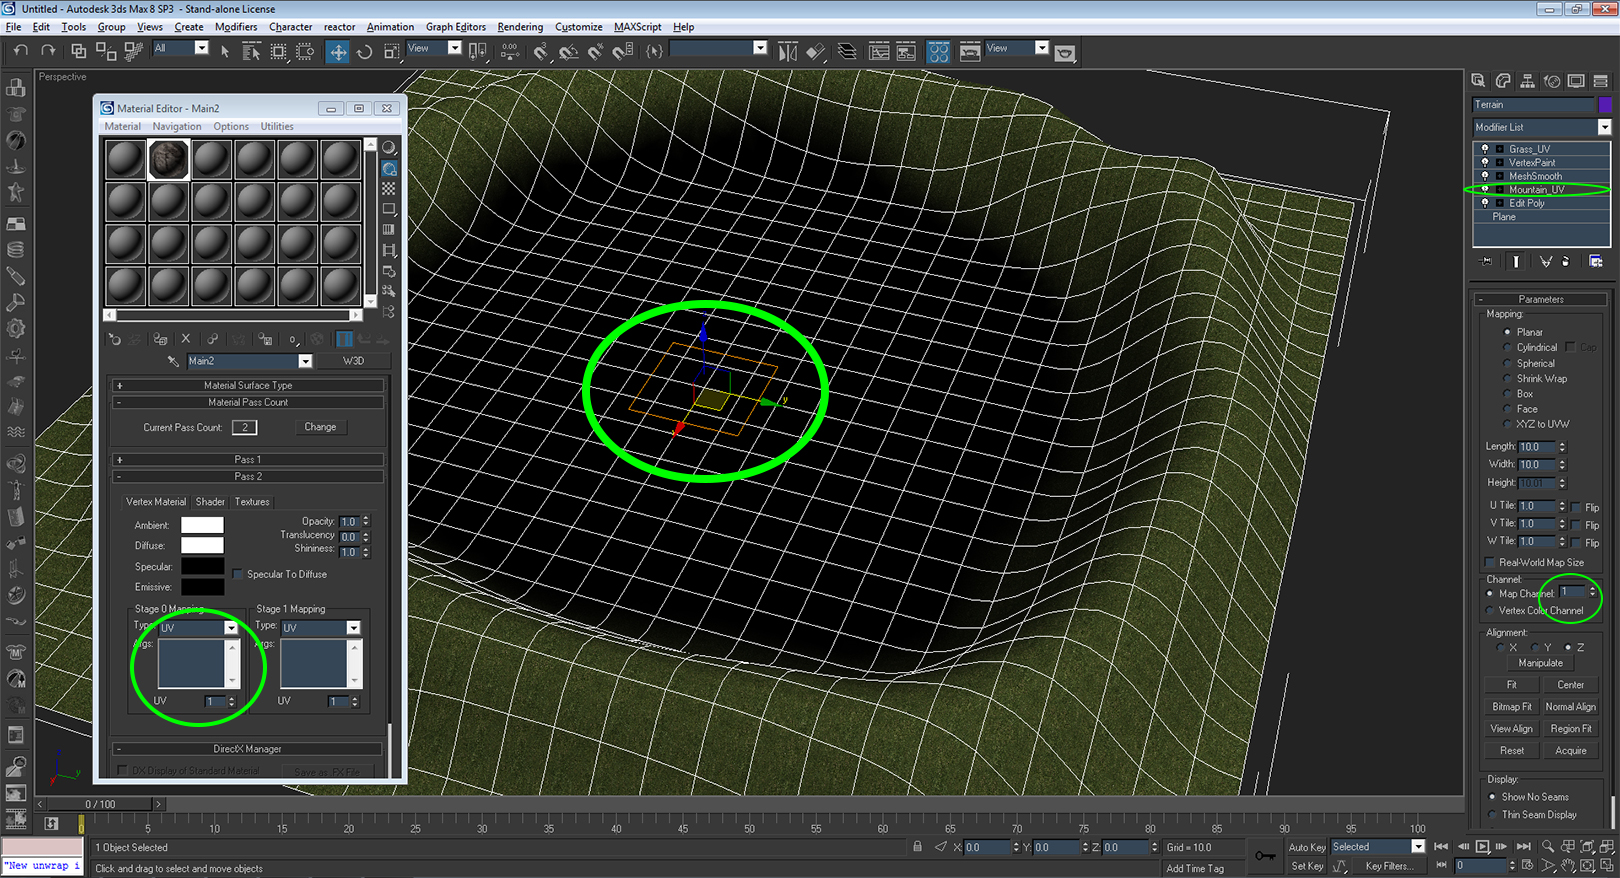
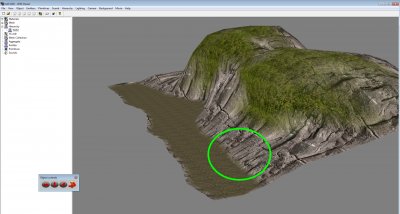
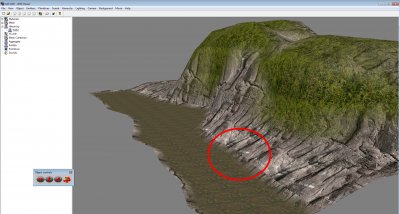
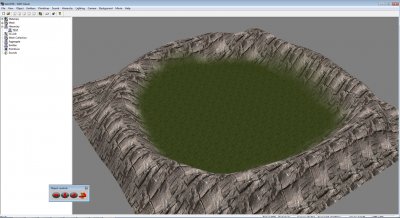
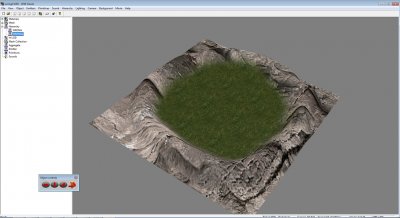
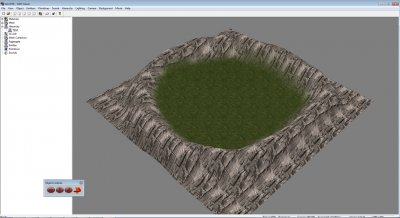
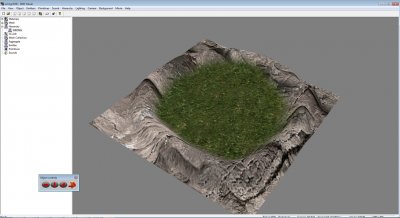
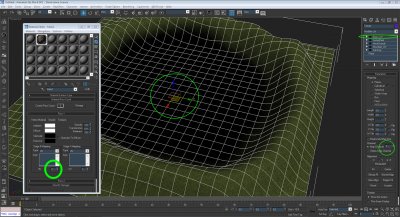
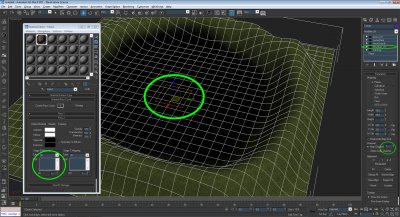
So this tutorial is a short one. Will basically show you how to setup multiple UV scales for an object by using multiple passes. This is useful for terrain texturing, alpha blending. Allows the artist to properly scale different textures, for instance a mountain texture with a grass texture and not be overly stretched and look horrible. 1. This is my start file with default UV mapping modifier. Textures are stretched and will not look good at all ingame! 2. So I will return to my max file and make adjustments. At this point we want to adjust the grass first. Let's first start by applying a UV mapping modifier to the mesh. Set your parameters to your liking, here I used a planar with 3x3 scale. Make sure to apply the UV pass to something other than default pass '1', also make sure to set the UV pass to the same number as set in the material modifier. All green circles. The orange box in the middle is our scale of the grass texture! Our results on the second screenshot is much better than what we started off with. 3. Next we will adjust the mountain cliff texture to something more refined. Same steps as above (2). Although I left the cliff texture to the default '1'. I made sure to scale the texture a bit bigger, here I used 10x10 planar. You may have to play with the settings and find your own preference! The results are much better than the default we started with. Now we have the cliff and grass textures separated and can now be adjusted individually! 4. After some further adjustments to UV scales I have a completed terrain with proper flowing textures and looks great! Here is the final results! 5. GIF animation of texturing work completed! From beginning to final progress!
-
Sad to to see this.. Lots of things will no doubt be lost...hopefully some of it can be salvaged
-
"Renx so fluid" lol when it isn't crashing haha. I use it sometimes and feels naked
-
BTW nice map, I'm on the fence about the rock texture tiling though. Edit:removed off topic discussion
-
I hope you are not talking about Fabian's Field? Because that is a gorgeous map and uses tons of eye catching visuals.. Some that even caught me offguard..
-
I was around MPF while this was going on... Looks like it did back then but this time with a Imperial age tank..
-
I enjoy my job... I rip apart diesel engines and put them back together nicely and replace broken parts from time to time.. hehe
-
Entire fleet gone! Worse than Wolf 359
-
I use the Westwood theme but always reverts back to Reborn EDIT: Offtopic
-
I personally think the like button is better than the rep point system.
-
Ari Shankar is great! I love his unauthorized bootleg films! https://www.youtube.com/user/AdiShankarBrand/playlists Brilliant film maker
-
W3D Hub New Members Introduce Yourselves Here
Mauler replied to Einstein's topic in Off-Topic Discussion
Mauler here.. Been around Renegade for years, although I mainly kept to myself. It was only recently that I joined a rather large community and worked of various mods and such. Things were well for a while until myself and a friend decided to start our own things (Cinergy Gaming) and do fun stuff ourselves. Our new community is rather small but perhaps one day it will grow into something special I look forward to being a part of this community while keeping my own in check too EDIT: I also created a Nod pyramid model that I released and is used in some TSR maps in case you where wondering.. -
Fusion maps is a server modification that blends various C&C elements into custom and standard Renegade maps and even will include custom maps. This is all currently available without any special standalone installers or anything. Just need a copy of C&C Renegade and the latest Tiberian Technologies 4.1 patch and you can join our Fusion server to try this incredible new stuff!! Here is a more detailed list of changes and images http://forums.cinergygaming.com/index.php?/topic/9-what-are-fusion-maps/ Here are some trailers we made for showcasing things.. And our latest patch that adds carryall units to Canyon Falls and other upcoming maps
-
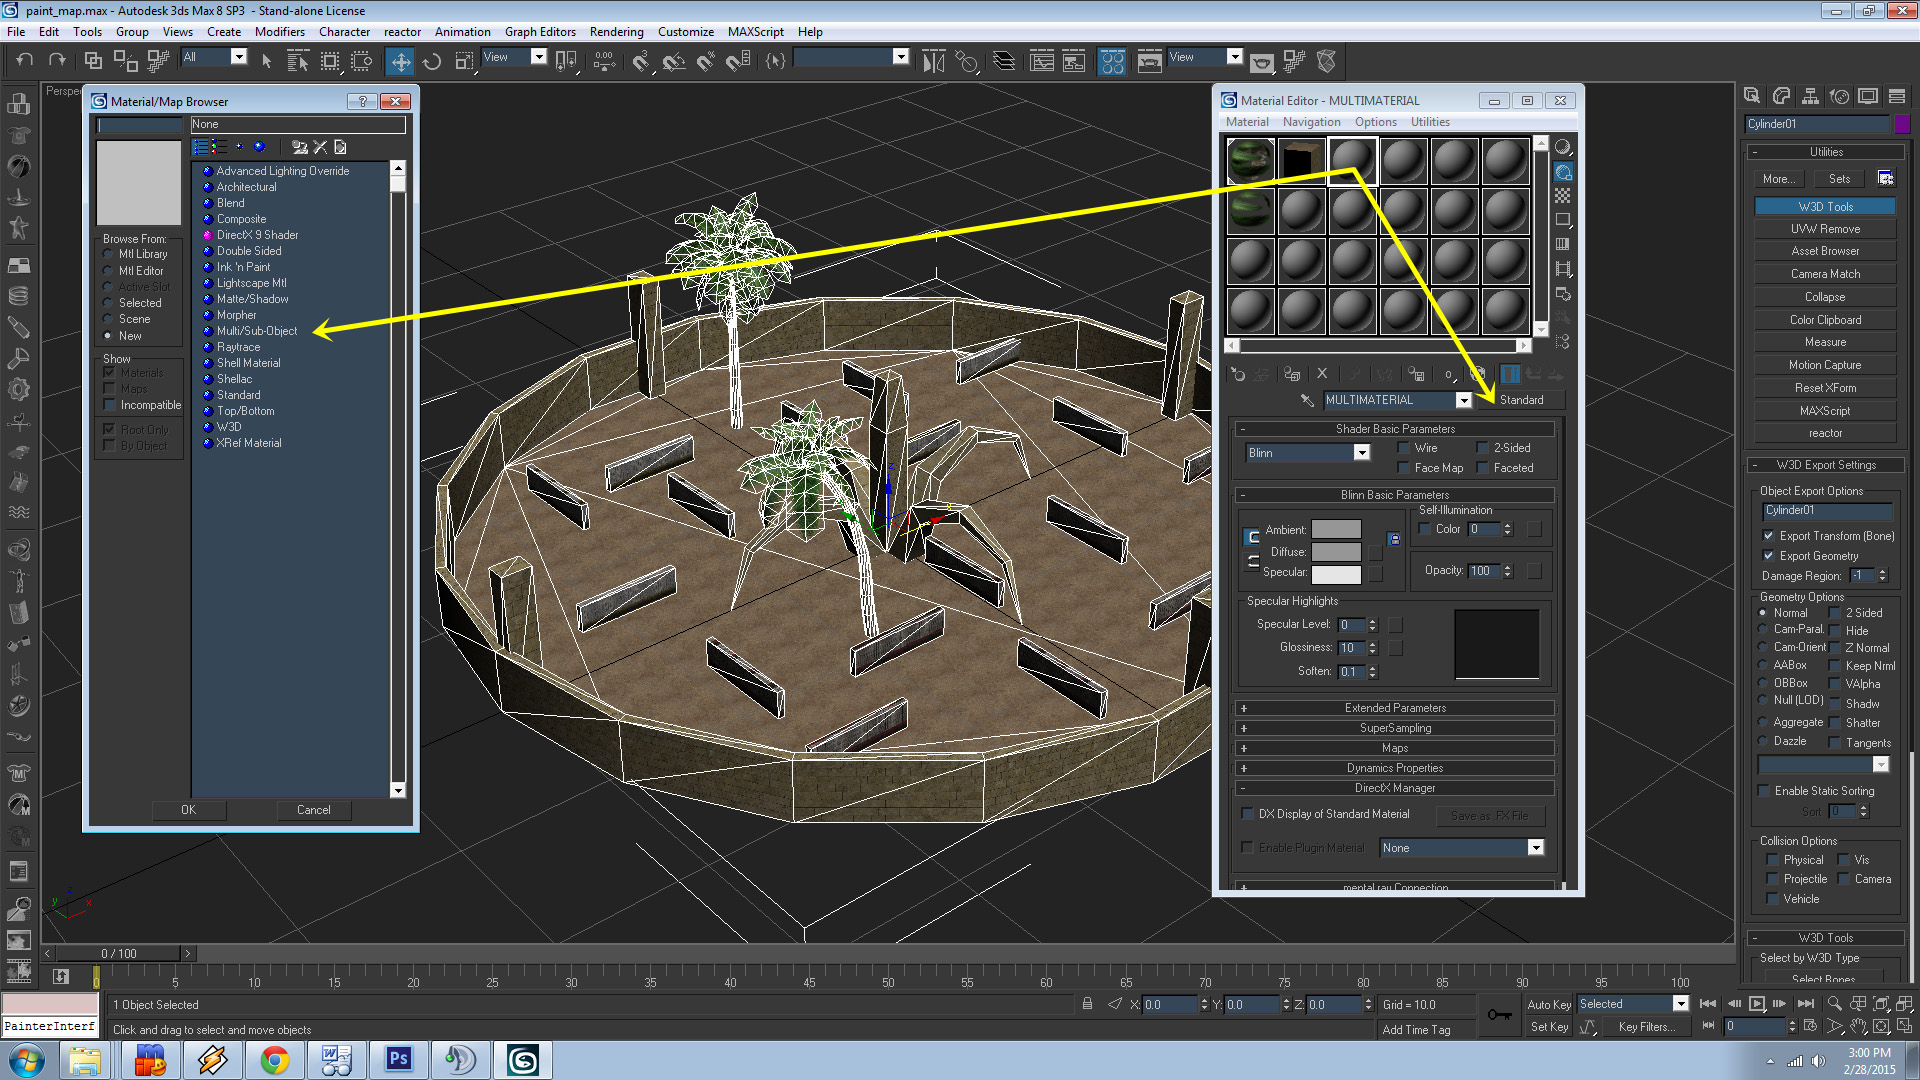
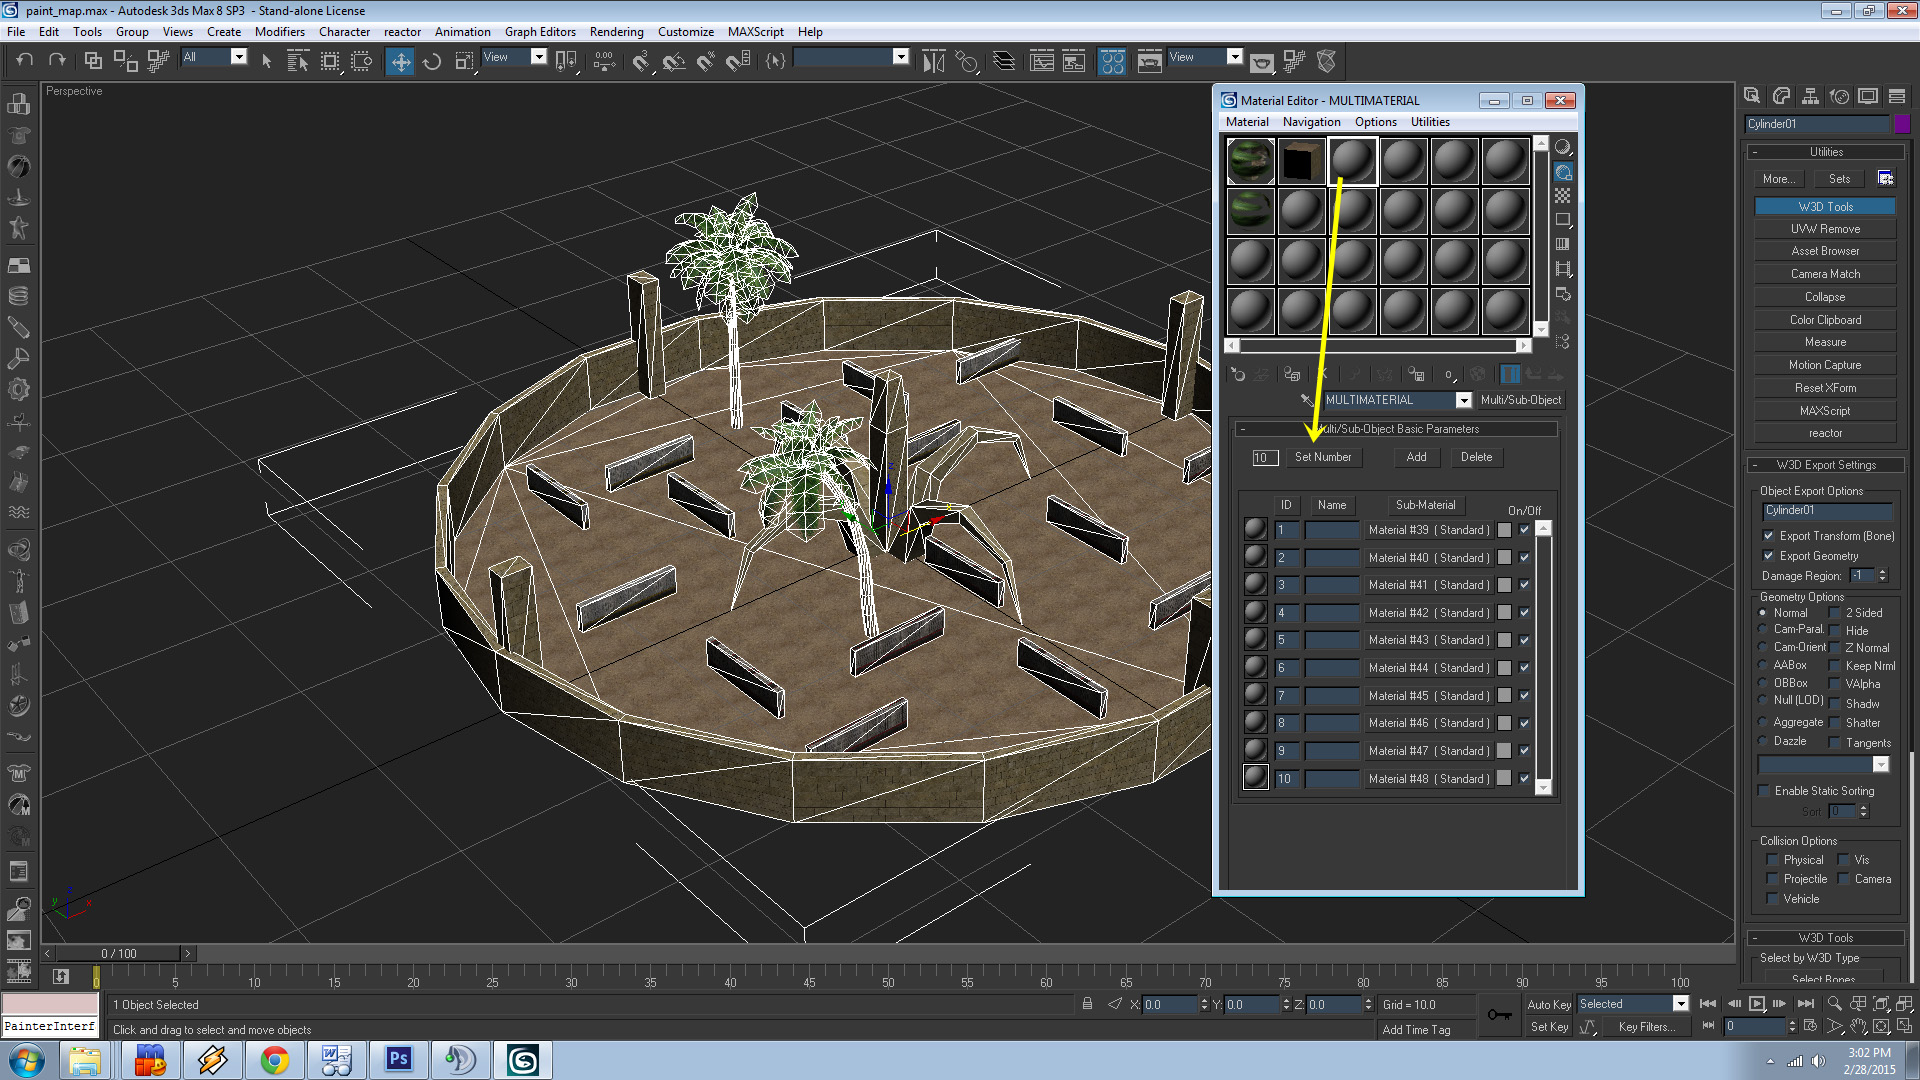
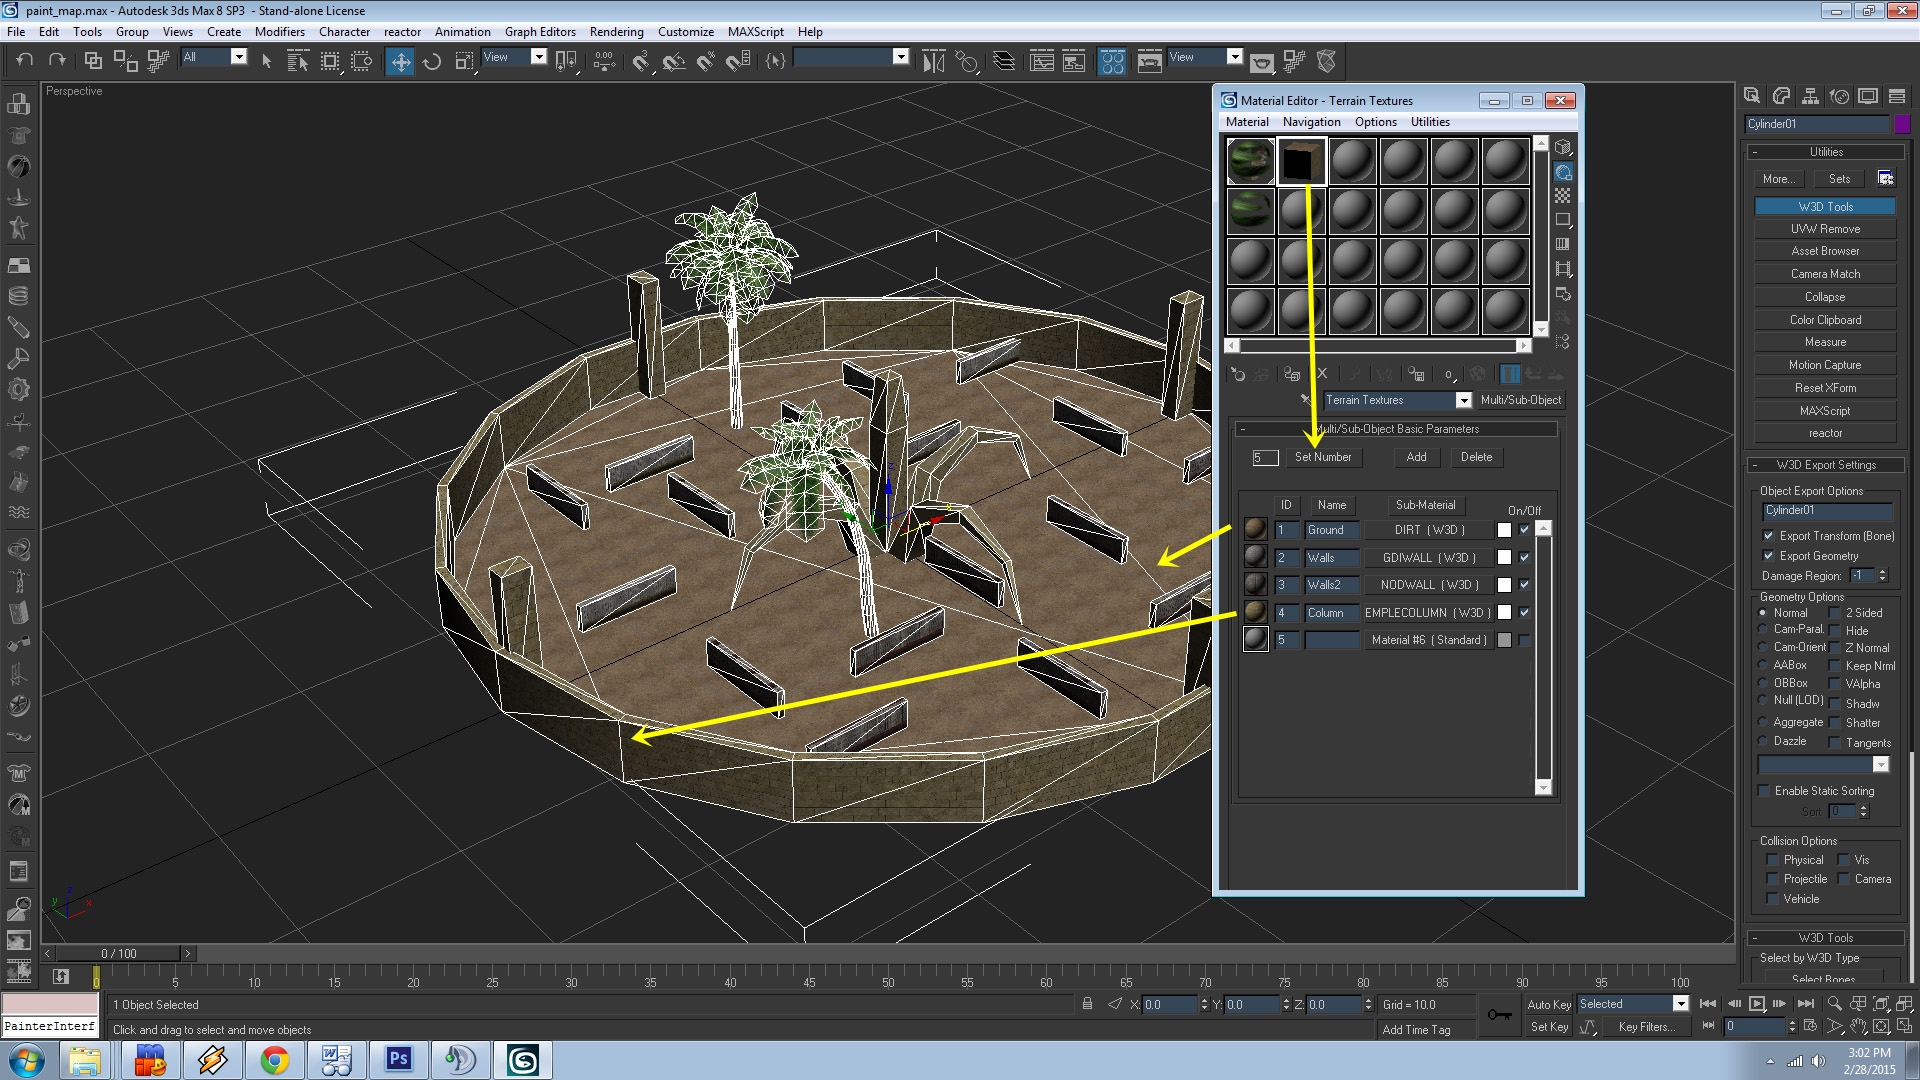
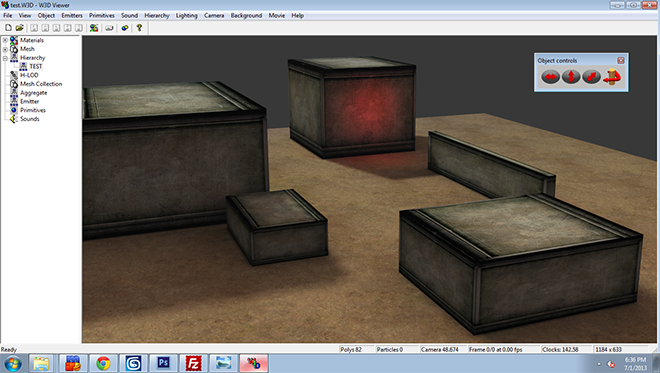
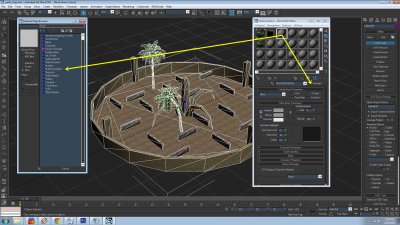
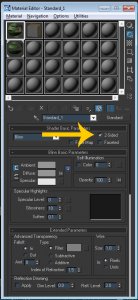
This tutorial was written on how to use multiple materials on a single mesh or simply for better organization and flow of level materials within Max 8. Some westwood models incorporate this method.. I believe it was to streamline the original lightmapping process **Should mention this texture method is best used sparingly. It can effect frame rates not used properly. Here is my level i want to texture with a multi material. The terrain mesh is a single mesh that i want to use a ground and wall texture on it.. Next we need to create a new material slot, Choose an empty material and click on on "Standard" and choose "Multi-Sub Object" from pop-up Once created the material will load up up to 10 different slots, You can adjust the number of materials as needed from the "Set Number" tab. This where our normal W3D materials would be set and placed normally. By clicking the individual "Sub-Material" will bring you to your actual material Here is my completed material list i will use for my level. Using this method can give you unlimited amount of texture slots, instead of using individual material spheres in the material editor window. Here is how to apply materials to your object while using Multi Materials, Simply drag and drop onto selected polygons/mesh Thanks and enjoy!


-
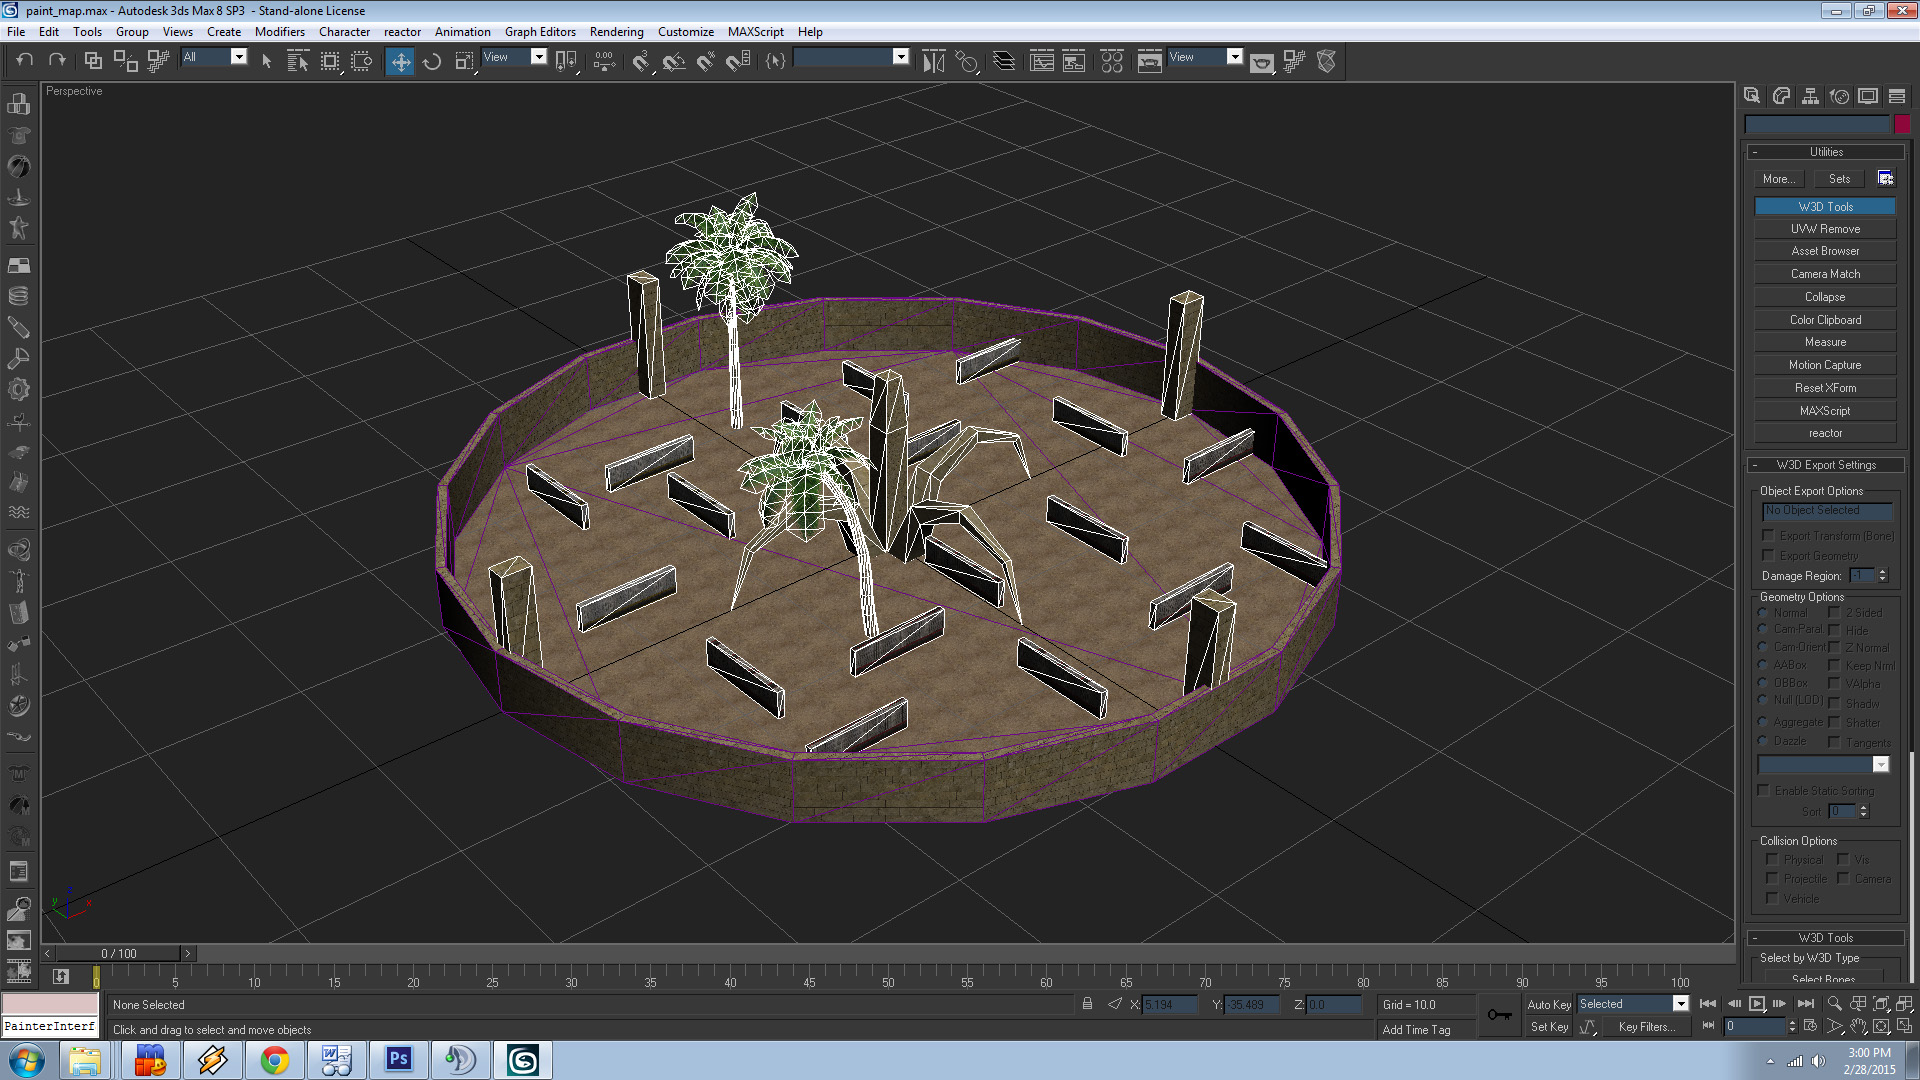
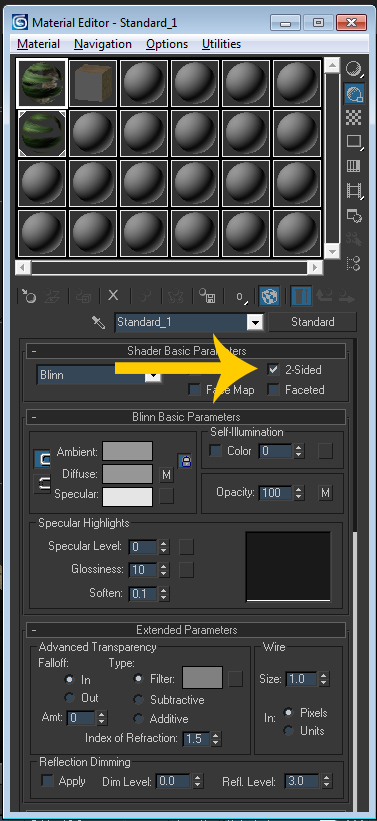
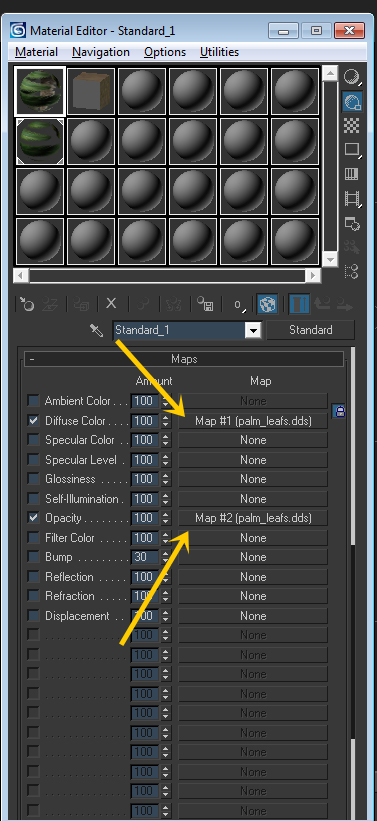
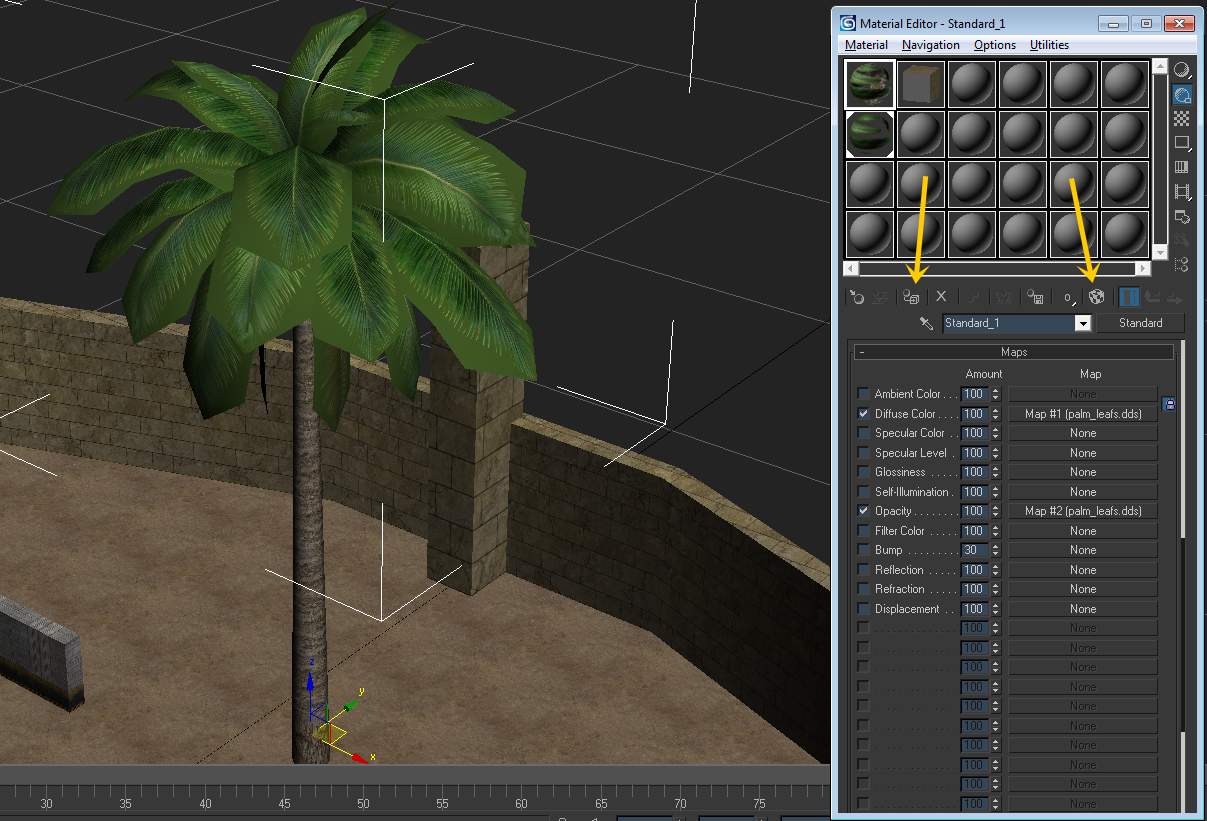
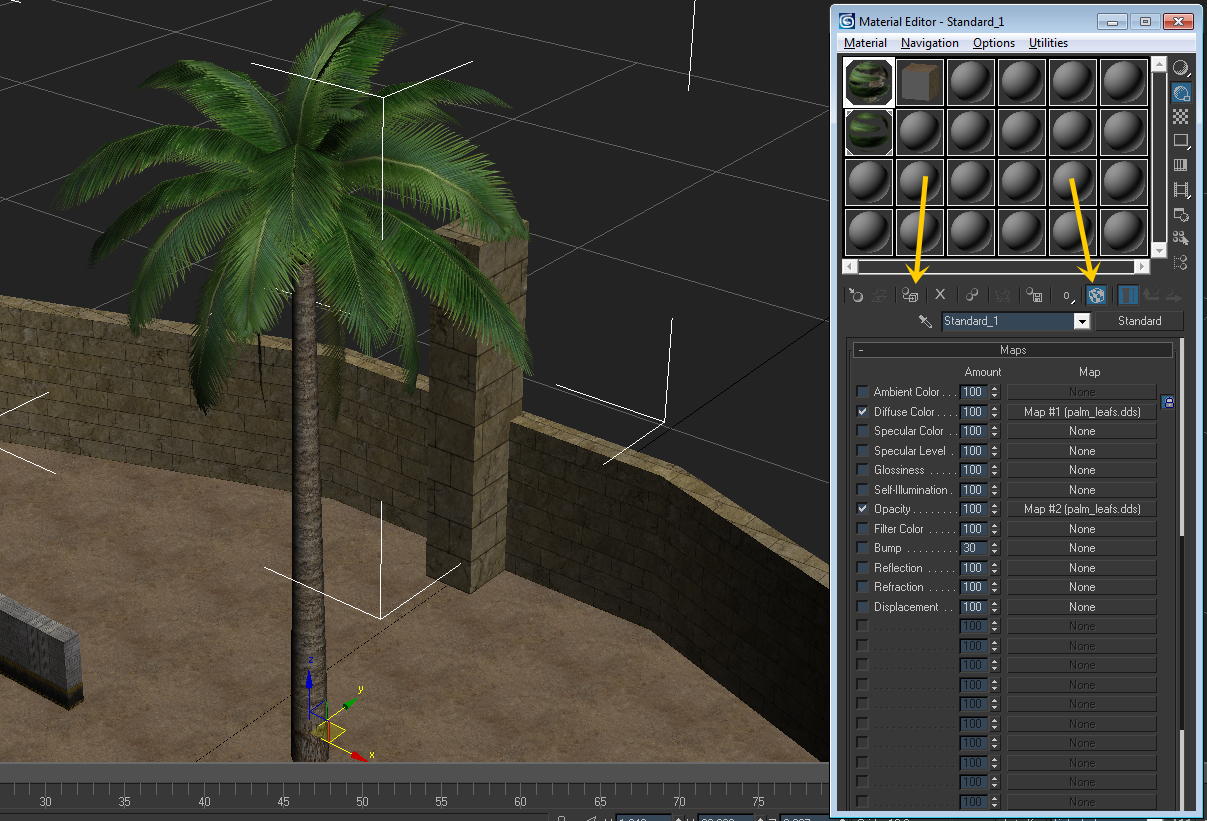
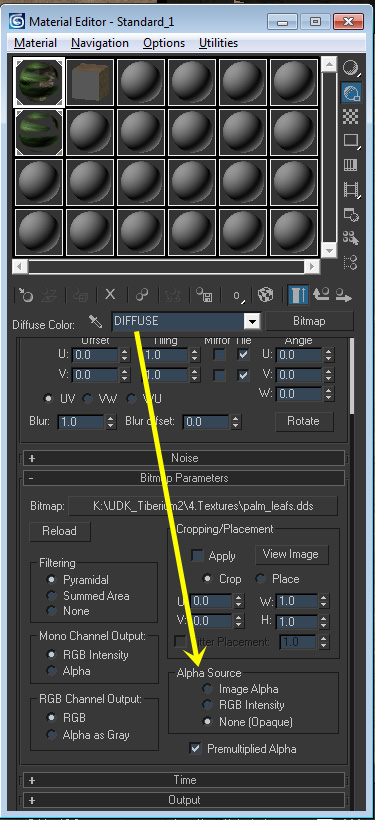
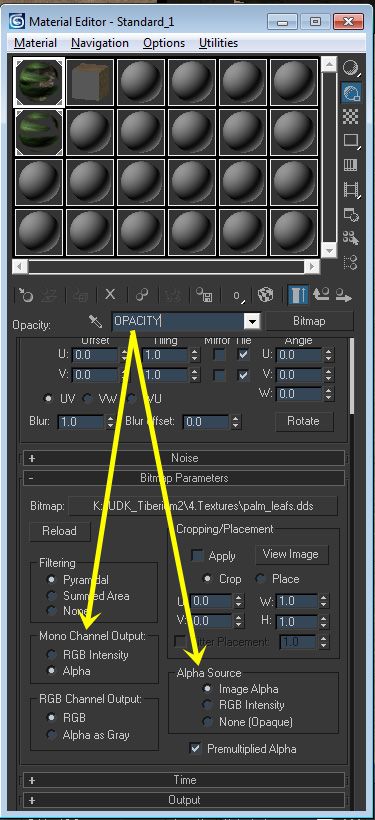
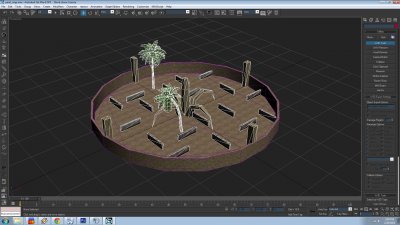
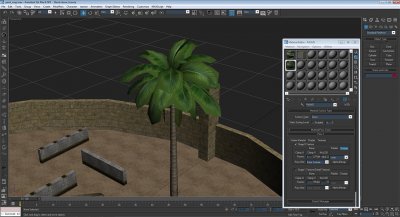
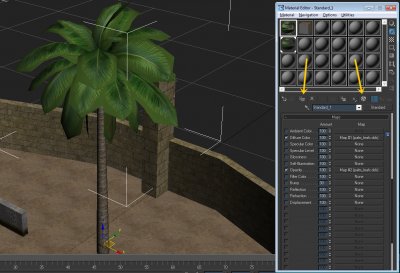
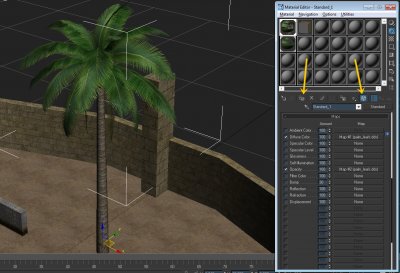
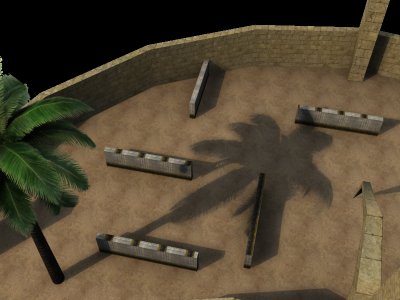
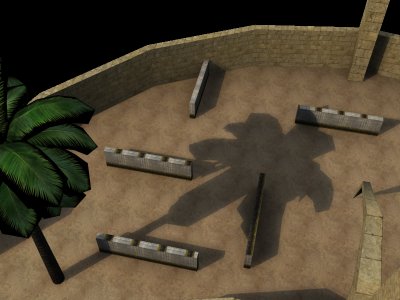
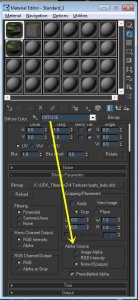
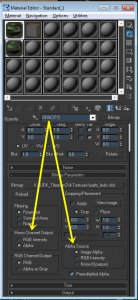
This is just a spin off tutorial created for the lightmap tutorial. This mainly covers how to properly cast shadows of trees,plants, foliage etc in 3DSmax for rendering or lightmap purposes. Open your scene that contains your mesh. Here I have a level I wish to lightmap. I want to have the palm tree cast a shadow on the terrain using the existing alpha channel created for it. Normally W3D materials in max do not render with alpha channels. Here is the W3D material that does not have the channel enabled. **Aritst Notes: You will need a W3D material and a Standard Max material for this setup We will need to create a standard max material for rendering and viewport previews. First off bring up the material editor and click a empty slot, Under "Shader Basic Parameters" click 2-sided. Then click the "Maps" rollout. Set the the "Diffuse Color" to your desired bitmap texture while in diffuse make sure the alpha source is set to opaque, Click "Opacity" and set the bitmap texture to the same texture as diffuse, as this contains your alpha channel. While in opacity, make sure to set the "Mono Channel Output" to Alpha. Once completed apply the standard max material to the desired mesh you wish to display the alpha enabled mesh. Make sure to click the "Show Map in Viewport" button (looks like a checkered box) After applying the max material the mesh should now properly display your texture alpha channel in viewport and renderer. **Aritst Notes: If you see just a grey mesh you need to click on the "Show in Viewport" box to enable Final render results: W3D material on LEFT and Standard Max Material on RIGHT. As you can see the alpha channel material will give me very good results for my lightmap rendering or scene renders! Remember to revert the Standard Max material to a W3D material upon exporting, as max materials do not function properly in Renegade Goodluck and enjoy!

-
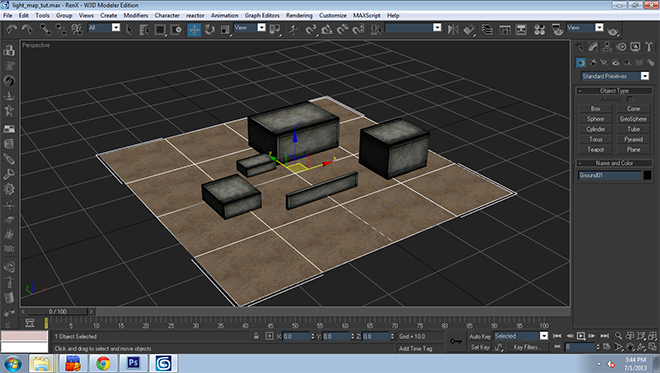
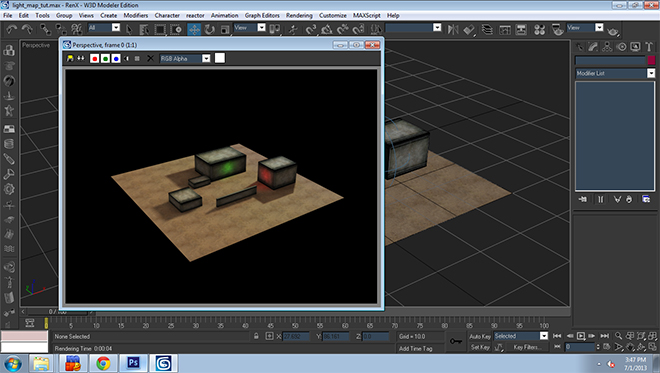
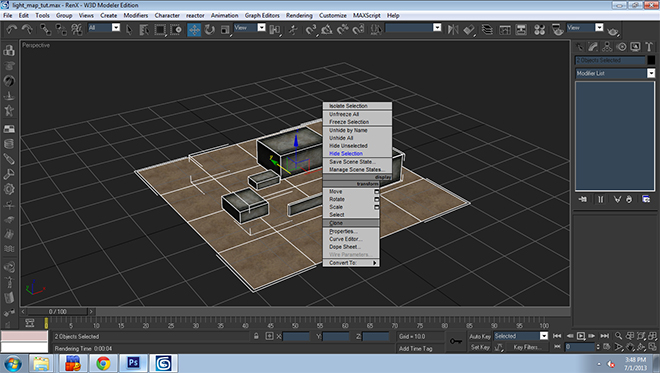
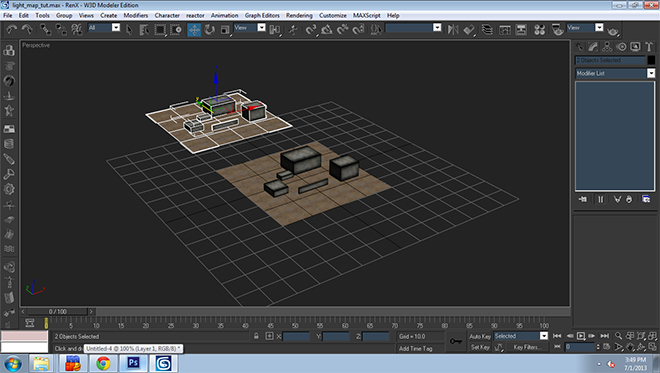
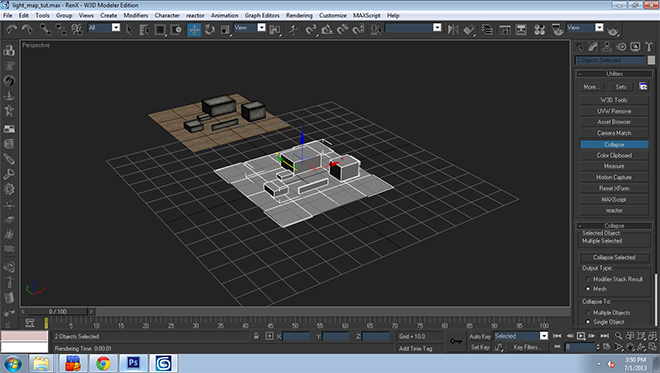
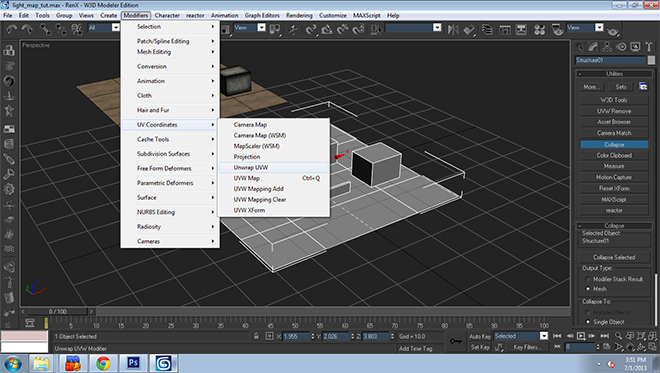
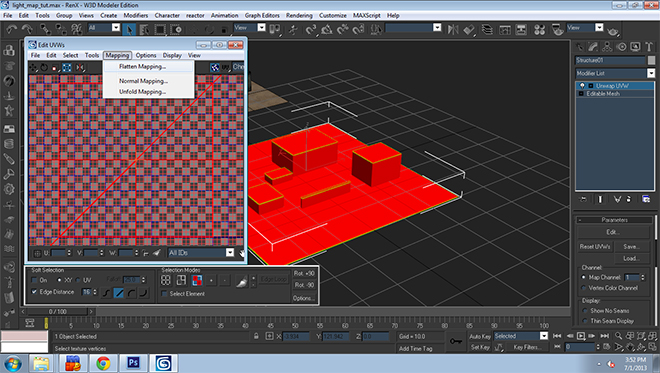
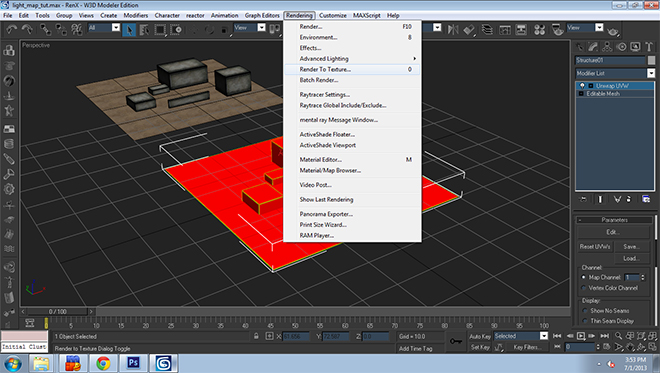
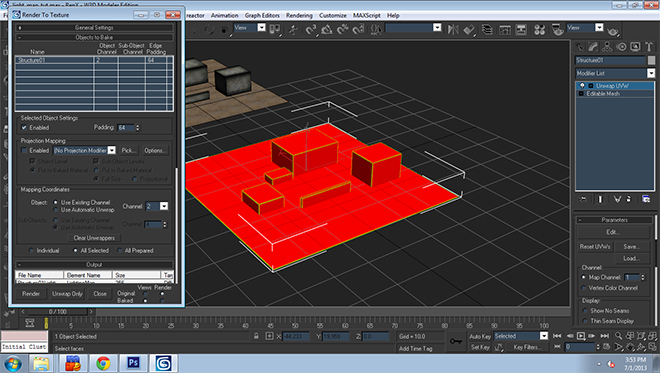
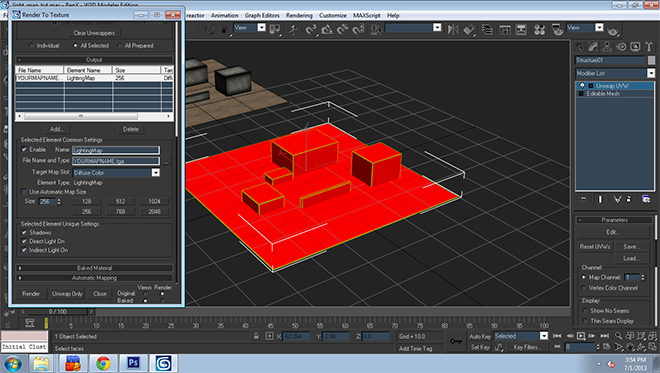
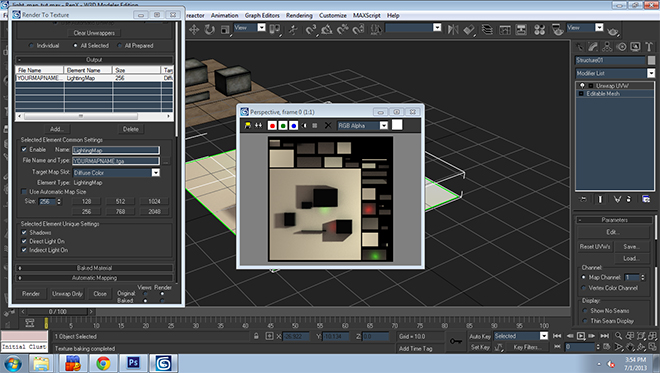
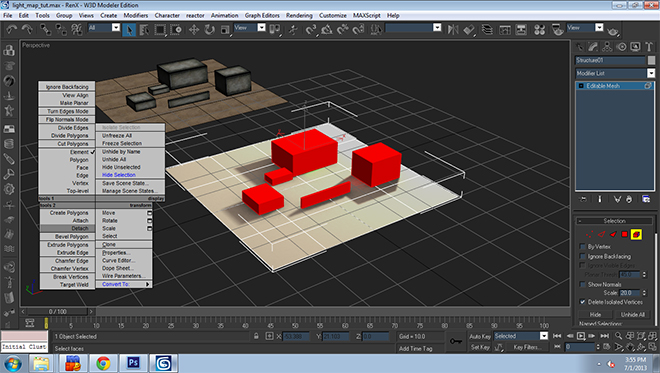
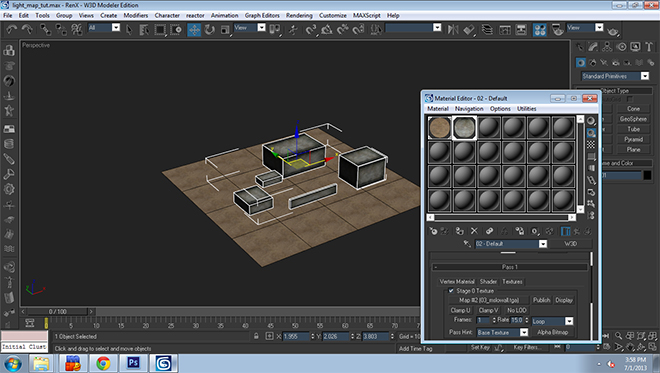
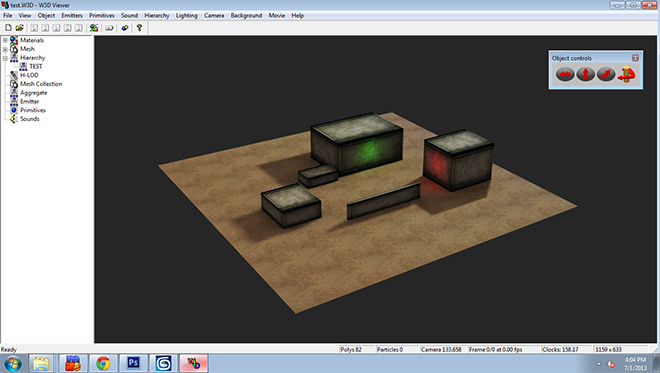
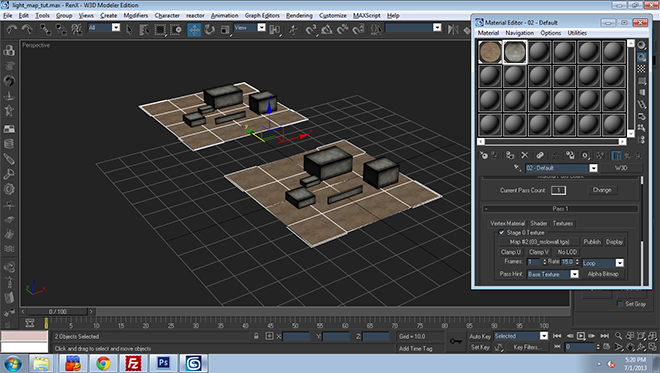
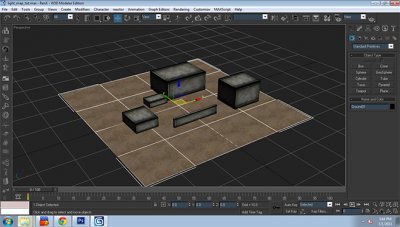
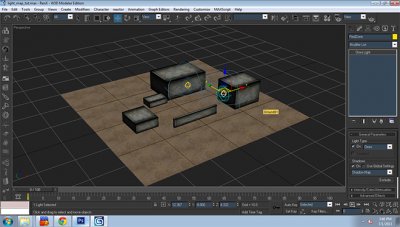
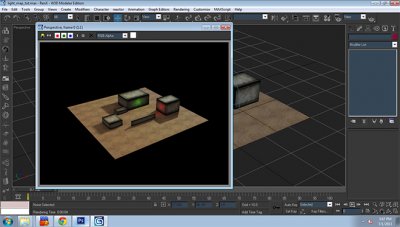
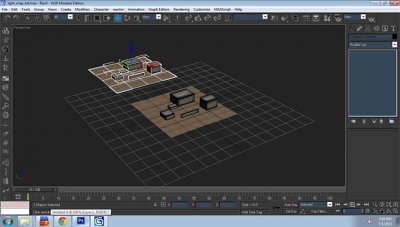
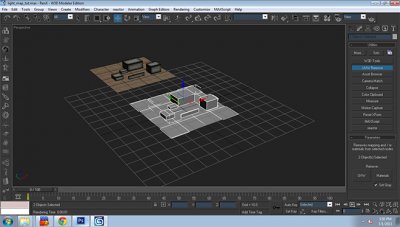
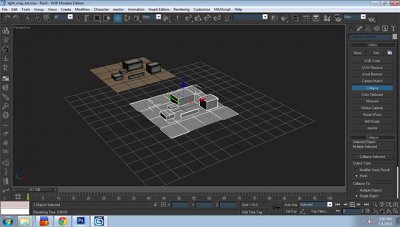
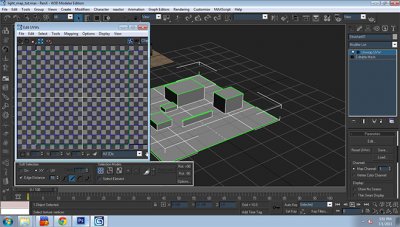
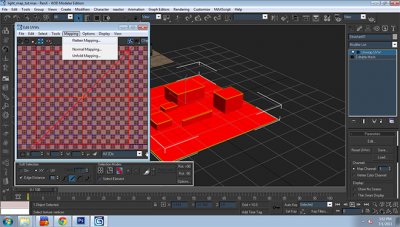
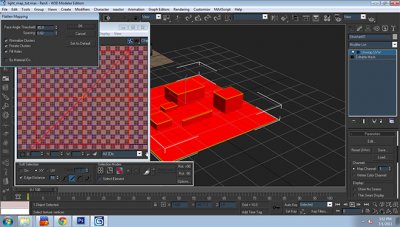
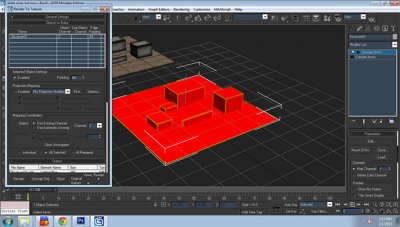
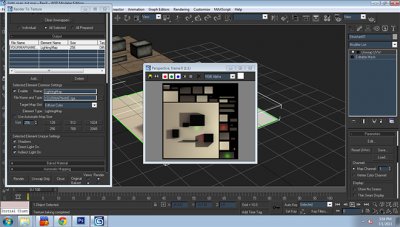
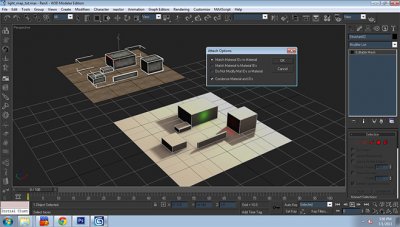
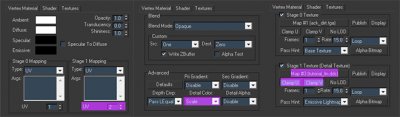
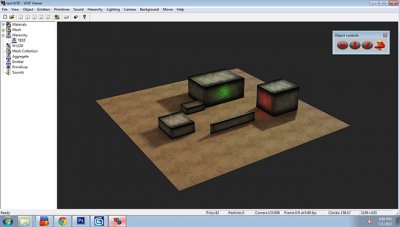
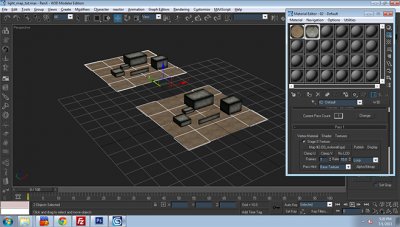
I have finally gotten around to creating a simple tutorial on how to get lighting effects from 3DSMax 8 into Renegade, Some would call this "lightmapping" when using this and some other tools TT have developed you too can get professional looking shadows, lighting effects... just one thing i should mention, this method is not dynamic lighting, but rather static baked in lighting Let's begin Open your completed level, textures are optional, but recommended that the level be completely textured before starting the process. Just easier to render and see the effect the lighting will have on the level Here I have placed some lights and other atmosphere effects to the scene. Let's render [F9] the scene and check out how the lighting looks, Everything looks fine, When you happy with the final product move on to the next step. **Remember to render often to check for lighting errors or glitches be sure to look at all surfaces etc.. Now that our lights are done, lets hide them and just keep the terrain I want to lightmap visible, First thing you want to do is clone all the terrain pieces you wish to apply the lighting to... In my case, it is the concrete boxes and ground. [Right Click > Clone] Now both pieces are cloned simply move them to the side, Leave it there for now, we will work on that in a bit.. As you can see I've moved mine a bit off from center. Now select the original two pieces and remove the materials from them [utilities Tab> UVW Remove>Materials Make sure "Set Gray" is checked] With the materials off the original meshes, we need to combine them for the lightmap. [utilities>Collapse>Collapse Selected] This will make the pieces into one mesh. Now that it is one mesh, we need to apply a UVW unwrap, Select the mesh [Modifiers>UV Coordinates>Unwrap UVW] Now that it has applied a UV unwrap we need to flatten all faces for the lighting information. ** Before moving on set the "Map Channel" to 2, we will need to remember this for later Under "Selection Modes" click on the third button to the left "Face Sub-object Mode" then select all faces in the scene [Ctrl+A] to select all, then we need to flatten, [Mapping>Flatten Mapping]. Once that is done just use the defaults that are displayed on my screenshot. Click "Ok" when done. The modifier should auto-flatten to something similiar to what i got pictured above. Once that is done, move on to the next step. Now we need to render the lighting information to a texture, [Rendering>Render to Texture] This will provide a pop-up of the settings of the texture we will render, Set the Padding to 64, Object should "Use existing Channel" then set the channel to 2, we set this channel from earlier... Continue down to "Add" button, Click on it and select "Lightingmap" after it will provide you with the ability to change the file name and type of the texture output [To change output location click on the " ... " ] **For lightmaps I tend to make them DDS with DXT-1 settings, and Use a 256x256 size Once you are happy with file name and output location press "Render", You should see a pop up with the lightmap texture, something like my lightmap pictured above. Once rendered close the pop up windows Now the lightmap texture is applied to the original mesh, At this point we need to detach the single mesh back into the orginal two pieces we started with.. [Right-Click on the mesh>Detach with the element tool] Once complete move on to the next step. Now this is where the cloned copy of the original comes into play, We need to attach the cloned pieces to the lightmapped pieces. Ground>Ground, Concrete Boxes>Concrete Boxes... Once you attach the cloned copy to the lightmap meshes a pop up will appear [Pictured above] leave those default settings and press Ok. Now that the pieces are attached together we need to re-apply the materials over the meshes, Once complete move to next step Now the two pieces are retextured we need to get rid of the cloned mesh we made earlier [Mine was the top one] just make the mesh editable and select and delete the cloned mesh [Pictured above] We are left with the one piece, Now we need to apply the lightmap texture we made earlier to the materials of the Ground and Concrete Boxes.. Go into the material editor [ M ] and apply the next step settings to the materials. Vertex Tab, Stage 1 Mapping should be set to 2 Shader Tab, Pri-Gradient set to "Disable", Detail Color to "Scale" Textures Tab, Check Stage 1 Texture, And place the Lightmap texture you output earlier here, Click on "Clamp U" and "Clamp V" Once completed close material editor and Export your scene into a W3D Once all is complete and lightmap textures are applied to the mesh/meshes.. You will need to add a user defined parameter.. Right click, goto properties and goto User Defined tab... There you will see a text box add the line [ Prelit=true ] - everything in between the brackets.. And apply this line to all lightmapped mesh.. This is so that the Renegade vertex lighting system ignores these pre-baked light meshes Here is my completed level with Lightmap applied in W3D Viewer... Enjoy! and experiment!! UPDATE: There maybe some possible issues that result from using this method Alpha blended materials will break once "Pri-Gradient" is set to disable. To fix you will need to set to "Modulate" for any mesh that is lightmapped and has alpha blending. Tree, Shrub etc. Shadows not displaying properly in render or lightmap, You will need to follow this Alpha material tutorial for proper display of alpha enabled textures. This is what the model looks like without a lightmap texture and using default vertex lighting instead Hope you guys learned a bit from this... you can now go and create some cool looking levels with this method of lightmapping I've provided for you...It can get very complex for larger, more detailed levels, so you will need to dedicate quite sometime to do it right! I've only covered the basics on this tutorial, but I'm sure you guys can experiment and achieve more... Good luck and please feel free to post any questions you might have about Lightmapping in this tutorial thread...


-
That was my fault, I told you to name it CK, but turns out you can only have a single letter IE: H_R_Human instead of H_CK_Human. This does mean we're limited to 36 Skeletons, a few more if it also accepts special characters. So we are limited to only alphabetical or can we use numbers and symbols too? just curious Example : H_O_Human , H_2_Human , H_&_Human
-
Very nice! You're getting there bud.. I really like that crouch anim haha
-
Bioware environment artists start at about 65k here in Canada.. Leads can net about 85k QA's start off @ like $13 an hour I should also mention being a QA is not all fun and games, repetitive work, paperwork, etc.. It's not so glamorous
-
That was my fault, I told you to name it CK, but turns out you can only have a single letter IE: H_R_Human instead of H_CK_Human. This does mean we're limited to 36 Skeletons, a few more if it also accepts special characters. Yeah it worked but only backwards and forward anims.. Shall try it again sometime.. So I'm guessing this dog does not have idle/jump animations. I think the forward animation is good perhaps a bit more movement in the spine as suggested