Leaderboard


Popular Content
Showing most liked content on 06/29/2017 in all areas
-
I agree, the Riot Shield will indeed greatly.4 likes
-
[blurb]Good welcome, citizens! Battle Grid Response has received reports of progress on Tiberian Sun: Reborn 2.0. Intel indicates a look at Limpet Drones, the Mutant Hijacker's new tool, and the prospect for the GDI Riot Trooper.[/blurb] <<<Incoming Transmission>>> Good welcome, citizens! Battle Grid Response has received reports of progress on Tiberian Sun: Reborn 2.0. Intel indicates a look at Limpet Drones, the Mutant Hijacker's new tool, and the prospect for the GDI Riot Trooper. Limpet Drones First appearing in Firestorm, the Limpet Drone is a reconnaissance unit utilised by both GDI and Nod. Initially designed to uncover stealthed Nod bases, the Limpet Drone relays tactical information from the battlefield from its sensor and camera equipment. Even before being brought on as full staff, Ice was working with TSR Lead Producer Wallywood on the Limpet Drones. Mutant Hijacker Wrench Nod Mutant Hijackers are notorious for effortlessly breaking into any GDI vehicle and making it their own amidst the confusion of the battlefield. Being caught in the crossfire however usually leaves their prizes with some scratches and damage. For this reason, Mutant Hijackers have procured wrenches that will allow field repairs on their newfound rides. Numerous hijackings and equally numerous repairs have left their wrenches as worn out as their rusty crowbars, yet it gets the job done. Riot Trooper Shield The GDI Riot Trooper as we have noticed appears to have trouble in the open battlefield. While the Riot Trooper naturally excels in close-quarters combat, his survivability is greatly reduced when left out in the open. To alleviate this, there are plans to provide the Riot Trooper with an appropriate Riot Shield. This will greatly increase his survivability in the field. Ice is currently working on the Riot Shield, as well as working on a Nod Repair Station. More on the latter in another update. Shield preview by Ice. Early WIP. It should be noted that the Imperial Age guys have already gotten this down for their infantry. Check out Imperial Age if you haven't already and explore the amazing things @dblaney1 and @Kaskins have done with their project! That is it for this update! In the next update expect news of a certain fan mapper among other things. Peace through power citizens! One Vision. One Purpose. <<<End Transmission>>>2 likes
-
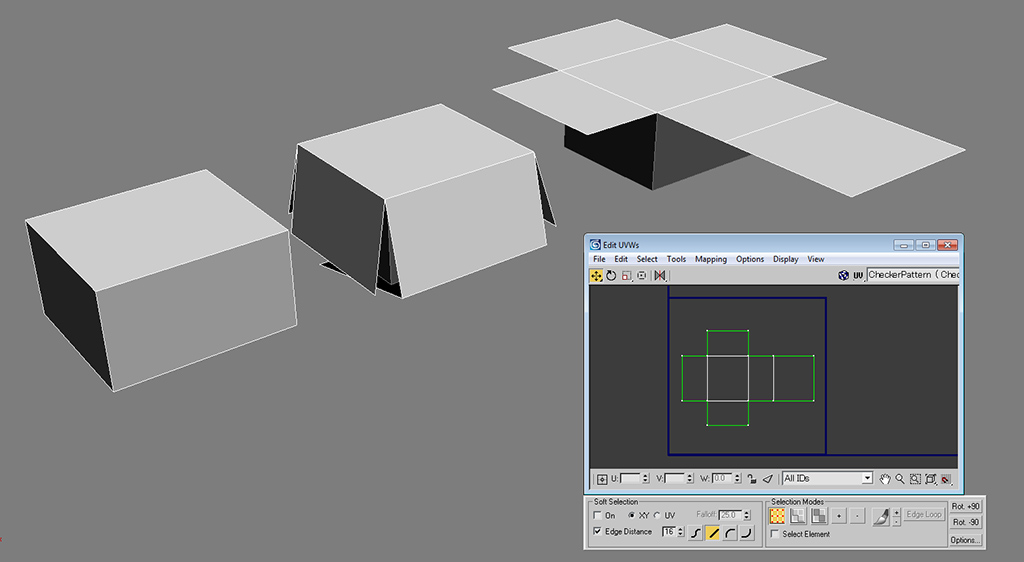
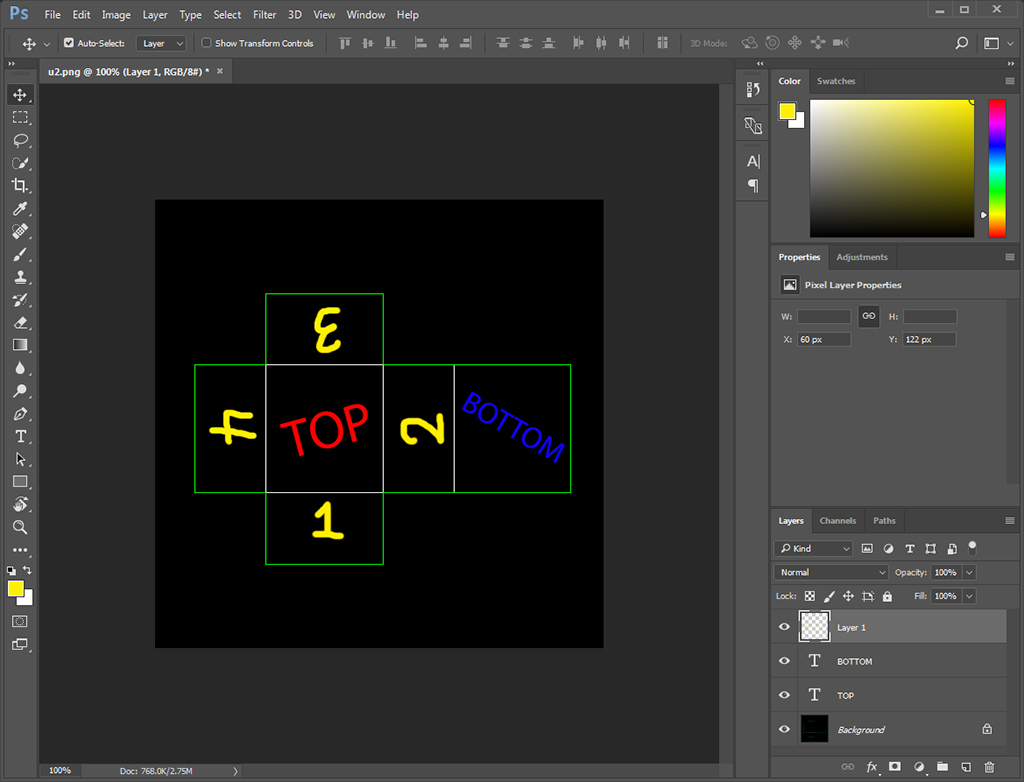
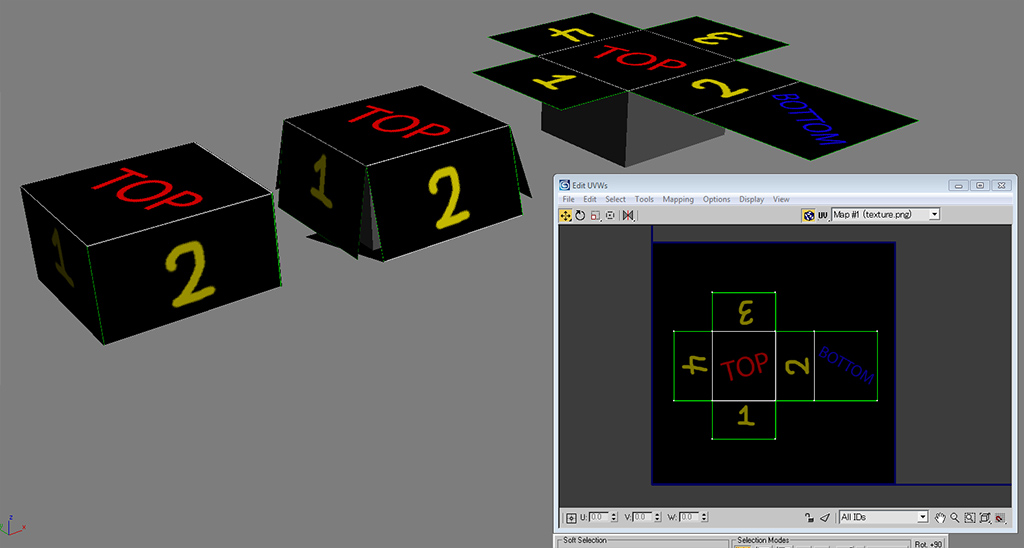
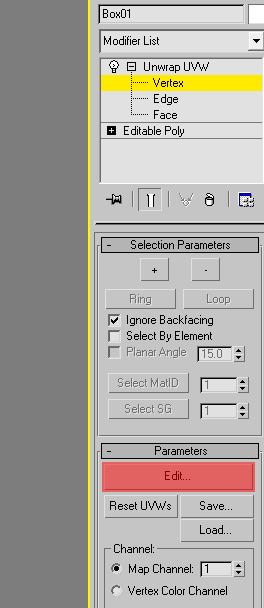
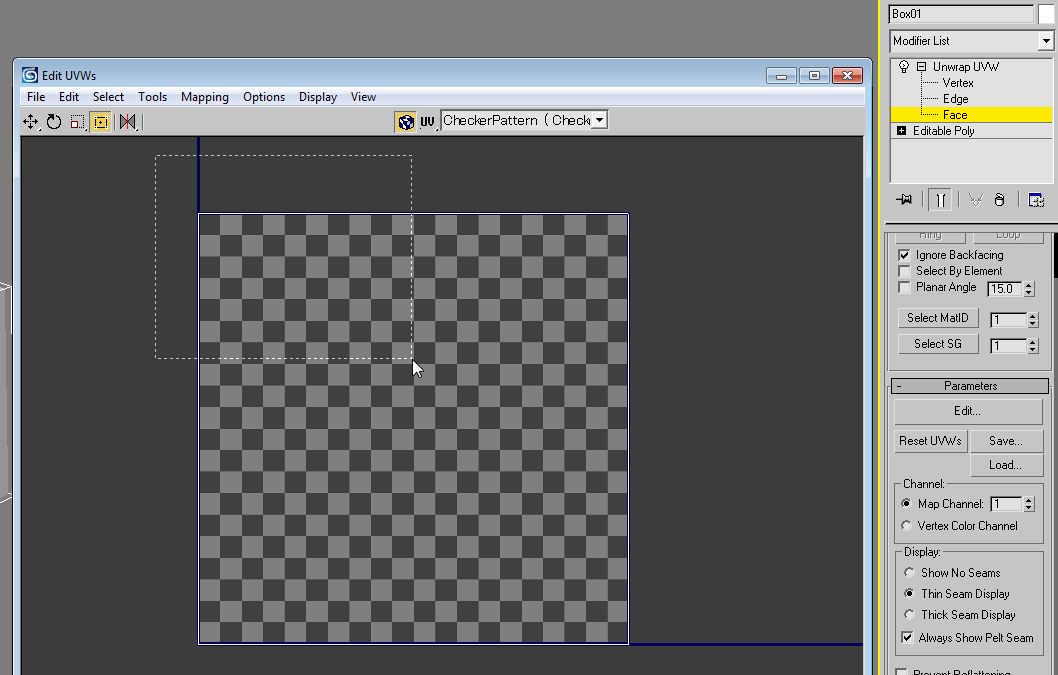
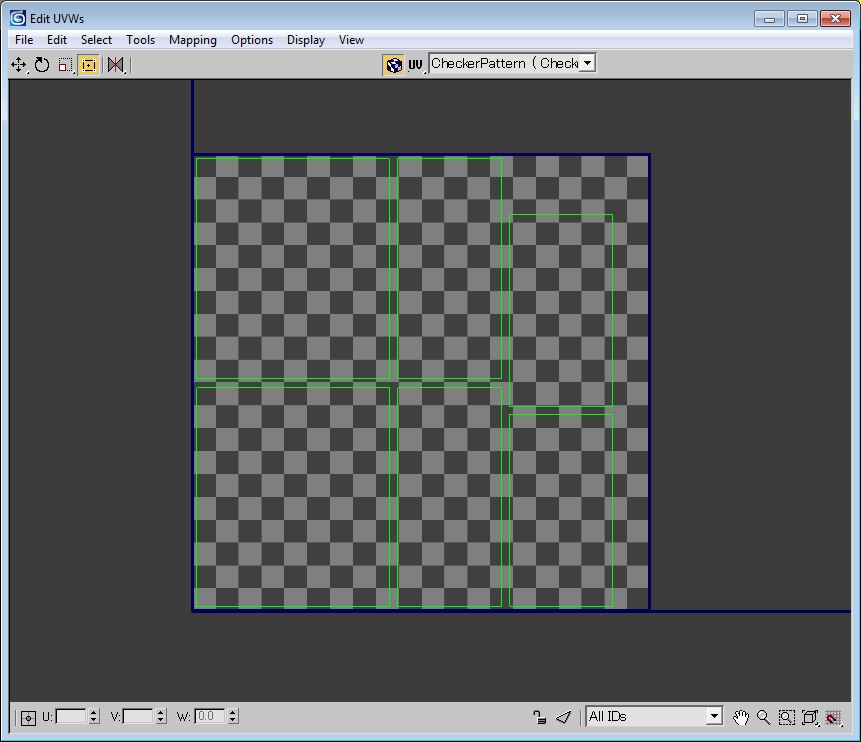
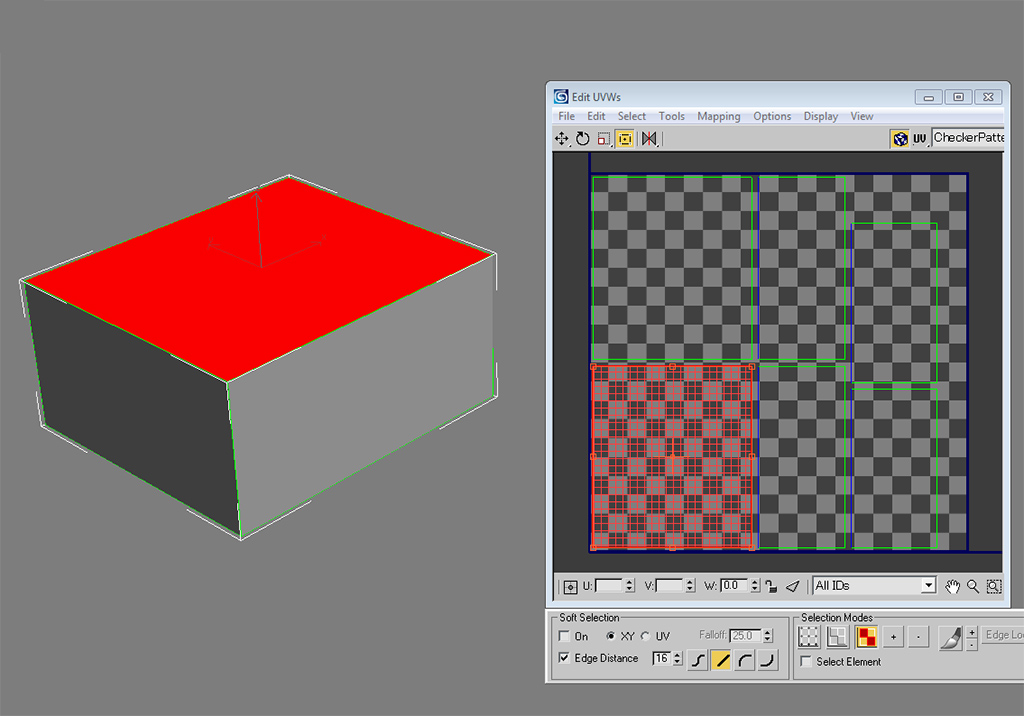
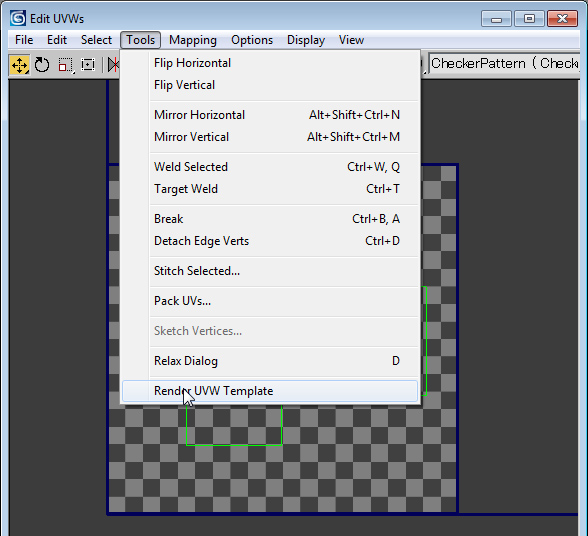
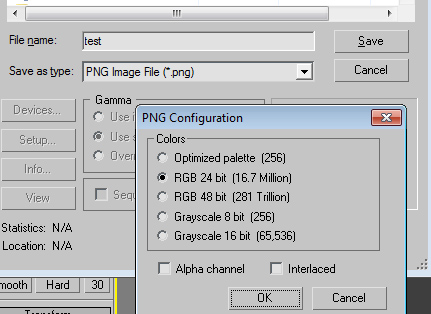
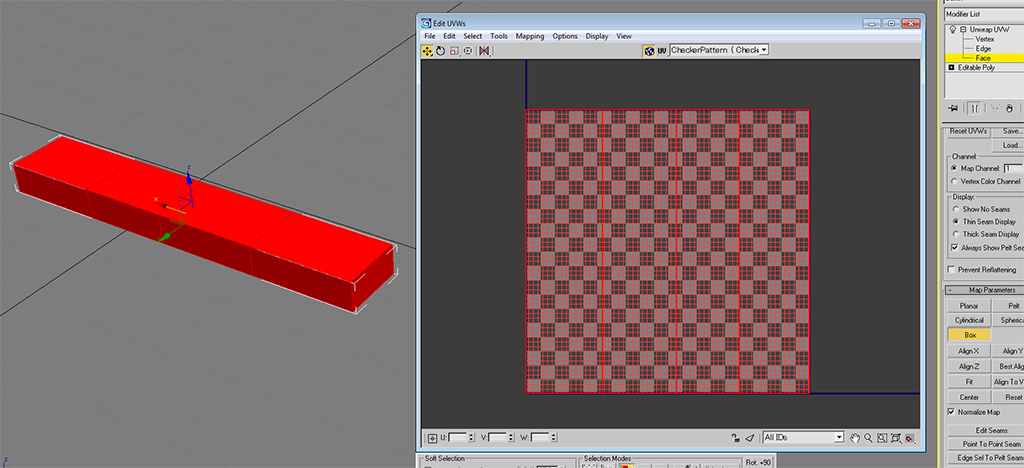
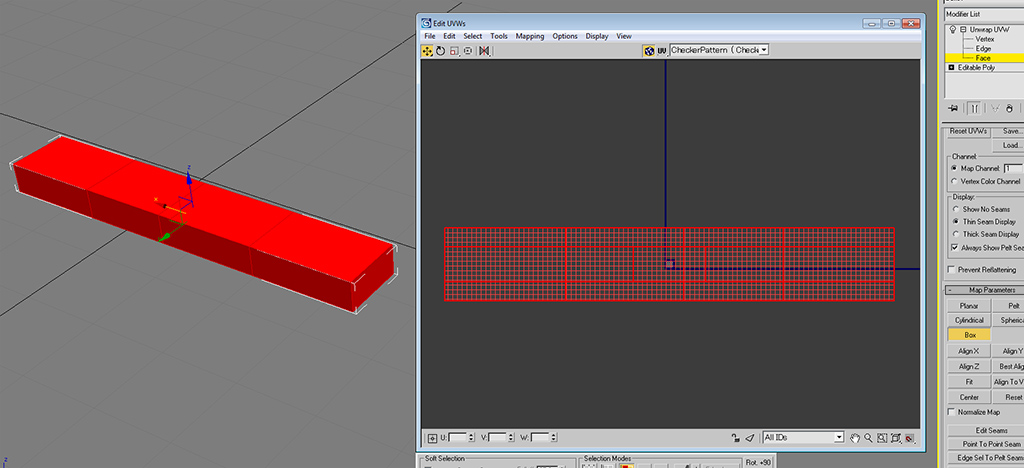
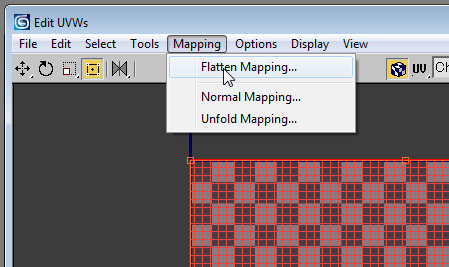
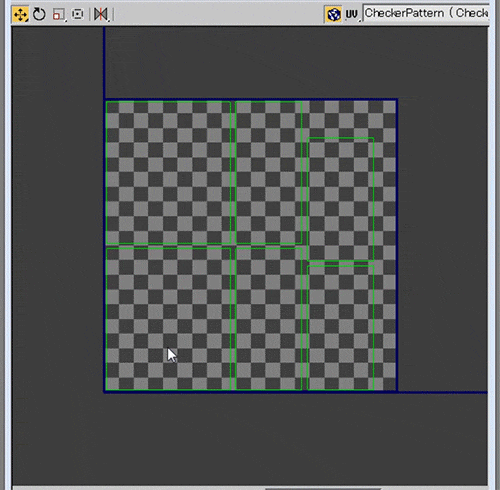
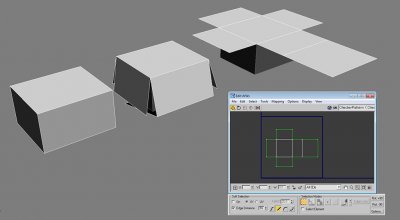
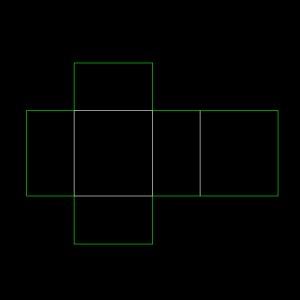
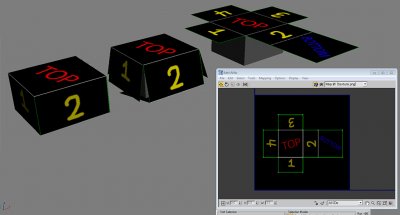
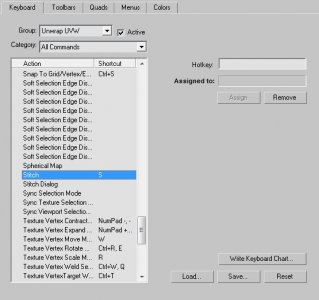
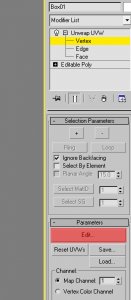
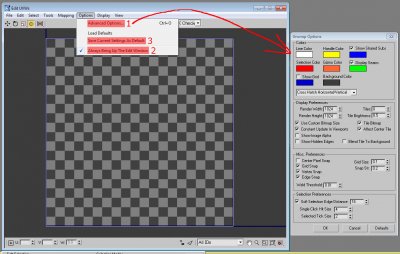
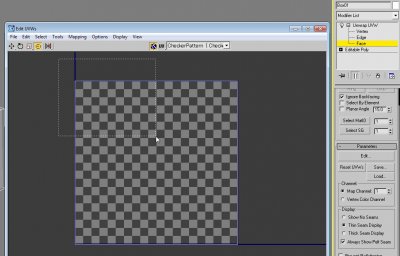
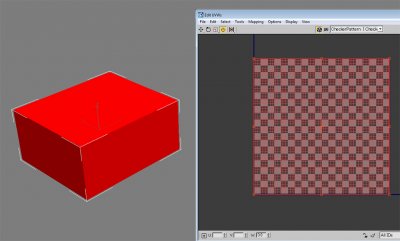
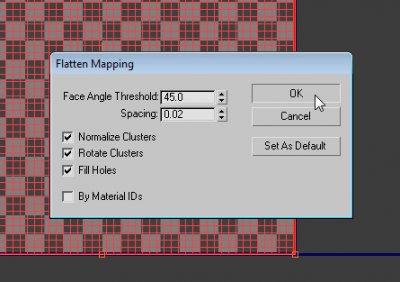
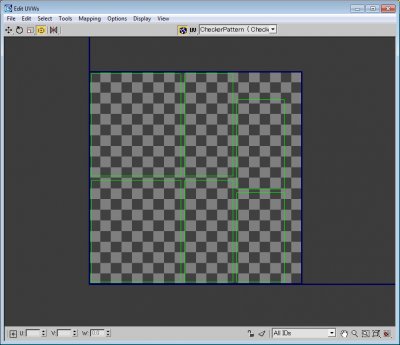
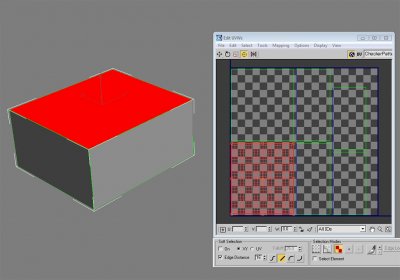
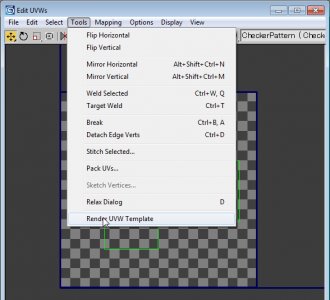
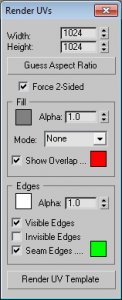
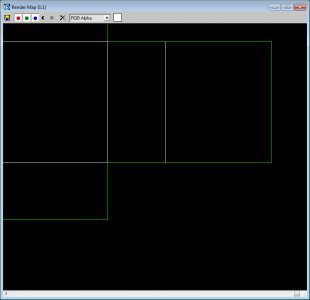
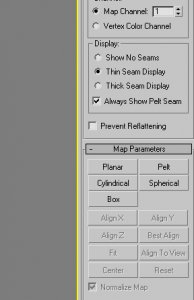
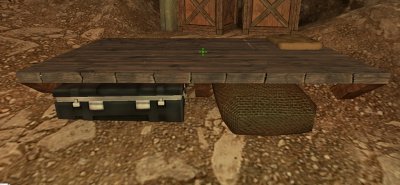
So you've modeled an object. It's probably gray or some assortment of solid colors, and if you're reading this, what you're likely wanting to do is apply stylized texturing to your object using Photoshop or some other 2D imaging program, and you either don't know how to do that yet or want to learn a few more tips to up your game. If you would rather watch a video tutorial, use this: https://w3dhub.com/forum/topic/414495-uvw-unwrapping-101-with-owa/ Otherwise, read on! This tutorial assumes a solid basic understanding of 3DS Max 8, and I will use "Photoshop" to mean whichever 2D imaging program is applicable in your case. Before we go through the tools and buttons, it would be good to provide a general outline of unwrapping and its process. I suppose the easiest way to explain it is to compare your object to a Christmas present. Imagine it is a box shape that already has wrapping on it. The wrapping is white paper and doesn't have any color on it, so you need to unwrap the present, put the wrapping on a flat table, color it, then wrap it back onto the present. The same principle applies no matter the complexity of the object. Every polygon needs to be able to be laid flat across the table. Sometimes this involves cutting parts up, which is where we get seams (useful on a lot of angular, manmade objects), and sometimes this involves slight texture stretching if seams are to be avoided (more organic or fluidly-shaped objects). The image above illustrates the principle of unwrapping a cuboid and what that unwrap would look like in the UVW edit window. The blue box in the UVW edit window indicates the boundaries of the square texture file that you will see in Photoshop. What is seen in this window can be rendered to a PNG file that will be loaded as a background layer in Photoshop, which can then be painted on. Here it is, with the texture brought back into 3DS Max. For W3D projects, the texture file would be saved as .dds and applied as a W3D material. Obviously, the UVW template background layer would also be hidden so as not to show the lines of edges and green seams in the final product. Now, HOW to do the unwrapping in 3DS Max? Glad you asked! Because of how often I do this, I set up a keyboard shortcut and I recommend you do the same (assuming you haven't imported chopbam.kbd previously, of course). Set Unwrap UVW Modifier to Shift U. Also set stitch to S. Now select your object and press Shift U. Being as familiar with 3DS Max as you undoubtedly are, you will notice that it created a modifier. Expanding this modifier you will see "Vertex," "Edge," and "Face": modes that are similar to the subobject modes in the Editable Poly mode. You can press 1, 2, and 3 to cycle through Vertex, Edge, and Face, and press the same button again to go out into the general Unwrap UVW modifier. Press "Edit..." to bring up the UVW edit window we saw above. You'll want to generally always have this window open while doing your unwrapping work. ***For future reference, the UVW unwrap you see in the window by default would be the result of any unwrap if you select all and hit "Planar" in the command panel. There is an invisible eye in the sky that looks straight down on your object on the Z axis and throws a normalized (stretched to fit the blue square) version into the UVW edit window. Unless you're unwrapping a flat plane, this is not the look you'll want in the end, but it's just the default view. These are the options I use. Sometimes things change based on the need. You'll definitely want the render width and height to match your planned texture resolution. I "Always Bring Up The Edit Window" because unwrapping is useless without it, and it saves me the step of clicking "Edit..." every time. "Save Current Settings As Default" saves me time later, since I like my preferences and don't want to have to set them every time I apply an Unwrap modifier, which is very often. Let's move forward into actually unwrapping. With face mode selected, you'll want to select all your faces. By default, all the polygons are normalized/stretched to fill the UVW square. Draw a box or Ctrl A to select all polygons. You can also select your polygons on the model itself, but keep in mind "Ignore Backfacing" is enabled by default, so unless you uncheck that box in the "Selection Parameters" rollout, that method will only select polygons facing you in the viewport. There are a bunch of ways to tell the program how exactly to cut up your 3D model's wrapping and flatten it onto the table, but the way I'll show you right now is to go to Mapping -> Flatten Mapping and hit OK. Here is the resulting unwrap for me. Find the top. In face mode select the top of your object so you know which poly that will be in the edit window. Now in edge mode, select the edges of the top and press "S" to automatically stitch the polygons on the corresponding sides. You'll see in the GIF below that I'm quickly switching between move and scale, and I'm doing that using the W and R keys. E is for rotate. I don't remember if these are set by default, so you may need to check your options. Note: If selecting individual subobjects isn't working right, and it's selecting the entire element, try unchecking "Select Element" on the panel docked below the edit window. Tip: Unfold mapping might do this automatically for you with a box, but I did flatten mapping to show the principle of stitching, which is a real time saver with more complicated objects. Now to render this out as a UVW template to get into Photoshop, go to Tools -> Render UVW Template. It will only render inside the blue square. The main thing is to make sure Width and Height match the exact texture resolution you want to use. For W3D projects, we use 512*512 for small objects, 1024*1024 for medium objects, and 2048*2048 for high resolution, newer objects like APB's redone vehicles. Keep in mind you can also use multiple textures for your object, so that'll require multiple UVW templates. Once you hit render, you'll see your render map. If it's a bit larger, it'll be scaled down by default but you can use your mouse wheel to zoom in and examine your beautiful UVW template. Save UVW template and I usually just save as a PNG. Alpha not really necessary since it's used as a background layer. Now you can work with the layer in Photoshop. Put other layers on top of it. If you set them to "Screen" or "Lighten," you'll always be able to see the UVW template through your drawn pixels and use them as a guide for where your poly edges are. For more complicated objects, flatten mapping might not always be the way to go. You'll see there are a number of map parameter options in the command panel. You can use them as alternate ways to project UVW coordinates (the term I use to denote the connection between the polygon itself and its 2D counterpart in the unwrap). These tools are for more manual work. Select the faces you want to set UVW coordinates for, and then go to work. Each tool is self explanatory. Planar acts as an eye that looks on the X, Y, or Z direction (depending on which button you press). Cylindrical works well for cylinders. Box does guesswork and lays a good groundwork for stitching, in my opinion. A few tips. 1) Always uncheck "Normalize Map." This will stretch and distort the texture to fit exactly into the square edges, and you don't want that. You want uniform scaling. Whenever I uncheck it, my polygons and elements in the edit window get really huge. Make sure to scale them down later. On this long plank, that will mean the difference between: and You will see that in the first image, the long plank is forced into a square, whereas the second image, the UVW polys are much more consistent with the shape of their object (and that the UVW elements are HUGE). I usually wait until everything's been mapped to scale down, so all my elements get scaled down uniformly. If I scale a pipe down, but not as much as the thing it's attached to, they will have different texel densities, or resolutions, and look inconsistent. 2) Maximize your UVW space. Try to eliminate as much negative space as possible by filling up the blue square with UVW elements. Otherwise you will end up with unnecessarily wasted texture space that goes into the game. 3) Provide sufficient texel density. Pretty much a no-brainer, but probably should be covered anyway. Make sure your texture has enough resolution to actually look good ingame. If elements are small, obviously they won't need as much texture detail. If elements will be large and close up ingame, you will want them to have more texture detail. 4) Use unwrapping to fix existing errors. If existing stretching needs fixing, or seams don't look quite right, or you want to rotate that wooden plank so it's going down the board (example below), you can use an unwrap modifier to fix it. Something like this would be fixable by opening the edit window, selecting that face, then using the rotate and move tools to put it into its proper place. Further tweaking can be done to the individual UVW vertices. 5) If you collapse your modifier stack, you can always get your unwrap data back later by applying another modifier with Shift U. It even saves multiple channels. If you applied a UVW map modifier to terrain but wish to fix just one spot, collapsing the stack and then applying a UVW Unwrap is for you. You can look in realtime as you adjust vertices in the Edit UVWs window and see how it's affecting the texture in the viewport. 6) If you're wanting to show your texture in the Edit UVWs window, click the CheckerPattern dropdown near the top and select your texture (assuming it's been applied through the material editor). You may need to Reset Texture List to get it to show. 7) Check out the Tools available. In the Tools dropdown, see what else you can do, from welding to mirroring to breaking vertices to relaxing, it's all there and extremely useful. Play around with it and see what you can do! You've probably also noticed the buttons for Saving and Loading UVWs, which do seem to work as expected. If you save UVWs out to a file, you can Load them into a different Map Channel. I hope this tutorial has been helpful! Write here if you have questions or comments or tutorial bug reports and I'll do my best to answer or amend any issues.


 2 likes
 -
Thanks for the feedback. I'm just going to assume you didn't literally mean walking to the enemy base, so I think you might be exaggerating things ever so slightly because sprinting from the inside of one of your own buildings to the inside of one of the enemy's, when taking the longer outer routes on the largest maps like Ridge War, should rarely take more than 2 minutes if uninterrupted (just checked myself - danpaul is right on the money here). And again that's just for the biggest maps. 2 minutes might still sound like a lot but compare it to how long vehicles take in the same situation - it's not that much slower. Most tanks aren't even 50% faster than sprinting infantry and that's not even taking into account speed loss from turning and climbing. Don't tell me you've never felt the same way from brazenly trudging a mammoth tank across the map for longer than an infantryman takes, then eating a triple cheeseburger mine and instantly losing your tank? Though travel time is definitely a concern even if it's not as exaggerated as you insist. Something I kinda want to do in future is paradrops that temporarily allow infantry at home to "teleport" to the front lines quickly. Possibly enabled by some kind of limited-purchase flare akin to the a-bomb, so it doesn't entirely supplant transport vehicles. So can snipers (who killed in 1 headshot even before the overhaul), AP mines, phase tank splash barrage (or track-sniping vs Volkov), V2/arty, squishing, and so on, and I don't think anyone will call for any of these to be "dealt with" (except snipers which are certainly a little controversial). Granted, several of these got nerfed in addition to being discouraged through the better-but-harder headshots. Killing infantry is now more of a job for infantry. Though the free rifles could probably stand to get nerfed a bit further to hamper the respawner advantage. It kind of sounds like you're attacking with one infantry in which case, yes, expect to die against a lone defender even if it's not right away and especially if he's waiting for you. This is also true in Reborn despite the whole "infantry are made of adamantium" thing (unless you're a commando) so I don't think applying that method here would help much...1 like
-
Hurray, an update! So excited for 2.0.1 like
-
Yep. But you can't even get Tanyas on the maps where Medics are a big issue. Besides, her lack of armour means that from the very moment she enters combat, she is taking far more damage from small arms than any armoured infantry are - sure, she has more health to compensate for that, but those small arms have an easier time of outdamaging the medic kit's healing on her right away. Plus the only benefit she gains from the medic's armour cache is uncrushable status - she doesn't become near-immune to splash damage like any armoured soldiers do, and she doesn't gain temporary armour like any armoured soldiers who've been stripped do. So that mitigates Medic+Tanya a slight bit, which you may think holds it back on the maps where it can be done, but if Tanyas could gain armour, that'd make them roughly twice as tough as they currently are against everything that isn't a PKM or direct hits of big projectiles, and survive headshots from sniper rifles, which might be just a little bit bullshit.1 like