moonsense715
-
Posts
5,440 -
Joined
-
Last visited
-
Days Won
121 -
Donations
60.00 USD
Content Type
Profiles
Forums
Events
Documentation
Bug Tracker
Downloads
Everything posted by moonsense715
-
There's more. You need to reset your game and get heavenly chips. The more you have, the more cookie production multipliers you can get. After you have enough heavenly chips you will be able to switch seasonal events and get all the upgrades and achievements without waiting until Xmas/Easter/Halloween and get all upgrades an achievements in just a week or a few days if you play a lot. With enough heavenly chips you can get prisms in the first 5 minutes of the game and that means you can in the end build not 50 but 250 in the same amount of time before resetting again. Have fun
-
TS_Burrow.mix implemented all this.
-
Reminds me of the Mistery Machine from Scooby Doo
-
Why would anyone use the IP Board theme?
-
I'll give you a simple example: Place a script zone, go to its scripts tab and add a script: JFW_Message_Send_Zone. Parameters: Playertype 1 for gdi/allied 0 for nod/soviet. Message: string message to display. (e.g. "Hello world!") Colors: 0-255. Sound: just skip it for now. Delete: 0 (so it can be activated as many times you want) When the right teamed unit walks into this script zone with this script on you will get that message with the given color displayed And no, you can not create new scripts in LevelEdit, just use existing ones that the Jonwil and his team writes. You'd need to sit down and code in Visual Studio or something similar and compile it.
-
I have actually made plenty of these and the irony is that that's what started me on making pixel art Unfortunately there are all terrible and not worth posting here but maybe I'll make a new one this year... What about Heroes-X?
-
Does it lock on targets when spotted one? If so then it should work.
-
 Like this!
 -
Dogs can't drive, but they run really fast! Not drive but travel. Ohhh I can assure you they will be common passengers in transport units so they can tear infantry to shreds during an interior attack! I want to encourage players to do this if it's not too unbalanced.
-
That is one massive blog out there. I love the Grinder-Space jam remix! Nice job.
-
4 - Competent Adding special effects and rigging a character
moonsense715 posted a topic in Characters
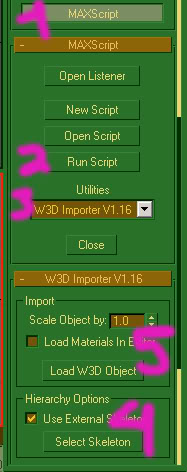
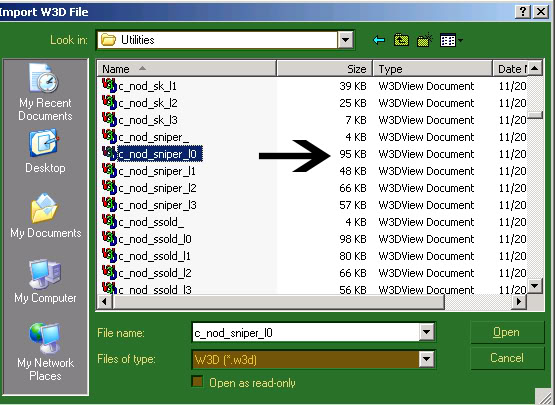
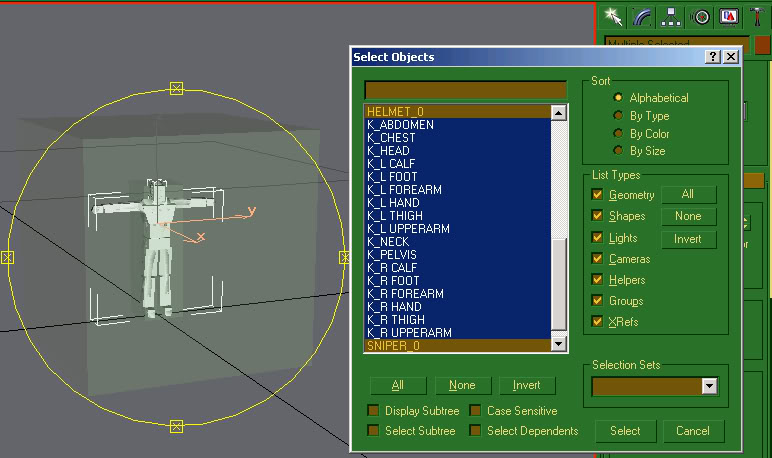
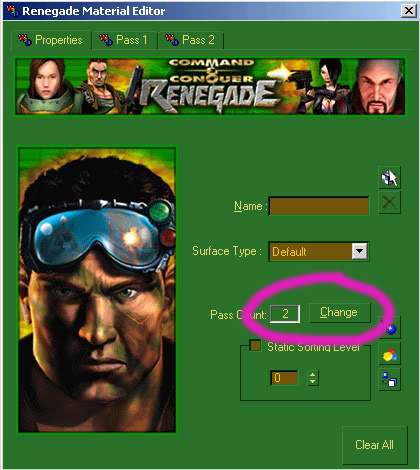
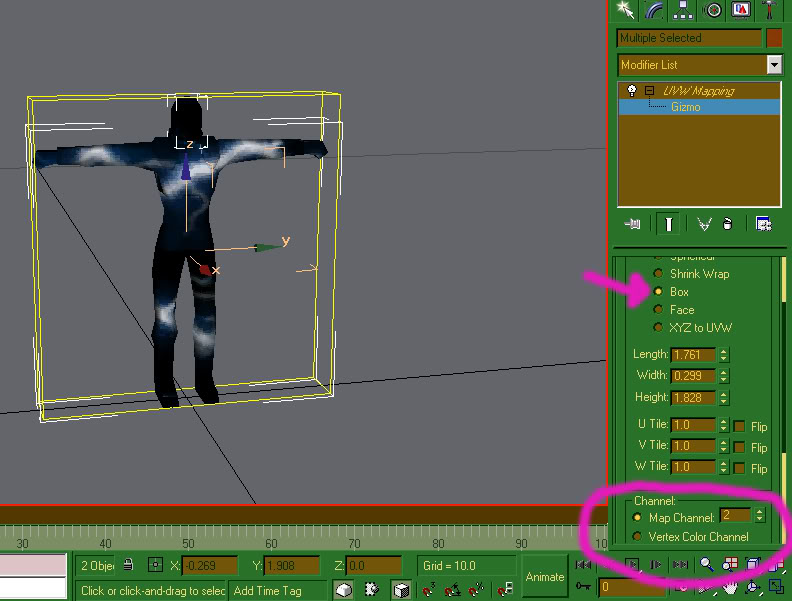
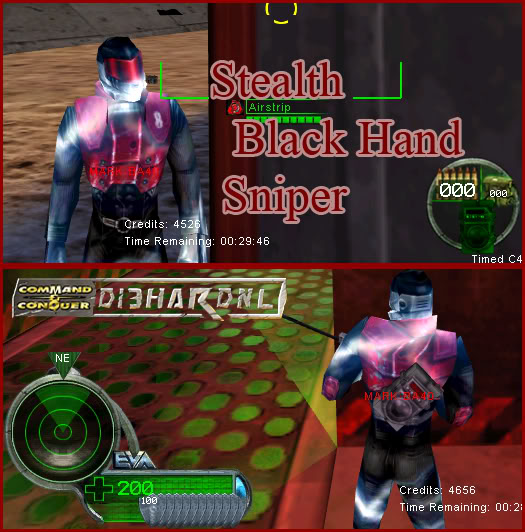
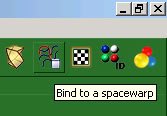
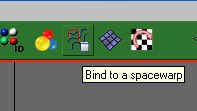
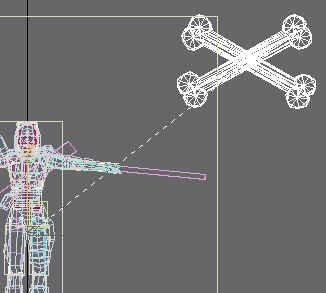
Author: Di3HardNL Skill level: 4 This tutorial was made on request by Di3HardNL. It explains how to add texture effects to a character in RenX. You will also learn how to bone a character. If you don't understand this tutorial properly, you can download the final product and Gmax scene in the attachment. GL. If you use the same w3d importer as me follow these steps ( You can download file in attachment) -Open Renx -Follow steps of the picture above, 1- Go to hammer press Maxscript -> Run script -> select the w3d importer. Before you open a character you must load the skeleton first(step 4). For male characters select s_a_human.w3d. For female s_b_human.w3d. Then load the actual character model you want to edit. -Open the right file, this one is for the nod sniper. (c_nod_sniper_l0.w3d - first export this file from XCCMixer) -Delete everything except for the character meshes. So delete everything except Helmet_0 and Sniper_0 -Re-apply the original texture (c_nod_sniper.dds) First open the .dds file in any photo editing program and save it as .TGA. Otherwise you can't apply it in RenX. -Now we are going to add the moving effect (stealth effect) to this character. Open stealth_effect.dds in your photo editing program. Edit this file the way you want. Save as .TGA (Don't name it stealth_effect but something else) To apply this to your character use the same settings as mine: - 2 Passes Pass 1 Vertex Material: Shader: Don't have to change anything here Textures: Set the character texture as stage 0 texture. Pass 2 Vertex Material: Shader: Set blend mode as 'Add' Textures: Set the moving effect (Stealth effect) as stage 0 texture. You can position the texture for the moving effect (if you have UV 2 selected in material settings) by selecting BOTH meshes and then click 'Modifiers' -> 'UV Coordinates' -> UWV Map. In the right side at the MODIFY tab you can see some numbers. I suggest simply click on 'box' MAKE SURE MAP CHANNEL = 2 (Because UV = 2 in material settings) Now the character is done, only we will have to re BONE it again. In Renx go to 'File' -> 'Merge' and open the Male.gmax scene. (Located in Renegadepublictools folder -> 'HowTo' -> Characters. I also attached that file to this post. Press 'H' and delete the following files: body_0 (this is the body file for the havoc which you imported with male.gmax) head (head file for havoc) Boundingbox Now select the mesh Sniper_0 Press the 'bind to spacewarp' button Now click and hold on the mesh Sniper_0 and release the mouse when you are on the bonething. Notice the right menu now (go there by clicking on the blue button on the right, the 'modify' tab. Now select the 'select object' button, and select ALL those blue dots. Just click and hold mouse over the character to select them all. When you selected them all press the 'Auto-link' button on the right menu. When you did that select the Helmet_0 mesh and do the same thing as we did for the Sniper_0 mesh. (Where we started 'bind to spacewarp') BUT after you selected all the blue dots don't click on Auto-link, but on 'link to bone' Now press 'H' and select c_head and click on 'pick' Now your character is all set and done to EXPORT it. Go to File -> Export and save it in your renegade DATA as c_ag_nod_sniper.w3d 'export using skeleton' Here you must select s_a_human.w3d END RESULT + FILES IN ATTACHMENT Stealth BlackHand - Gmax Scene - W3d Importer - Di3HardNL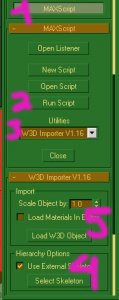


-
Happy birthday!
-
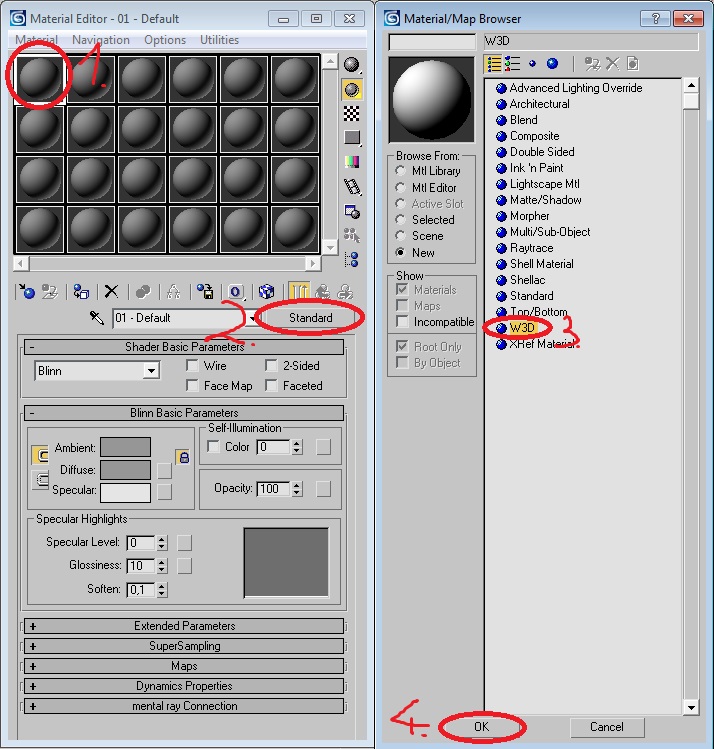
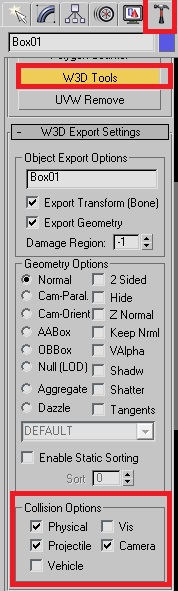
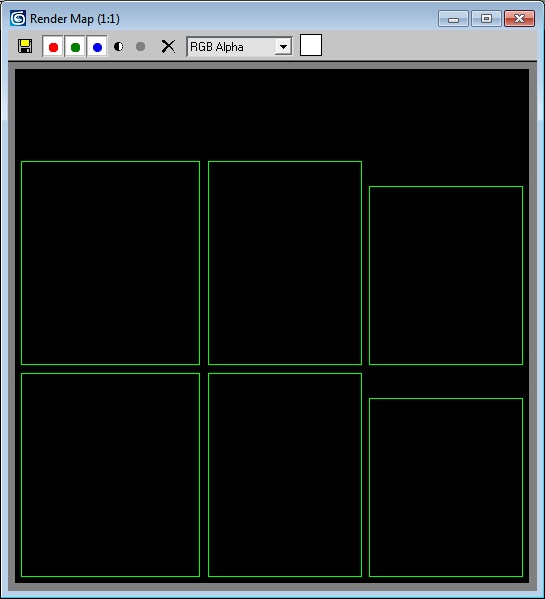
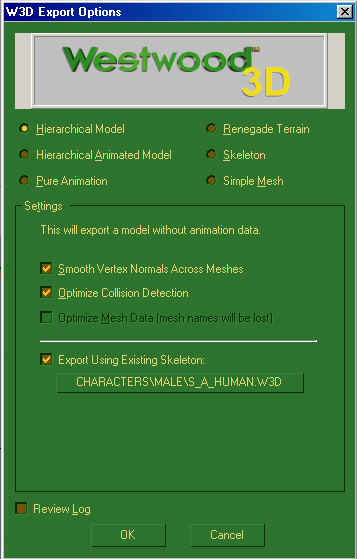
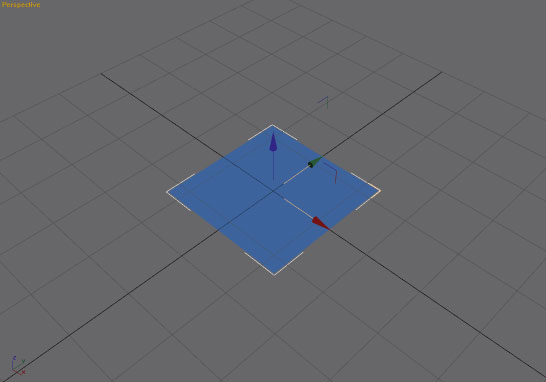
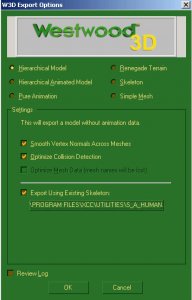
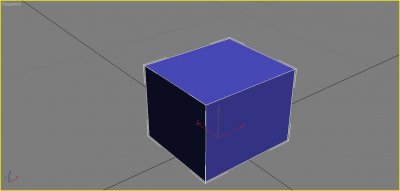
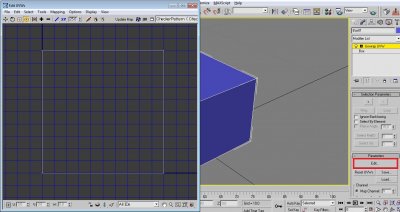
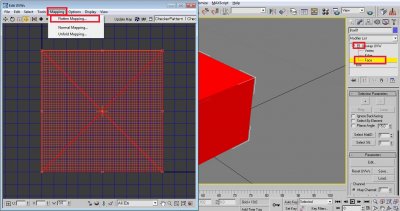
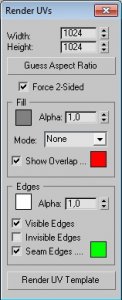
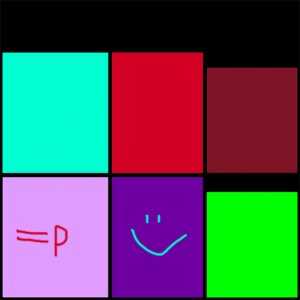
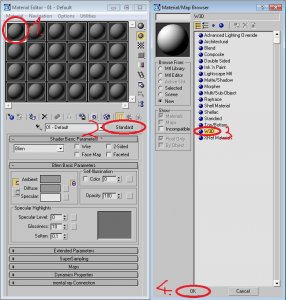
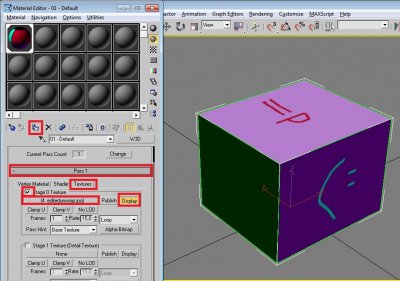
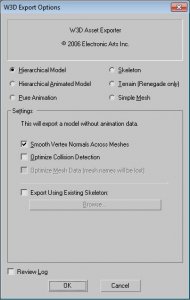
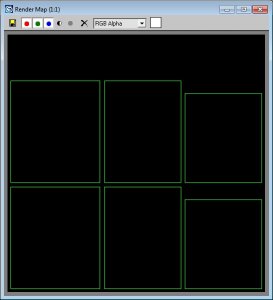
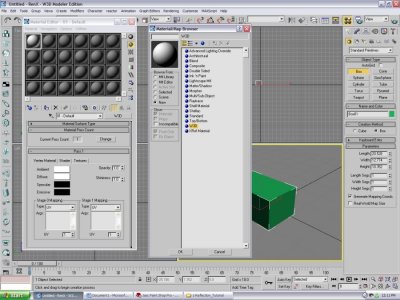
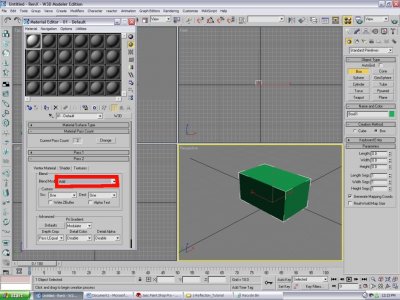
Author: moonsense715 Skill level: 2 Ever wondered how to connect modeling, unwrapping and texturing together? How an unwrap gets into photo editors and then comes back to the modeling software? Then this tutorial is for you. 1. Create your model To keep this tutorial simple, I will demonstrate the workflow on (you guessed it) a box, but it works for almost anything. So in 3ds Max, get your model complete, here's my box (size: 3.5 x 4.0 x 3.0): 2. Unwrap your model The next step is, unwrapping your model. Apply the UVW Unwrap modifier onto your model (make sure it is selected): Now on the right side panel, you will see "Parameters" and under that a big "Edit" button. Click that and the Edit UVWs window will pop up: Now on the right panel, expand Unwrap UVW and select Face. Hit CTRL + A to select all the faces. On the Edit UVWs window, click Mapping and choose Flatten Mapping. On the popup window, just hit OK. The unwrapping for this box is complete as it is a very simple model. For more complicated models, the unwrap will most likely look very unoptimized and scattered all around. You can learn more about unwrapping HERE. For now, let's continue using the unwrap in the texturing phase. 3. Get your unwrap ready for an image editor Before you close the Edit UVWs window, we need it for one more thing. Click Tools and select "Render UVW Template". The following dialog should appear: Play around with the settings if you like or leave it as default and hit "Render UV Template". An unwrap image will render. Click the save icon save it as a PNG or TGA filetype, whichever you can open with your image editor software such as Photoshop, Gimp or even MS Paint if you just want to try out this tutorial. 4. Use the unwrap in the image editor Open the picture you rendered with an image editor software. Edit it to your liking, the unwrap lines help you as they show where to draw on the image. If you are unsure which part of the unwrap is which, you can check it on your Edit UVWs window. Select a face and it will be highlighted in all your open camera views. This is an example I came up with: Save the image. 5. Apply the new texture to your model Back in 3ds Max 8, open your material editor by hitting "M". Select any material slot (big grey ball) and click Standard. Change it to W3D and hit OK. Under Pass 1, switch to the Textures tab. Tick Stage 0 Texture and click on None. Browse for the texture file you just created and hit OK. Click Display and Assign Material Selection on your selected model. The texture should appear on it. 6. Export the model and finish In normal cases, you should tick Physical, Projectile and Camera collisions on your mesh on the Utilities (hammer) tab under W3D Tools so you can collide with it, shoot it and your camera will not go through it. This does not apply to characters and vehicles in W3D, you need to rig those in a special way. See the other tutorials for them. As for this box model tutorial, now click File -> Export. Filetype should be W3D Asset, give it any name. On the export options, choose Hierarchical Model and change nothing else. Now your asset is ready to be used in the W3D engine. Open it with W3D View to look at it or add it as a preset in Level Edit to use it. Tutorial source files Here are the files used by this tutorial, feel free to look at it to check as reference: GenericAssetWorkflow.zip


-
I meant the smaller sunglasses used by the officer guy on the left image and ingame Ren, not the huge one on the right
-
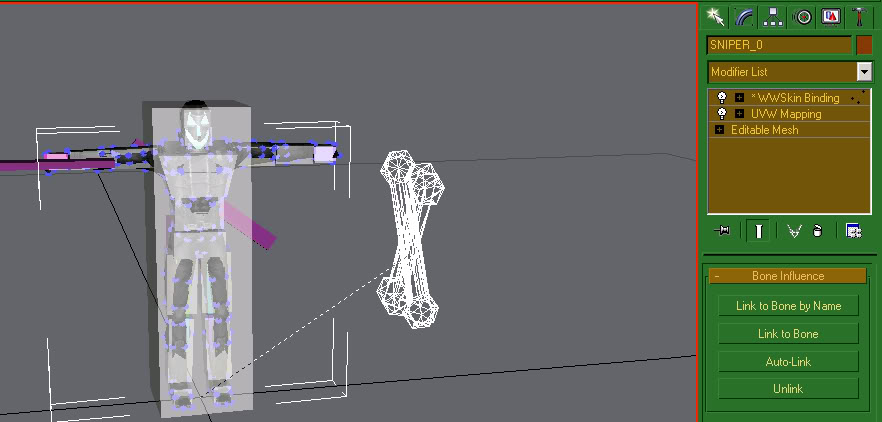
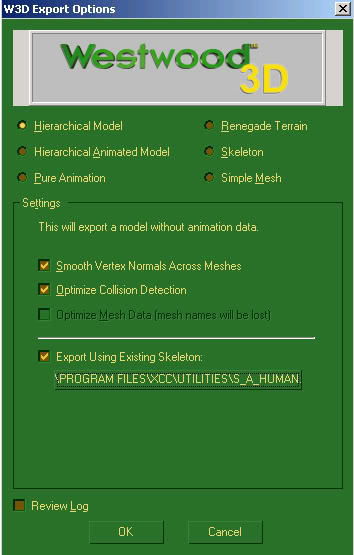
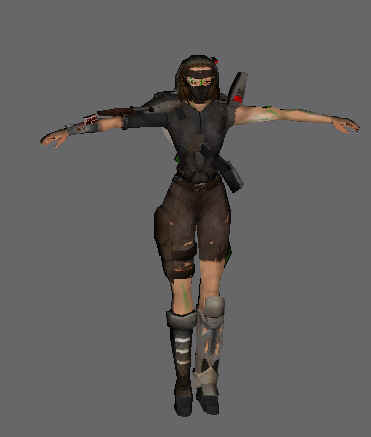
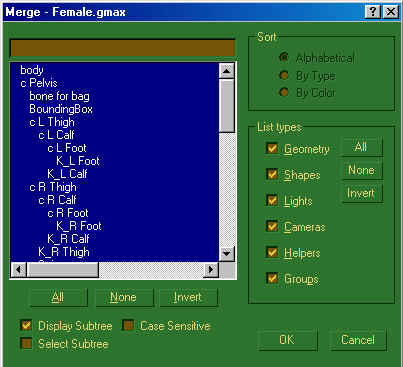
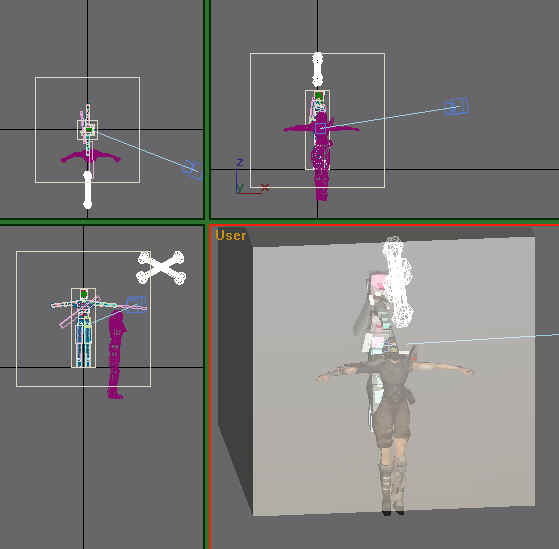
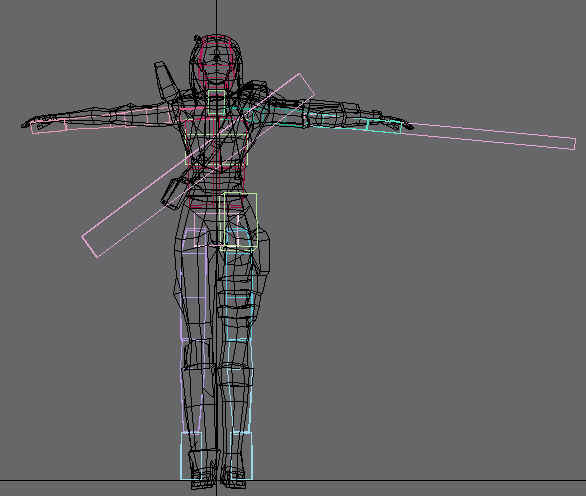
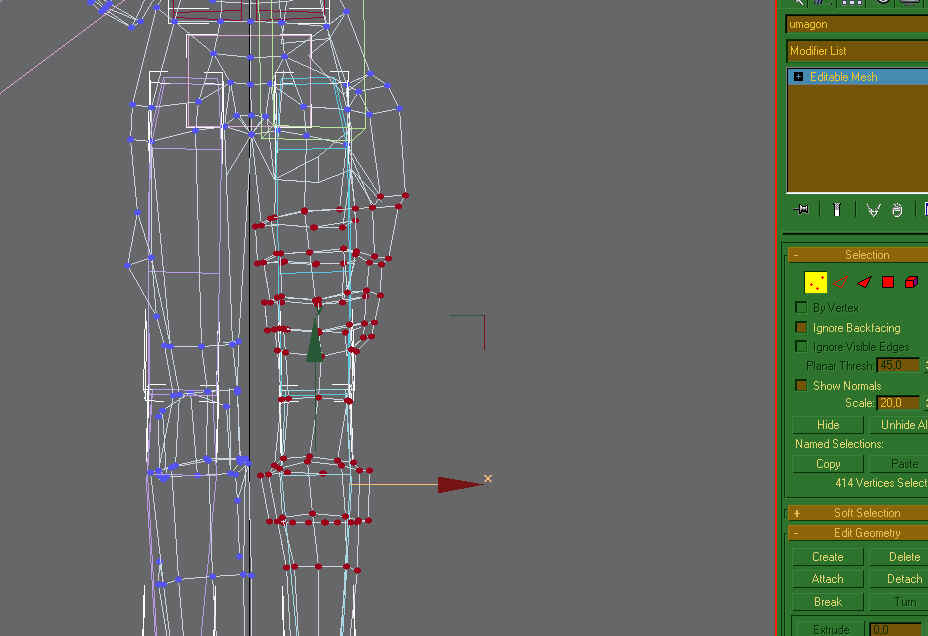
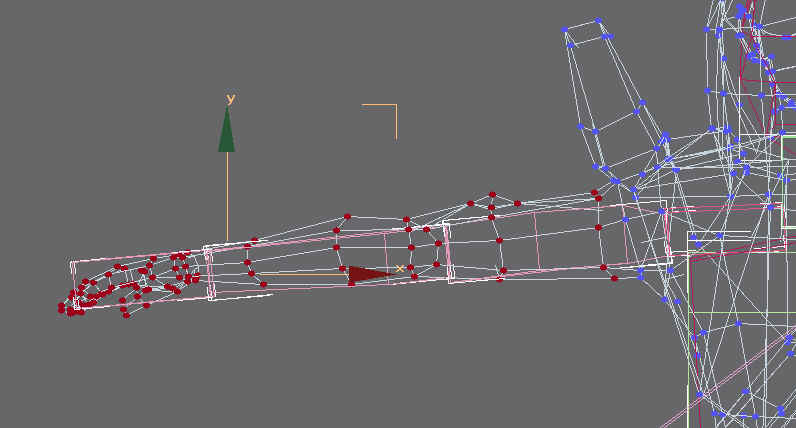
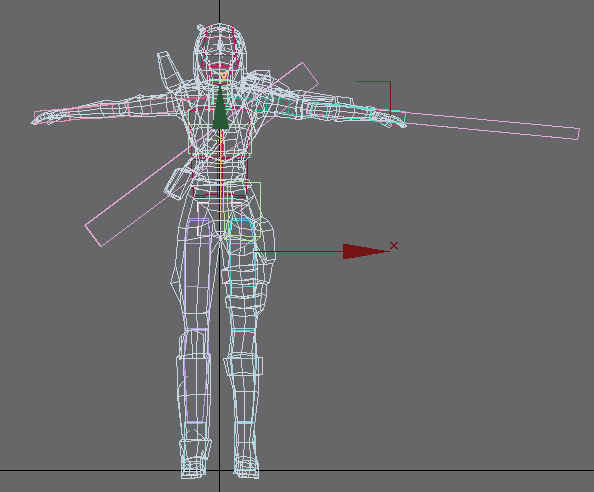
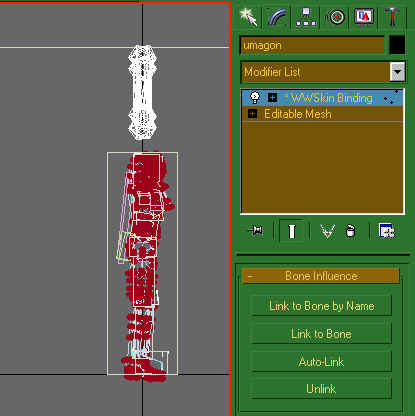
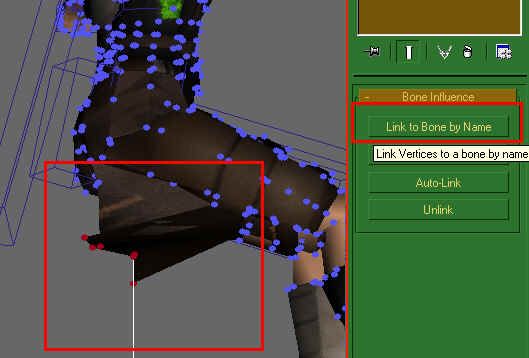
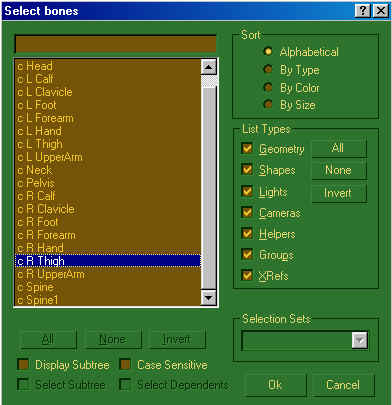
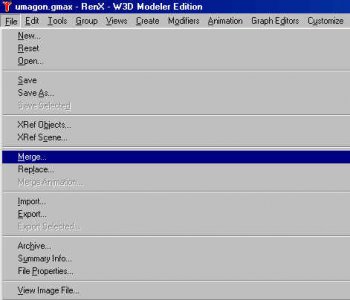
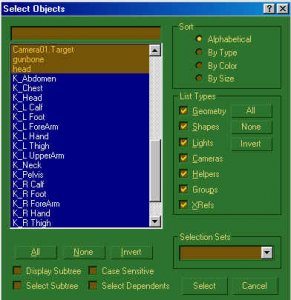
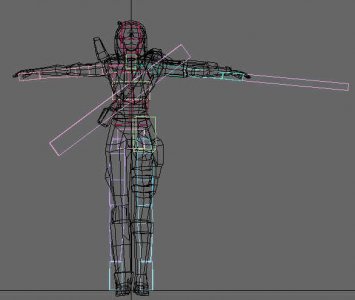
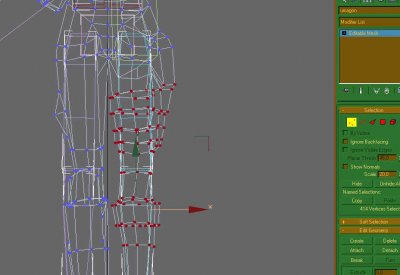
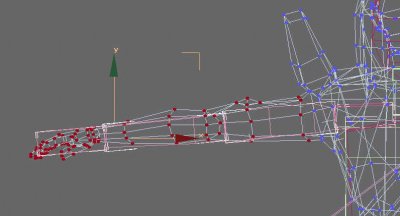
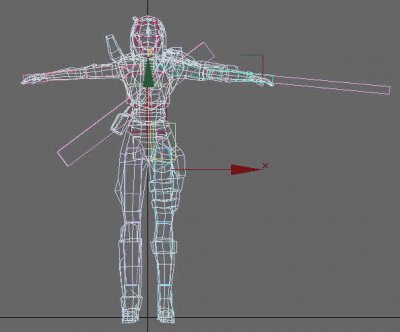
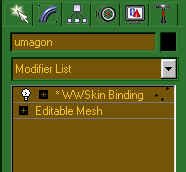
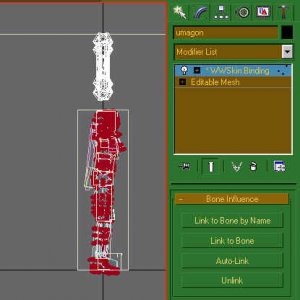
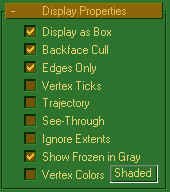
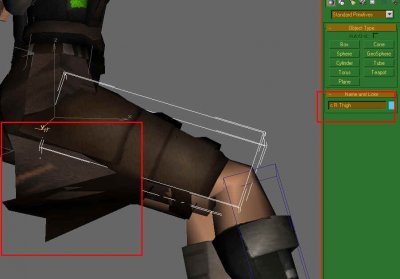
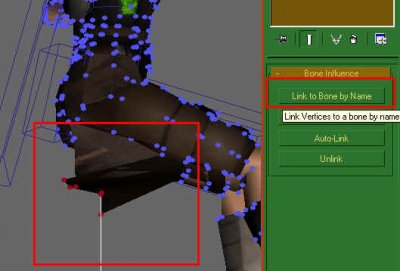
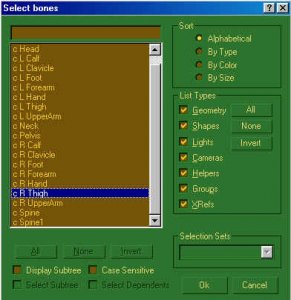
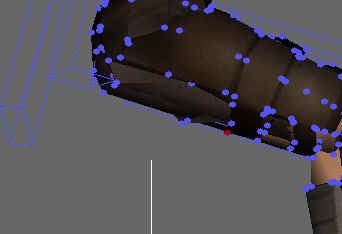
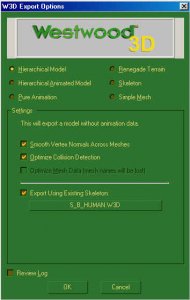
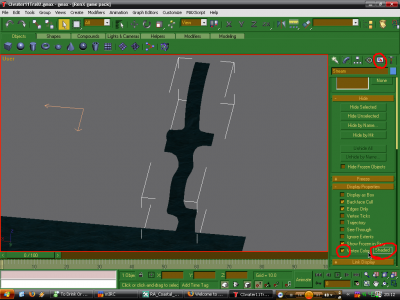
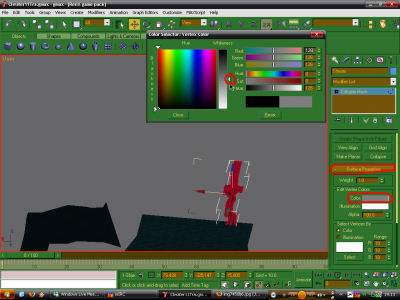
Author: Läubi Skill level: 5 This written tutorial will show you how to make your character model ready to be used in the W3D engine. Step 1 First we need our Character, here you can see the Umagon from Reborn Step 2 Then we need the Skeleton, depending on what Character-type we have, import either the Male or the Female character (Here you can download: Female skeleton, Male skeleton) Select All and press Ok. Step 3 Now we need to align and resize the character, because in most cases it will look like this: To make your life easier, you should hide all K_ bones and the old mesh, as well as the Worldboxes Try to align the character as closely as possible to fit the bones!! Step 4 Tweak up the base position, so the character fits the bones. As you saw on the previous screenshot the arms and the feet/legs don`t fit that good, so we need to align them, so hope that the creator of the model has already designed the model to fit, otherwise you'll have a lot of fun trying to align it properly It is very important that you align it as close as possible, as that will make your life a lot easier later and will reduce the amount of animation errors you later might get! Now it fits the bones a lot better: Step 5 Unhide all parts, delete the merged Head and body mesh. The female file also contains a camera object that you can delete as it's not needed. If you have not done it yet, save your work into a new file Step 6 Now we will Link the Mesh to the WWSkin (that's the small CrossBone) by selecting: and the click on the mesh and drag to the WWSkin: Now the model has the WWSkin Binding Modifier applied, we will now use this to bind the vertices to the bones: Select all vertices and press on the Auto-Link Button Congratulations, the smart part is done now Step 7 Time for fixing errors, or did you think it is THAT easy??? For better working on the next steps you can again hide all the K_ Bones the Worldbox, the select all the c_ bones and activate the Display as Box option: Now move the animation slider to Frame 1. You will notice that your Character moves. Move through the different frames and watch out for any misaligned faces. Select the Bone the faces "should" be aligned to. Here it is the correct bone, write it down, or remember it, and select the misaligned faces, and click on Link to Bone by Name: Find and select the bone the faces belong to: Press Ok and if your faces are aligned right, well done. Repeat these steps until all faces are aligned correctly. Step 8 - Export your final result Export it with following Settings: Female Characters use S_B_Human as existing skeleton: Male Characters use S_A_Human: You find the needed Skeleton Files in the corresponding folder from where you have merged the skeleton file. Now you can test the Character In-Game and see if there are any other problems you might need to fix. Have fun on your hard way!


-
W3D Hub New Members Introduce Yourselves Here
moonsense715 replied to Einstein's topic in Off-Topic Discussion
Please don't do this to Sarah. Thank you. -
Let me ask a question. What plus/advantage do you gain with this? Not posting for a while and not being able to post AT ALL are different things. This seems like an "oh yeah? fuck this" sudden reaction to that other thread's moderation. The hiding posts approach will change. But unlike Facebook we don't use your profile information so you don't need to nuke your account as maybe even today evening you will change your mind and then it would be still here instead of "welp, too late". Deleting your profile will also cause you not being able to log in to the launcher. You have a good knowledge of W3D as I can see in all the threads you posted in, all that is welcomed here. I liked how you contributed to the knowledge central and you helped Shnappz a lot. If you want to share a piece of your mind, send it to me in PM.
-
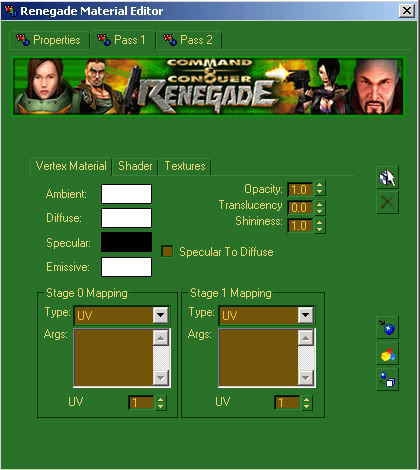
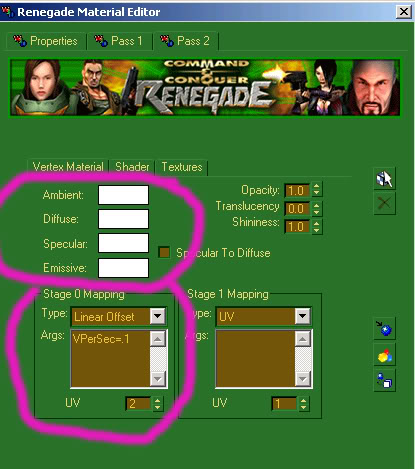
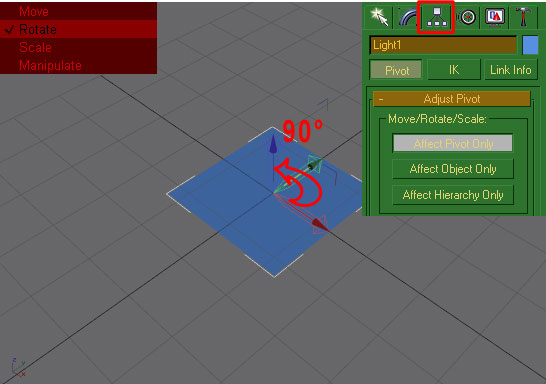
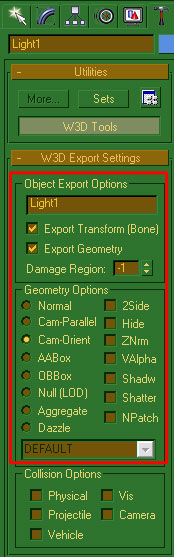
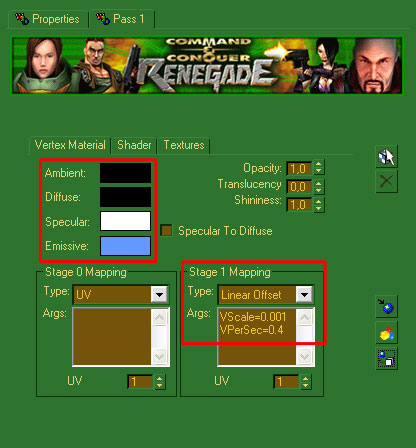
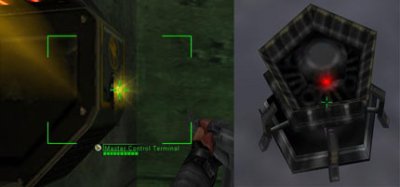
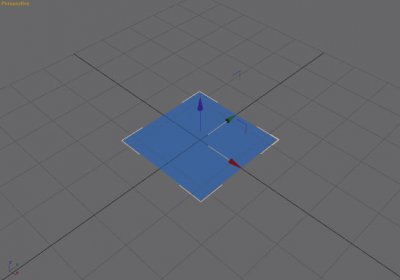
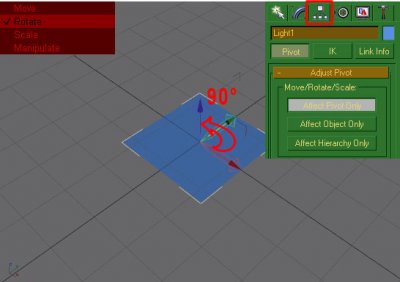
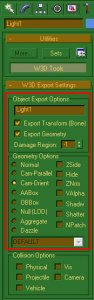
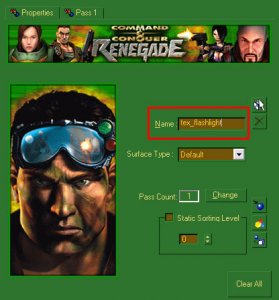
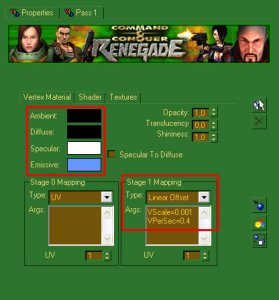
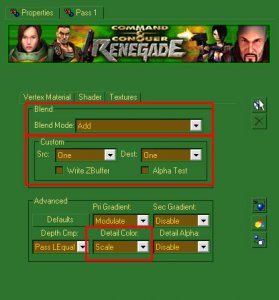
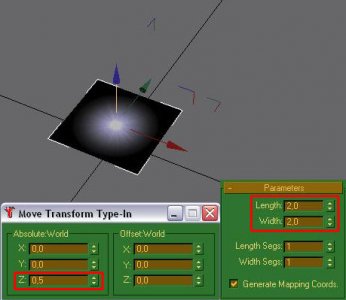
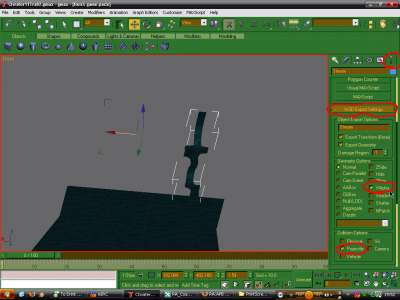
Author: Slave, Raptor-RSF Skill level: 3 In this tutorial you will learn how to create basic (flashing) lights in renx or 3dsmax. In the example above is showed the flashing light explained in this tutorial. It works the same as the basic lights, seen on the Ion Beacon and MCT's but with some additional settings. Step 1 Download the Tutorial files. Step 2 Open renx or 3dsmax and create a plane (size doesn't matter). Step 3 Rotate the Privot -90 degrees on its y-axe. Step 4 Modify the setting in the "W3D Export Settings" rollout as shown below. Step 5 Set up the texture in the "Renegade Material Editor". To edit the light color just click on the "Emissive" colorbar to modify it. Step 6 (optional) You may rescale the plane to 2x2 meter and lift it to 0,5 meters for ingame testing. Step 7 Export the file as a normal "Hierarchical Model". If you want to test your flashing light in the game, just save it to w_c4-p.W3D and place it into the renegade "Data" folder. Run Renegade and look at the Proximity C4 (landmine) while its on the ground. Warning: Renaming the file after export may result in errors and game crashes. Adjusting the lightflash - If you want the light to have a faster flash, just edit the "VPerSec=..." Argument. - If you want the light to have a different flash pattern, just edit the gradient texture. The flash pattern moves in the direction of the red arrow: Credits: - Slave (Knowledge of the flashing light and creator of the gmax file) - Raptor [RSF] (Writing this tutorial)


-
For a first attempt it looks very nice. I like your tank model as well
-
Author: Di3HardNL Skill level: 2 Allright this tutorial shows how you can make a sound object which you can attach to an object (Like vehicles,structures and weapons) Open W3dviewer - Click 'Sound' and then Create Sound Object - Name the file however you like best - Browse for you MP3 or WAV files (put them to your LE project folder or your game's Data folder if they are not inside always.dat) - Play around with the settings untill you think its good, you can always change it afterwards if it isn't what you wish. - Export the Sound Object. Open RenX - Create a box and name it however you named your Sound Object file. - At the W3d settings of this box only select 'Export Geometry' - Below the Geometry settings select 'Aggregate' - Then LINK the box to some object which you have opened in RenX. Export and enjoy If you still can't work it out PM me on www.renegadeforums.com Slave was the guy who explained it on renegadeforums.com, so he takes the actual credits.
-
4 - Competent Using existing hand animations on custom weapons
moonsense715 posted a topic in Weapons
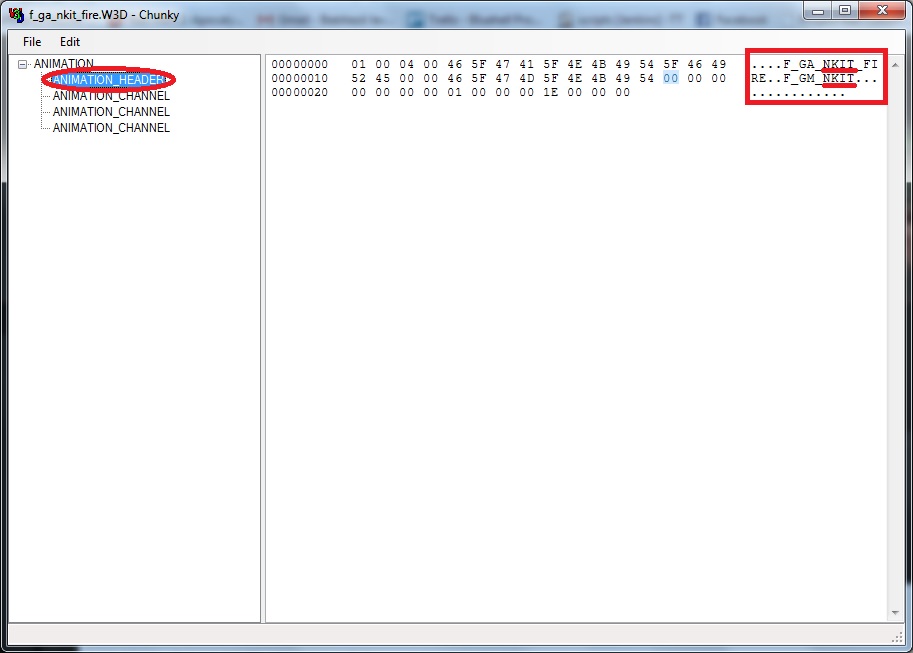
Author: Oblivion165 Skill level: 4 In this tutorial I will show you how to use the original Westwood weapon animations on your custom weapon. It works for any weapon in any W3D game though, not just the Renegade ones. For example, some of the TS: Reborn weapons were animated this way. Step 1: Load Renegade (or any other W3D game) and find a weapon that fits your guns style. The Nod laser rifle from Ren is a safe bet because it uses the most generic reload animation. Step 2: Using RenegadeEx (or XCC Mixer), extract all the animations associated with this weapon. IE: f_gm_lsrr, f_ha_lsrr_(enter/exit/fire/idle/reload), w_lsrr, w_lsrr_b Step 3: Rename all the ANIMATION filenames (f_ha = hand animation) to your weapon's 4 letter abbreviation, in my case with the thompson from Roleplay 2, to f_ha_thom_enter and so on. Leave the gun model parts alone. Step 4: Open these files in your favorite hex editor, if you don't have one then I would suggest UltraEdit. In each file, find and replace all ascii (text) that says LSRR to THOM. (replace THOM with your weapon's 4 character abbreviation) Save all files with these changes. Alternatively, you can download and use Chunky, which was designed for w3d. Open the files with it one by one, expand ANIMATION and select ANIMATION_HEADER. You can rewrite the 4 letter abbreviations on the right side panel, highlighted on the picture. (If your keyboard switches to Insert mode, you can switch it back to normal by hitting the Insert key on the keyboard) Once done, save the file with a new name that fits your weapon's abbreviation and continue with the next animation file. Step 5: Import the original weapon model into RenX using the W3D Importer. (Start with f_gm_lsrr) -Select all the bones around the model and uncheck export geometry. -Merge your new model into Renx (with the imported weapon still intact) and line up your model to fit over the original renegade model as best as it will go. Hide or delete the original model (NOT the bones). -You may wish to change the box named "mz_lsrr1" to something more related to this Thompson, you can find all the muzzle flashes using RenegadeEx by simply searching for mz_. For this model I will use "mz_chain3", this chain gun muzzle flash matches this Thompson much better. -Export as f_gm_thom and repeat for the w_thom and w_thom_b versions of the model. (W_thom_b will not need any of the bones.) Step 6: Create the weapon presets in LE and test in game, you may need to move the weapon model around to get it to fit in the players hands just right. Enjoy.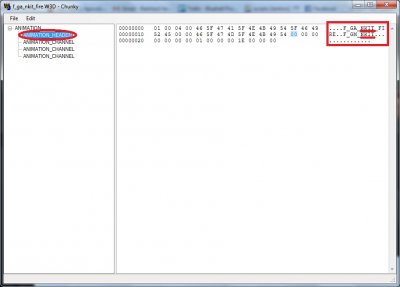
-
W3D Hub New Members Introduce Yourselves Here
moonsense715 replied to Einstein's topic in Off-Topic Discussion
Good to see you're still around man. -
2 - Novice Shiny Texture in RenX/3ds Max
moonsense715 posted a topic in Modelling, Unwrapping & Texturing
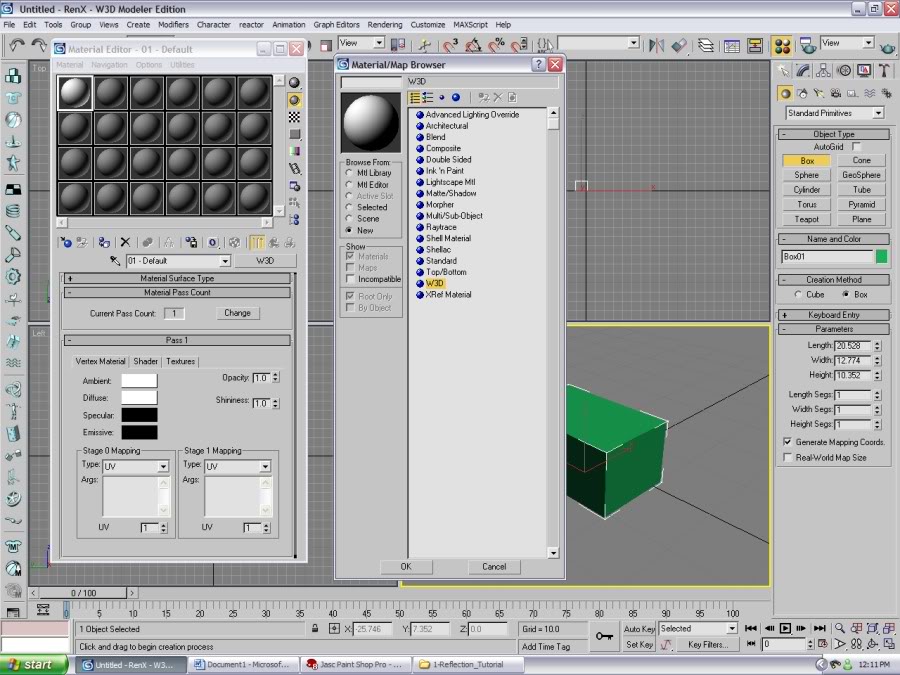
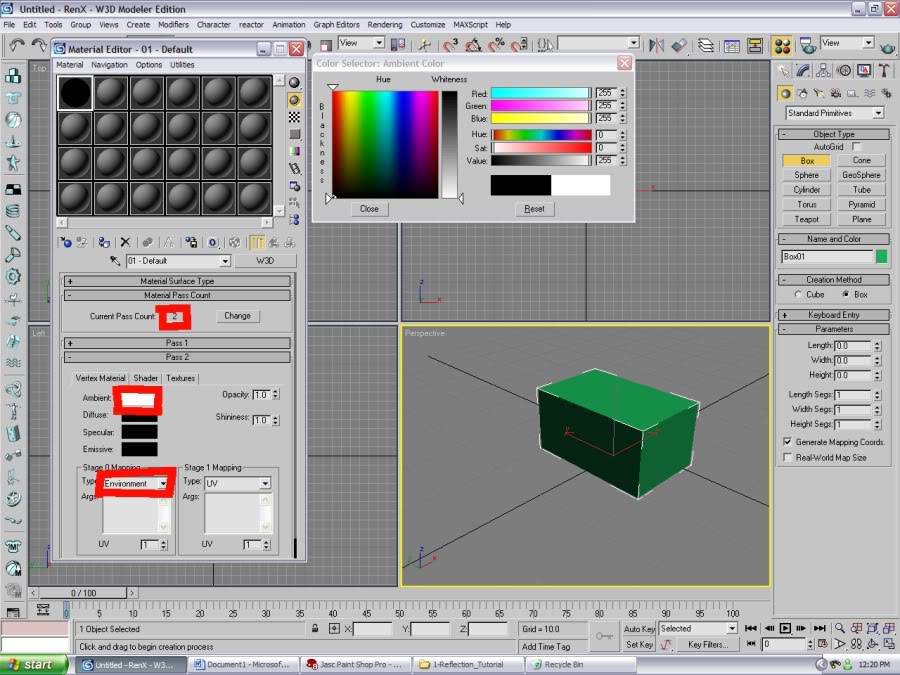
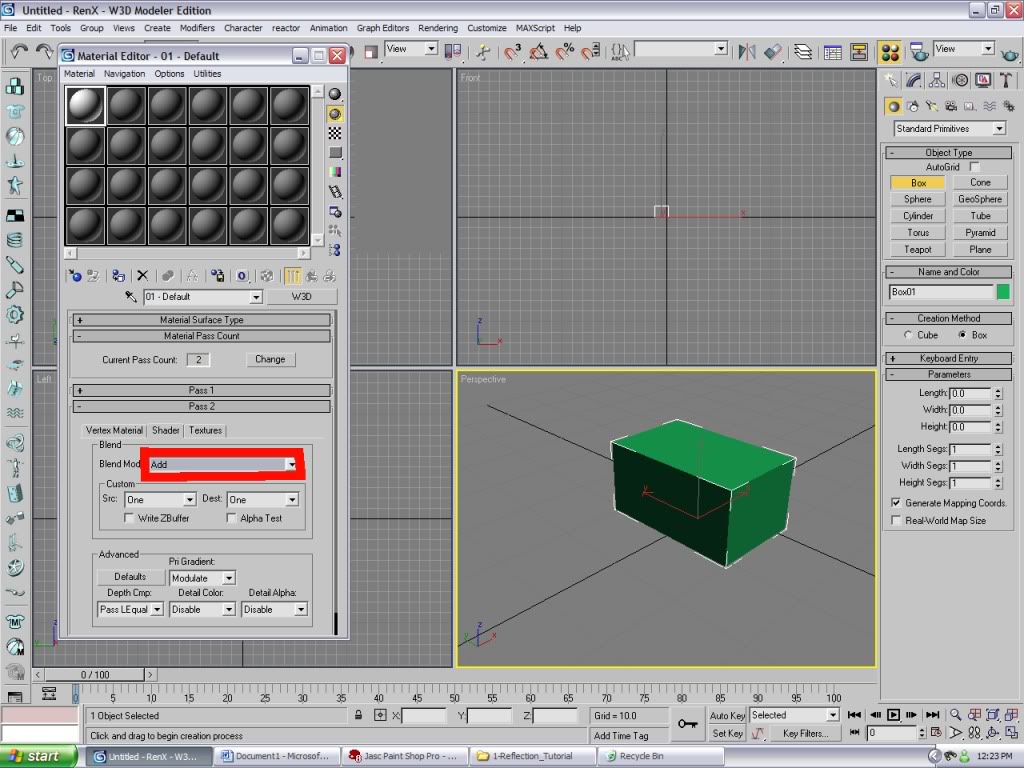
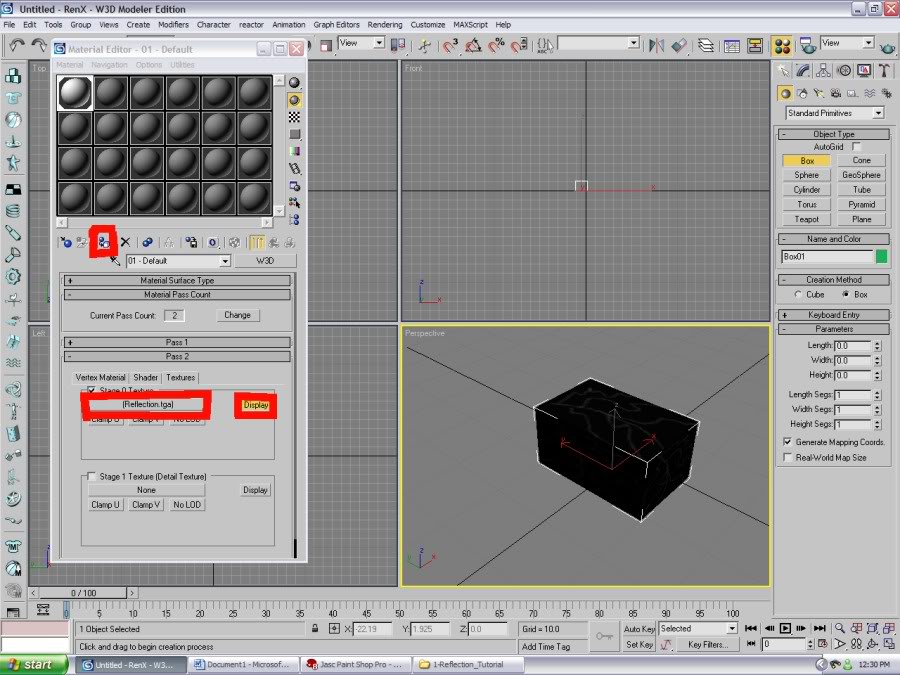
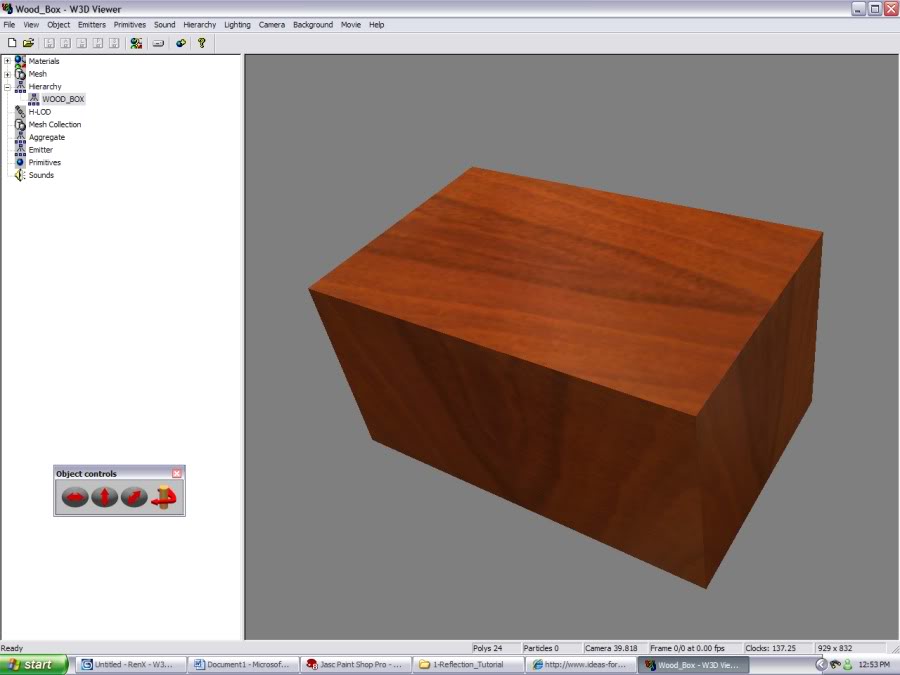
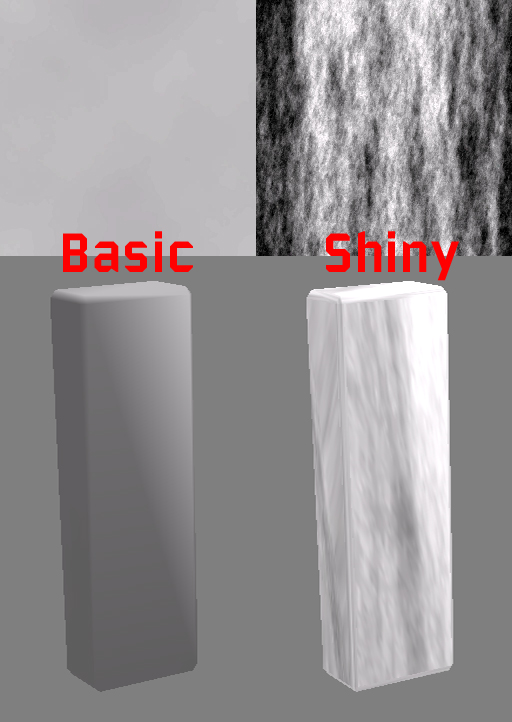
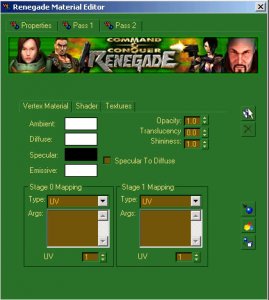
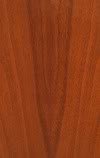
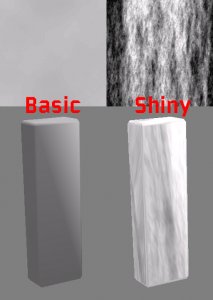
Author: Wub Wub Skill level: 2 This is a tutorial to make textures shiny, a.k.a. fake reflective. For it I will be using a simple reflective texture and a simple wood texture. You can get more advanced as you get more skill but for now I will tell you the basics. Here is a basic reflection: Here is a basic wood texture: Now, open both of them up in photoshop (or paintshop pro) and save them both as .tga Save the reflective one as Reflection and the wooden as Wood Open 3ds max and make a box any size. Now click on it and push m to open material editor and goto the w3d tab: Change the pass count from 1 to 2. On pass 2, change the Ambient to white (255, 255, 255) Make the stage 0 mapping from UV to Environment Now go to the Shader tab right beside the Vertex Material tab and change the Blend Mode from Opaque to Add Go to the Textures tab right beside shader and click on Stage 0 texture box and then click None and open Reflection.tga file you saved earlier. Hit display and click the box and then assign material to selection The box should now be black with faded white lines Now to apply the background texture. Go to Pass 1 and go to Textures Click stage 0 mapping and then click None and open Wood.tga you saved earlier. Click Assign to material again. Go to File and export as Wood_Box.w3d in the format of W3D Asset Make sure you put eh w3d file in the same folder as Reflection.tga and Wood.tga or else they wont show up. Click on Wood_Box.w3d file and it will go to w3d viewer. Go to hierarchy and click wood_box. A wooden box should now appear and if u move it around u should see the reflection Here is the finished product: Bonus section Here's another example: The basic texture is a regular 1 Pass material, and the shiny one has the reflect texture added to it as per this tutorial.


-
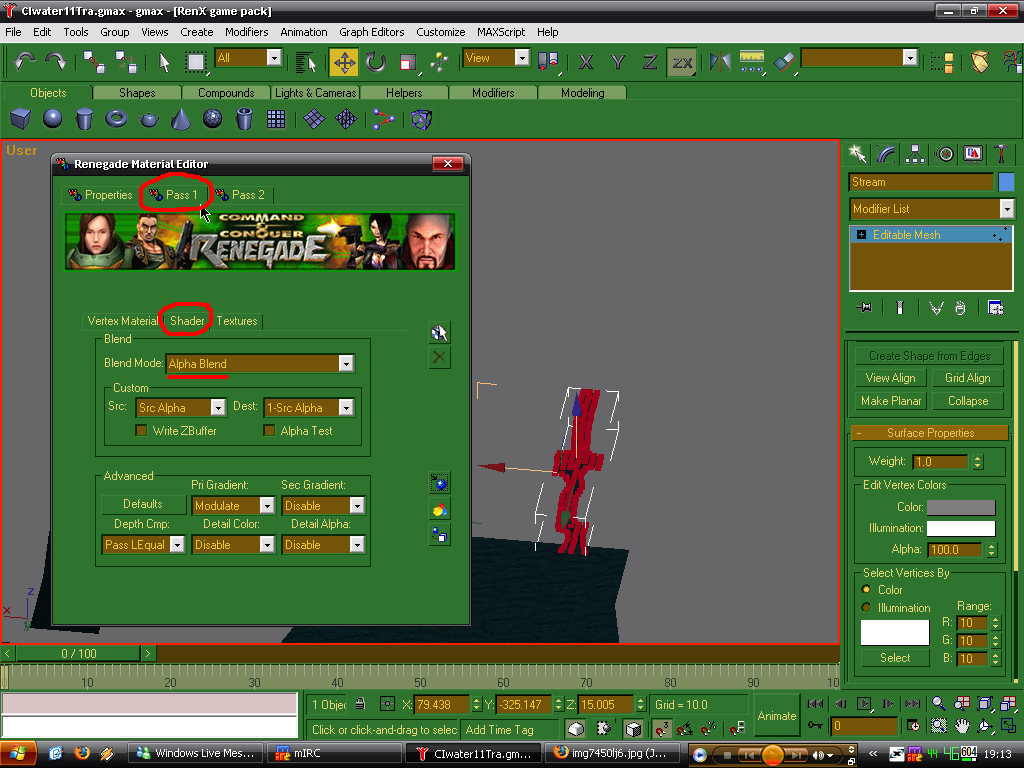
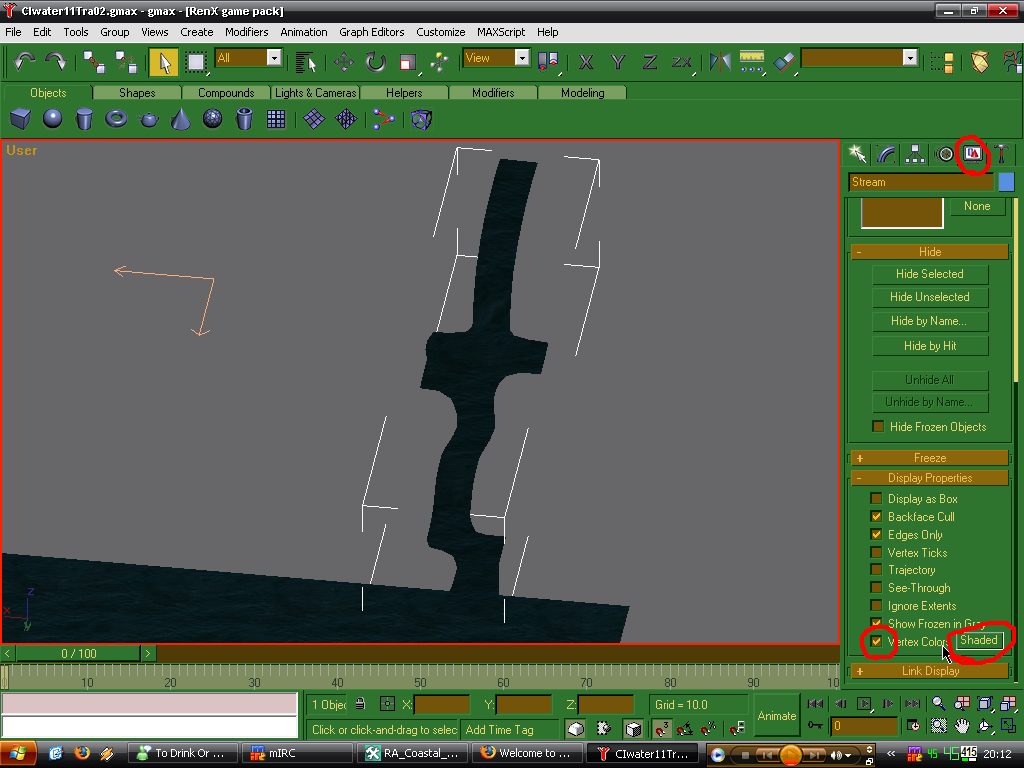
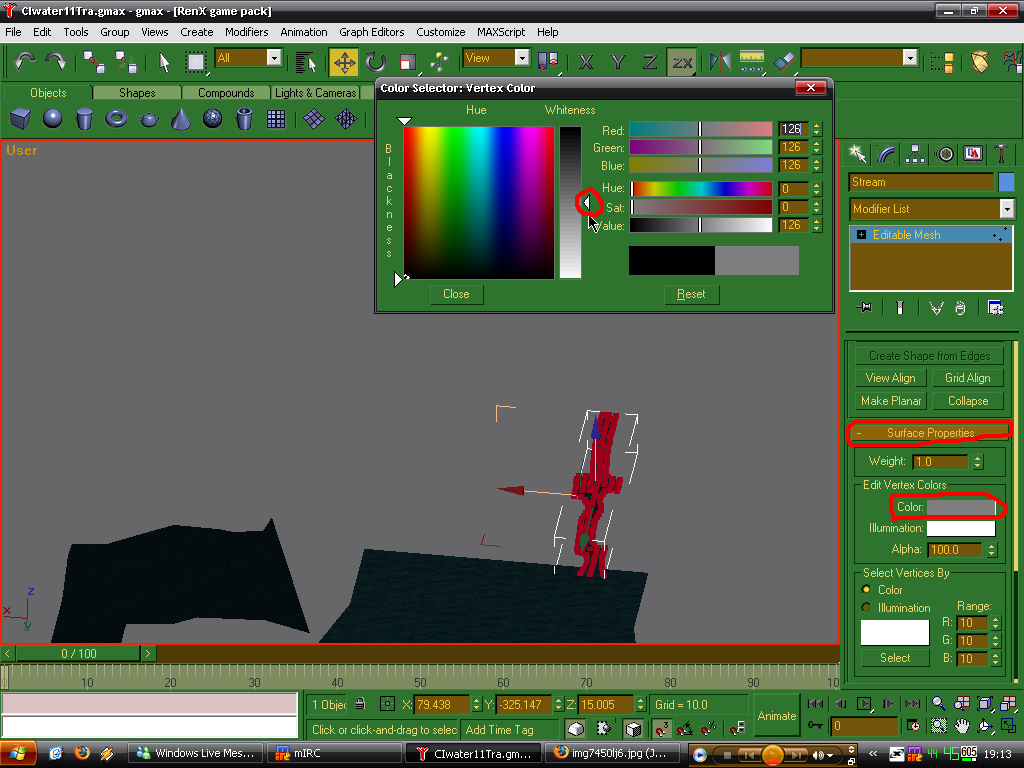
Author: r34ch Skill level: 2 RenX Stage OK This tutorial goes through how to make the realistic water from the link below, translucent. So I'm guessing you've already set up the water plane with the tutorial below *Hint* Realistic water tutorial OK so select the plane you want translucent. Hit 'M' to bring up the material editor. Firstly in the properties tab, make sure you have ticked static sorting and set it to 1 (should do this by default) Otherwise the water will seem to flicker at different angles. Also set the material type as "Water Permeable", so projectiles go through it. There should be two passes from where you set up the realistic water from the tutorial linked above. Click on 'Pass 1', then 'Shader' and change blend mode to 'Alpha Blend'. Leave everything else. Click on the little TV screen. Scroll down to find 'Vertex Colours'. Check this. Click on 'Shaded', This will mean in the next step when you colour the vertices they will change colour in renX. (just helps to see) Change to edit vertices so the little blue cubes appear. Select the cubes in the areas you want translucent (or select all if you want it all translucent) Scroll down to 'Surface Properties'. Click on colour and change the colour to Grey (halfway) This will make the water translucent but will still keep the water effects (i.e. not make it completely translucent) Click on the hammer to see the W3D settings. Open up W3d export settings and click 'vAlpha' so that the game renders the alpha blend (and so makes it translucent) If its the sea your doing, click 'vehicle' so boats and subs can use it. Also click 'projectile' so projectiles leave splashes, but make sure the water is set to 'water permeable', otherwise boats can't hit subs. Notes When making a level in renX, anything that is made translucent like in this tutorial must be saved on its own as a different file, and deleted out of the original file. I.e. 'MyMap' would contain all the terrain etc, but the water deleted. 'MyMapWater' Would only contain the water from 'MyMap', no terrain. LE Stage Now when you go into LE and 'make' the ground and water separately, both can be toggled hidden within LE. When you are ready to compute vertex solve, click the instances tab and deselect 'MyMapWater'. This will 'hide' the water in the level in LE. Now compute vertex solve while the water is hidden. Once the lighting is done, check 'MyMapWater' again to show the water. Save. Export to mix. If you do compute vertex solve with water on your map in LE, it will turn white. Many thanks to Raapnaap - For basically showing me how to do this, so he deserves most credit. I just wrote it up and took pics to help other people. r34ch

-
I'd prefer the Ren Officer's yellowish glasses if you go with that. http://vignette4.wikia.nocookie.net/cnc/images/6/61/Renegade_GDI_Officer_concept_art.jpg/revision/latest?cb=20130917031628