

Raap
-
Posts
1,636 -
Joined
-
Last visited
-
Days Won
67 -
Donations
0.00 USD
Content Type
Profiles
Forums
Events
Documentation
Bug Tracker
Downloads
Everything posted by Raap
-
One of my long-standing W3D 'pet issues' (see wut? yes you did! good boy), has to be how teams are essentially hard coded. Everywhere you look the game keeps referring to GDI and Nod, and I'd absolutely love it if we could simply refer to Team A/B/C/etc as well as un-limit the team limits, purchase roster limits, spawn limits, HUD limits, etc. Essentially while removing restrictions I'd love to keep the engine and tools themselves "game neutral", to make it more approachable by other people. We'd be one step closer to having an "engine package" that doesn't scream "2001 Renegade mod". @Mezmerize I do think AI controlled dogs is the most logical option, if we had to have dogs. As for the purchase method, APB abandoned separate terminals (exception: A-Bomb due to code limitations). However, W3D 5.x AI is a lot smarter than W3D 4.x (which IA is based on), I'm sure @moonsense715 would be able to spawn a purchased unit (in this case a dog) at a pre-set Kennel and move to it the owner. He can answer that better himself, however. That still leaves the question; What niche does a dog fill? Spy-sniffing? AP mines make this redundant - unless spies no longer trigger AP mines? And in that case (and as you already said), you need to be able to tell a dog to 'hold position' so it guards a certain radius with target priority on spy/thief units. I do worry that it might make the game a little more confusing to new players, though. So at the very least, the controls have to be very intuitive, or not be done at all.
-
I just find it tasteless, is all. As for shape shifting, it is a harder thing to sell. The main problem here is that the infantry physics are too limited, it results in the whole process of shifting into a dog and controlling it to feel significantly disconnected from the game.
-
I don't see how it adds anything meaningful to the game. You're playing a soldier, shape-shifting into a dog feels out of place. I could see it possible as an AI unit that you purchase and it follows you around (until you enter a vehicle, then it goes away), but playable? Too many issues from aesthetics, to immersion, to gameplay. You'd need a whole new infantry controls and physics system to support it properly, such as support for forward-strafing movement animations. Further more you'd be crossing into AR territory too much. Personal opinion: dogs are the least fun AR 'infantry' unit at the moment due to all the various issues that come from controlling them as well as their unit role simply not being very fun (especially not on the receiving end). Lastly, another personal opinion; I know it is a game, but I never feel good about killing animals. I feel that games which do it go from "funny" to "couldn't they think of anything else?".
-

A Path Beyond Codename: Midnight Update!
Raap replied to Coolrock's topic in Red Alert: A Path Beyond
The water bowl receives extra damage. I think dogs will remain an AR exclusive. I think they'd be an odd fit for APB, gameplay-wise. -
A Path Beyond Codename: Midnight Update!
Raap replied to Coolrock's topic in Red Alert: A Path Beyond
And someone else to make it! I'm not going to say that I'll never do an APB map again, but my track record hasn't been good for APB Delta. I can deliver a level, it can even be a good looking one, but I am not in sync with the current player base and the meta that it has embraced. I'm also kind of waiting before starting a new full-blown level project again. They are time consuming, and I'm on hold until some W3D tech advancements are implemented before looking into it again. Hopefully, soon. Edit: If you truly need a naval map, and @Pushwall hasn't finished HW 5.0 yet, as a short term option he can opt to re-include the current HW but with the iceberg objectives disabled. It won't have an airfield though, which I guess makes this a hard sale. -
A Path Beyond Codename: Midnight Update!
Raap replied to Coolrock's topic in Red Alert: A Path Beyond
Looks much more intimidating. 😱 -
News EA announces interest in remastering Command & Conquer games!
Raap replied to OWA's topic in Community News
Ok, so they produced one decent title, out of 10+ complete flops? AFAIK the star wars game was also the first one they created? Either way they ran out of competent developers and creativity after that. As for a Renegade remake, I seriously think that Renegade is the only title they would never remaster. Firstly because they are building a team to remaster the RTS games, this is a vastly different genre compared to FPS. Secondly, Renegade is arguably the most "re-mastered" game out of all the C&C games, having seen the largest amount of community development via scripts, black hand, and tiberian technologies updates over the years. It saw a re-creation in unreal, and the engine itself is still being worked on even now. I seriously doubt EA could do it better if they had to start over with the 2002 (?) final-patch Renegade iteration. I think a lot of us forget that stock Renegade is... very, very old, and it did not age quite as well as the iconic 2D RTS games. -
A Path Beyond Codename: Midnight Update!
Raap replied to Coolrock's topic in Red Alert: A Path Beyond
Ah, well then I hope the pods are re-designed to make sense. Where do the missiles originate from in the current pods? The piece holding the pods isn't big enough to have a missile transport system in place. I think it would be infinitely more neat to have the missiles fire UP and OUT of the submarine deck, like they do in the real world. I think the PT's could do with an update regardless but that's just my 2c. I'm mainly just very against the idea of baked texts. My belief is that all texts should be in a localisation file. It's one of the main issues I currently have with a lot of the non-Dan scripts in 5.x; They use text as a raw parameter input instead of referring to a string ID, this makes localisation impossible without altering the game client/levels. With text removed from the purchase images, you are left with more space for the image. -
A Path Beyond Codename: Midnight Update!
Raap replied to Coolrock's topic in Red Alert: A Path Beyond
I like the axing of the Missile Sub "pods", they always looked extremely weird even by Red Alert standards. Taking some artistic liberties with units is always fine in my opinion, when the outcome makes more sense. As for the botes, kinda makes me wish we had new water based vehicle physics. Edit: I presume the renders will function as purchase icons? Would be nice to have those for all recently updated vehicle units. -
News EA announces interest in remastering Command & Conquer games!
Raap replied to OWA's topic in Community News
They also never made a single good RTS title, and the stuff they create nowadays isn't even worth mentioning. They got lucky with C&C. -
News EA announces interest in remastering Command & Conquer games!
Raap replied to OWA's topic in Community News
Using TS/FS as an example, I believe a re-master should include, but also not go beyond: Updated art assets that match the existing aesthetic. For example they could update all the TS/FS vehicle 'models' to be more consistent, as the ones the game shipped with were very hit and miss in terms of appearances. Updated environments to include more varied assets that match the setting. This including fixing the later FS campaign missions which Westwood rushed to the point where the very final missions were just a raw terrain layout with no props. Update audio by adding additional effects and improving the less good ones. Redone music. As much as we love Frank's old tracks, new tracks would be a more worthy addition. Updated cutscene quality by using less compression and better resolution scaling. The old cutscenes should NOT be remade (this would simply cost too much and risk losing a lot of the 'charm' of the games). Update the engine to make use of modern OS's and technology. This is no doubt not an easy task and likely involves re-writing a lot of the engine(s). Update long standing issues such as unit pathfinding and better matchmaking for multiplayer. Update long standing game and content issues that most people did not enjoy. For TS/FS mainly the Hunter-Seeker droid comes to mind. Moderately enhance the game with gentle additions such as properly enabling the 5 TS/FS Tiberium types, and allowing random meteors and ion storms to occur without having to edit ini files. It could also be a great opportunity to add axed features, such as the day/night cycle and buildable light posts/spotlight towers. UI enhancements. Last but not least, a re-master, if proven successfull, should include an optional paid-for expansion pack that adds content akin to traditional expansion packs (campaign, new units, new game modes). For TS/FS specifically it could bridge the gap to C&C3, but also present the opportunity to retcon some unpopular decisions (lack of Tiberium life and CABAL, and the near-removal of the Forgotten in C&C3). Core gameplay and aesthetics should remain the same. -
Been too long since a proper update, Delta's been out for literally 10 years! Bring on APB Echo! APB Echo! APB Echo! APB Echo!
-
So now you'd have to figure out his fee for a custom track set. Problem is he would probably charge more than most of us could afford for a completely new album. The ideas of 'licensing' his solo albums came to my mind as this should theoretically be cheaper.
-
Over the years of on-and-off working on W3D art (which is also the bulk of my 3D work since on other projects I mostly did other tasks), I learned something shockingly simple; The primary limiting factor in what you can create, is merely your own imagination. Step back a moment and consider what it means to acknowledge that whatever you create is defined purely by you. For starters, you can drop the notion that you are to follow arbitrary limitations imposed upon you by the engine you are working with or some vague design restrictions. Once you focus purely on what you can create, you will easily change your way of thinking away from seeing limitations as "not allowed" impassable barriers, but towards simply challenges to overcome. So my advice to you now, is to get an idea in your head, ignore everything else that concerns you in regards to pulling it off. Just start working on it. As your mastery of the tools improves so will your results. And when you have a segment of your idea that you are not sure how to handle, just google it using terminology you think is appropriate, you'd be surprised by what you can find out there. And every time you learn a new method, that is knowledge gained which makes repeating that process easy in the future. I know I am sounding very cliché here! Some of you probably read this while rolling yours eyes in real life thinking "Sure Raap, whatever!", but believe me sometimes cliché's exist for a reason, there is often some truth to them. So stop being worried about what you cannot do, and start learning how to bring your ideas to life, one step at a time. On a personal note, I did not learn everything I know from trying myself or looking at W3D projects. Even when I wasn't actively modelling anything for years I was still "learning" how to do things by always looking at what other people (other games) created.
-
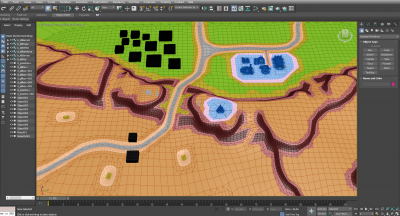
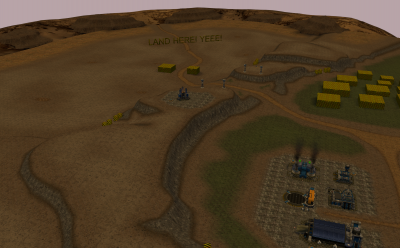
Working on these things can indeed be a great escape as you are mentally quite involved in the work! Sometimes too much and you forget to do silly things, like eating and sleeping. But as Moonsense said, you are going to make it extremely hard on yourself if you use a mesh such as what you created as your baseline. I suggest an alternative approach; Create a plane mesh that represents the total scale of your level, including backdrop space. Place your base building proxies in the spot where you want those to exist (not exactly, just in the area based on your on-paper design). Optional: If you have a concept art, place it in the viewport background and place your building proxy meshes based on the design location using top-down viewport mode. Based on the length and width of your level and plane mesh, increase the plane mesh polygon count. At this stage, a good measure is about 1 polygon per 10 meters. So if a plane mesh has a 600m width, 60 polygons wide is a good starting point. If your level uses additional key props, place a temporarily object that represents those in the scene, to help you maintain your sense of scale. Convert your plane mesh to editable poly. Editable mesh is not ideal for terrain tasks as the tool set differs. Further more if you are using 3DS Max8, the Polyboost plugin only works with editable poly mode. Based on your design, expand editable poly on the right side menu and use polygon selection, then select all polygons that represent low hills or mountains, then use the extrude tool to raise these by 10m. Next, while keeping the polygons selected in polygon selection mode, switch to edge selection mode and select the outer edges of this new elevated platform, one side at the time (north, east, south, west), and move these edges inward by approx 3m. This is important to avoid 90 degree cliffs later on. Return to the polygon selection mode, un-select the polygons that are already representing your intended lower hills, and now only select the polygons intended for your higher hills. Repeat the prior steps for this next elevation and for any additional elevators you require. Likewise, if you need a lake, do reverse extrude but just use more angled edges. Your level will be very flat at this stage and we do not like that. So now, go to vertex selection mode (the blue dots), and on the right side menu expand soft selection, enable it, and set the selection range to approx 40m (this can differ per level, you will need to experiment with what looks best for yours). In the viewport, rotate your view to 45 degrees on your plane mesh, so that you can see the rows of vertices line up. Then, selecting entire rows at once (one row at a time), apply a gentle wave effect in your entire level, the amount can varry based on your level location. Rolling grasslands can be quite uneven, where as urban levels are mostly flat. At this point you will have a very rough shape of a map consisting of what looks like a bunch of boxes with some ramp-like surfaces on sides and some basic un-flattening waves, with key assets like buildings in the area you want them to eventually be. Before proceeding, we need to clean up a little. On the outward edges on your initial plane mesh, you will see polygons where you extruded up or down, facing away from the level. Find and select all of these for removal as these will only complicate the mesh work there and add unwanted polygons. It is important that you save this level and make a backup at this very specific stage as in the next few steps we will be altering this mesh dramatically with a few simple actions, and it is possible that those actions result in a mesh you do not like (for example, ramps could turn out not the way you envisioned), and having a backup means you can always go back to this point and make edits to the rough mesh shape to make the following steps apply differently to them. Next, select all polygons that will represent your cliffs, with the exception of the polygons that touch the mesh outer border, and on the right side menu, look for the Mesh Smooth button (also shortened to M.Smooth on some resolutions). This will make your cliffs or hills smooth by adding additional polygons to your selection. It is important that you do not select your entire level and apply this to your entire level, doing so would add polygons in places where there is no need for it. Effectively what you're doing here is manually LoD-ing your terrain mesh by adding detail where it is needed and seen, and nowhere else. Repeat the mesh smoothing in all areas you previously extruded. Note that with some experience you can use these steps to help mesh out things like roads as well. This is why you made that backup, you can always revisit your layout in a re-do, since updating your level layout is much easier when dealing with just 1 polygon per 10 meters, as opposed to 10 polygons per 10 meters. Assuming that at this point you are satisfied with your overal terrain mesh shape, and knowing that this is the geometry (untextured) people will walk around on in-game, save and proceed to the next parts. Now comes the part where we divide your terrain mesh into various segments based on a logical set of choices for alpha blending. Alpha blending and texturing in W3D is done using the Max8 W3D material plugin, but for this quick guide I am going to assume you know how to do this. I will note however that you should always aim to set up your material editor list in a clean and logical way, with a good naming convention and logical flow, unless you like to stab yourself a lot while working with this moving forward. For example, if your Main_Grass material is your primary grassy field material, consider what will surround this specific material - yes, a transitional material that goes from grass, to not-so-grassy-terrain like rough ground, so your second material will be Main_Grass_Transition. What comes after that? Whatever connects to that transition on the other side, so your Not-So-Grassy-Terrain_Transition is next, which leads up to yet another material that could be your Main_Cliffs, and then those cliffs have a top surface, so you will want a Main_Cliffs_Transition next where that funnels into a different type of uplands grassy material... and so on, and so on. This is how you create very diverse terrain in a very work-friendly way. Having cut up your mesh in logic based on my above example, you will end up with something looking like this; Next, assuming you applied your materials to the appropriate meshes, select the borders of your meshes. A quick way of doing this is using the border selection mode, select your mesh border, and then holding left Ctrl and switching to vertex selection mode, this will then select all your border vertices, and allows you to quickly change the RGB value of your selection to black for alpha blending to work. If having trouble seeing your results, select all terrain meshes, right click in viewport, go to object properties and enable "vertex channel display" near the bottom-left. Fast-forward, and you will have your mesh textured. I have skipped how to actually do material texturing with alpha blending efficiently because that in itself is a long topic as well, but at least this is a good way to begin creating levels with, and you got to start somewhere! Edit: If curious the above example image when textured ended up looking like this; Unfortunately and as is the nature of development, the level was not used due to the design it was based on being... not fun to play. So take this as a bonus lesson, make sure your design is sound before committing time into bringing it to life! Also note I am on Discord a lot, feel free to poke me with questions, we can grab a voice channel and talk about whatever you need to know!
-
That only happens to me very occasionally and due to simple server stress. Rubber banding in any form is entirely ping related and mine to the APB EU server is never above 30. It can also happen in locations with weird collision detection though, for example the APB construction yard interior has since the elevator change been consistently weird about collisions. I also hope this can be improved at some point, especially for infantry, since infantry make quick and sporadic movement more frequently compared to vehicles, with the exception of the Allied Ranger - and we all know how that one handles, just take a look at Ridge Racer during a 10+ people match. But I do not believe there will be a perfect fix for this. So really, each W3D project has to unfortunately deal with providing one server per active region (which will likely always just be NA and EU). Any monetized game does this, we just have the significant drawback of having to pay those server costs out of our own pockets (or rather, the people who do pay for it, which currently does not include me).
-
Stair lag? I've never heard of an issue with stairs and I worked with them plenty. Rubber banding though? Oh yeah, that is a true problem. Fortunately it doesn't happen constantly.
-
Throw em into bluehell as a welcoming gift! All the new faces need to know this... experience. Grammar error spotted, cannot write the words "lastly" and "graphics programming" in the same sentence. Anyhow, welcome guys!
-
GIMP -> Select target layer -> Colours (top drop down menu) -> Hue-Saturation. From there you select common RGB values and change their hue, brightness, and saturation values. Be wary of overdoing saturation, colours lost are difficult to regain and therefore also difficult to alter. Other options in the 'Colours' drop down list are all also very useful but some take a lot more know-how to use right. I personally use nearly all of them, including the more complex ones like curves and levels. That stuff takes no explaining, but experience from trial and error. Believe it or not but creating a game level will actually help you figure these things out in natural pace, because in your head you will have a better idea of what you actually want, and that becomes your goal.
-
In gimp you have various colour altering tools to do what you want. So say you want to adjust all shades of red and make them shades of green, that is a straight forward operation.
-
Needs to come with an explosion of colours! (no probably not but hey)
-
Small update. I have started converting this for Max 2017, which will make finishing the mesh easier. Unfortunately, after some debate, myself and Pushwall were unable to get to common consensus on how to proceed with the level in terms of gameplay. Because the level was originally not intended for core gameplay, every decision revolving around implementing it, effectively feels like too much of a compromise in one category or another. The short version is that the level cannot properly support vehicle play due to the scale as well as object density. An idea was tossed around to separate vehicle and infantry play via lanes but this proved unpopular. No solution has been found as of yet that would please a majority of you, the players. This means that as of now, this project is more or less back to being a technical demonstration, as APB does not require another infantry map like Wasteland. I may opt to release the level as-is when finished, without official game and patch support. Alternatively, perhaps someone else is interested in having it, although the art style was intended for APB.
-
I do think cruiser motorcycles look fitting in the Red Alert universe especially considering they were designed and created between 1930 and 1960. I look forward to seeing them in-game to replace the Soviet Ranger.

-
Did hell freeze over again?
-
Where is BattleLaf? Make him prep his anus voice for the line "Our Uber-Duper Advanced Naval Yard is under a tag!". I mean otherwise it'll just get a butcher job like "Our AIR!!!!(!!!!) field is under a tag." And nobody likes that. Nobody.

