
OWA
-
Posts
5,747 -
Joined
-
Last visited
-
Days Won
260 -
Donations
760.00 USD
Content Type
Profiles
Forums
Events
Documentation
Bug Tracker
Downloads
Everything posted by OWA
-
The new w3d tools require 3DS Max 2017 to work. (tools for other recent versions of Max such as 2019 may be possible but porting and testing would be required) The new w3d tools are 100% compatible with files made in Max 8 with the old w3d tools. When you load an old file, WWSkin data is converted to Max skin data automatically. All the material settings and export flags will be read in and converted as well. Features from the old plugins not currently supported: Animation compression BFME2 FX shader chunks and associated data NPatches (hardware that actually supports this feature has long since vanished and current versions of Renegade no longer support it) Export with Std Mtls Create Settings Floater How to Install Download the plugin from here: https://w3dhub.com/forum/files/file/37-w3d-tools-3ds-max-2017-exporter/ Copy the the files in the "W3D Exporter - Max 2017" folder to your 3DS Max 2017 directory. Default: "C\Program Files\Autodesk\3ds Max 2017\Plugins" Run 3DS Max and the tools will load with it! Contents W3D Materials W3D Material Interface Vertex Material W3D Shader W3D Textures W3D Skinning W3D Importer W3D Exporter Export Options
-
I like golf!
-
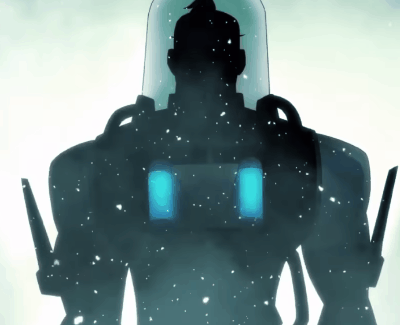
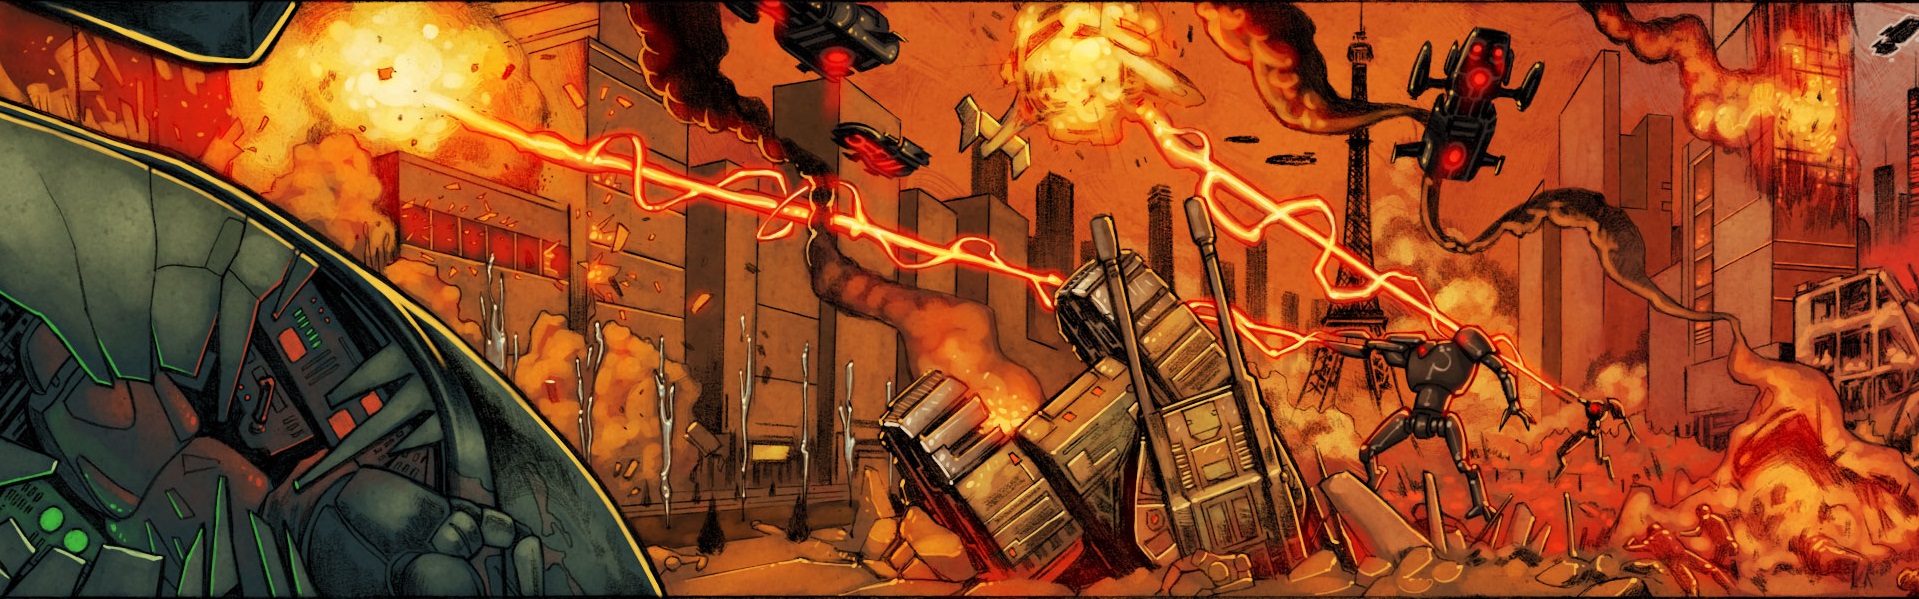
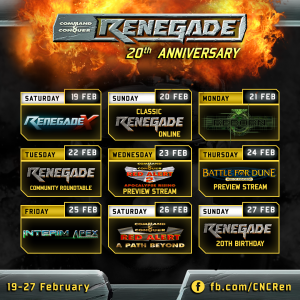
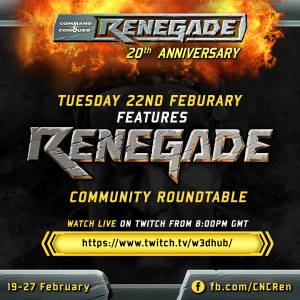
Welcome to the 29th edition of W3D Weekly! This one has been thrown immensely off track, but hey, we're here now and that's what matters! <3 Let's jump on in. Renegade's 20th Birthday!C&C Renegade's 20th Birthday is coming up at the end of this month (the 27th of Feb) and to celebrate the community has banded together to present a week-long celebration! Over the course of the next week, you can look forward to exciting streams from Renegade X, Apocalypse Rising, Battle for Dune, Interim Apex and more! Also on Tuesday the 22nd of February we will be hosting a special community roundtable event, where we will be discussing Renegade, it's history, it's legacy and why we still continue to support it to this day! We've started taking questions now, so feel free to post yours in the thread below: Scripts 4.7 Update 2 Released!The latest version of the Renegade Custom Scripts package has been released! This one has some brilliant QoL improvements, such as Discord rich presence support and a fix for the in-game Gamespy server browser menu (thanks to @ The Unstoppable for these!) Check out the full changelog here: Naval Combat Gameplay SurveyWe're still looking for your input on APB's naval combat! Have your say and let us know where it could be improved! >> CLICK HERE TO FILL OUT THE SURVEY << We'll be closing this survey soon, so make sure you get your feedback in and make your voice heard! Tiberian Dawn: Ground Zero This week, we're proud to showcase the primary weapon wielded by Nod Minigunners! We had originally planned on using the M16A3, however we felt like going in a more interesting direction rather than use yet another AR-15 variant. Introducing the QBZ-95 "Headhunter!" You've probably noticed that there is a scope on one of these renders, but not the other. That's because Minigunners will have the option to use either traditional ironsights or ACOG scopes, whichever better fits your playstyle. Battle for Dune: War of AssassinsIn case you missed it, the official trailer dropped recently thanks to the very handsome and talented @ Killing_You ! See you on Arrakis this spring! Red Alert: A Path BeyondIntel has provided us with a classified image an upcoming change in the War Factory. Two changes actually! Can you name them? Until Next Week!Stay tuned for next week's update! [blurb]Come and read the latest edition of W3D-not-so-Weekly! This week we've got some great community announcements![/blurb]
-
Hi everyone! We're having a C&C Renegade Roundtable next Tuesday in order to celebrate Renegade's 20th Anniversary! For this stream, we'd love to answer any questions you have on Renegade, the mods as well as gauge our opinions on the game and it's legacy. please use this thread to ask any questions and we will try our best to answer them on stream!
-
Overview Command and Conquer Tiberian Sun Reborn (usually referred to in the community as simply Reborn or TSR) is an extremely extensive modification to C&C Renegade. The overall design of the game follows that of the popular 90's RTS game, Command & Conquer: Tiberian Sun. This leads to all units and maps being redesigned and remodeled into accurate C&C Tiberian Sun counterparts. A game of TSR will typically include two factions named GDI and Nod fighting against each other on a map based off of the RTS game. Each team has 30 minutes to use their factions' strengths (Nod being more covert and specialized while GDI is more powerful yet slow and expensive) to ensure the complete destruction of each other through their bases or by earning points. The game as a whole has been in development since early 2003.. changing hands from Deezer Studios to Bluehell Productions and finally into W3DHub development. History (To be updated as more information becomes available.) Originally starting out in 2003 from Deezer Studios, the project was very hopeful and accomplished a majority of things given the tools available at the time. Late 2000's is when Reborn finally joined Blue Hell Productions (now defunct) to release their famed Infantry Beta. This smaller scale beta helped to pave the way for the true potential of this mod with a multitude of units being available from Tiberian Sun including the Cyborg Commando, Mutant Hijacker and Medic. However, after being acquired from W3Dhub in 2014 is when Reborn started to really take off with updates granting veteran abilities, Juggernaut artillery and vehicles abound. The server as a result typically hosted 15 -25 Players in the afternoon. Events are typically hosted every month or so currently to help bring the player base together and gain excitement for a huge new 2.0 update expected to be released soon. Gameplay A game of Reborn almost always starts out with being randomly placed on one of two teams. GDI or Nod. Each side has their own strengths but it is widely regarded that being on Nod will lend cheaper, weaker, more multi-use units while GDI will lend their technology to slower, more powerful units. It should be noted however GDI does have some specialized units as well that are not just firepower based (Such as a medic or Jump Jet Infantry). Game play for most maps follows typical Renegade style of base destruction or point accumulation for winning. In the 30 minutes from the game starting the player will be presented typically with a base offering the options to buy vehicles or infantry. Purchasing becomes a very important aspect as units are not as flexible as they are in Renegade. Only one unit and one building can repair a vehicle, while only one unit or purchasing a refill can give your character full health. While utilizing each side for what it offers, along with the features of the map, will give a player a better chance at victory, the most important aspect of Reborn immediately becomes clear where the team must work together to help make up for firepower or skills that their unit cannot accomplish by themselves. A defence can easily destroy a tank, however a whole entire base can easily be overran by simply five tanks working together. Whether or not your team works together and how they do will determine who emerges as victorious. It should be noted as well that veterancy will be gained through killing other units in-game. Compared with A Path Beyond, Tiberian Sun Reborn lends a higher importance on teamwork. Whilst every unit is powerful in their own right, there is not a single unit that can strong arm and take over the others base (besides the Mammoth MK.II). This means that rushes comprising of multiple units will be your best bet into destroying the others structures. Typically games that do not end with base destruction will come down to the final minutes for point accumulation and be determined by which team has more, thus increasing the pressure as time counts down. Current State The game is currently monitored and updated by the staff at www.W3Dhub.com. The game is also being developmentally lead by staff member "Wallywood" and in a consistent state of being updated for better game play based on feedback from players. As of recent the game has been updated to 1.5.2 but is expected to go 2.0 soon once some more testing and development has been completed. Graphics have also been extensively refined to the point of an almost modern take on Renegade where special effects and lighting that the game engine can use has been pushed to the absolute max.
-
Here is a list of common abbreviations used in Renegade: (alphabetical by abbreviation) afk = Away from Keyboard agt/guard = GDI Advanced Guard Tower air/strip/as = Nod Airstrip AOW = All Out War APB = Red Alert: A Path Beyond APC = Armored Personnel Carrier (from either team) arty/art/mobart = Artillery att/atk = Attack b2b = Base to Base, shooting from your base to the enemy base bar/barr/bars/brax/rax/barix = GDI Infantry Barracks BC = Black-Cell (and their servers) bh = Big Head (Cheat) bhs = Black Hand Sniper bk = BaseKill (killing buildings) bot = The computer-controlled "Host" that processes commands like !bind or !minelimit, or computer opponents in modded maps br = BrenBot, a second generation server moderation Bot created by Blazer BR.NET = BlazeRegulator.NET, an old bot that isn't used much any more bs= bullshit-lang CCM = Command and Conquer Mode - same as AOW chopper/heli = Helicopter, Orca or Apache CTF = Capture the flag CS = CloudyServ, a server moderation bot created by CloudyOne CW = Clan War/Clan Match cy/con/Conyard = Construction Yard DA = Dragonade, the server side modification used on Black-Cell.net's servers instead of SSGM def = Defend DM = DeathMatch doza = Mendoza DS = DragonServ, the bot used on Black-Cell.net's servers engie = Engineer flame/flamer/ftank (rarer)/bbq (=barbecue) = Flame Tank fr = Final Renegade (Cheat) ffs = For F***'s Sake - Lang fps = Frames Per Second ftw = For The Win fu = F*** you - Lang g3k = Geek - Insult gg = Good Game ggg/ggg! = Go Go Go gj = Good Job gt = Guard Tower/Good Try gta = Grand Theft Auto/Stealing teammate's vehicles gl = Good luck harv/harvy = Harvester hax = Hacks/Cheats hc/hillcamp/h2b = Hill Camping - camping on the hill on Hourglass and attacking the enemy base hon/hand = Hand of Nod hot/hottie = Hotwire hs = Headshot hummer/hum/humv = Hummvee inc = incoming ion/ICB = ion cannon beacon irc = Internet Relay Chat kbps = Kilobits per Second, an indication of how much data the server is sending your way lcg = Laser Chain Gun (as in LCG Black Hand) lang = Language (swearing) light/ltank/lt/lank = Light Tank lol = Laugh(ing) Out Loud mammy/mam = Mammoth Tank master = rank given to an Orca/apache flyer. Person with a medium experience lvl. mct = Master Control Terminal med = Medium Tank mrl = Mobile Rocket Launcher mine = Mine, proximity C4 mob/mobi/n00bius = Mobius MPF = Multi Player Forums n1 = Nice One nj = Nice Job noob/n00b/n00bie/nub = Usually referes to a new player, a very bad player or both also the rank given to a person new to flying in Orca/Apache. noobjet = Ramjet Rifle/someone using a Ramjet Rifle to pick off people in 1 shot when the Barracks/Hand of Nod is destroyed or shooting vehicles with it np = No Problem NR = NightRegulator (another relatively common bot used on servers) ns = Nice Shot nt = Nice Try nuke/NSB = nuclear strike beacon ped = Beacon Pedestal in the Barracks and Hand of Nod, usually said to indicate a beacon has been placed on it. PIC = Personal Ion Cannon, also refers to the Prototype/Personal Ion Cannon Sydney pilot = A rank given to Orca/Apache drivers. A medium experienced flyer pp = Power Plant pro-master = highest rank of a Orca/Apache pilot. Given to only the best of their branch. pt = Purchase Terminal ob/oby/obi/obby = Nod Obelisk of Light omg = Oh My God rav/rave = Raveshaw ref/tib = Tiberium Refinery (either side) ren/renny = Renegade itself renalert = Renegade Alert rep = Repair rg = RenGuard rgr = Roger rookie = rank given to a Orca/Apache driver with a minimum of experience. RR = Renegade Resurrection rso = Rocket Soldier Officer sbh = Stealth Black Hand ss/screenie = screenshot (press your Print Screen key to take one) SSGM = Server Side Game Manager stfu = Shut The F*** Up - lang stank = Stealth Tank tech/techie = Technician tfg/tfr = Tiberium Fletchette Gun tib = Tiberium (Refinery, Harvester, Tiberium field, Tiberium weapon (as in tib rifle)) tibref = Tiberium Refinery) th = Team Hampering/Doing things that hurt your own team tk = Type Kill - Killing a person while they were typing a message. tk (other) = Team Kill - Killing people in your own team ts = tank steal transport/trans = Transport Chopper ty/thx/tnx = Thank You veh/vech = Vehicle vtol = VTOL vehicle (i.e. Orca/Apache/Transport) wf/warf/war/fac/weps = GDI Weapons Factory (P.S. Most clans are referred to by their clan tags in casual conversation.)
-
Use toggle_spectator <playerid> in the console (` or F8) to make somebody a spectator (use the ID command to get the player IDs). Can usually only be used by the host. There is a boolean setting AllowClientSpectators in tt.ini that allows clients to toggle spectator for themselves. Spectators can still influence the game in some ways if they manage to kill themselves so they're not yet safe to enable for the public. Keys for movement are the same as for soldiers or vehicles (forward/backwards/left/right/up/down). Special keys: Action Default Key (APB) Explanation Toggle Gunner / Special Action Q Follow a random player in third person view** Action / Use E Follow next player** Secondary Fire Right Mouse Button Exit follow mode Previous Weapon Wheel Down Decrease spectator speed* Next Weapon Wheel Up Increase spectator speed* * Maximum spectator speed is set per-game in the Global->General preset settings (subsection "Soldier Movement Speed Controls"). ** Unfortunately the current iteration doesn't network other players correctly so you may encounter some extremely weird movement and teleporting players, especially if your follow target is far away from the position you were at in free camera mode. Current public build also crashes if your follow target dies.
-
These are the FMOD preset reverbs. The name gives a decent enough description of what they are. Reverb Type Number Off 0 Generic 1 PaddedCell 2 Room 3 Bathroom 4 LivingRoom 5 StoneRoom 6 Auditorium 7 ConcertHall 8 Cave 9 Arena 10 Hangar 11 CarpettedHallway 12 Hallway 13 StoneCorridor 14 Alley 15 Forest 16 City 17 Mountains 18 Quarry 19 Plain 20 ParkingLot 21 SewerPipe 22 Underwater 23
-
The Emitter System is W3D's own particle system. It is fully customizable and helps you to create some great special effects. It designed to be very efficient with game engines, However, it is ultimately up to the end user to be creative enough to come up with ways to push that efficiency to the max and monitor the load that it takes on the machine. To Create a New Emitter: Go to the Main Menu under Emitters >Create Emitter The Emitter Properties box will pop open. NOTE: Hitting the "OK" button and closing the Emitter Properties box without naming it or changing any properties will make it inaccessible. You wont be able to select or edit it. It is a good idea to name your emitter before clicking the "OK" button. ALSO NOTE: If you close the file or program, it will not ask you if you'd like to save your work, it will just close the program. You can avoid costly mistakes by Exporting often. This saves your emitter so you can reopen it later. Naming the emitter and exporting it are two different things, make sure to do both. Once you have named it, You can access it through the asset display window in it's hierarchy rollout under "Emitter" just click the name of your emitter to select it. Once Selected you can edit it's properties by going to the main menu under Emitters > Edit Emitter. The easier way to access the properties panel is to select the emitter and hit the "Enter" key on your keyboard. NOTE: Most of the emitter's properties are based on a global coordinate system. Certain emitter properties are based on a local system and will be noted. So unless otherwise noted, we are referring to a global coordinate system. NOTE: You can type in negative (-) numerical values in most of the input fields of the emitter properties. To do so, just type the minus key in before typing a numerical value. NOTE: There is NO edit > undo for W3D. When adjusting the properties of the emitter, It will save you some time to remember the values of what your about to adjust in case you make a mistake you can at least get back to the state at which it previously was.
-
Aggregates are simply hierarchical models that have render objects tied to their bones. The viewer provides a UI to attach/remove these bone-objects, and is capable of saving these definitions to a W3D file that is compatible with the current asset manager. In other words the user can load a tank model, tie a smoke emitter to the muzzle of the tank, and save this 'aggregate' to a W3D file. When the game loads the W3D file, the emitter will automatically be tied to the muzzle of the tank with no extra effort from the programmer. In this case the emitter is controlled by the visibility state of the bone. In other words if the bone is invisible, the emitter will stop emitting particles, if the bone then becomes visible, the emitter will start emitting particles. Particle emitters are not the only type of object that can tied to a bone in an aggregate, any valid render object can be. "Campfire" is the name of this aggregate, It's made up of the following individual scene elements. 1 Bone 3 Mesh's = 1 Wood (hierarchy) 3 Emitters (brightfire, fire n smoke, sparks) All of these combined scene elements go into making the aggregate. You can switch out pieces of an aggregate, remove items and or add items as needed by going to the Main Menu and click on Bone Management, a window will pop open allowing you to remove or attach items to the bones. Remember to use proper naming conventions for whatever project your on. To Create an aggregate: You must have at least one item in the asset display under "Hierarchy", (the rest you can add later). Select that Item and notice on the that "Hierarchy" becomes visible on the main menu. Click Hierarchy > Make Aggregate from the main menu. Enter a name for your aggregate and hit ok. Now you can select your aggregate from the asset display window. To Save or Export your aggregate: Use the export aggregate button located on the main toolbar of W3D. Alternativley you can go File > Export >Aggregate from the main menu. Be sure to export often so as not to lose valuable work from changes that were made. To Add or Remove items from your Aggregate: Select your aggregate from the asset display window and on the main menu, click on Aggregate > Bone Management. This opens the Bone management window which allows you to add or remove items from your aggregate. To Open an Aggregate: When you open an Aggregate, your opening the set of files that go into making that aggregate. Here are some more controls that become available once you have selected an aggregate from the asset display window: Aggregate Rename Aggregate Allows you to rename your aggregate Bone Management Pops open the bone management box which allows you to attach or remove objects from your bones. To scene objects to bones: Select the name of your bone in the hierarchy display window inside the bone management display window. Select the object you wish to attach to the bone from the drop down list and click "Attach". Hit "OK" to close the window and confirm the changes. To remove scene objects from bones: Use the hierarchy display window to expand the list and select the object you wish to remove from the bone, Click "Remove" and hit "OK" to close the window and confirm the changes. Auto Assign Bone Models This will attempt to find assets, currently loaded in the view, that have the same name as a bone inside the hierarchy. If a match is found, the viewer will attach the object to the bone. Bind SubObject LOD Makes all objects have the same LOD as main object. Generate LOD Generates a L.O.D. (Level of Detail) LOD models are simply a collection of hierarchical models that can be switched between to meet the current polygon 'budget'. The 'budget' is the number of polygons that can be rendered on a machine in a reasonable frame rate. For faster machines this 'budget' is higher resulting in better looking models. The user can save this LOD by using the "Export" option under the File submenu
-
NOTE: Animation, Hierarchy, Aggregate and LOD all occupy the same space on the main menu. "Animation" will appear only if you have a animation selected, "Hierarchy" will appear only if you have a hierarchy selected, etc. If none of the above is selected from the asset display window, then nothing will appear in that space on the main menu. File New (CTRL + N) Opens new scene or clears current scene. Open (CTRL + O) Used to open files. Munge Sort on Load If enabled, will assign static sort levels to a mesh auto. Required to be set if sorting is turned off. Save Settings (CTRL + S) Lets you save your lighting background and camera settings. Load Settings Loads your previously saved settings. Import Facial Anims For Importing Facial animations (.txt files) Export Lets you export various scene assets. View Toolbars Lets you toggle on / off main, object and animation control menus. Status Bar Lets you toggle on / off the status bar. Prev / Next (Pg Up/ Pg Dn) Scrolls one up / down, through your collection of assets in the asset display window. View Fullscreen ( Disabled ) Change Device ( Disabled ) Change Resolution ( Disabled ) Wireframe Mode Displays the mesh in your viewport as wireframe. Polygon Sorting (CTRL + P) Toggles Polygon sorting on / off. N-Patches Sub Division Level Splits Each Triangle into multiple triangles calculated by the selected level squared. I.E. Level 3, (3 x 3 = 9) 9 triangles N-Patches Gap Filling This is used for a specialty graphics card, You must have this card in your machine in order for this feature to work. (not widly available yet) the card itself tesselates to add smoothness to a mesh, So low poly meshes instantly become medium res meshes, without taking any load on the cpu. Object Rotate X (CTRL + X) Animates the object rotating around it's"x"axis. Rotate Y (Up Arrow) Animates the object rotating around it's"y"axis. Rotate Z (Right Arrow) Animates the object rotating around it's"z"axis. Properties Displays the selected asset's properties. Restrict Anims Restricts a Hierarchy's animation list to those that match it's skeleton. Reset May Reset an objects animation or tell an emitter to restart from beginning. Toggle Alternate Materials Toggles between alternate material (If present). Emitters Create Emitter Creates a particle effect emitter, for more info see (Emitters) Scale Emitter Lets you uniformly scale the emitter as a whole unit. Edit Emitter (Enter) (with Emitter selected) Edits the selected emitter's properties. Edit Disabled Primitives Create Sphere Lets you create a sphere and set its properties. See also () Create Ring Creates a donut shaped planer right and allows you to set its properties. See also () Edit Primitive (Enter) (with primitive selected), Allows you to edit your currently selected primitive. Sound Create Sound Object Creates a sound object that can be attached to bones. You may also adjust its properties. Edit Sound Object (Enter) (with object selected), Allows you to edit your currently selected sound object. Animation Play Plays the current animation. Pause Pauses the current animation. Stop Stops the current animation. Step Back Moves back 1 frame of animation. Step Forward Moves forward 1 frame of animation. Speed Lets you Adjust the speed of the animation. (Also allows you to toggle on / off the frames blending) Advanced This opens a window that allows for you to blend two or more animations together. Hierarchy Generate LOD Generates an L.O.D. (Level of Detail) Make Aggregate (CTRL+A) Use this to create a new aggregate Aggregate Rename Aggregate Allows you to rename your aggregate Bone Management Pops open the bone management box which allows you to attach or remove objects from your bones. Auto Assign Bone Models This will attempt to find assets, currently loaded in the view, that have the same name as a bone inside the hierarchy. If a match is found, the viewer will attach the object to the bone. Bind SubObject LOD Makes all Children LOD objects( in the LOD )have the same as the Parent LOD object. Generate LOD Generates a L.O.D. (Level of Detail) LOD models are simply a collection of hierarchical models that can be switched between to meet the current polygon 'budget'. The 'budget' is the number of polygons that can be rendered on a machine in a reasonable frame rate. For faster machines this 'budget' is higher resulting in better looking models. The user can save this LOD by using the "Export" option under the File submenu LOD Record Screen Area Use the space bar to set the areas that define where the Sub LOD's will switch. Once you have done this, you must return to max and in the objects properties box, (CTRL + V) to paste the value assigned to that LOD Object. then re-export. Include NULL Object ? Prev Level Cycles back one to the Previous Subobject LOD and i'ts specified Camera Distance. Next Level Cycles to the Subobject Next LOD and i'ts specified Camera Distance. Auto Switching When you move your camera closer to- or farther away from the LOD in the viewport, it will switch between LOD sub Objects depending on where you set them. Make Aggregate (CTRL+A) Use this to create a new aggregate for more info see: (Aggregates) Lighting Rotate Y (CTRL+Up Arrow) Toggles (on / off) the light rotating around the mesh objects "Y" Axis. Rotate Z (CTRL+Rt Arrow) Toggles (on / off) the light rotating around the mesh objects "Z" Axis. Ambient Adjust the RGB / grayscale values of the lighting in your scene. Scene Light Adjust the advanced lighting properties. Inc Ambient Intensity ( + ) Increases your Scene's Ambient Light Intensity. Bug: keyboard shortcut disabled. Dec Ambient Intensity ( - ) Decreases your Scene's Ambient Light Intensity. Bug: keyboard shortcut disabled. Inc Ambient Light Intensity (CTRL+"+") Bug: keyboard shortcut disabled. Dec Ambient Light Intensity (CTRL+"-") Bug: keyboard shortcut disabled. Expose Precalculated Lighting ? Kill Scene Light (CTRL+"*") Sets Scene light's diffuse and specular Channel RGB values to 0,0,0. Note: this can be turned back on by adjusting the RGB values in the "Scene Light's" properties panel. Vertex Lighting Toggle between Multi-Pass, Multi Texture and Vertex Lighting for the scene. Multi-Pass Lighting For use with the Renegade lightmap tool Multi-Texture Lighting ? Camera Front (CTRL + F) Switches Camera viewpoint to the front of the object. Back (CTRL + B) Switches Camera viewpoint to the back of the object. Left (CTRL + L) Switches Camera viewpoint to the left of the object. Right (CTRL + R) Switches Camera viewpoint to the right of the object. Top (CTRL + T) Switches Camera viewpoint to the top of the object. Bottom (CTRL + M) Switches Camera viewpoint to the bottom of the object. Rotate X Only Restrict Camera To Rotate on "X" axis only. Rotate Y Only Restrict Camera To Rotate on "Y" axis only. Rotate Z Only Restrict Camera To Rotate on "Z" axis only. Copy Screen to Clipboard (CTRL + C) Copy the displayed screen size of the current object to the clipboard. Animate Camera ( F8 ) ? +X Camera Toggles on / off, if the Camera will look down it's x axis. Settings Adjust the Camera's field of view and clipping planes. Set Distance Set the Camera distance. Reset on Display Toggles on / off the Camera Resetting when a new object/asset is selected from the asset display window. Reset Resets the Camera's orientation back to it's default. Background Color Adjust the viewport background color properties. Bitmap Select a bitmap to be used as a backdrop for the viewport. Object Select a hierarchy to be used as a background object in the viewport. Fog (CTRL + Alt + F) Toggle fog on / off, in your scene. Movie Make Movie Creates a video clip of your animation full frames, uncompressed at the size of your current viewport. Capture Screen Shot ( F7 ) Captures a screen shot of your current viewport, Stores the screenshot as a .tga, on your local drive in /W3D / W3DVIEW /
-
W3D Export Options When you are ready to export into a w3d file. NOTE: Be sure and check to see that the type of export you will be doing matches what you have already selected in the "object export options" (export transform) and (export geometry) which is located in the W3D in Max > W3Dtools Exporter. Use the Export command in the File menu. Select the w3d file type from the drop-down box in the following file selector dialog. This will bring up the following dialog box. Hierarchal Model: Use this option if you are exporting a model that will contain a hierarchy. (such as a bone) Hierarchal Animated Model: Use this option when you are exporting a hierarchical model with an animation. Note: When using this option, make sure to set the number of frames you want to export with your animation from the frames selection below. Pure Animation: Use this option to export just the data for an animation. Renegade Terrain: Use this option to export your geometry in a renegade terrain format. Skeleton: This exports the hierarchy tree without any geometry or animation data. Simple Mesh: Use this option to export a mesh (model) with no hierarchy, no bones, and no animation. Settings: These extra settings become available depending on which type of export you have selected. Smooth Vertex Normals Across Meshes Smooths the look of curved surfaces. Optimize Collision Detection Generates data that will improve the speed of collision detection. Turning this on is definitely a good thing for Renegade. Its not needed for the RTS titles. Export Using Existing Skeleton: You can use this option if you are exporting a hierarchial model, a hierarchial animated model or pure animation. It allows you to select a skeleton. Browse Lets you browse for an existing skeleton you wish to use. Frames: Use this to set from which frame to which frame you plan to export. Make sure to set these when exporting animation data. Review Log: This opens a window that contains the various information about what was being exported. Just so you can review what you've done if so desired.
-
W3D Exporter The final part of the W3D plugin for max is the W3D Exporter. Each object in the Max scene that is not hidden will be considered for export. A utility plugin is used to set the export options. Each mesh can have its transform exported for the animation system and/or its geometry exported. This separation exists due to the way the motion capture data comes into the system. There are often meshes in the system which are only there to provide transforms and vice-versa; there are meshes that are rigidly connected to those "transform-only" meshes. The exporter basically allows you to reduce the number of transforms that have to be calculated by the animation system. Each object that is exported will have its name associated with it. One limitation of the w3d file format is that these names be 15 characters or less. If you try to use a longer name, it will be truncated when it is exported. If two objects with the same name are loaded, only the first object will be kept. It's a good idea to configure your button sets, in the utilities panel in max, to display it by default. This way, you wont have to look under the "more" section every time you want to use it. Here is a description of the various tools associated with exporting your selections to W3D. Object Export Options: General Export Options Selection Window: Displays the name of what you have selected. Export Transform (Bone): Check this to only export a bone or animation. Export Geometry: Check this to only export a mesh or geometry. Geometry Options: These options allow your exported geometry to have different characteristics. You can select multiple options from choices on the right. Normal Default mode, just a normal mesh with no specific characteristics. Cam-Parallel Aligns the object to the near clipping plane of the camera, for example, if an object moves around the scene, it will remain parallel to the viewport. Kind of like a strafing effect. Cam-Orient Aligns to the local X axis of the Camera: This makes the object always face toward the camera so where ever the object or camera is, the camera will always be facing the x-axis. AABox This mesh is to be used as an axis aligned collision box. OBBox Use this if you're exporting a bounding box. Null (LOD) Indicates that its a NULL LOD object. Null LODs will not be rendered. Aggregate Export this mesh as a reference to another W3D. This lets you include other W3Ds, such as particle effects, in other objects. E.g. if you have a particle W3D called smoke_fx.w3d, then naming the mesh as smoke_fx would put that particle W3D there when the model is loaded. You can have multiple aggregate meshes with the same name (if you need more than one instance of the W3D), but these aggregates need to have Export Transform unticked and linked to a bone that is in the position you want the other W3D in. Dazzle Use this option to export a Dazzle. Set the dazzle type in the list below. Cam-ZOrient Like Cam-Orient but is oriented in the Z axis only. Only usable with current versions of Renegade. 2Side Enable/Disable two sided rendering for the entire mesh. Hide Use this option to make your geometry hidden, e.g. a bounding box. ZNrm Uses normals that point in the +z direction. VAlpha With this checked, your mesh will have a "vertex alpha", which is created from the grayscale values of the vertices that you have given to them in max. NOTE: texture blend mode must be "Alpha Blend" in order for this to work. Shadw The mesh is not rendered normally, it is used to generate shadows only. Shatter For use when your objects may need to shatter, such as glass. Tangents Use this when you are exporting for Renegade and need tangent/bi-normal data. Prelit Set this to cause the mesh to be ignored by the light generation code. Only usable with current 5.0 versions of Renegade. Enable Static Sorting Tells the game engine not to sort those polygons. The value you enter into the Sort spinner next to it defines which batch to render them in. Always Dyn Light Tells Mammoth's static vertex lighting code to skip this mesh, and instead just render it using the dynamic lighting that dynamic objects (such as vehicles and characters) use. Only really useful for terrain objects. Only usable with current 5.0 versions of Renegade. Collision Options: You can select the physical characteristics for your geometry that you are exporting. Physical Select this for a surface that another object (such as a character or a vehicle) can't move through. Projectile Select this if a projectile can hit it. Vehicle Select this if you wish a vehicle not to proceed through or past it. (If a mesh has Physical ticked, you don't need to tick this! Use this for things that you want infantry to move through, while not letting vehicles through.) Vis Select this when exporting your "Vis" areas. A vis area is a specific area within the cameras view, where the computer will not draw in geometry past that point until you crossed over into another Vis area. Camera Select this in case you don't want the camera to go through it, or get stuck in it. Select by W3D Type: Rather than Manually selecting objects in your scene to be exported, you can use these buttons select specific items for you. Select Bones Selects all the bones in your scene. Select Geometry Selects all the geometry in you scene. Select Alpha Meshes Select all Alpha Meshes in your scene. Phys Select all Physical Objects in your scene. Proj Select all objects that are affected by projectiles in your scene. Vis Select all Vis objects in your scene. Naming Utilities: A convenient way to name a selected set. Assign Node Names Opens the "Generate Node Names" window. This allows you to assign a root name, prefix and suffix. After setting your preferences, all of the selected objects in your scene will be renamed in sequence according to the node name. Artist Note: You may want to de-select "Assign Collision Bits" because it will override what you already have selected, in the collision options box. Assign Material Names Opens the "Generate Material Names" window. This allows you to assign a root name to your materials, After setting your preferences, all of the materials you affected will be renamed in sequence according to the node name. Assign Extensions This will append an extension to your currently selected objects. LOD 0 should be your highest poly model, with increasing LOD numbers going to your lower poly models. Damage models should be extension numbers 1 and up.
-
W3D Skinning WWSkin has now been deprecated. For all relevant information on 3DS Max's skin modifier (which W3D exports now correctly support), please head here: https://knowledge.autodesk.com/support/3ds-max/learn-explore/caas/CloudHelp/cloudhelp/2015/ENU/3DSMax/files/GUID-9596F6EF-3569-44F2-8D6C-6EB58C30BEDD-htm.html The only point of note is that W3D models for Renegade and BFME2 only support up to 2 weights per bone. Really old versions of Renegade as well as Generals and BFME only support 1 weight per bone. To ensure your model only uses 1 or 2 bone weights, go to the Advanced Parameters tab in the sidebar while your skinned mesh is selected and set Bone Affect Limit to 1 or 2, depending on what you're working on.
-
Textures: Here you can Load bitmaps and adjust their properties. Stage 0 Texture: Enable this if you wish to use a bitmap on your mesh. Stage 1 Texture (Detail Texture): Enable this if you wish to use a secondary bitmap (detail texture)on your mesh. None: Click this bar to browse and select a bitmap. Publish: This button instructs the runtime engine to make this a "swappable" texture. You are essentially publishing the existance of this texture to the programmers. This must be enabled for any textures that may need to be swapped or changed at runtime. Display: This button controls whether the (W3D shader) texture is visible in the Max viewport. Clamp U: Nearly Obsolete: For use in help with "T" junctions in geometry, Keeps the map to running across the U coordinate of the geometry in a linear way as to not have minimal seams showing. Clamp V: Nearly Obsolete: For use in help with "T" junctions in geometry, Keeps the map to running across the U coordinate of the geometry in a linear way as to not have minimal seams showing. No LOD: Tells it that there there is no L.O.D. associated with this material. Frames: This spinner can be used to specify that the texture is animated. If you specify a number of frames greater than 1, the texture is assumed to be animated and the other frames for the animation will be generated from the filename you specify for the texture (.tga sequence) . You should use the first frame of the animation as the texture you use in Max. Rate: Lets you set the frame rate for the frames you will be using, (tga sequence). (drop down list): For use with Tga sequences. Loop: Loops the tga sequence from begining to end, then back to beginning, ect. Ping-Pong: Tga sequence starts from beginning, goes to end, then goes through the frames in reverse, back to begining, ect. Once: Tga sequence starts from beginning, goes to end, then stops, ends on last file in sequence. Manual: Manually enter the tga frame for it to cycle through. Alpha Bitmap: A sort of compression tool for the alpha channel in a bitmap. If enabled, It tells the alpha to either be on or off, reducing it to 1 bit rather than 8. Pass Hint: These selections do not produce visible results. It is used to help optimize the code by specifying what type of pass it is so that it doesnt search to see what type of pass it is. Base Texture: This is the Default and most commonly used. This is just your normal texture. Emissive Lightmap: This specifies top the code that the texture is basically just a shadow. Environment Map: This specfies to the code that the texture is basically a reflection map. Shineyness Mask: This specfies to the code that the texture is basically a shineyness map.
-
W3D Shader: The Shader tab is directly related to the "stage" mapping or (mappers), which is located on the vertex material tab. The way in which these mappers will blend with the background and other objects in the scene will be determined by the blending mode you choose. Everything in the advanced portion of the shader tab is directly related to the "stage 1 texture" or (detail texture). Use these setting to adjust how the texture behaves if you have enabled stage 1, from the texture tab. Blend Mode : Select from this variety of ways to blend against the elements of your scene. Opaque: The map or color in its normal state with No Alpha opacity, and No blended overlay. Add: Looks at the color information in each channel and brightens the base color reflecting the colors behind it, creating the effect of an additive overlay. It creates an opacity value based on the grayscale levels of the map. Multiply: Looks at the color information in each channel and multiplies the base color by the blend color. The result color is always a darker color. Multiplying any color with black produces black. It creates an opacity value based on the inverted grayscale levels of the map. (Blacks are opaque, whites are transparent) Multiple and Add: Multiplies the base colors by themselves, lights become brighter, darks become darker. It creates an opacity value based on the inverted alpha levels of the map. (Blacks are opaque, whites are transparent) Screen: Similar to Add but not burning the brightness levels as much. It creates an opacity value based on the grayscale levels of the map. AlphaBlend: The map or color in its normal state, If the map contains an alpha channel, it uses the alpha channels grayscale values to establish the opacity of the map. AlphaTest: The map or color in its normal state, If the map contains an alpha channel, it uses the alpha channel to establish the opacity of the map however, it adjusts the threshold of the alpha channel to make it higher in contrast, no grays just black and white, resulting in harsher edges in the opacity. AlphaTest and Blend: Combines aspects from AlphaTest and Alphablend. Custom: You can create a custom blend mode using any of the combinations below; e.g. If you select the Src to be Alpha, and you select 1 Src Alpha for the Dest, you will have created the "Alpha Blend" effect, however if you used zero for the source and zero for the Dest, this would produce pure black. NOTE: Many of these custom blend modes aren't very game engine friendly, use caution when making decisions to use these to avoid costly mistakes. Src : This controls the source blend factor. Blending is specified by the following equation: (Destination Blend * Destination Pixel) + (Source Blend * Source Pixel). The destination pixel is the pixel which exists in the frame buffer while the source pixel is the pixel which has been generated by this material. Zero: Nothing will be the base. One: The map in its normal state. Src Alpha: Creates a grayscale value based on the color and uses this for the base. 1-Src Alpha: Inverts the alpha channel of the map and uses this for the base. If map has no alpha channel then black is the default color. Dest Src : This controls the destination blend factor. Zero: Creates no opacity value for the base and If the base has its own alpha channel, this will override and disable it so that the base will have no opacity values. One: Creates an opacity value for the base, based on the maps grayscale levels, also adds those levels to the base to increase the lightness of light areas in the base. Src Color: Overlays the colors in the object over the base. 1-Src Color: Creates an opacity value for the object based on the maps color levels, if no color is present, then it uses the grayscale levels. Src Alpha: Overlays the base with its own Inverted Alpha channel. 1-Src Alpha: This uses the the bases levels to establish and determine opacity values. If the base has no alpha channel, then no opacity values will be established. Src Color PreFog: Uses the rgb values, then decreases the contrast to determine the opacity. Write Zbuffer: This will enable / disable itself when certain blend modes are selected. Alpha Test: This will enable / disable itself when certain blend modes are selected. Defaults: Clicking this button resets the defaults for the advanced parameters. Everything Below here is directly related to the "Stage 1 Texture" which is the secondary (if desired) detail texture. Depth Cmp: (Depth Comapre) Tells the graphics card what to do with the polygon its rendering based on the value of the Zbuffer. Pass Never: New polygons never pass, polygons wont render. Pass Less: Renders the polygon if the Z value is less than the value thats in the Zbuffer already. Pass Equal: Will only render the polygon if its equal to whats already in the Zbuffer. Pass LEqual: -Gets used most often: Polygon gets drawn only if it's less than or equal to the Zbuffer value. Pass Greater: Only renders the polygons if they farther back than the closer polys. (If you want far away things poking through closer things) Pass NEqual: Only renders a polygon if it's not equal to whats in the Zbuffer. Pass GEqual: Only renders the polygons if they are Greater or Equal to the Zbuffer value. Pass Always: Draw the Polygon no matter what, -ignores the Zbuffer. Pri Gradient: (Primary gradient) This tells it what to do with the diffuse lighting. Disable: Disables it, If you want it Not to use the diffuse lighting. Modulate: Multiplys the color of the pixel by the lighting color. Add: Adds lighting to the color of the pixel, e.g. Lightmaps Detail Color: These allow for more specific detail in how the second texture is applied. Disable: Disables it, You wont see it at all. Detail: Overrides stage 0 mapping. Scale: Pure white in the overlay will remain unchanged, while darks become darker, increasing the contrast. InvScale: Similar to add but doesn't burn as much. Creates a transparency based on the grayscale values of the map. A little more costly than add. Add: Looks at the color information in each channel and brightens the base color to reflect the colors behind it, creating the effect of an additive overlay. Sub: This works as a Subtractive overlay. Looks at the color information in each channel and darkens the color overlaying the brighter colors behind it. SubR: ? Blend: ? DetailBlend: Uses the detail texture and self illuminates it. Sec Gradient: Disabled: (Secondary Gradient) controls the specular lighting. Disable: Disables specular lighting Enable: Enables specular lighting Detail Alpha: This tells the map what to do with the Alpha Channel in the stage 1 texture. Disable: Disable it. Detail: Overrides the alpha of stage 0 mapping. Scale: Pure white in the Alpha's overlay will remain unchanged, while darks become darker, increasing the contrast. InvScale: Uses a transparency based on the grayscale values of the map. A little more costly than add.
-
Vertex Material: This is the Standard material or texture for the geometry in your scene. It's important to realize that many items in here are co-dependant on each other, some things only work when others are enabled and to best get acquainted with it, experiment around to find the most useful combinations. The "Args:" (Arguments) window allows you to enter in specific information that you'd want the mapper to do. When you see the Arguments listed in here for each type, do not include the "( )" parenthesis in your actual argument and the types are as follows: (float) - any real number, ex: 1.8 (int) - any integer, e.g:: -.5 (bool) - either TRUE or FALSE Ambient: Ambient color is the color of the object's shaded portion. Diffuse: The diffuse color is the color that the object reflects when illuminated by lighting, the base color of the object. Specular: Disabled Emissive: Acts as the base of the alpha levels in a map, however, It wont be effected by light, similar to a self illumination shader in max. NOTE: For in-game vertice coloring; If emissive is any color other than black, ambient and diffuse have to be black. If emissive is black, ambient and diffuse may be any color, but the colors must be the same color. Opacity: Sets the opacity of the mesh, 1 = 100% opaque, and 0 = completely transparent. NOTE: Doesn't work with the shader blending mode "opaque". Also note; when used in conjunction with the "alpha test" shader blending mode, the texture map you choose must have an alpha channel in it, for this to display correctly. Translucency: Disabled Shininess: Disabled: Controls the tightness of the specular highlights. Specular to Diffuse: Obsolete Stage 0 Mapping: This area is where you select the way the mesh will display in its environment. Refer to the Shader tab (blend area) to adjust more properties and to load a bitmap. A note about mappers: When creating a Texture map for use with any type except "UV", you must flip your map vertically so that it will appear upside down in order for it to work correctly. Stage 0 Mapping types: Also known as "Mappers", Blending modes for the mesh in it's environment. UV: For use with UV Mapping coordinates Environment: Uses the normals to look up the environment map. Hotspot of light always comes from top right no matter which direction the object or camera is facing. Artist Notes: It has a couple downsides. It doesn't show the graduation of light across a flat surface as well as a World Space environmental and when used in conjunction with camera tracking the object, it wont appear to be as real because the light source remains constant. Classic Environment: Similar to Environment; uses the reflection to look up the environment map, overall object has more contrast, (better for simulating metallic objects) Screen: Takes the screen coordinate and uses that as the UV coordinate, this makes the map always facing the camera. Args: UScale=(float) e.g: 3.0 VScale=(float) e.g: 0.5 UPerSec=(float) e.g: -0.1 VPerSec=(float) e.g: 1.0 Linear Offset: Same mapping type as "UV" except it allows you to make the texture scroll across the map at a speed specified in the arguments box. The Scrolling speed works on 1 unit per second basis. U is for horizontal, positive values move it left while (-) negative values move it right (based on UV mapping coordinates). V is for vertical, positive values move it down while (-) negative values move it up(based on UV mapping coordinates) . Args: UPerSec=(float) e.g: -0.3 VPerSec=(float) e.g: 5.0 Silhouette: Obsolete, not supported Scale: NEW Scales the UV coordinates, useful for detail mapping. Args: UScale=(float) e.g: 3.0 VScale=(float) e.g: 0.5 Grid: NEW (e.g. Of a Grid Map) For use with a "Grid Bitmap" Similar to how the "Frame / UCoordinate" works in the emitter system; A grid bitmap is divided into individual frames that the computer reads as a grid, left to right, top to bottom, one frame at a time and displays each section of the grid as a single frame, then the next frame then so on, until it cycles through back to the beginning. This effect creates an animated map. You can Adjust the speed of your map in frames per second (FPS). Args: FPS=(float) e.g: 29.5 Log2Width=(int) e.g: 2 Grid Map creation parameters: (for use with all "grid" type maps.) 1 = 2 X 2 (2 frames across 2 frames down) 2 = 4 X 4 (4 frames across 4 frames down) 4 = 8 X 8 (8 frames across 8 frames down) 8 = 16 X 16 (16 frames across 16 frames down) Rotate: NEW Rotates a texture map about a specified center. The speed of the rotation is measured in radians per second, (e.g: 2 = 2 full rotations per second). Positive values rotate counter clockwise while negative rotate the map clockwise. Note: by default the mapping coordinates center starts at the top left corner of the map. To make it start in the center of the map, make the UCenter and VCenter values of "0.5". Args: Speed=(float) e.g: 2 UCenter=(float) e.g: 0.5 VCenter=(float) e.g: 0.5 Sine: NEW Moves the texture map around in the shape of a lissajous figure. (You can create figure 8's and such) Args: UAmp=(float) e.g. 1 UFreq=(float) e.g: 2 UPhase=(float) e.g: 1 VAmp=(float) e.g. 1 VFreq=(float) e.g: 2 VPhase=(float) e.g: 1 Step: NEW Similar to Linear Offset but jumps the map from location to location rather than the smooth scrolling motion of linear offset. (Doesn't interpolate between steps) SPS = steps per second. Args: UStep=(float) e.g: 1.0 VStep=(float) e.g: 1.0 SPS=(float) e.g: 1.0 Zigzag: NEW Similar to linear offset but reverses direction periodically. Args: UPerSec=(float) e.g: -0.3 VPerSec=(float) e.g: 5.0 WS Classic Environment: NEW World Space normal environment map. Map coordinates generated procedurally. Similar to World Space Environment mapper. WS Environment: NEW World Space reflection environment map. Artist Preferred over the environment mapper for the following reasons: Good for use in scenes with camera tracking. Better with flat surfaces. Grid Classic Environment: NEW Animated normal environment map. Uses a "Grid Bitmap" for animation. This Combines the "Grid" type mapper, with the "Classic Environment" type mapper. Map coordinates generated procedurally. Args: FPS=(float) e.g: 29.5 Log2Width=(int) e.g: 2 Grid Environment: NEW Animated reflection environment map. Works similar to "Grid Classic Environment" but different. Uses a "Grid Bitmap" for animation. This Combines the "Grid" type mapper, with the "Environment" type mapper. Args: FPS=(float) e.g: 29.5 Log2Width=(int) e.g: 2 Random: NEW Offsets and rotates coordinates at random in a "step" like fashion,. useful for trying to make a map "shake". Args: UPerSec=(float) e.g: -0.3 VPerSec=(float) e.g: 5.0 Edge: NEW Gives off Fuzzy edges, can be used as a glow as well. Uses the "Classic Environment" mapping style but takes the top row of pixels in the bitmap and looks only at that to produce its fuzzy edge effect. Artist tip: You can adjust the VPerSec argument to create an nice "pulsing" effect. Args: UseReflect=(bool) e.g: true VPerSec=(float) e.g: 2.0 UV Channel: Select the UV channel to use. Args: The "Args:" (Arguments) window allows you to enter in specific information that you'd want the mapper to do. When you see the Arguments listed in here for each type, do not include the "( )" parenthesis in your actual argument and the types are as follows: (float) - any real number, ex: 1.8 (int) - any integer, er: -.5 (bool) - either TRUE or FALSE NOTE: Only specific functions will work with certain mapping types, (see the mapping types for a list of the arguments allowed for that type). All arguments are CAse SENSitiVe, they have to be typed in exactly as shown. New mappers will only work on the DX8 and WW3D2. Pre-DX8 viewers will not work. Stage 1 Mapping: Same properties as stage 0 mapping but Adds another stage so that you may overlay and combine the two mappers. Stage 1 is considered to be the "detailer" because it is usually used when extra detail is needed. The advanced controls for Stage 1 Mapping are located in the advanced section of the shader tab.
-
W3D Material Interface Accessing the W3D Materials To apply maps or add a material to the geometry in your scene, you need to use a special kind of material, used specifically for W3D and found in the material map browser. You can access this material by opening up the material editor (shortcut: M) and selecting a new swatch and clicking on the button labelled"standard" by default. This will pop open the material / map browser of which you can then select the following material. This is the W3D Material editor Interface, It contains 3 Roll outs It's where you will load your textures and adjust properties of the material. Here is a breakdown of the following elements: Material Surface type: Material Pass Count: Pass Rollout: Material Surface Type: The Material Surface type is used in conjunction with an "ini" file which determines which events will occur when objects or projectiles collide with the surface your applying it to. Events vary and may contain any of the following: Decals, emitters, sounds, geometry and animaitons. Heres an example example of an effect of "wood" surface type applied to a box object: A bullet shoots at a wooden crate. The bullet collides with the box, leaving a decal of a bullet hole, an emitter that spits out a few splinters and a sound of a bullet hitting wood occur at the same time. This helps to make the occurence more convincing to the player. Use the drop down list to select the type of surface that best fits the physical characteristics of the object your applying it to. Light Metal: A thin metal, used for metal that may become deformed slightly when hit, e.g. light armor cars and vehicles. Heavy Metal: A thick metal, used for metal that doesn't get penetrated easily or not at all. e.g. Heavy armor tank. Water: A liquid, used for creating splash effects when hit. e.g. A lake. Sand: Sand, e.g. A beach Dirt: A ground type of surface, e.g A dirt road. Mud: A muddy surface: used for creating that splashy mud effect. e.g. a mud puddle. Grass: A grassy surface: e.g. a grassy plain Wood: A wooden type of surface: e.g. a wooden crate. Concrete: A concrete surface: e.g. A sidewalk or bricks. Flesh: A fleshy surface, for use with most mammals, e.g. A human character. Rock: A rock type of surface. impenatrable and very hard. e.g. a large boulder. Snow: A snow type of surface: e.g. snow covered mountains. Ice: An icyy type of surface: e.g. A thin sheet of Ice on a frozen lake. Default: This is used if you want no collision effects. Glass: A Glass type of surface, e.g. a window. Tiberium Field: A Tiberium field type of surface: (for use with command and conquer associated games), e.g. a tiberium field. Foliage Permeable: A plant line permeable surface, (permeable meaning you can put a hole in it) e.g. A bush Glass Permeable: A glass permeable surface, (permeable meaning you can put a hole in it) e.g. shatterproof glass. Ice Permeable: An Ice permeable surface, (permeable meaning you can put a hole in it) e.g. Thick lake Ice. Cloth Permeable: A cloth permeable surface, (permeable meaning you can put a hole in it) e.g. A blanket hanging on a clothesline. Electrical: An Electrical surface, used for surfaces that give off a little electric shock when struck. e.g. a transformer. Electrical Permeable: An Electrical Permeable surface, used for surfaces that electrify when struck. e.g. A television or toaster. Flammable: A Flammable surface, used for surfaces that become on fire when flame hits them. e.g. A trail of gas. Flammable Permeable: A Flammable Permeable surface, used for surfaces that burn when caught on fire. e.g. Office papers. Steam: A steam type of surface. e.g. smoke rising from a chimney. Steam Permeable: The surface to use when steam can come out of it. e.g. Steam pipes. Static Sorting Level: Tells the game engine not to sort those polygons. The value you enter into the spinner next to it defines which bactch to render them in. Material Pass Count: Lets you set the number of passes that your material will use. Pass: A single pass is basically the layer which contains the mapper info, texture map, color, ect. A second pass is a second map layer you have the option of adding. E.g: If you have a glass texture with a transparancy value to it on the first pass, you can assign a second pass with a reflection map. The outcome would create a more realistic glass window, however, Using multiple passes comes at a price as it can be costly on the game engines. You have a maximum of 4 passes you can perform. NOTE: Due to a limitation in our run-time engine, all materials used in a single mesh must have the same number of passes. -If you need to use materials with different numbers of passes, you will have to split the polygons into two separate meshes. The pass rollout is broken down into 4 tabs: Vertex Material: Lets you set the material (mapper) properties. W3D Shader The original W3D Shader. Textures Allows you to select various bitmaps and set their properties.
-
xxx_tt.ini (where xxx is the name of the map, these are the tt.ini settings that can either go in the per-map tt.ini or the main tt.ini) [General] section AirFactoryVehicleLimit=int (vehicle limit for air factories) NavalFactoryVehicleLimit=int (vehicle limit for naval factories) VehicleFactoryVehicleLimit=int (vehicle limit for vehicle factories) LowPowerDamageScale=float (when buildings are damaged and power is off, the damage is scaled by this amount) UseExtraPTPages=bool (enables the extra "secret" pages on the PT, not relavent for the sidebar) BuildingRefillDisable=bool (enable this to allow you to require a specific building in order to refill. If the building doesn't exist on the map or its alive, refill works, otherwise its disabled) NodBuildingRefillDisable=string (building controller preset for Nod for the above feature) GDIBuildingRefillDisable=string (building controller preset for GDI for the above feature) NoPowerCostMultiplier=float (what to multiply purchase costs by when the power is low) BuildTimeDelay=float (what to multiply build time by when the power is low) NewTechLevel=bool (enable the new tech level and factory stuff that works through settings on the presets) VisceroidEnable=bool (enable the Visceroid Probability stuff in armor.ini that might spawn a Visceroid when you die) OverrideMuzzleDirection=bool (let AI infantry aim their muzzles like player infantry do) GDIUpArrowTexture=string (texture for the up arrow on the GDI sidebar) GDIDownArrowTexture=string (texture for the down arrow on the GDI sidebar) GDIBackgroundTexture1=string (texture for the background upper part on the GDI sidebar) GDIBackgroundTexture2=string (texture for the background lower part on the GDI sidebar) NODUpArrowTexture=string (texture for the up arrow on the Nod sidebar) NODDownArrowTexture=string (texture for the down arrow on the Nod sidebar) NODBackgroundTexture1=string (texture for the background upper part on the Nod sidebar) NODBackgroundTexture2=string (texture for the background lower part on the Nod sidebar) Sidebar=bool (whether to enable the sidebar) SidebarSoundsEnabled=bool (whether to enable the sidebar sounds) SidebarRefillSound=string (sound to use when purchasing refill on the sidebar) SidebarRefillSoundNod=string (sound to use when purchasing refill on the Nod sidebar) SidebarRefillSoundGDI=string (sound to use when purchasing refill on the GDI sidebar) SidebarInfantrySound=string (sound to use when purchasing infantry on the sidebar) SidebarInfantrySoundNod=string (sound to use when purchasing infantry on the Nod sidebar) SidebarInfantrySoundGDI=string (sound to use when purchasing infantry on the GDI sidebar) SidebarVehicleSound=string (sound to use when purchasing vehicles on the sidebar) SidebarVehicleSoundNod=string (sound to use when purchasing vehicles on the Nod sidebar) SidebarVehicleSoundGDI=string (sound to use when purchasing vehicles on the GDI sidebar) SidebarRefillEnabled=string (enable refill on the sidebar) SidebarTabsEnabled=string (enable tabs on the sidebar) TabCharacters=int (what tab to put infantry on) TabCharactersSecret=int (what tab to put secret infantry on) TabVehicles=int (what tab to put vehicles on) TabVehiclesSecret=int (what tab to put secret vehicles on) TabAir=int (what tab to put air vehicles on) TabAirSupplemental=int (what tab to put supplemental air vehicles on) TabNaval=int (what tab to put naval vehicles on) GDISidebarPowerOnTexture1=string (sidebar power on texture for GDI) GDISidebarPowerOnTexture2=string (sidebar power on texture for GDI) GDISidebarPowerOffTexture1=string (sidebar power off texture for GDI) GDISidebarPowerOffTexture2=string (sidebar power off texture for GDI) NODSidebarPowerOnTexture1=string (sidebar power on texture for Nod) NODSidebarPowerOnTexture2=string (sidebar power on texture for Nod) NODSidebarPowerOffTexture1=string (sidebar power off texture for Nod) NODSidebarPowerOffTexture2=string (sidebar power off texture for Nod) GDITabTexture1=string (sidebar tab 1 texture for GDI) GDITabTexture2=string (sidebar tab 2 texture for GDI) GDITabTexture3=string (sidebar tab 3 texture for GDI) GDITabTexture4=string (sidebar tab 4 texture for GDI) NODTabTexture1=string (sidebar tab 1 texture for Nod) NODTabTexture2=string (sidebar tab 2 texture for Nod) NODTabTexture3=string (sidebar tab 3 texture for Nod) NODTabTexture4=string (sidebar tab 4 texture for Nod)
-
xxx_map.ini (where xxx is the name of the map) [General] GDIWinBanner=HUD_GDIWINBAN (w3d file to use for the GDI win banner, no .w3d on the end) NodWinBanner=HUD_NODWINBAN (w3d file to use for the Nod win banner, no .w3d on the end) LoadingMusic=filename OverrideNightTime=bool (set this to true to cause it to be night time no matter what the actual time is set to) [CustomBackdrop] Works just like campaign.ini backdrop settings (documentation on how this works needed) ; You can specify a 'color' in two ways: ; 1. Separate Red/Green/Blue components: ; SkyColorRed=112 ; SkyColorGreen=146 ; SkyColorBlue=176 ; 2. Hex color (ARGB): ; SkyColorHex = 0xFF7092b0 [SkyColors] OverrideSkyColors=bool (enable this to override the sky colors) WarmSkyColor=color (Warm sky color - Clouded sky's additional, color around the sun) ColdSkyColor=color (Cold sky colors - Clouded sky's additional color everywhere else + Fog color (bottom skydome)) SunColor=color (Sun color) SunHaloColor=color (Sun halo color) MoonHaloColor=color (Moon halo color) SkyColor=color (Sky color (top skydome)) GloominessColor=color (Cloud gloominess color) StarfieldAlpha=int (Star field transparency, 255 - Stars appear (good for clear sky night time); 0 - No stars) ; These are the defaults. Textures for sky settings: [SkyTextures] StarTexture=Star.tga LightningTexture=LightningBolt.tga LightningSource=LightningSource.tga SunTexture=Sun.tga SunHaloTexture=SunHalo.tga MoonHaloTexture=MoonHalo.tga CloudTexture=CloudLayer.tga MoonTexture1=FullMoon.tga MoonTexture2=PartMoon.tga EarthTexture1=FullEarth.tga EarthTexture2=PartEarth.tga Thunder sounds [ThunderSounds] ThunderSound1=Thunder01 ThunderSound2=Thunder02 ThunderSound3=Thunder03 ThunderSound4=Thunder04 ThunderSound5=Thunder05 ThunderSound6=Thunder06 WarBlitzSound=SFX.Ambient_Explosion_01 Weather textures [WeatherTextures] WeatherTexture=WeatherParticles.tga Weather sounds [WeatherSounds] WindSound=Wind01 RainSound=Rainfall01 All sounds set in this ini file are sound preset names and should work as twiddlers. Although the sounds are loaded once when the level is loaded or the weather settings get changed by e.g. a script command (at least for the thunder, wind and rain sounds, war blitz sound is weird and I don't fully understand that one)
-
This controls the entries that appear in the Weapons part of the encyclopedia, either in single player, or if the multiplayer version is enabled in TT.ini. Each entry needs a name in square brackets (e.g. [M16 Mk 2 Pulse Rifle]), then these items: Name Type Description NameID string Name of the unit in the encyclopedia, this should be the name of a strings.tdb entry. DescriptionID string Description of the unit in the encyclopedia, this should be the name of a strings.tdb entry. AffiliationID string A string which shows what side this belongs to. This should be the name of a strings.tdb entry. Model string This should be the name of a W3D file. This will appear in the model viewer area. Anim string This should be the name of a W3D file with an animation. The model will play this animation on loop in the model viewer area. This is optional. ID int This is the ID number for the entry. If you have a single player campaign, the object that will unlock this entry should have this ID in it's EncyclopediaID field. MinDist float This controls how far away the camera is from the object, if it is too close. Team int This controls what team an encyclopedia entry represents, 0 is for Nod (or that equivalent team), 1 is for GDI (or equivalent). Defaults to -2. Optional if the object isn't teamed. If the object is teamed, it will also colour the name in the team appropriate colours (set in the variables NodHouse/GDIHouse in hud.ini) HideInMP bool If you have a singleplayer campaign, and want to hide an entry from the MP side; ensure this is set to true. That will allow for the object to have an entry in the SP campaign, while not showing up in MP.
-
This controls the entries that appear in the Vehicle part of the encyclopedia, either in single player, or if the multiplayer version is enabled in TT.ini. Each entry needs a name in square brackets (e.g. [GDI Titan]), then these items: Name Type Description NameID string Name of the unit in the encyclopedia, this should be the name of a strings.tdb entry. DescriptionID string Description of the unit in the encyclopedia, this should be the name of a strings.tdb entry. AffiliationID string A string which shows what side this belongs to. This should be the name of a strings.tdb entry. Model string This should be the name of a W3D file. This will appear in the model viewer area. Anim string This should be the name of a W3D file with an animation. The model will play this animation on loop in the model viewer area. This is optional. DefinitionName string This should be the name of a vehicle definition in Mammoth. The encyclopedia will use this to properly set the suspension height for the object. ID int This is the ID number for the entry. If you have a single player campaign, the object that will unlock this entry should have this ID in it's EncyclopediaID field. MinDist float This controls how far away the camera is from the object, if it is too close. Team int This controls what team an encyclopedia entry represents, 0 is for Nod (or that equivalent team), 1 is for GDI (or equivalent). Defaults to -2. Optional if the object isn't teamed. If the object is teamed, it will also colour the name in the team appropriate colours (set in the variables NodHouse/GDIHouse in hud.ini) HideInMP bool If you have a singleplayer campaign, and want to hide an entry from the MP side; ensure this is set to true. That will allow for the object to have an entry in the SP campaign, while not showing up in MP.
-
[General] Section ContinueReloadOnVehicleExit=bool (enables reloading to continue when vehicles are empty) VehicleOwnershipDisable=bool (disables the stock Renegade vehicle locking feature to allow e.g. spies to be able to steal vehicles) VehicleBuildingDisable=bool (changes how the code determines if a factory is busy, if you have naval/air or you have the sidebar, you will want this off) DisableVehicleFlipKill=bool (disables the killing of vehicles when they flip over) MapPrefix=string (changes the map prefix for multiplayer maps from the default of C&C_ to something else) NeutralVechiclePointsFix=bool (ensures you get points for killing a vehicle even if the players get out of it) DrawDistance=float (changes the distance at which stuff gets drawn, also changes matching things in the netcode) ScriptsLastTeamTime=int (sets how long the vehicle will remain teamed after you get out of it, set to -1 for infinite time) NukeWeatherDisable=bool (disable weather effects for the nuke beacon) IonWeatherDisable=bool (disable weather effects for the ion beacon) CreditsMultiplier=float (multiplier for how many credits you get for every one score value you get) DisableOnFire=bool (disables some "when you are on fire, you can't shoot" code for soldiers) MultiplayerTutorialEnable=bool (makes the tutorial run in a special version of skirmish mode rather than in single player mode) MultiplayerTutorialTeam=int (what team the player should be in the multiplayer tutorial mode) StreamedSoundBufferSize=int (controls the size at which a sound becomes a streamed sound, you can only have one streamed sound playing at once) ScriptZoneDebug=bool (enable this to make script zones visible in-game for debugging purposes) SectorDebug=bool (enable this to make pathfind sectors visible in-game for debugging purposes) PortalDebug=bool (enable this to make pathfind portals visible in-game for debugging purposes) PathfindingDebug=bool (enable this to make pathfind web paths visible in-game for debugging purposes) HUDDebug=bool (enable this to show HUD element extensions in-game for debugging purposes) DialogDebug=bool (enable this to show dialog element extensions in-game for debugging purposes) StealthShader=string (shader fx file to use for the stealth effect) UndergroundShader=string (shader fx file to use for the underground effect) NewUnpurchaseableLogic=bool (special case logic if you are using the old PTs and are using certain features related to air and naval, chances are you want this enabled) RefillLimit=float (limits how often you can refill) DisableKillMessages=bool (disables the stock kill messages if you have custom ones instead) DisableSP=bool (disables the "single player" button from working) HidePassengerRadarIcons=bool (hides icons for vehicle passengers on the radar) LoadingMusic=string (sets the music track for when a player is loading) OverrideHelpWithNewEncyclopedia=bool (if set to true, replaces the help menu with a version of the old SP encyclopedia) SidebarHUDEnabled=bool (set this to false to disable the rendering of the HUD while the ingame sidebar is open) SidebarDescriptionCostEnabled=bool (set this to true to show the cost of the selected unit in the sidebar, next to the description, uses IDS_MERCH_DESCRIPTION_COST for translation) SidebarBuyButtonEnabled=bool (set this to true to show an exclusive buy button on the sidebar) SidebarShowCredits=bool (set this to true to show an extra text near the sidebar that shows the current credits of the player, uses IDS_HUD_CREDITS for translation) GDIBuyTexture=string (texture to display on the buy button for team 1) NODBuyTexture=string (texture to display on the buy button for team 0) SidebarCostsEnabled=bool (set this to false to disable showing the costs of merch items) SidebarNamesEnabled=bool (set this to true to enable showing the names of merch items) SidebarCustomCostsEnabled=bool (set this to true to enable showing the costs of merch items in the top right corner of the merch boxes, uses IDS_MERCH_COST for translation) SidebarCustomNamesEnabled=bool (set this to true to enable showing the names of merch items in the bottom center of merch boxes) SidebarExtraSlotsEnabled=bool (set this to true to enable 10 merchandise slots instead of the default 8 slots) GDITabTexture1=string (texture to display on the tabbed sidebar's 1st button for team 1, change number from 1 to 2/3/4 for the other tabs) GDITabTexture1Selected=string (texture to display on the tabbed sidebar's 1st button for team 1 if active, change number from 1 to 2/3/4 for the other tabs) NODTabTexture1=string (texture to display on the tabbed sidebar's 1st button for team 0, change number from 1 to 2/3/4 for the other tabs) NODTabTexture1Selected=string (texture to display on the tabbed sidebar's 1st button for team 0 if active, change number from 1 to 2/3/4 for the other tabs)
-
This file has one section per combination of surface and hitter type. The names must be specified exactly as in the lists below, including capitalization. There are also three more sections called "Bullet_Stopping", "Damage_Warhead" and "Damage_Rate". Surface Types: Light Metal Heavy Metal Water Sand Dirt Mud Grass Wood Concrete Flesh Rock Snow Ice Default Glass ** Cloth Tiberium Field Foliage Permeable Glass Permeable ** Ice Permeable Cloth Permeable Electrical Electrical Permeable Flammable Flammable Permeable Steam Steam Permeable Water Permeable Tiberium Water Tiberium Water Permeable Underwater Dirt Underwater Tiberium Dirt Blue Tiberium * Red Tiberium * Tiberium Veins * Laser * * Scripts 5.0 only ** Surface types "Glass" and "Glass Permeable" are special in that they are the only ones able to apply decals to transparent meshes and they will also not be applied to neighboring objects if you hit near the edge between them (unfortunately does not discriminate between individual meshes that are part of an object). This is currently hard coded. Hitter Types: None Generic Object Footstep Run Footstep Walk Footstep Crouched Footstep Jump Footstep Land Bullet Bullet Fire Bullet Grenade Bullet Chem Bullet Electric Bullet Laser Bullet Squish Bullet Tib Spray Bullet Tib Bullet Shotgun Bullet Silenced Bullet Sniper Bullet Water Eject Casing Shell Shotgun Tire Rolling Tire Sliding Track Rolling Track Sliding Footstep Ladder *** *** This is hard coded to hit the "Light Metal" surface type whenever you are stepping up/down a ladder, so you do not need to specify its effects for each surface type (unless you for some reason decide to make an ammo preset with this hitter type). [Bullet_Stopping] This section sets whether a given surface type stops bullets when hit. If there is no entry for a surface type, it defaults to true. Example [Bullet_Stopping] Cloth=true Cloth Permeable=false Concrete=true Default=true Dirt=true Electrical=true Electrical Permeable=false [Damage_Warhead] This section determines the damage warhead (see armor.ini) of the given surface type. Shown below is a specific example from APB that handles barbed wire and water damage. Example ; Water = water surface (instakills helicopters) ; Underwater Tiberium Dirt = underwater surface (minor damage to vehicles; the main bulk of the damage is dealt by the water script zone, for vehicles that are fully submerged in deep water) ; Tiberium Water = top of barbed wire fence (hurts infantry only, not so lethal to those with armour) ; Tiberium Field = places infantry should not be able to access, like un-laddered rooftops (instant death) [Damage_Warhead] Water=AntiAircraft2 Water Permeable=AntiAircraft2 Underwater Tiberium Dirt=Water Tiberium Water=Splash Tiberium Field=Splash [Damage_Rate] This section determines the damage caused per second when touching the given surface type. Example [Damage_Rate] Water=9999.0 Water Permeable=9999.0 Underwater Tiberium Dirt=15.0 Tiberium Water=30.0 Tiberium Field=9999.0 [SurfaceTypeName_HitterTypeName] This section determines the effects created when "HitterTypeName" hits/touches "SurfaceTypeName". Note that there can be an arbitrary number of entries named Sound/Emitter/Decal by adding a number N at the end of the entry name. Numbers must start at 0 and must be contiguous. The game will pick one of these entries at random each time the effect is spawned. Entry Type Default Description SoundN String (Preset Name) Sound to play when surface is hit by this hitter. EmitterN String (Model Name) Particle emitter to create when surface is hit by this hitter (can be an HLOD model). DecalN String (Texture File Name) Decal to create on the surface when it is hit by this hitter. DecalSize Float (Decimal Number) 1.0 Decal radius in meters. DecalSizeRandom Float (Decimal Number) 0.0 Random variation of decal radius in meters. Duration Float (Decimal Number) -1.0 Lifetime of the emitter in seconds. If specified as -1.0 and the emitter model is just an emitter (not an HLOD), it will use the emitter's own lifetime setting instead. Friction Float (Decimal Number) 0.5 Extra friction applied if touching this surface. * Drag Float (Decimal Number) 0.0 Extra drag applied if touching this surface. * * Only applies to hitter types "Generic Object", "Tire Rolling" and "Track Rolling". Generic objects currently only apply friction (not drag), tracked vehicles currently do not apply either friction or drag. Example [Wood_Bullet Silenced] Sound0=Wood Ricochet Sounds Twiddler Emitter0=e_wdblt Duration=3 Decal0=D_BH_s_wood1.tga Decal1=D_BH_s_wood2.tga Decal2=D_BH_s_wood3.tga DecalSize=0.05 DecalSizeRandom=0.01
-
[paths] section RegBase=string (sets base registry path) RegClient=string (sets client registry path) RegFDS=string (sets FDS registry path) FileBase=string (sets base file path) FileClient=string (sets client file path) FileFDS=string (sets FDS file path) UseRenFolder=bool (set this to use the renegade folder for data storage instead of the documents folder) ConfigExe=string (exe file to load for configuration instead of wwconfig.exe)